Bladder Accumulators Trouble Shooting Guide Operating ...
Bladder Accumulators Trouble Shooting Guide Operating ...
Bladder Accumulators Trouble Shooting Guide Operating ...
- TAGS
- bladder
- accumulators
- operating

Create successful ePaper yourself
Turn your PDF publications into a flip-book with our unique Google optimized e-Paper software.
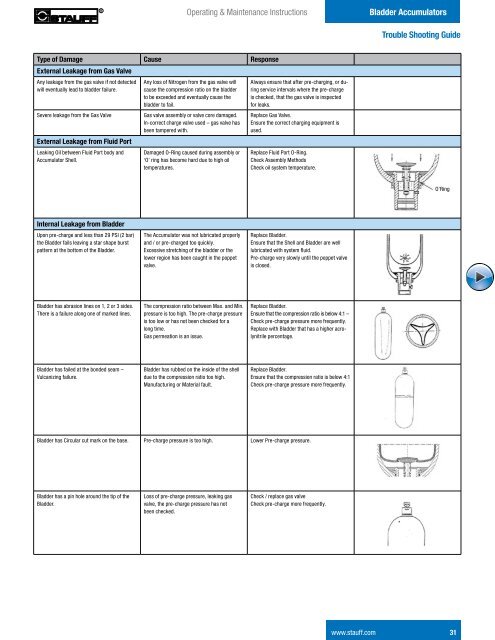
<strong>Operating</strong> & Maintenance Instructions<strong>Bladder</strong> <strong>Accumulators</strong><strong>Trouble</strong> <strong>Shooting</strong> <strong>Guide</strong>Type of Damage Cause ResponseExternal Leakage from Gas ValveAny leakage from the gas valve if not detectedwill eventually lead to bladder failure.Severe leakage from the Gas ValveExternal Leakage from Fluid PortLeaking Oil between Fluid Port body andAccumulator Shell.Any loss of Nitrogen from the gas valve willcause the compression ratio on the bladderto be exceeded and eventually cause thebladder to fail.Gas valve assembly or valve core damaged.In-correct charge valve used – gas valve hasbeen tampered with.Damaged O-Ring caused during assembly or‘O’ ring has become hard due to high oiltemperatures.Always ensure that after pre-charging, or duringservice intervals where the pre-chargeis checked, that the gas valve is inspectedfor leaks.Replace Gas Valve.Ensure the correct charging equipment isused.Replace Fluid Port O-Ring.Check Assembly MethodsCheck oil system temperature.O’RingInternal Leakage from <strong>Bladder</strong>Upon pre-charge and less than 29 PSI (2 bar)the <strong>Bladder</strong> fails leaving a star shape burstpattern at the bottom of the <strong>Bladder</strong>.The Accumulator was not lubricated properlyand / or pre-charged too quickly.Excessive stretching of the bladder or thelower region has been caught in the poppetvalve.Replace <strong>Bladder</strong>.Ensure that the Shell and <strong>Bladder</strong> are welllubricated with system fluid.Pre-charge very slowly until the poppet valveis closed.<strong>Bladder</strong> has abrasion lines on 1, 2 or 3 sides.There is a failure along one of marked lines.The compression ratio between Max. and Min.pressure is too high. The pre-charge pressureis too low or has not been checked for along time.Gas permeation is an issue.Replace <strong>Bladder</strong>.Ensure that the compression ratio is below 4:1 –Check pre-charge pressure more frequently.Replace with <strong>Bladder</strong> that has a higher acrolynitrilepercentage.<strong>Bladder</strong> has failed at the bonded seam –Vulcanizing failure.<strong>Bladder</strong> has rubbed on the inside of the shelldue to the compression ratio too high.Manufacturing or Material fault.Replace <strong>Bladder</strong>.Ensure that the compression ratio is below 4:1Check pre-charge pressure more frequently.<strong>Bladder</strong> has Circular cut mark on the base. Pre-charge pressure is too high. Lower Pre-charge pressure.<strong>Bladder</strong> has a pin hole around the tip of the<strong>Bladder</strong>.Loss of pre-charge pressure, leaking gasvalve, the pre-charge pressure has notbeen checked.Check / replace gas valveCheck pre-charge more frequently.www.stauff.com 31