Download manual do arquivo - Dabi Atlante
Download manual do arquivo - Dabi Atlante
Download manual do arquivo - Dabi Atlante

You also want an ePaper? Increase the reach of your titles
YUMPU automatically turns print PDFs into web optimized ePapers that Google loves.
English<br />
18<br />
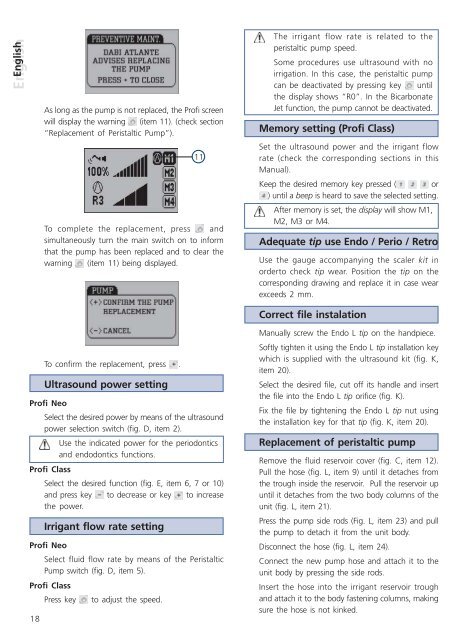
As long as the pump is not replaced, the Profi screen<br />
will display the warning (item 11). (check section<br />
“Replacement of Peristaltic Pump”).<br />
11<br />
To complete the replacement, press and<br />
simultaneously turn the main switch on to inform<br />
that the pump has been replaced and to clear the<br />
warning (item 11) being displayed.<br />
To confirm the replacement, press .<br />
Ultrasound power setting<br />
Profi Neo<br />
Select the desired power by means of the ultrasound<br />
power selection switch (fig. D, item 2).<br />
Use the indicated power for the perio<strong>do</strong>ntics<br />
and en<strong>do</strong><strong>do</strong>ntics functions.<br />
Profi Class<br />
Select the desired function (fig. E, item 6, 7 or 10)<br />
and press key to decrease or key to increase<br />
the power.<br />
Irrigant flow rate setting<br />
Profi Neo<br />
Select fluid flow rate by means of the Peristaltic<br />
Pump switch (fig. D, item 5).<br />
Profi Class<br />
Press key to adjust the speed.<br />
The irrigant flow rate is related to the<br />
peristaltic pump speed.<br />
Some procedures use ultrasound with no<br />
irrigation. In this case, the peristaltic pump<br />
can be deactivated by pressing key until<br />
the display shows “R0”. In the Bicarbonate<br />
Jet function, the pump cannot be deactivated.<br />
Memory setting (Profi Class)<br />
Set the ultrasound power and the irrigant flow<br />
rate (check the corresponding sections in this<br />
Manual).<br />
Keep the desired memory key pressed ( or<br />
) until a beep is heard to save the selected setting.<br />
After memory is set, the display will show M1,<br />
M2, M3 or M4.<br />
Adequate tip use En<strong>do</strong> / Perio / Retro<br />
Use the gauge accompanying the scaler kit in<br />
orderto check tip wear. Position the tip on the<br />
corresponding drawing and replace it in case wear<br />
exceeds 2 mm.<br />
Correct file instalation<br />
Manually screw the En<strong>do</strong> L tip on the handpiece.<br />
Softly tighten it using the En<strong>do</strong> L tip installation key<br />
which is supplied with the ultrasound kit (fig. K,<br />
item 20).<br />
Select the desired file, cut off its handle and insert<br />
the file into the En<strong>do</strong> L tip orifice (fig. K).<br />
Fix the file by tightening the En<strong>do</strong> L tip nut using<br />
the installation key for that tip (fig. K, item 20).<br />
Replacement of peristaltic pump<br />
Remove the fluid reservoir cover (fig. C, item 12).<br />
Pull the hose (fig. L, item 9) until it detaches from<br />
the trough inside the reservoir. Pull the reservoir up<br />
until it detaches from the two body columns of the<br />
unit (fig. L, item 21).<br />
Press the pump side rods (Fig. L, item 23) and pull<br />
the pump to detach it from the unit body.<br />
Disconnect the hose (fig. L, item 24).<br />
Connect the new pump hose and attach it to the<br />
unit body by pressing the side rods.<br />
Insert the hose into the irrigant reservoir trough<br />
and attach it to the body fastening columns, making<br />
sure the hose is not kinked.