Download manual do arquivo - Dabi Atlante
Download manual do arquivo - Dabi Atlante
Download manual do arquivo - Dabi Atlante

Create successful ePaper yourself
Turn your PDF publications into a flip-book with our unique Google optimized e-Paper software.
Português<br />
fig. C<br />
02<br />
1<br />
fig. A<br />
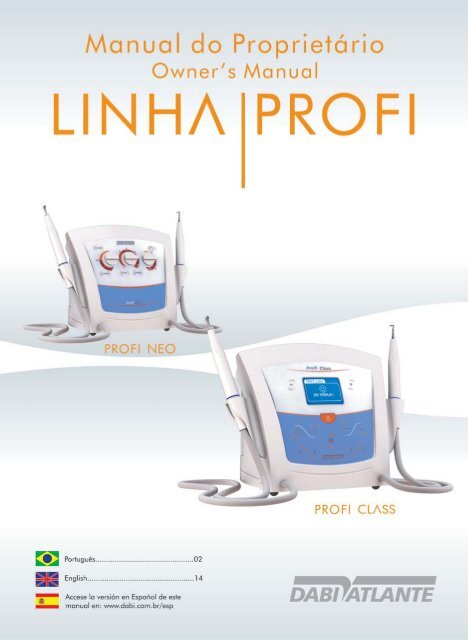
Profi Neo Profi Class<br />
2<br />
7<br />
5<br />
9<br />
11<br />
12<br />
6<br />
8<br />
6<br />
3<br />
4<br />
10<br />
8<br />
21<br />
1<br />
2<br />
fig. B<br />
13<br />
5<br />
22<br />
14<br />
6<br />
3<br />
4<br />
9
fig. F<br />
Painel Profi Neo / Panel Profi Neo Painel Profi Class / Panel Profi Class<br />
1<br />
2 3 4<br />
5<br />
fig. D<br />
15<br />
17 18 19<br />
fig. E<br />
fig. G<br />
fig. H fig. I<br />
fig. J fig. K<br />
1<br />
4<br />
5<br />
2<br />
10<br />
15 16<br />
9<br />
8<br />
20<br />
3<br />
6<br />
7<br />
03<br />
Português
Português<br />
fig. L<br />
04<br />
8<br />
9<br />
21<br />
22<br />
9<br />
23<br />
24<br />
23<br />
22
Partes Acompanhantes e Opcionais<br />
Tips Dentística*<br />
Configurações Opcionais (licitações)<br />
Profi Neo e Profi Class somente com ultra-som<br />
Profi Neo e Profi Class somente jato de bicarbonato<br />
Profi Neo e Profi Class com filtro de ar adicional<br />
Profi Neo e Profi Class sem bomba peristáltica<br />
Conteú<strong>do</strong><br />
Indicação, finalidade ou uso a que se<br />
destina o equipamento ............................... 05<br />
Prioncípio físico e fundamentos da<br />
tecnoclogia <strong>do</strong> produto, aplica<strong>do</strong>s para seu<br />
funcionamento e sua ação ......................... 05<br />
Legenda .......................................................... 06<br />
Painel de controle (Profi Neo) .................... 06<br />
Painel de controle (Profi Class) ................... 06<br />
Funções das teclas <strong>do</strong> painel de controle<br />
(Profi Class) .................................................... 06<br />
Instalação ....................................................... 06<br />
Procedimentos antes da utilização/<br />
reutilização <strong>do</strong> equipamento ..................... 06<br />
Selecionar um idioma (Profi Class) ............ 06<br />
Operação ........................................................ 07<br />
Mensagens <strong>do</strong> display (Profi Class) ........... 07<br />
Configuração da potência <strong>do</strong> ultra-som ...... 09<br />
Configuração da vazão <strong>do</strong> líqui<strong>do</strong> irrigante ..... 09<br />
Memorização (Profi Class) ........................... 09<br />
Utilização correta <strong>do</strong>s tips En<strong>do</strong>/Perio/Retro .... 09<br />
Instalação correta da lima ........................... 09<br />
Substituição da bomba peristáltica ........... 09<br />
Limpeza .......................................................... 10<br />
Esterilização ................................................... 10<br />
Drenagem de água ....................................... 10<br />
Manutenção ................................................... 10<br />
Recomendações, cuida<strong>do</strong>s e advertências .... 10<br />
Efeitos secundários ou colaterais<br />
indesejáveis e contra indicações ................ 10<br />
Precauções em caso de alteração <strong>do</strong><br />
funcionamento <strong>do</strong> equipamento .............. 10<br />
Sensibilidade a condições ambientais<br />
previsíveis nas situações normais de uso ..... 11<br />
Precauções em caso de inutilização <strong>do</strong><br />
equipamento ................................................. 11<br />
Condições de transporte e armazenamento .... 11<br />
Após a instalação .......................................... 11<br />
Preparação antes da entrega ...................... 11<br />
Rede de Serviços Autorizada <strong>Dabi</strong> <strong>Atlante</strong> ..... 11<br />
Simbologia ..................................................... 11<br />
Recomendações finais ................................. 12<br />
Garantia <strong>do</strong> equipamento ........................... 12<br />
Abastecen<strong>do</strong> o reservatório de líqui<strong>do</strong><br />
irrigante .......................................................... 12<br />
Falhas, causas e soluções ............................ 12<br />
Características técnicas ................................. 13<br />
Tips En<strong>do</strong><strong>do</strong>ntia Tips Perio<strong>do</strong>ntia Tips Retro Cirurgia*<br />
Apresentação<br />
* Vendi<strong>do</strong>s separadamente<br />
To<strong>do</strong>s os componentes, partes e acessórios<br />
descritos nesse <strong>manual</strong> são de uso exclusivo<br />
nos produtos <strong>Dabi</strong> <strong>Atlante</strong>.<br />
Preza<strong>do</strong> Cliente,<br />
Seja bem Vin<strong>do</strong>!<br />
Estamos orgulhosos de sua opção por nosso produto.<br />
O conhecimento <strong>do</strong> Profi Neo e Profi Class<br />
potencializa seu desempenho e aumenta a sua<br />
durabilidade e benefícios. Portanto, antes de utilizálos<br />
leia atentamente este Manual.<br />
Importante<br />
Todas as informações, ilustrações e especificações<br />
deste Manual foram baseadas em da<strong>do</strong>s existentes<br />
na época de sua publicação. Reservamo-nos o direito<br />
de fazer modificações a qualquer momento, tanto<br />
no produto, quanto neste Manual, sem prévio aviso.<br />
Indicação, finalidade ou uso a que se<br />
destina o equipamento<br />
Estes produtos são de uso exclusivo de Cirurgiões Dentistas e<br />
de Assistentes O<strong>do</strong>ntológicos no apoio aos tratamentos dentais<br />
realiza<strong>do</strong>s em consultórios, clínicas, ambulatórios e clínicas<br />
escolares ou de outras entidades de tratamento bucal,<br />
portanto é indica<strong>do</strong> apenas a profissionais de O<strong>do</strong>ntologia<br />
que tenham conhecimento e experiência suficientes para<br />
executar procedimentos utilizan<strong>do</strong>-se <strong>do</strong> mesmo.<br />
Princípio físico e fundamentos da<br />
tecnologia <strong>do</strong> produto, aplica<strong>do</strong>s<br />
para seu funcionamento e sua ação<br />
Ultra-som<br />
Gera<strong>do</strong>r de onda ultra-sônica (com freqüência entre 24000<br />
e 30000 Hz) que através de um transdutor, utilizan<strong>do</strong><br />
pastilhas cerâmicas, transmite a instrumentos ativos,<br />
vibração mecânica na mesma freqüência e que auxiliam o<br />
cirurgião dentista em várias práticas o<strong>do</strong>ntológicas tais<br />
como: perio<strong>do</strong>ntia, en<strong>do</strong><strong>do</strong>ntia, prótese, cirurgia e outros.<br />
Jato de Bicarbonato de Sódio<br />
É uma mistura pressurizada de ar, água e bicarbonato de sódio,<br />
conduzida através de dutos até o bico da peça de mão, onde<br />
forma um jato uniforme utiliza<strong>do</strong> para remoção da placa<br />
bacteriana, matéria alba e manchas dentais.<br />
05<br />
Português
Português<br />
1<br />
2<br />
3<br />
4<br />
5<br />
6<br />
7<br />
8<br />
9<br />
10<br />
06<br />
Legenda<br />
1<br />
2<br />
3<br />
4<br />
5<br />
6<br />
7<br />
8<br />
9<br />
10<br />
11<br />
12<br />
13<br />
14<br />
15<br />
16<br />
17<br />
18<br />
19<br />
20<br />
21<br />
22<br />
23<br />
24<br />
Peça de mão <strong>do</strong> jato de bicarbonato de sódio (fig. A e B)<br />
Suporte da peça de mão <strong>do</strong> jato de bicarbonato<br />
de sódio (fig. A e B)<br />
Peça de mão <strong>do</strong> ultra-som (fig. A e B)<br />
Suporte da peça de mão <strong>do</strong> ultra-som (fig. A e B)<br />
Painel de controle (fig. A e B)<br />
Pedal de coman<strong>do</strong> (fig. A, B e C)<br />
Reservatório de bicarbonato de sódio (fig. C)<br />
Reservatório de líqui<strong>do</strong> (fig. C e L)<br />
Mangueira (fig. C e L)<br />
Cabo de alimentação elétrica (fig. C)<br />
Entrada de ar comprimi<strong>do</strong> (fig. C)<br />
Tampa <strong>do</strong> reservatório de líqui<strong>do</strong> (fig. C)<br />
Filtro de ar (fig. C)<br />
Chave geral liga/desliga (fig. C)<br />
Chave de instalação <strong>do</strong>s Tips En<strong>do</strong>/Perio/Retro (fig. F e G)<br />
Capa protetora da peça de mão (fig. G)<br />
Adapta<strong>do</strong>r Tip Dentística (fig. H)<br />
Porca de aperto (fig. H)<br />
Tip Dentística (fig. H)<br />
Chave de instalação <strong>do</strong> Tip En<strong>do</strong> L e Dentística (fig. K)<br />
Colunas de fixação <strong>do</strong> tanque (fig. C e L)<br />
Bomba peristáltica (fig. C e L)<br />
Haste da Bomba Peristáltica (fig. C e L)<br />
Conexão da mangueira (fig. L)<br />
Painel de controle (Profi Neo)<br />
1<br />
2<br />
3<br />
4<br />
5<br />
Chave liga/desliga e seleção das funções ultrasom<br />
e jato de bicarbonato de sódio<br />
Chave seletora de potência <strong>do</strong> ultra-som<br />
Faixa laranja indica<strong>do</strong>ra <strong>do</strong> limite de potência<br />
recomenda<strong>do</strong> para Tips En<strong>do</strong><br />
Faixa laranja+marron indica<strong>do</strong>ras <strong>do</strong> limite de<br />
potência Tips Perio<br />
Chave da bomba peristáltica (liga/desliga e<br />
controle de vazão <strong>do</strong> líqui<strong>do</strong>)<br />
Painel de controle (Profi Class)<br />
Tecla ‘ON/OFF’ (fig. E)<br />
Tecla (fig. E)<br />
Tecla (fig. E)<br />
Tecla ‘Bomba peristáltica’ (fig. E)<br />
Tecla ‘Jato de bicarbonato’ (fig. E)<br />
Tecla ‘Ultra-som En<strong>do</strong>’ (fig. E)<br />
Tecla ‘Ultra-som Perio’ (fig. E)<br />
Acesso à programação das memórias (fig. E)<br />
Display (fig. E)<br />
Tecla ‘Dentística’ (fig. E)<br />
Funções das teclas <strong>do</strong> painel de<br />
controle (Profi Class)<br />
Utilize os ícones abaixo para identificar as teclas <strong>do</strong><br />
painel de controle e suas respectivas funções (fig. E):<br />
Tecla ON/OFF (fig. E, item 1)<br />
Função ‘Ultra-som Perio’ e configuração da<br />
potência (fig. E, item 7).<br />
Função ‘Ultra-som En<strong>do</strong>’ e configuração da<br />
potência (fig. E, item 6).<br />
Função ‘Jato de bicarbonato de sódio’ (fig. E,<br />
item 5).<br />
Função ‘Bomba peristáltica’ e configuração da<br />
vazão <strong>do</strong> líqui<strong>do</strong> irrigante (fig. E, item 4).<br />
Diminuição da potência e seleção <strong>do</strong> idioma<br />
(fig. E, item 2).<br />
Aumento da potência e seleção <strong>do</strong> idioma (fig.<br />
E, item 3).<br />
Acesso à programação das<br />
memórias (fig. E, item 8).<br />
Escolha <strong>do</strong> Tip Dentística (fig. E item 10).<br />
Instalação<br />
Este equipamento deve ser desembala<strong>do</strong> e instala<strong>do</strong><br />
por um técnico autoriza<strong>do</strong> <strong>Dabi</strong> <strong>Atlante</strong>, sob pena<br />
de perda da garantia.<br />
É essencial que haja aterramento da<br />
instalação elétrica.<br />
Procedimentos antes da utilização/<br />
reutilização <strong>do</strong> equipamento<br />
Antes de sua utilização/reutilização, siga as instruções<br />
de operação e limpeza contidas neste Manual.<br />
Selecionar um idioma (Profi Class)<br />
Pressione a tecla e simultaneamente ligue o<br />
equipamento colocan<strong>do</strong> a chave geral (fig. C item<br />
14) na posição ‘On’.<br />
Pressione a tecla ou a tecla e quan<strong>do</strong> o display<br />
mostrar o idioma deseja<strong>do</strong> aperte a tecla “on” .
Operação<br />
Uso <strong>do</strong> ultra-som<br />
Encaixe a capa protetora na peça de mão (fig. G,<br />
item 16).<br />
Tips En<strong>do</strong> / Perio / Retro<br />
Coloque o tip escolhi<strong>do</strong> na chave (fig. F, item 15) e,<br />
em seguida, enrosque-o na peça de mão (fig. G).<br />
Tips Dentística<br />
Rosqueie o adapta<strong>do</strong>r (fig. H, item 17) na peça de<br />
mão e aperte-o firmemente com o auxílio da chave<br />
de instalação.<br />
Encaixe a porca (fig. H, item 18) deixan<strong>do</strong>-a um<br />
pouco desapertada e insira o Tip dentística deseja<strong>do</strong>,<br />
empurran<strong>do</strong>-o até encostar no batente.<br />
O conjunto deve ficar como na fig. I.<br />
Aperte a porca com a chave de instalação.<br />
Para trocar o Tip, desaperte a porca (fig. H, item<br />
18), remova o Tip, coloque o Tip deseja<strong>do</strong> e aperte<br />
a porca novamente.<br />
Nunca use os Tips Dentística sem a devida<br />
refrigeração.<br />
Retire a tampa <strong>do</strong> reservatório (fig. C, item 12) e completeo<br />
com o líqui<strong>do</strong> de sua preferência, sem ultrapassar a<br />
linha indica<strong>do</strong>ra de volume máximo (verifique o tópico<br />
“Abastecen<strong>do</strong> o reservatório”).<br />
Ligue o equipamento colocan<strong>do</strong> a chave geral na<br />
posição ‘On’ (fig. C, item 14).<br />
Profi Neo - Coloque a chave seletora (fig. D, item 1)<br />
na função “ultra-som”.<br />
Profi Class - Pressione a tecla ON/OFF (fig. E, item 1)<br />
e depois a tecla ou .<br />
Configure a potência <strong>do</strong> ultra-som e a vazão de<br />
líqui<strong>do</strong> irrigante (verifique tópicos correspondentes<br />
neste Manual).<br />
Para agilizar tais configurações,<br />
recomendamos a utilização das teclas de<br />
memória no Profi Class.<br />
Pressione o pedal para iniciar o procedimento (fig. A e<br />
B, item 6).<br />
Ao término <strong>do</strong> procedimento, solte o pedal, coloque<br />
a peça de mão no suporte e desligue o equipamento.<br />
Uso <strong>do</strong> jato de bicarbonato de sódio<br />
Retire a tampa <strong>do</strong> reservatório de bicarbonato de<br />
sódio (fig. C, item 7) e, se houver resíduos de pó no<br />
fun<strong>do</strong>, aspire com o suctor.<br />
Massageie o sachê de bicarbonato de sódio <strong>Dabi</strong><br />
<strong>Atlante</strong> para homogeneizá-lo.<br />
Coloque um sachê de bicarbonato de sódio <strong>Dabi</strong><br />
<strong>Atlante</strong> dentro <strong>do</strong> reservatório, sem ultrapassar a<br />
marca de volume máximo.<br />
07<br />
Português<br />
Recoloque a tampa. Certifique-se de que o<br />
reservatório ficou bem fecha<strong>do</strong>.<br />
Use somente o bicarbonato de sódio <strong>Dabi</strong><br />
<strong>Atlante</strong>, pois os outros produtos têm<br />
granulometria variada e umidade não<br />
controlada, poden<strong>do</strong> obstruir o equipamento.<br />
Retire a tampa <strong>do</strong> reservatório de líqui<strong>do</strong> (fig. C.<br />
item 12) e complete-o com o líqui<strong>do</strong> de sua<br />
preferência (verifique o tópico “Abastecen<strong>do</strong> o<br />
reservatório”).<br />
Ligue o equipamento colocan<strong>do</strong> a chave geral na<br />
posição ‘On’ (fig. C, item 14).<br />
Profi Neo - Coloque a chave seletora (fig. D, item<br />
1) na função “jato de bicarbonato”.<br />
Profi Class - Aperte a tecla ON/OFF (fig E, item 1)<br />
e Pressione a tecla .<br />
Configure a vazão de líqui<strong>do</strong> irrigante (verifique<br />
tópico “Configuração da vazão <strong>do</strong> líqui<strong>do</strong><br />
irrigante”).<br />
Para agilizar tal configuração, recomendamos<br />
a utilização das teclas de memória no Profi<br />
Class.<br />
Pressione o pedal para iniciar o procedimento (fig.<br />
A e B, item 6).<br />
Ao término <strong>do</strong> procedimento solte o pedal, coloque<br />
a peça de mão no suporte e desligue o<br />
equipamento.<br />
Para habilitar somente a bomba peristáltica<br />
no Profi Class (fig. E, item 4), desabilite a<br />
última função “jato de bicarbonato” ou<br />
“ultra-som” pressionan<strong>do</strong> a tecla<br />
correspondente.<br />
Mensagens <strong>do</strong> display (Profi Class)<br />
1 - O nome ‘DABI ATLANTE’ aparecerá ao ligar o<br />
equipamento, segui<strong>do</strong> de uma saudação:
Português<br />
08<br />
O nome ‘DABI ATLANTE’ aparecerá durante<br />
uma eventual queda de energia e enquanto<br />
o aparelho estiver em standby.<br />
2 - Observe os indica<strong>do</strong>res abaixo, que são usa<strong>do</strong>s<br />
para exibir o status de seu Profi Class:<br />
1 7<br />
4<br />
5<br />
6<br />
2<br />
4<br />
5<br />
6<br />
3<br />
5<br />
6<br />
1 - Indica que a função “Ultra-som Perio” está<br />
acionada.<br />
2 - Indica que a função “Ultra-som En<strong>do</strong>” está<br />
acionada.<br />
3 - Indica que a função “Jato de Bicarbonato” está<br />
acionada.<br />
A função “Jato de Bicarbonato de Sódio”<br />
não possui indicação de potência, pois<br />
trabalha com pressão de ar estabilizada.<br />
4 - Indica a potência habilitada para a função. A<br />
potência pode ser aumentada ou diminuida<br />
apertan<strong>do</strong> as teclas e .<br />
5 - Indica o acionamento da “Bomba Peristáltica”.<br />
6 - Indica o nível de vazão da “Bomba Peristáltica”.<br />
A vazão pode ser regulada apertan<strong>do</strong> a tecla .<br />
São 4 níveis: R0 (desliga<strong>do</strong>), R1, R2 e R3.<br />
7<br />
7<br />
7 - Indica a memória habilitada para a função<br />
escolhida.<br />
8 - Indica que a função “Dentística” foi acionada.<br />
9 - Indica o “Tip Dentística” escolhi<strong>do</strong>.<br />
10 - Indica que a programação <strong>do</strong> “Tip Dentística”<br />
foi alterada.<br />
3 - Escolha <strong>do</strong> “Tip Dentística”:<br />
Pressione a tecla e a seguinte tela aparecerá:<br />
8<br />
9<br />
8<br />
9<br />
Pressione a tecla até selecionar o Tip deseja<strong>do</strong>.<br />
A potência <strong>do</strong> ultra-som e a vazão da bomba<br />
peristáltica já vem programadas de fábrica.<br />
Para alterar a programação aperte ou para<br />
potência, e para a Bomba Peristáltica.<br />
Tanto as programações de fábrica quanto as novas<br />
programações podem ser memorizadas nas teclas:<br />
.<br />
4 - Resfriamento <strong>do</strong> transdutor:<br />
Durante a utilização <strong>do</strong> ultra-som com Tips que<br />
não necessitam de irrigação (água), a peça de mão<br />
se aquece. O aparelho Profi Class possui um sistema<br />
de contagem <strong>do</strong> tempo que desliga<br />
automaticamente o equipamento quan<strong>do</strong><br />
necessário. Neste momento, aparecerá no display<br />
um aviso para aguardar o resfriamento.<br />
5 - Troca da “Bomba Peristáltica”:<br />
O sistema identifica o desgaste da bomba e quan<strong>do</strong><br />
necessário sugere a troca da mesma, aparecen<strong>do</strong> o<br />
aviso a seguir. Aperte a tecla para fechar o aviso.<br />
10
Enquanto a bomba não for trocada aparecerá o<br />
aviso (item 11) na tela <strong>do</strong> Profi. (Verifique o<br />
tópico “Subistituição da Bomba Peristáltica”).<br />
Para completar a troca pressione e<br />
simultaneamente ligue a chave geral para informar<br />
a troca da bomba e apagar o aviso (item 11) <strong>do</strong><br />
display.<br />
Para confirmar a troca pressione .<br />
11<br />
Configuração da potência <strong>do</strong> ultra-som<br />
Profi Neo<br />
Escolha a potência desejada através da chave<br />
seletora da potência de ultra-som (fig. D, item 2).<br />
Use as potências indicadas para as funções<br />
perio<strong>do</strong>ntia e en<strong>do</strong><strong>do</strong>ntia.<br />
Profi Class<br />
Selecione a função desejada (fig. E, item 6, 7 ou 10)<br />
e pressione a tecla para diminuir ou a tecla<br />
para aumentar a potência.<br />
Configuração da vazão <strong>do</strong> líqui<strong>do</strong><br />
irrigante<br />
Profi Neo<br />
Escolha a vazão <strong>do</strong> líqui<strong>do</strong> através da chave da<br />
Bomba Peristáltica (fig D, ítem 5).<br />
Profi Class<br />
Pressione a tecla para regular a rotação.<br />
A vazão <strong>do</strong> líqui<strong>do</strong> irrigante está relacionada<br />
com a rotação da bomba peristáltica.<br />
Em alguns procedimentos, o ultra-som é utiliza<strong>do</strong><br />
sem irrigação. Neste caso, a bomba peristáltica<br />
pode ser desabilitada pressionan<strong>do</strong> a tecla<br />
até o display mostrar R0. Na função Jato de<br />
Bicarbonato não é possível desabilitar a bomba.<br />
Memorização (Profi Class)<br />
Escolha a potência <strong>do</strong> ultra-som e a vazão de líqui<strong>do</strong><br />
irrigante (verificar tópicos correspondentes neste Manual).<br />
Mantenha pressionada a tecla de memória<br />
desejada ( ou ) até soar um bip para<br />
salvar a configuração escolhida.<br />
Após a memorização o display mostrará M1,<br />
M2, M3 ou M4.<br />
Utilização correta <strong>do</strong>s tips En<strong>do</strong> /<br />
Perio / Retro<br />
Utilize o gabarito anexo ao kit de ultra-som para<br />
verificar o desgaste <strong>do</strong>s tips. Posicione o tip sobre o<br />
desenho correspondente e substitua se o desgaste<br />
for superior a 2 mm.<br />
Instalação correta da lima<br />
Rosqueie <strong>manual</strong>mente o tip En<strong>do</strong> L na peça de mão.<br />
Aperte suavemente com a chave de instalação <strong>do</strong> tip<br />
En<strong>do</strong> L que acompanha o kit de ultra-som (fig. K, item 20).<br />
Selecione a lima desejada, corte o cabo e introduza<br />
a lima no orifício <strong>do</strong> tip En<strong>do</strong> L (fig. K).<br />
Fixe a lima apertan<strong>do</strong> a porca da ponta <strong>do</strong> tip En<strong>do</strong> L<br />
com a chave de instalação deste tip (fig. K, item 20).<br />
Substituição da bomba peristáltica<br />
Retire a tampa <strong>do</strong> reservatório de líqui<strong>do</strong> (fig. C,<br />
item 12). Puxe a mangueira (fig. L, item 9) até<br />
desencaixá-la da canaleta dentro <strong>do</strong> reservatório.<br />
Puxe o tanque para cima até desencaixá-lo das duas<br />
colunas <strong>do</strong> corpo <strong>do</strong> produto (fig. L, item 21).<br />
Aperte as hastes laterais da bomba (fig. L, item 23)<br />
e puxe-a até desencaixá-la <strong>do</strong> corpo <strong>do</strong> aparelho.<br />
Desconecte a mangueira (fig. L, item 24).<br />
Conecte a mangueira da nova bomba e encaixe-a no<br />
corpo <strong>do</strong> aparelho apertan<strong>do</strong> as hastes laterais. Insira<br />
a mangueira na canaleta <strong>do</strong> reservatório de líqui<strong>do</strong><br />
irrigante e encaixe-o nas colunas de fixação <strong>do</strong> corpo,<br />
cuidan<strong>do</strong> para que a mangueira não fique <strong>do</strong>brada.<br />
09<br />
Português
Português<br />
10<br />
Limpeza<br />
Limpe a superfície <strong>do</strong> equipamento com um pano<br />
limpo e macio umedeci<strong>do</strong> com Aplic O<strong>do</strong>nto da<br />
<strong>Dabi</strong> <strong>Atlante</strong> ou produto com propriedades químicas<br />
similares.<br />
A utilização de outros produtos químicos não<br />
é recomendada, pois pode danificar o<br />
equipamento.<br />
Para higienizar o tanque <strong>do</strong> reservatório, retire-o<br />
<strong>do</strong> produto (fig. L). Limpe-o e coloque-o novamente<br />
no equipamento.<br />
Retire o tanque apenas quan<strong>do</strong> for<br />
extremamente necessário.<br />
Esterilização<br />
Esterilize as peças de mão <strong>do</strong> jato de bicarbonato<br />
de sódio, tips, chave de instalação <strong>do</strong>s tips e capa<br />
protetora da peça de mão em autoclave até 135°C.<br />
Retire a mangueira <strong>do</strong> bico da peça de mão<br />
<strong>do</strong> jato de bicarbonato de sódio, pois não é<br />
autoclavável.<br />
Drenagem de água<br />
Após cada dia de uso, coloque o equipamento sobre<br />
um pano seco, incline para o la<strong>do</strong>, em um ângulo de<br />
aproximadamente 45°. Drene o filtro de ar (fig. C,<br />
item 13) apertan<strong>do</strong> o pino de despressurização até<br />
que toda a água seja eliminada.<br />
Este procedimento previne entupimento no<br />
bico <strong>do</strong> jato de bicarbonato de sódio.<br />
Manutenção<br />
Manutenção preventiva<br />
Para reduzir a probabilidade de falha e aumentar<br />
a vida útil de seu equipamento, procure uma<br />
Assistência Técnica Autorizada <strong>Dabi</strong> <strong>Atlante</strong> e faça<br />
um plano regular de manutenção preventiva.<br />
Profi Class: O sistema identifica o desgaste<br />
da bomba e quan<strong>do</strong> necessário sugere a troca<br />
da mesma por meio de um aviso no display.<br />
Manutenção corretiva<br />
Caso o equipamento apresente alguma anormalidade<br />
não relacionada no tópico “Falhas, causas e soluções”<br />
deste Manual, entre em contato com uma Assistência<br />
Técnica Autorizada <strong>Dabi</strong> <strong>Atlante</strong>.<br />
Não abra o equipamento e/ou tente consertá-lo. Isto<br />
pode agravar o problema ou até gerar outras falhas.<br />
Esquema de circuito, listas de peças,<br />
componentes e outros<br />
Caso seja necessário, solicite à <strong>Dabi</strong> <strong>Atlante</strong><br />
esquemas elétricos e/ou listas de peças,<br />
componentes ou outras informações, os quais serão<br />
forneci<strong>do</strong>s mediante acor<strong>do</strong>.<br />
Recomendações, cuida<strong>do</strong>s e<br />
advertências<br />
Se houver entupimento <strong>do</strong> bico <strong>do</strong> jato de<br />
bicarbonato de sódio, retire a mangueira e proceda<br />
a desobstrução (fig. J).<br />
O bicarbonato de sódio desidrata os lábios. Use<br />
algum tipo de lubrificante nos lábios <strong>do</strong> paciente<br />
antes <strong>do</strong>s procedimentos.<br />
A peça de mão <strong>do</strong> jato de bicarbonato de sódio<br />
precisa ser desrosqueada pelo menos uma vez por<br />
semana, para evitar travamento da rosca.<br />
Os tips <strong>do</strong> ultra-som precisam ser desrosquea<strong>do</strong>s<br />
pelo menos uma vez por dia, para evitar travamento<br />
da rosca.<br />
Profi Neo: Quan<strong>do</strong> os tips en<strong>do</strong> forem<br />
utiliza<strong>do</strong>s sem refrigeração, o equipamento<br />
deve ser utiliza<strong>do</strong> durante um perío<strong>do</strong> máximo<br />
de 4 minutos, seguin<strong>do</strong> uma pausa de 8<br />
minutos, para prevenir danos irreparáveis na<br />
peça de mão <strong>do</strong> ultra-som.<br />
Efeitos secundários ou colaterais<br />
indesejáveis e contra indicações<br />
O uso <strong>do</strong> jato de bicarbonato de sódio é contraindica<strong>do</strong><br />
para pacientes com complicações renais<br />
ou que se submetam a hemodiálise.<br />
O uso <strong>do</strong> ultra-som é contra-indica<strong>do</strong> para pacientes<br />
e cirurgiões dentistas porta<strong>do</strong>res de marca-passo<br />
cardíaco.<br />
A névoa <strong>do</strong> pó de bicarbonato de sódio pode<br />
interferir nos males respiratórios. Nestes casos, é<br />
aconselhável orientação médica.<br />
Precauções em caso de alteração <strong>do</strong><br />
funcionamento <strong>do</strong> equipamento<br />
Se o equipamento apresentar alguma<br />
anormalidade verifique se o problema está<br />
relaciona<strong>do</strong> a algum item lista<strong>do</strong> no tópico “Falhas,<br />
causas e soluções”. Se não for possível solucionar o<br />
problema, desligue o equipamento, retire o cabo<br />
de alimentação de energia da tomada e solicite os
serviços de uma Assistência Técnica Autorizada <strong>Dabi</strong><br />
<strong>Atlante</strong>.<br />
Sensibilidade a condições ambientais<br />
previsíveis nas situações normais de uso<br />
Este equipamento não é sensível a interferências<br />
magnéticas, elétricas, eletrostáticas e de pressão, desde<br />
que sejam observa<strong>do</strong>s os itens de instalação, limpeza,<br />
manutenção, transporte e operação deste Manual.<br />
Precauções em caso de inutilização<br />
<strong>do</strong> equipamento<br />
Ao ser inutiliza<strong>do</strong>, o equipamento deve ser<br />
descarta<strong>do</strong> em local apropria<strong>do</strong> (de acor<strong>do</strong> com a<br />
legislação local vigente), evitan<strong>do</strong> a contaminação<br />
ambiental ou o uso inadequa<strong>do</strong> <strong>do</strong> mesmo.<br />
Condições de transporte e<br />
armazenamento<br />
O equipamento deve ser transporta<strong>do</strong> e armazena<strong>do</strong>:<br />
Com cuida<strong>do</strong> para evitar quedas e impactos;<br />
Com o la<strong>do</strong> da seta para cima;<br />
Observan<strong>do</strong>-se os limites de empilhamento<br />
máximo indica<strong>do</strong> na embalagem;<br />
Protegi<strong>do</strong> contra umidade, chuvas, respingos<br />
de água e solo molha<strong>do</strong>.<br />
Condições ambientais de transporte/armazenamento<br />
Faixa de temperatura<br />
ambiente de transporte ou<br />
armazenamento<br />
0ºC a + 55ºC<br />
Faixa de umidade relativa de 0% a 90% (não<br />
transporte ou armazenamento condensante)<br />
Faixa de pressão atmosférica 500hPa a 1060 hPa (375<br />
mmHg a 795 mmHg)<br />
Após a instalação<br />
Manter o equipamento em local protegi<strong>do</strong> de<br />
chuva e sol.<br />
Condições ambientais de operação<br />
Faixa de temperatura ambiente<br />
de funcionamento<br />
+10ºC a +35ºC<br />
Faixa de temperatura +21ºC a + 26ºC<br />
ambiente recomendada pela<br />
<strong>Dabi</strong> <strong>Atlante</strong><br />
Faixa de umidade relativa de 30% a 75% (não<br />
funcionamento<br />
condensante)<br />
Faixa de pressão atmosférica 700 hPa a 1060 hPa (525<br />
mmHg a 795 mmHg)<br />
Condições ambientais de acondicionamento<br />
(entre as operações)<br />
Faixa de temperatura ambiente +5ºC a +45ºC<br />
de acondicionamento<br />
Faixa de temperatura +15ºC a +30ºC<br />
ambiente recomendada pela<br />
<strong>Dabi</strong> <strong>Atlante</strong><br />
Faixa de umidade relativa de 30% a 75% (não<br />
acondicionamento condensante)<br />
Faixa de pressão atmosférica 700 hPa a 1060 hPa (525<br />
mmHg a 795 mmHg)<br />
Preparação antes da entrega<br />
Este equipamento foi revisa<strong>do</strong> e aprova<strong>do</strong> de<br />
acor<strong>do</strong> com o Programa de Inspeção e Controle de<br />
Qualidade <strong>Dabi</strong> <strong>Atlante</strong> para lhe proporcionar o<br />
melhor desempenho.<br />
Rede de Serviços Autorizada <strong>Dabi</strong><br />
<strong>Atlante</strong><br />
A instalação e to<strong>do</strong>s os serviços de manutenção<br />
nos equipamentos <strong>Dabi</strong> <strong>Atlante</strong> deverão ser feitos<br />
por meio de uma Assistência Técnica Autorizada<br />
<strong>Dabi</strong> <strong>Atlante</strong>, caso contrário o equipamento terá<br />
sua garantia comprometida.<br />
Utilize o encarte anexo ou o site www.dabi.com.br<br />
para encontrar a Assistência Técnica Autorizada<br />
<strong>Dabi</strong> <strong>Atlante</strong> mais próxima.<br />
Simbologia<br />
Utilizar os ícones abaixo para identificar a simbologia<br />
de seu equipamento.<br />
Indica os terminais de aterramento<br />
para proteção.<br />
Atenção - advertência para consulta<br />
de <strong>do</strong>cumentos acompanhantes.<br />
Equipamento tipo B<br />
“Frágil”<br />
Localiza<strong>do</strong> na lateral da embalagem,<br />
determina que o transporte deve ser<br />
feito com cuida<strong>do</strong>, evitan<strong>do</strong> a<br />
ocorrência de quedas ou batidas.<br />
“Proteger contra umidade”<br />
Localiza<strong>do</strong> na lateral da embalagem,<br />
determina que durante o transporte e<br />
o armazenamento, haja proteção<br />
contra qualquer tipo de umidade.<br />
11<br />
Português
Português<br />
12<br />
“Face superior nesta direção”<br />
Localiza<strong>do</strong> na lateral da embalagem,<br />
determina que a mesma seja<br />
manuseada sempre com o senti<strong>do</strong> da<br />
seta volta<strong>do</strong> para cima.<br />
“Empilhamento máximo”<br />
Localiza<strong>do</strong> na lateral da embalagem,<br />
determina a quantidade máxima de<br />
caixa que pode ser empilhada durante<br />
o transporte e armazenamento.<br />
“Limite de temperatura”<br />
Determina o limite de temperatura<br />
dentre os quais a embalagem deve<br />
ser armazenada ou transportada.<br />
Recomendações finais<br />
Para garantir a vida útil de seu equipamento,<br />
reponha somente peças originais <strong>Dabi</strong> <strong>Atlante</strong>, as<br />
quais possuem a garantia <strong>do</strong>s padrões e as<br />
especificações técnicas exigidas pela empresa.<br />
Utilize somente os serviços de uma Assistência<br />
Técnica <strong>Dabi</strong> <strong>Atlante</strong>, pois possui técnicos treina<strong>do</strong>s<br />
e ferramentas específicas para a correta<br />
manutenção de seu equipamento.<br />
Garantia <strong>do</strong> equipamento<br />
Os “Termos de Garantia” constam no verso <strong>do</strong><br />
Certifica<strong>do</strong> anexo ao produto. Ficam vetadas quaisquer<br />
alterações ou concessões de garantia, condições e/ou<br />
autorizações, tanto verbais como por escrito, sem<br />
anuência prévia <strong>do</strong>cumentada pela <strong>Dabi</strong> <strong>Atlante</strong>.<br />
Abastecen<strong>do</strong> o reservatório de líqui<strong>do</strong> irrigante<br />
A tabela abaixo mostra possíveis concentrações. Outras podem ser utilizadas a critério <strong>do</strong> cirurgião-dentista.<br />
Anti-sépticos indica<strong>do</strong>s Concentrações sugeridas<br />
Cloreto de Cetilpiridínio 1:2000 (Cepacol)<br />
Puro<br />
a 50% - 250 ml <strong>do</strong> produto e 250 ml de água filtrada<br />
Clorexidina 0,12% (Periogard)<br />
a 25% - 125 ml <strong>do</strong> produto e 375 ml de água filtrada<br />
Listerine<br />
PVPI tópico<br />
a 50% - 250 ml <strong>do</strong> produto e 250 ml de água filtrada<br />
Hipoclorito de sódio 3ppm* 0,6 ml <strong>do</strong> produto em 454 ml de água filtrada<br />
*Utilizar apenas para En<strong>do</strong><strong>do</strong>ntia.<br />
Falhas, causas e soluções<br />
Falhas Causas Soluções<br />
O plug não está liga<strong>do</strong> à rede Ligue o plug<br />
O equipamento não liga Fusível queima<strong>do</strong> Substitua o fusível<br />
Falta de energia Aguarde a volta da energia<br />
Disjuntor desliga<strong>do</strong> Ligue o disjuntor<br />
Falta de pressurização na rede Compressor desliga<strong>do</strong> e/ou Ligue o compressor e/<br />
registro fecha<strong>do</strong> ou abra o registro<br />
O tip não oscila, Tip mal encaixa<strong>do</strong> Encaixe corretamente o tip<br />
mas a lâmpada acende ou tente outro tip<br />
Vazamento de água na peça Tip mal rosquea<strong>do</strong> Rosqueie devidamente o tip ou troque o<br />
de mão O'ring (anel tipo 'O')<br />
Terminal da peça de mão <strong>do</strong> jato de Aperte bem o terminal da peça de mão <strong>do</strong><br />
bicarbonato de sódio mal rosquea<strong>do</strong> jato de bicarbonato de sódio<br />
Bico entupi<strong>do</strong> Desobstrua o bico<br />
Não sai bicarbonato de sódio<br />
Falta de bicarbonato de sódio no Coloque bicarbonato de sódio no<br />
reservatório reservatório<br />
Excesso de bicarbonato de sódio no Retire o excesso de bicarbonato de sódio<br />
reservatório <strong>do</strong> reservatório<br />
Não sai líqui<strong>do</strong> irrigante<br />
Falta de líqui<strong>do</strong> irrigante no reservatório<br />
Bomba peristáltica não habilitada<br />
Abasteça o reservatório<br />
Habilite a bomba peristáltica<br />
Percepção de choque elétrico no tip<br />
Representante legal CE:<br />
Falta de aterramento ou terra ineficiente Aterre adequadamente o equipamento<br />
MPC International S.A - 26, Boulevard Royal - L-2449 - Luxembourg - Fone: +49 431-7028 219 - Fax: +49 431-7028 202
Características e Especificações Técnicas - Tabela Comparativa<br />
Características Profi Neo Profi Class<br />
Peça de mão para ultra-som x x<br />
Peça de mão para jato de bicarbonato x x<br />
2 peças de mão: ultra-som e jato de bicarbonato x x<br />
Corpo em ABS injeta<strong>do</strong> x x<br />
Circuito eletrônico com estabiliza<strong>do</strong>r de frequência x x<br />
Transdutor cerâmico piezoelétrico x x<br />
Capa protetora <strong>do</strong> transdutor removível e esterilizável x x<br />
Chaves individuais com proteção para a troca <strong>do</strong>s tips x x<br />
Reservatório de bicarbonato de sódio em ABS injeta<strong>do</strong> x x<br />
Tampa transparente <strong>do</strong> reservatório de bicarbonato de sódio x x<br />
Filtro de ar x x<br />
Pedal único de acionamento x x<br />
Peça de mão com mangueiras lisas e flexíveis x x<br />
Irrigação por bomba peristáltica x x<br />
Painel de controle, controla<strong>do</strong> por chaves rotativas (knobs) x ———-<br />
Painel de controle com display gráfico e tecla<strong>do</strong> de membrana ———— x<br />
Função para en<strong>do</strong> 0 x<br />
Função para dentística 0 x<br />
Função para perio<strong>do</strong>ntia x x<br />
Especificações x x<br />
Altura 212 mm x x<br />
Largura 240 mm x x<br />
Comprimento 250 mm x x<br />
Peso Total 3,2 Kg x x<br />
Tensão 99 a 242 V x x<br />
Freqüência 50 a 60 Hz x x<br />
Potência 36 VA x x<br />
Freqüência ultrasom 24 a 30 kHz x x<br />
Amplitude <strong>do</strong> tip 0,05 a 0,1 mm x x<br />
Chave de operação Pedal de Coman<strong>do</strong> x x<br />
Fusível de proteção 2A x x<br />
Consumo de ar 10 l/min x x<br />
Pressão de entrada de ar 60 a 80 PSI x x<br />
X = Características e especificações de série 0 = Características e especificações opcionais<br />
Responsável Técnico: Leonel Issa Halak - CREA-SP 0600256918<br />
Registro Anvisa Nº: 10101130067<br />
13<br />
Português
English<br />
14<br />
Standard and Optional Parts<br />
Dentistry Tips<br />
Optional Configurations<br />
Profi Neo and Profi Class only with ultrasound<br />
Profi Neo and Profi Class only with bicarbonate jet<br />
Profi Neo and Profi Class with additional air filter<br />
Profi Neo and Profi Class without peristaltic pump<br />
Contents<br />
Recommendation of use and purpose of the<br />
equipment...................................................... 14<br />
Physical principle and fundamentals of the<br />
product’s technology applied for its<br />
functioning and action ................................ 14<br />
Legend ............................................................ 15<br />
Control panel (Profi Neo) ............................ 15<br />
Control panel (Profi Class) .......................... 15<br />
Functions of control panel keys (Profi Class) .... 15<br />
Installation ..................................................... 15<br />
Additional procedures prior to equipment<br />
use/reutilization ............................................ 15<br />
Language selection (Profi Class) ................ 15<br />
Operation ....................................................... 16<br />
Display messages (Profi Class) ................... 16<br />
Ultrasound power setting ........................... 18<br />
Irrigant flow rate setting ............................. 18<br />
Memory setting (Profi Class) ....................... 18<br />
Adequate tip use of En<strong>do</strong>/ Perio/ Retro ... 18<br />
Correct file installation ................................. 18<br />
Replacement of peristaltic pump ............... 18<br />
Cleaning ......................................................... 19<br />
Sterilization .................................................... 19<br />
Water drainage .............................................. 19<br />
Maintenance .................................................. 19<br />
Recommendations, care and warnings .... 19<br />
Undesirable secondary or adverse affects<br />
and contraindications .................................. 19<br />
Procedures in case equipment functioning is<br />
altered .............................................................. 19<br />
Sensitivity to predictable environmental<br />
conditions in normal working situations ..... 20<br />
Procedure in case of equipment disposal ..... 20<br />
Transportation and storage conditions .... 20<br />
After installation ........................................... 20<br />
Preparation prior to delivery ....................... 20<br />
<strong>Dabi</strong> <strong>Atlante</strong> Authorized Service Network ..... 20<br />
Symbols .......................................................... 20<br />
Final recommendations ............................... 21<br />
Equipment warranty .................................... 21<br />
Reservoir replenishment ............................. 21<br />
Troubleshooting ........................................... 21<br />
Technical features ......................................... 22<br />
En<strong>do</strong><strong>do</strong>ntics Tips Perio<strong>do</strong>ntics Tips Retrosurgery Tips<br />
All components, parts and accessories<br />
described in this <strong>manual</strong> are to be solely used<br />
with <strong>Dabi</strong> <strong>Atlante</strong> products.<br />
Presentation<br />
Dear Customer,<br />
Welcome!<br />
We are proud of your preference for our products.<br />
Your familiarization with the Profi Line will help<br />
maximize your equipment’s performance and<br />
increase its durability and benefits. Therefore,<br />
before starting your equipment, be sure to read<br />
this Manual very attentively.<br />
Important<br />
All the information, illustrations and specifications in<br />
this <strong>manual</strong> are based on data existing at the time<br />
of its publication. Rights are reserved to make<br />
alterations at any time, both to the product and to<br />
this Manual, with out a previous notice.<br />
Recommendation of use and purpose<br />
of the equipment<br />
These products are intended to be used solely by<br />
Dental Surgeons and Assistants while performing<br />
dental work in dental offices, clinics, outpatient<br />
dental units in schools or other institutions providing<br />
dental care. Therefore, they are recommended for<br />
use only by qualified dental professionals who are<br />
knowledgeable and experienced enough to<br />
perform such dental procedures.<br />
Physical principle and fundamentals<br />
of the product’s technology applied<br />
for its functioning and action<br />
Ultrasound<br />
A generator of ultrasonic waves (with frequency<br />
from (24,000 to 30,000 Hz) which transmit<br />
mechanical vibration to active instruments in the same<br />
frequency by means of a transducer using ceramic<br />
pieces. Helps dentists perform different procedures<br />
in various dental fields such as perio<strong>do</strong>ntics,<br />
en<strong>do</strong><strong>do</strong>ntics, prosthetics, surgery and others.<br />
Sodium Bicarbonate Jet<br />
It is a pressurized mixture of air, water and sodium<br />
bicarbonate. Such mixture is conducted through ducts<br />
to the tip of the handpiece, where it forms a uniform<br />
jet used to remove bacterial plaque, materia alba<br />
and dental stains.
Legend<br />
1<br />
2<br />
3<br />
4<br />
5<br />
6<br />
7<br />
8<br />
9<br />
10<br />
11<br />
12<br />
13<br />
14<br />
15<br />
16<br />
17<br />
18<br />
19<br />
20<br />
21<br />
22<br />
23<br />
24<br />
Sodium bicarbonate jet handpiece (fig. A and B)<br />
Sodium bicarbonate jet handpiece holder (fig.<br />
A and B)<br />
Ultrasound handpiece (fig. A and B)<br />
Ultrasound handpiece holder (fig. A and B)<br />
Control panel (fig. A and B)<br />
Foot control (fig. A, B and C)<br />
Sodium bicarbonate reservoir (fig. C)<br />
Fluid reservoir (fig. C and L)<br />
Hose (fig. C and L)<br />
Electric power cable (fig. C)<br />
Compressed air input (fig. C)<br />
Fluid reservoir cover (fig. C)<br />
Air filter (fig. C)<br />
On/Off main switch (fig. C)<br />
En<strong>do</strong>/ Perio/ Retro tips installation wrench (fig. F and G)<br />
Handpiece protective cover (fig. G)<br />
Dentistry Tip adapter (fig. H)<br />
Tightening nut (fig. H)<br />
Dentistry Tip (fig. H)<br />
En<strong>do</strong> L and Dentistry tips installation wrench (fig. K)<br />
Reservoir fastening columns (fig. C e L)<br />
Peristaltic pump (fig. C and L)<br />
Peristaltic Pump arm (fig. C and L)<br />
Hose connection (fig. L)<br />
Control panel (Profi Neo)<br />
1<br />
2<br />
3<br />
4<br />
5<br />
On/Off switch and selection of ultrasound and<br />
sodium bicarbonate jet functions<br />
Ultrasound power selection switch<br />
Orange range indicator of recommended<br />
power limit for En<strong>do</strong> Tips<br />
Orange+brown range indicator of Perio Tips power limit<br />
Peristaltic pump switch (on/off and fluid flow<br />
rate control)<br />
Control panel (Profi Class)<br />
1<br />
2<br />
3<br />
4<br />
5<br />
6<br />
7<br />
8<br />
9<br />
10<br />
‘ON/OFF’ key (fig. E)<br />
Key (fig. E)<br />
Key (fig. E)<br />
‘Peristaltic pump’ key (fig. E)<br />
‘Bicarbonate jet’ key (fig. E)<br />
‘En<strong>do</strong> ultrasound’ key (fig. E)<br />
‘Perio ultrasound’ key (fig. E)<br />
Access to memory programming (fig. E)<br />
Display (fig. E)<br />
‘Dentistry’ key (fig. E)<br />
Functions of control panel keys<br />
(Profi Class)<br />
15<br />
English<br />
Use the icons below to identify the control panel<br />
keys and their respective functions (fig. E):<br />
ON/OFF key (fig. E, item 1).<br />
‘Perio ultrasound’ key and power setting (fig.<br />
E, item 7).<br />
‘En<strong>do</strong> ultrasound’ key and power setting (fig.<br />
E, item 6).<br />
‘Sodium bicarbonate’ jet function (fig. E, item 5).<br />
‘Peristaltic pump’ function and irrigant flow rate<br />
setting (fig. E, item 4).<br />
Power lowering and language selection (fig. E,<br />
item 2).<br />
Power increasing and language selection (fig.<br />
E, item 3).<br />
Access to memory programming<br />
(fig. E, item 8).<br />
Dentistry Tip selection (fig. E, item 10)<br />
Installation<br />
This equipment must be unpacked and installed by<br />
an authorized <strong>Dabi</strong> <strong>Atlante</strong> technician, otherwise,<br />
warranty will be voided.<br />
Additional procedures prior to<br />
equipment use/reutilization<br />
Prior to equipment use/reutilization, follow the<br />
operation and cleaning instructions in this Manual.<br />
Language selection (Profi Class)<br />
Press key and simultaneously turn the equipment<br />
on by setting the main switch (fig. C, item 14) to the<br />
‘ON’ position.<br />
Press key or key and when the display shows<br />
the desired language, press the “on” key .
English<br />
Operation<br />
Use of ultrasound<br />
Attach the protective cover to the handpiece (fig.<br />
G, item 16).<br />
En<strong>do</strong> / Perio / Retro Tips<br />
Insert the selected tip into the wrench (fig. F, item<br />
15) and then screw it onto the handpiece (fig. G).<br />
Dentistry Tips<br />
Screw the adaptor (fig. H, item 17) onto the<br />
handpiece and tighten it firmly with the aid of an<br />
installation wrench.<br />
Screw the nut (fig. H, item 18) a little loosely and<br />
insert the desired Dentistry Tip, pushing it flush with<br />
the stop. The set must be like in (fig. I).<br />
Tighten the nut with the installation wrench.<br />
To change the Tip, loosen the nut (fig. H, item 18),<br />
remove the Tip, insert the desired Tip and tighten<br />
the nut again.<br />
Never use the Dentistry Tips without the<br />
correct cooling.<br />
Remove the reservoir cover (fig. C, item 12) and fill<br />
it up with your preferred fluid, without exceeding<br />
the maximum volume indication line (check section<br />
“Reservoir replenishment”).<br />
Turn the equipment on by setting the main switch<br />
(fig. C, item 14) to the ‘ON’ position.<br />
Profi Neo - Set the selection switch (fig. D, item 1)<br />
to the “Ultrasound” function.<br />
Profi Class - Press the ON/OFF key (fig. E, item 1)<br />
and then key or .<br />
Set the ultrasound power and the irrigant flow<br />
rate (check the corresponding sections in this<br />
Manual).<br />
To speed up such setting, we recommend the<br />
use of the memory keys in Profi Class.<br />
Press the foot control to start the procedure (fig. A<br />
and B, item 6).<br />
Upon finishing the procedure, release the foot<br />
control, place the handpiece into the holder and<br />
turn the equipment off.<br />
Use of the sodium bicarbonate jet<br />
Remove the sodium bicarbonate reservoir cover<br />
(fig. C, item 7) and if there are residues on the<br />
bottom, clean with the aspirator.<br />
Rub the <strong>Dabi</strong> <strong>Atlante</strong> sodium bicarbonate packet<br />
16<br />
for a while to homogenize it.<br />
Pour one <strong>Dabi</strong> <strong>Atlante</strong> sodium bicarbonate packet<br />
inside the reservoir. Never pour more than the<br />
indicated by the volume level mark.<br />
Replace the cover. Make sure the reservoir is tightly<br />
closed.<br />
Use only <strong>Dabi</strong> <strong>Atlante</strong> sodium bicarbonate,<br />
since other products may have varied grain<br />
size and uncontrolled moisture, which can clog<br />
the equipment.<br />
Remove the fluid reservoir cover (fig. C, item 12)<br />
and fill it up with your preferred fluid (check section<br />
“Reservoir replenishment”).<br />
Turn the equipment on by setting the main switch<br />
(fig. C, item 14) to the ‘ON’ position.<br />
Profi Neo – Set the selection switch (fig. D, item 1)<br />
to the bicarbonate jet function.<br />
Profi Class - Press the ON/OFF key (fig. E, item 1)<br />
and then key .<br />
Set the irrigant flow rate (check section “The<br />
irrigant flow rate setting”).<br />
To speed up such setting, we recommend the<br />
use of the memory keys in Profi Class.<br />
Press the foot control to start the procedure (fig. A<br />
and B, item 6).<br />
Upon finishing the procedure, release the foot<br />
control, place the handpiece into the holder and<br />
turn the equipment off.<br />
In order to activate only the peristaltic pump<br />
in Profi Class (fig. E, item 4), disable the last<br />
function “sodium bicarbonate jet” or<br />
“ultrasoud” by pressing the corresponding<br />
key.<br />
Display messages (Profi Class)<br />
1 - The DABI ATLANTE name will be displayed when<br />
the equipment is turned on, followed by a greeting:
The ‘DABI ATLANTE’ name will be displayed<br />
during a power outage and while the<br />
equipment is in standby mode.<br />
2 - Observe the indicators below, which are used to<br />
display your Profi Class status:<br />
1 7<br />
4<br />
5<br />
6<br />
2<br />
4<br />
5<br />
6<br />
3<br />
5<br />
6<br />
1 – Indicates the “Perio Ultrasound” function is<br />
actuated.<br />
2 – Indicates the “En<strong>do</strong> Ultrasound” function is<br />
actuated.<br />
3 – Indicates the “Bicarbonate Jet” function is<br />
actuated.<br />
The “Sodium Bicarbonate Jet” function has<br />
no power indications, since it operates with<br />
stabilized air pressure.<br />
4 – Indicates the effective power for the function.<br />
The power can be either increased or decreased<br />
by pressing keys and .<br />
5 – Indicator that the “Peristaltic Pump” is actuated.<br />
6 – Indicates the “Peristaltic Pump” flow rate level.<br />
Flow rate can be adjusted by pressing key .<br />
There are 4 levels: R0 (off), R1, R2, and R3.<br />
7<br />
7<br />
7 – Indicates the memory programming for the<br />
selected function.<br />
8 – Indicates the “Dentistry” function is actuated.<br />
9 – Indicates the selected “Dentistry Tip”.<br />
10 – Indicates the “Dentistry Tip” programming<br />
has been altered.<br />
3 – Selection of Dentistry Tip:<br />
Press the key and the following screen will be<br />
displayed:<br />
8<br />
9<br />
8<br />
9<br />
Press the key until the desired Tip is selected.<br />
The ultrasound power and the peristaltic pump flow<br />
rate are factory programmed.<br />
In order to alter the programming, press or<br />
for power and for the “Peristaltic Pump”.<br />
Both factory programming and new programming<br />
can be memorized in keys: .<br />
4 – Transducer cooling:<br />
During the utilization of ultrasound with Tips that<br />
need no irrigation (water), the handpiece warms<br />
up. The Profi Class has a timekeeping system that<br />
automatically switches off the unit when necessary.<br />
At that moment, a warning will be displayed to<br />
wait for the unit to cool <strong>do</strong>wn.<br />
5 – Replacement of the “Peristaltic Pump”:<br />
The system identifies pump wear and, if necessary,<br />
suggests its replacement by displaying the following<br />
warning. Press key to clear the warning.<br />
10<br />
17<br />
English
English<br />
18<br />
As long as the pump is not replaced, the Profi screen<br />
will display the warning (item 11). (check section<br />
“Replacement of Peristaltic Pump”).<br />
11<br />
To complete the replacement, press and<br />
simultaneously turn the main switch on to inform<br />
that the pump has been replaced and to clear the<br />
warning (item 11) being displayed.<br />
To confirm the replacement, press .<br />
Ultrasound power setting<br />
Profi Neo<br />
Select the desired power by means of the ultrasound<br />
power selection switch (fig. D, item 2).<br />
Use the indicated power for the perio<strong>do</strong>ntics<br />
and en<strong>do</strong><strong>do</strong>ntics functions.<br />
Profi Class<br />
Select the desired function (fig. E, item 6, 7 or 10)<br />
and press key to decrease or key to increase<br />
the power.<br />
Irrigant flow rate setting<br />
Profi Neo<br />
Select fluid flow rate by means of the Peristaltic<br />
Pump switch (fig. D, item 5).<br />
Profi Class<br />
Press key to adjust the speed.<br />
The irrigant flow rate is related to the<br />
peristaltic pump speed.<br />
Some procedures use ultrasound with no<br />
irrigation. In this case, the peristaltic pump<br />
can be deactivated by pressing key until<br />
the display shows “R0”. In the Bicarbonate<br />
Jet function, the pump cannot be deactivated.<br />
Memory setting (Profi Class)<br />
Set the ultrasound power and the irrigant flow<br />
rate (check the corresponding sections in this<br />
Manual).<br />
Keep the desired memory key pressed ( or<br />
) until a beep is heard to save the selected setting.<br />
After memory is set, the display will show M1,<br />
M2, M3 or M4.<br />
Adequate tip use En<strong>do</strong> / Perio / Retro<br />
Use the gauge accompanying the scaler kit in<br />
orderto check tip wear. Position the tip on the<br />
corresponding drawing and replace it in case wear<br />
exceeds 2 mm.<br />
Correct file instalation<br />
Manually screw the En<strong>do</strong> L tip on the handpiece.<br />
Softly tighten it using the En<strong>do</strong> L tip installation key<br />
which is supplied with the ultrasound kit (fig. K,<br />
item 20).<br />
Select the desired file, cut off its handle and insert<br />
the file into the En<strong>do</strong> L tip orifice (fig. K).<br />
Fix the file by tightening the En<strong>do</strong> L tip nut using<br />
the installation key for that tip (fig. K, item 20).<br />
Replacement of peristaltic pump<br />
Remove the fluid reservoir cover (fig. C, item 12).<br />
Pull the hose (fig. L, item 9) until it detaches from<br />
the trough inside the reservoir. Pull the reservoir up<br />
until it detaches from the two body columns of the<br />
unit (fig. L, item 21).<br />
Press the pump side rods (Fig. L, item 23) and pull<br />
the pump to detach it from the unit body.<br />
Disconnect the hose (fig. L, item 24).<br />
Connect the new pump hose and attach it to the<br />
unit body by pressing the side rods.<br />
Insert the hose into the irrigant reservoir trough<br />
and attach it to the body fastening columns, making<br />
sure the hose is not kinked.
Cleaning<br />
Clean the equipment surface with a clean soft cloth<br />
moistened in Aplic O<strong>do</strong>nto by <strong>Dabi</strong> <strong>Atlante</strong> or<br />
another product with similar chemical properties.<br />
The use of other chemical products is not<br />
recommended as it may damage the<br />
equipment.<br />
To clean the fluid reservoir, remove it from the<br />
product (fig. L). Clean it and put it back.<br />
Remove the reservoir only when it is extremely<br />
necessary.<br />
Sterilization<br />
Sterilize the sodium bicarbonate jet handpieces,<br />
tips, tip installation keys and the handpiece<br />
protective cap by autoclave at up to 135 °C.<br />
Remove the sodium bicarbonate jet<br />
handpiecetip hose as it is not autoclavable.<br />
Water drainage<br />
After each day of use, place the equipment on a<br />
dry piece of cloth, incline it sideways at an angle of<br />
approximately 45°. Drain the air filter (fig. C, item<br />
13) by pressing the depressurization pin until all the<br />
water has been eliminated.<br />
This procedure prevents clogging of the<br />
sodium bicarbonate jet tip.<br />
Maintenance<br />
Preventive maintenance<br />
In order to reduce equipment faults and<br />
increasedurability, call <strong>Dabi</strong> <strong>Atlante</strong> Authorized<br />
Technical Assistance and set a regular<br />
preventivemaintenance plan.<br />
Profi Class: The system identifies pump wear<br />
and, if necessary, suggests its replacement by<br />
displaying a warning.<br />
Corrective maintenance<br />
In case the equipment presents any faults that are<br />
not listed in “Troubleshooting”, contact <strong>Dabi</strong> <strong>Atlante</strong><br />
Authorized Technical Assistance.<br />
Do not open the equipment and/or try to<br />
repair it as such action may aggravate the<br />
problem or even generate further<br />
malfunctioning.<br />
Circuit diagrams, list of parts, components,<br />
others<br />
In case they are necessary, ask <strong>Dabi</strong> <strong>Atlante</strong> for<br />
electric diagrams and/or lists of parts, components<br />
or other information, which will be supplied by<br />
agreement.<br />
Recommendations, care and<br />
warnings<br />
In case the sodium bicarbonate jet tip becomes<br />
clogged, remove the hose and proceed with<br />
unclogging. (fig. J).<br />
Sodium bicarbonate dehydrates lips. Use some type<br />
of moisturizer on the patient’s lips prior to<br />
procedures.<br />
The sodium bicarbonate jet handpiece must be<br />
loosened at least once a week to prevent thread<br />
locking.<br />
The scaler tips must be removed at least once aday<br />
to prevent thread locking.<br />
Profi Neo: When the En<strong>do</strong> Tips are used with<br />
no cooling, the unit can be used for a<br />
maximum of 4 minutes, followed by an 8minute<br />
waiting period, to prevent irreparable<br />
damage to the ultrasound handpiece.<br />
Undesirable Secondary or Adverse<br />
effects and contraindications<br />
Sodium bicarbonate use is contra-indicated for<br />
patients with renal complications or who are being<br />
submitted to hemodialysis.<br />
The sodium bicarbonate powder spray may<br />
interfere with respiratory disorders. In such cases,<br />
medical advice is recommended.<br />
The use of ultrasound is contraindicated for patients<br />
and dentists wearing a pacemaker.<br />
Procedures in case equipment<br />
functioning is altered<br />
In case the equipment presents any faults, firstly<br />
check whether they are listed under<br />
“Troubleshooting”. In case the problem cannot be<br />
solved, turn off the equipment, unplug it from the<br />
power source outlet and call <strong>Dabi</strong> <strong>Atlante</strong><br />
Authorized Technical Assistance.<br />
19<br />
English
English<br />
20<br />
Sensitivity to predictable environmental<br />
conditions in normal working situations<br />
This equipment is not sensitive to magnetic, electric,<br />
electrostatic or pressure interferences as long as<br />
the cleaning, maintenance, transportation and<br />
operation recommendations found in this <strong>manual</strong><br />
are observed.<br />
Procedures in case of equipment<br />
disposal<br />
When the equipment is put out of use, it must be<br />
disposed of at an appropriate site (according to<br />
local regulations), thus preventing its inadequate<br />
use and environmental contamination.<br />
Transportation and storage<br />
conditions<br />
The equipment must be transported and stored:<br />
Carefully in order to prevent falls and impact.<br />
By keeping the side indicated by the arrow<br />
facing upwards.<br />
By observing maximum piling limits as indicated<br />
on the packaging.<br />
Protected against moisture, rain, waters<br />
prinkling and wet ground.<br />
Transportation/storage environmental conditions<br />
Transportation and storage 0ºC to + 55ºC<br />
environmental temperature<br />
range<br />
Transportation and storage<br />
relative humidity range<br />
0% to 90% (noncondensing)<br />
Atmospheric pressure range 500hPa to 1060 hPa (375<br />
mmHg to 795 mmHg)<br />
After installation<br />
Keep the equipment protected from sunlight and<br />
rain.<br />
Environmental operation conditions<br />
Environmental temperature +10ºC to +35ºC<br />
functioning range<br />
Environmental temperature +21ºC to + 26ºC<br />
range recommended by <strong>Dabi</strong><br />
<strong>Atlante</strong><br />
Functioning relative humidity 30% to 75% (non-<br />
range<br />
condensing)<br />
Atmospheric pressure range 700 hPa to 1060 hPa (525<br />
mmHg to 795 mmHg)<br />
Environmental accommodation operation<br />
conditions (between operations)<br />
Environmental temperature +5ºC to +45ºC<br />
accommodation range<br />
Environmental temperature +15ºC to +30ºC<br />
range recommended by <strong>Dabi</strong><br />
<strong>Atlante</strong><br />
Functioning relative humidity 30% to 75% (non-<br />
range<br />
condensing)<br />
Atmospheric pressure range 700 hPa to 1060 hPa (525<br />
mmHg to 795 mmHg)<br />
Preparation prior to delivery<br />
This equipment has been revised and approved<br />
according to the <strong>Dabi</strong> <strong>Atlante</strong> Quality Inspectionand<br />
Control Program for better performance.<br />
<strong>Dabi</strong> <strong>Atlante</strong> Authorized Service<br />
Network<br />
Installation and all maintenance service for <strong>Dabi</strong><br />
<strong>Atlante</strong> equipment must be given by <strong>Dabi</strong> <strong>Atlante</strong><br />
Authorized Technical Assistance, otherwise warranty<br />
will be compromised.<br />
Use the attached insert or access the web site<br />
www.dabi.com.br to find the nearest <strong>Dabi</strong> Atante<br />
Authorized Technical Assistant.<br />
Symbols<br />
Use the icons below to identify the symbols onyour<br />
equipment:<br />
Indicates the terminals forgrounding<br />
protection.<br />
Attention: warns that accompanying<br />
<strong>do</strong>cuments must be consulted.<br />
Type-B equipment<br />
“Fragile”<br />
Located on the packaging side. It<br />
determines that equipment must be<br />
carefully transported in order to<br />
prevent fallsor shocks.<br />
“Protect against humidity”<br />
Located on the packaging side. It<br />
determines that the equipment must be<br />
protected against any type of humidity<br />
during transportation and storage.
“This side up”<br />
Located on the packaging side. It<br />
determines that the packaging must<br />
be handled by keeping the side shown<br />
by the arrow facing upwards.<br />
“Maximum piling”<br />
Located on the packaging side. It<br />
determines the maximum number of<br />
boxes that can be piled up during<br />
transportation and storage.<br />
“Temperature limit”<br />
It determines the temperature limits<br />
at which the equipment must be stored<br />
or transported.<br />
Reservoir Replenishment<br />
Final recommendations<br />
In order to ensure greater durability for your<br />
equipment, use only original <strong>Dabi</strong> <strong>Atlante</strong><br />
replacement parts, which are in accordance with<br />
the technical standards and specifications required<br />
by the manufacturer.<br />
Also, use only the services provided by the <strong>Dabi</strong><br />
<strong>Atlante</strong> Authorized Technical Assistance Network as<br />
it counts on trained assistants and specific tools for<br />
the appropriate maintenance of your equipment.<br />
Equipment Warranty<br />
For sales outside Brazil, verify the “Warranty Terms”<br />
are the local distribuitor responsability.<br />
The table below shows possible concentrations. Others can be used on the dental surgeon’s discretion.<br />
Indicated anti-septic solutions<br />
Cetylpyridinium Chloride 1:2000 (Cepacol)<br />
0,12% chlorhexidine (Periogard)<br />
Listerine<br />
Topical PVPI<br />
Sodium hypochlorite 3ppm*<br />
*Use only for en<strong>do</strong><strong>do</strong>ntics.<br />
Troubleshooting<br />
Suggested concentrations<br />
Pure<br />
At 50% - 250 ml of the product and 250 ml of filtered water<br />
At 25% - 125 ml of the product and 375 ml of filtered water<br />
At 50% - 250 ml of the product and 250 ml of filtered water<br />
0,6 ml of the product in 454 ml of filtered water<br />
Faults Causes Solutions<br />
Not plugged in the power soure outlet Plug it in<br />
Equipment will not start Fuse is burned out Replace fuse<br />
Power failure Await normalization<br />
Circuit breaker is off Turn it on<br />
System is not pressurized Compressor is off and/or valve is closed Turn compressor on and/or open valve<br />
Tip will not oscillate but LED goes on Tip is not correctly fixed Fix tip appropriately or try another tip<br />
Water leakage in the handpiece Tip is incorrectly screwed on Screw tip on properly or replace O-ring<br />
Sodium bicarbonate jet handpiece Properly tighten the sodium bicarbonate<br />
terminal is not properly screwed on jet handpiece terminal<br />
Tip is clogged Unclog tip<br />
Sodium bicarbonate will not come out<br />
No sodium bicarbonate in the reservoir Supply the reservoir<br />
Sodium bicarbonate excess in the Remove excess<br />
Water will not come out<br />
No irrigating solution in the reservoir<br />
Peristaltic pump is not enabled<br />
Supply the reservoir<br />
Activate the peristaltic pump<br />
Perception of electric shock on tip No or ineffective grounding Ground equipment adequately<br />
Legal CE representative:<br />
MPC International S.A - 26, Boulevard Royal - L-2449 - Luxembourg - Fone: +49 431-7028 219 - Fax: +49 431-7028 202<br />
21<br />
English
English<br />
22<br />
Technical Features<br />
Characteristics Profi Neo Profi Class<br />
Ultrasound Handpiece x x<br />
Sodium Bicarbonate Jet Handpiece x x<br />
2 Handpieces: Ultrasound and Bicarbonate Jet x x<br />
Injected ABS Framework x x<br />
Frequency Stabilizer Electronic Circuit x x<br />
Piezoeletric Ceramic Transdutor x x<br />
Transdutor Removable Caps for sterilization x x<br />
Keys with protection for tips installation x x<br />
Sodium Bicarbonate Reservoir in injected ABS x x<br />
Transparent lid for the sodium bicarbonate reservoir x x<br />
Air filter x x<br />
Unique Foot Control x x<br />
Handpiece with smooth and flexible hoses x x<br />
Peristaltic Pump Irrigation x x<br />
Control Panel with Knobs x ———-<br />
Control Panel with graphic display and membrane keypad ———— x<br />
En<strong>do</strong><strong>do</strong>ntics function 0 x<br />
Dentistry function 0 x<br />
Perio<strong>do</strong>ntics function x x<br />
Especifications x x<br />
Height 212 mm x x<br />
Width 240 mm x x<br />
Length 250 mm x x<br />
Total Height 3,2 Kg x x<br />
Voltage 99 to 242 V x x<br />
Frequency 50 to 60 Hz x x<br />
Power 36 VA x x<br />
Ultrasound frequency 24 to 30 kHz x x<br />
Tip amplitude 0,05 to 0,1 mm x x<br />
Operation device Foot Control x x<br />
Protection Fuse 2A x x<br />
Air Consuption 10 l/min x x<br />
Compressed Air Primary Pressure 60 to 80 PSI x x<br />
X = Serial characteristics and technical features 0 = Optional characteristics and technical features<br />
technical responsability: Leonel Issa Halak - CREA-SP 0600256918
REV.: 00 MAI / 2008 26465-222/7