oscommerce_template_set_up(v1)

Create successful ePaper yourself
Turn your PDF publications into a flip-book with our unique Google optimized e-Paper software.
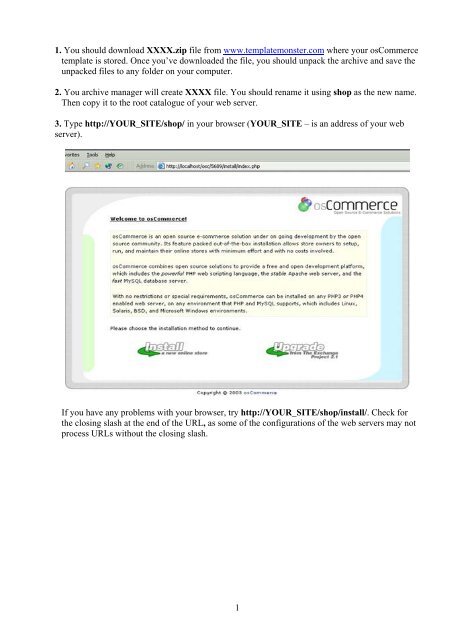
1. You should download XXXX.zip file from www.<strong>template</strong>monster.com where your osCommerce<br />
<strong>template</strong> is stored. Once you’ve downloaded the file, you should unpack the archive and save the<br />
unpacked files to any folder on your computer.<br />
2. You archive manager will create XXXX file. You should rename it using shop as the new name.<br />
Then copy it to the root catalogue of your web server.<br />
3. Type http://YOUR_SITE/shop/ in your browser (YOUR_SITE – is an address of your web<br />
server).<br />
If you have any problems with your browser, try http://YOUR_SITE/shop/install/. Check for<br />
the closing slash at the end of the URL, as some of the configurations of the web servers may not<br />
process URLs without the closing slash.<br />
1
4. Click Install to get the next step.<br />
2
5. For the correct installation check in both matchboxes (Import Catalogue Database and Automatic<br />
Configuration) and press Continue.<br />
As osCommerce uses database to store data, you should fill in all the fields to provide the<br />
information on your database server. osCommerce installing script will import values from the<br />
file WEB_ROOT/shop/install/<strong>oscommerce</strong>.sql to the database you point to (WEB_ROOT is<br />
the path to your web server's root catalogue).<br />
Database Server – your database server address<br />
Username – the name of the user who has rights to create and change databases and tables<br />
Password – password of the user<br />
Database Name – the name of your osCommerce database<br />
Session Storage – special storage to keep sessions’ values<br />
3
6. Press Continue for the next step. osCommerce will process the test connection to the database<br />
server now. You will be informed about the results. If osCommerce fails to process the<br />
connection, you should get in touch with your administrator to check your server <strong>set</strong>tings.<br />
7. Press Continue now. osCommerce will add the values to the database now. This process may<br />
take several minutes.<br />
4
8. Check osCommerce configuration <strong>set</strong>tings. It's recommended to keep these <strong>set</strong>tings unless you<br />
have to change them. After checking the <strong>set</strong>tings press Continue.<br />
5
9. We recommend that you save the <strong>set</strong>tings with the form but create a new account (user) for<br />
OsCommerce.<br />
10. To finish the installation press Continue. You will be shown a notification about successful<br />
installation.<br />
6
11. To have a look at your on-line shop, press Catalogue.<br />
You will have 2 or 3 notifications at the top of your browser. To hide them you should<br />
a) delete the catalogue install from WEB_ROOT/shop folder<br />
b) mark WEB_ROOT/shop/includes/configure.php file as read only<br />
7
12. To make any changes to your on-line shop, you should type<br />
http://YOUR_SITE/shop/admin/ with your browser. We recommend that you rename your<br />
admin folder with any other secret name (secret_name) and enter the admin section using this<br />
name http://YOUR_SITE/shop/secret_name/<br />
8