guitar & bass auto tuner gu30 owner's manual accordeur - Ibanez
guitar & bass auto tuner gu30 owner's manual accordeur - Ibanez
guitar & bass auto tuner gu30 owner's manual accordeur - Ibanez

Create successful ePaper yourself
Turn your PDF publications into a flip-book with our unique Google optimized e-Paper software.
GUITAR & BASS AUTO TUNER<br />
GU30<br />
OWNER’S MANUAL<br />
Caution<br />
1 To avoid short circuit, electric shock, or malfunction<br />
Do not disassemble or attempt to repair this unit.<br />
Do not place this unit in locations of high temperature or high<br />
humidity (such as nearby heating equipment, in direct sunlight, in a<br />
bathroom, or on a wet floor).<br />
Do not place this unit where it will be subjected to heavy vibration.<br />
Do not place this unit in dusty or dirty locations.<br />
Do not operate this unit with wet hands.<br />
2 To avoid damage<br />
Do not apply excessive force to the switches or other controls.<br />
Do not drop this unit.<br />
3 Cleaning<br />
Do not use thinner, alcohol, or other solvents to clean this unit.<br />
4 To prevent battery failure<br />
Remove the battery if you won't be using this unit for an extended<br />
time.<br />
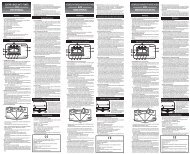
Features and Functions<br />
1 POWER button<br />
Turns the power on/off.<br />
If you leave the power turned on for approximately twenty minutes, it<br />
will turn off <strong>auto</strong>matically.<br />
2 MODE button<br />
Switches the tuning mode. Each time you press the MODE button,<br />
the tuning mode will cycle between the following settings.<br />
AUTO GUITAR - MAN.GUITAR - AUTO BASS - MAN.BASS<br />
3 FUNCTION button<br />
Select the type of adjustment you want to make: PITCH, NOTE, or<br />
FLAT.<br />
(You can select NOTE only if you're in MAN. (<strong>manual</strong>) tuning mode.)<br />
4 ▲▼ buttons<br />
Adjust the parameter you've selected using the FUNCTION button.<br />
i) PITCH: Reference pitch setting (calibration)<br />
Adjust the reference pitch (A5) in the range of 435~445 Hz (1 Hz<br />
steps).<br />
ii) NOTE: Note setting<br />
When in MAN (<strong>manual</strong>) mode, select the note to which you want<br />
to tune, from the following choices.<br />
NOTE: 6E, 5A, 4D, 3G, 2B, 1E, 7B (electric <strong>guitar</strong>, acoustic <strong>guitar</strong>)<br />
4E, 3A, 2D, 1G, HC, LB (<strong>bass</strong> <strong>guitar</strong>)<br />
iii) FLAT: Flat setting<br />
Specify a flatted tuning relative to the displayed note. You can<br />
tune to a flatted tuning from one to five semitones below the<br />
displayed note.<br />
5 SOUND button<br />
Sounds a reference tone from the internal speaker. This lets you tune<br />
while comparing the output of your instrument to the reference tone.<br />
You can use the FUNCTION button and the ▲▼ buttons to specify<br />
the note and flatted setting for the reference tone.<br />
Note) When using the SOUND output, the PITCH is fixed at 440 Hz.<br />
This cannot be changed.<br />
6 Liquid Crystal Display (LCD)<br />
* When you turn the power on, the LCD will show the following<br />
settings.<br />
MODE = AUTO GUITAR<br />
FUNCTION = PITCH<br />
PITCH = 440 Hz<br />
a MODE: AUTO GUITAR, MAN GUITAR, AUTO BASS, MAN BASS<br />
b NOTE: MAN.GUITAR 6E, 5A, 4D, 3G, 2B, 1E, 7B<br />
MAN.BASS 4E, 3A, 2D, 1G, HC, LB<br />
c FUNCTION: PITCH, NOTE, FLAT<br />
d #/ : When the tuning is correct, the needle will stop in the center,<br />
and the " " and "#" indications will both appear. The " "<br />
indication appears if your instrument is flatter than the<br />
displayed note, and the "#" indication appears if your<br />
instrument is sharper.<br />
e : Indicates the flatted tuning setting. This indicates how much<br />
lower the actual pitch of your instrument is compared to the<br />
displayed note.<br />
f Reference pitch: Indicates the currently-specified reference pitch.<br />
7 INPUT jack<br />
You can connect your instrument to this input jack.<br />
If you're tuning an electric <strong>guitar</strong>, acoustic-electric <strong>guitar</strong>, or electric<br />
<strong>bass</strong>, connect the output of your instrument to the GU30's INPUT<br />
jack.<br />
However in this case, you won't be able to use the GU30's internal<br />
mic.<br />
8 OUTPUT jack<br />
This jack directly outputs the signal that is being input. You can<br />
connect this jack to your amp. However to prevent hum or other noise<br />
while you're performing, turn off the power of the <strong>tuner</strong>.<br />
9 MICROPHONE<br />
Use the internal mic when you want to tune an instrument that has no<br />
pickup, such as an acoustic <strong>guitar</strong>.<br />
However, the internal mic cannot be used if a plug is inserted in the<br />
INPUT jack.<br />
0 Tuning guide LEDs<br />
The green LED in the center will light when your instrument matches<br />
the displayed note. The red LED at the left will light if your instrument<br />
is flat, and the red LED at the right will light if your instrument is sharp.<br />
Tuning Procedure<br />
For accurate tuning<br />
• Don't use this <strong>tuner</strong> near sound equipment such as radios or<br />
televisions.<br />
• When tuning an electric <strong>guitar</strong>/<strong>bass</strong>, use a moderate volume for<br />
best tuning results.<br />
• In order to tune strings faster, mute all strings by hand after you've<br />
finished tuning each string.<br />
Tuning in Auto mode<br />
1. Electric instruments: Connect the output of your instrument to the<br />
input jack of the <strong>tuner</strong>.<br />
Acoustic instruments: Use the internal mic.<br />
2. When you turn on the power, the GU30 is <strong>auto</strong>matically set to<br />
MODE=AUTO GUITAR and PITCH=440 Hz.<br />
3. Change the PITCH and FLAT settings if desired.<br />
4. If you're tuning a <strong>bass</strong> <strong>guitar</strong>, use the MODE button to select AUTO<br />
BASS.<br />
5. If the pitch of the string is more than ±50 cents away from the<br />
correct pitch, tune the string until the correct note name appears in<br />
the LCD and one of the tuning guide LEDs is lit.<br />
When the pitch of the string is within ±50 cents of the correct<br />
pitch, tune the string to make the needle stop at the "0" position.<br />
6. When the <strong>tuner</strong> needle stops at "0," the green LED in the center will<br />
light. Tuning is complete.<br />
Tuning in Manual mode<br />
1. Electric instruments: Connect the output of your instrument to the<br />
input jack of the <strong>tuner</strong>.<br />
Acoustic instruments: Use the internal mic.<br />
2. When you turn on the power, the GU30 is <strong>auto</strong>matically set to<br />
MODE=AUTO GUITAR and PITCH=440 Hz.<br />
3. Change the PITCH and FLAT settings if desired.<br />
4. Use the MODE button to select MAN. GUITAR or MAN. BASS.<br />
Use the FUNCTION button to select NOTE, and use the ▲▼buttons<br />
to select the note that you want to tune.<br />
5. If the pitch of the string is more than ±50 cents away from the<br />
correct pitch, tune the string until the correct note name appears in<br />
the LCD and one of the tuning guide LEDs is lit.<br />
When the pitch of the string is within ±50 cents of the correct<br />
pitch, tune the string to make the needle stop at the "0" position.<br />
6. When the <strong>tuner</strong> needle stops at "0," the green LED in the center will<br />
light. Tuning is complete.<br />
Tuning by Sound<br />
1. When you press the SOUND button, MODE will be set to MAN.<br />
GUITAR or MAN.BASS, FUNCTION will be set to NOTE, the NOTE<br />
indication will be 5A (GUITAR) or 3A (BASS), and that pitch will be<br />
sounded.<br />
2. Tune your instrument to match the pitch you hear from the GU30's<br />
internal speaker.<br />
3. Change the NOTE or FLAT settings accordingly.<br />
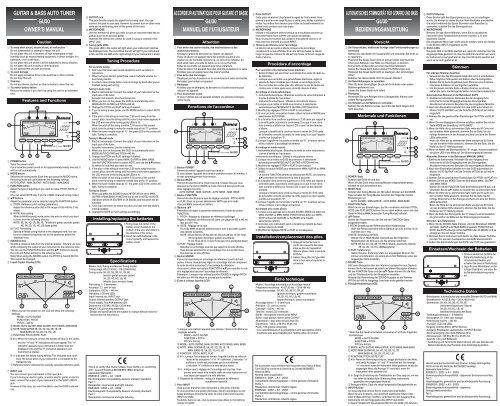
Installing/replacing the batteries<br />
1.Firmly press the center of the<br />
battery cover located on the<br />
bottom of the unit, and slide it in<br />
the direction of the arrow.<br />
2. Insert two AAA batteries in the<br />
correct polarity, and replace the<br />
battery cover.<br />
Specifications<br />
Modes: Auto Tuning and Manual Tuning modes<br />
Tuning range: A0 (27.50 Hz) ~ C8 (4,186.00 Hz)<br />
Tuning notes: 5A, 4D, 3G, 2B, 1E, 7B, 6E<br />
(electric <strong>guitar</strong>, acoustic <strong>guitar</strong>)<br />
3A, 2D, 1G, HC, LB, 4E<br />
(electric <strong>bass</strong>, acoustic <strong>bass</strong>)<br />
Flat tuning: 1~ 5 semitones<br />
Accuracy: ±1 cent or less<br />
Calibration: 435 Hz ~ 445 Hz<br />
Indicators: LCD and LEDs<br />
Input: Internal mic, INPUT jack<br />
Output: Internal speaker, OUTPUT jack<br />
Power supply: Two AAA batteries (3V)<br />
Dimensions: 105 (W) x 68 (D) x 25 (H) mm<br />
Weight: 120 g (including batteries)<br />
* Design and specifications are subject to change without notice for<br />
improvement of the product.<br />
This is to certify that Guitar & Bass Tuner GU30 is in conformity<br />
with : Council Directive 89/336/EEC (EMC Directive)<br />
Applicable Standards :<br />
EN55013 : 2001 + A1 : 2003<br />
Electromagnetic Compatibility-Generic emission standard.<br />
Part 1 :<br />
Residential, commercial and light industry.<br />
EN55020 : 2002 + A1 : 2003<br />
Electromagnetic Compatibility-Generic immunity standard.<br />
Part 1 :<br />
Residential, commercial and light industry.<br />
ACCORDEUR AUTOMATIQUE POUR GUITARE ET BASSE<br />
GU30<br />
MANUEL DE I'UTILISATEUR<br />
Attention<br />
1 Pour éviter des courts-circuits, des électrocutions ou des<br />
dysfonctionnements :<br />
N'essayez jamais de démonter ou réparer cet appareil.<br />
Evitez de placer cet appareil dans des endroits soumis à une<br />
chaleur ou une humidité excessive (p. ex. près d'un radiateur, en<br />
plein soleil, dans une salle de bains ou sur un sol humide).<br />
Evitez de soumettre cet appareil à de fortes vibrations.<br />
Evitez de placer cet appareil dans des endroits poussiéreux ou sales.<br />
N'utilisez pas cet appareil avec des mains humides.<br />
2 Pour éviter des dommages<br />
N'appliquez pas trop de pression sur les commutateurs et autres commandes.<br />
Ne laissez pas tomber cet appareil.<br />
3 Nettoyage<br />
N'utilisez pas de détergent, de benzène ou d'autres solvants pour<br />
nettoyer cet appareil.<br />
4 Pour économiser la pile<br />
Si vous n'utilisez pas cet appareil pendant une période prolongée,<br />
retirez la pile.<br />
Fonctions de l'<strong>accordeur</strong><br />
1 Bouton POWER<br />
Permet de mettre l'appareil sous/hors tension.<br />
Si vous laissez l'appareil sous tension pendant environ 20 minutes, il<br />
se met <strong>auto</strong>matiquement hors tension.<br />
2 Bouton MODE<br />
Permet de sélectionner le mode d'accord. Chaque fois que vous<br />
appuyez sur le bouton MODE, le mode d'accord bascule entre les<br />
deux réglages suivants.<br />
AUTO GUITAR - MAN. GUITAR - AUTO BASS - MAN. BASS<br />
3 Bouton FUNCTION<br />
Permet de sélectionner le type de réglage souhaité : PITCH, NOTE<br />
ou FLAT. (Vous ne pouvez sélectionner NOTE que si le mode<br />
d'accord MAN. (manuel) est défini.)<br />
4 Boutons ▲▼<br />
Permettent de régler le paramètre sélectionné à l'aide du bouton<br />
FUNCTION.<br />
i) PITCH : Réglage du diapason de référence (calibrage)<br />
Réglez le diapason de référence (A5) dans une plage de 435 à 445 Hz<br />
(par pas de 1 Hz).<br />
ii) NOTE : Réglage de la note<br />
En mode MAN. (manuel), sélectionnez la note à accorder à partir<br />
des options suivantes.<br />
NOTE : 6E (mi 6eme), 5A (la), 4D (ré), 3G (sol) 2B (si), 1E (mi 1ere),<br />
7B (si) (<strong>guitar</strong>e électrique, <strong>guitar</strong>e acoustique)<br />
4E (mi), 3A (la), 2D (ré), 1G (sol), HC (do aigu), LB (si grave)(<strong>guitar</strong>e <strong>bass</strong>e)<br />
iii) FLAT : Réglage bémol<br />
Spécifiez un accordage plus bas par rapport à la note affichée.<br />
Vous pouvez sélectionner un accordage d'un à cinq demi-tons<br />
plus bas que la note affichée.<br />
5 Bouton SOUND<br />
Permet de reproduire un accordage de référence à partir du hautparleur<br />
interne. Vous pouvez régler un accordage tout en comparant<br />
la sortie de votre instrument à l'accordage de référence.<br />
Vous pouvez utiliser les boutons FUNCTION et ▲▼ pour spécifier la note<br />
et le réglage plus bas pour l'accordage de référence.<br />
Remarque : Lorsque vous utilisez la sortie SOUND, le réglage PITCH<br />
est défini sur 440 Hz. Vous ne pouvez pas le modifier.<br />
6 Ecran à cristaux liquides (LCD)<br />
* Lorsque vous mettez l'appareil sous tension, l'écran LCD affiche les<br />
réglages suivants.<br />
MODE = AUTO GUITAR<br />
FUNCTION = PITCH<br />
PITCH = 440 Hz<br />
a MODE : AUTO GUITAR, MAN. GUITAR, AUTO BASS, MAN. BASS<br />
b NOTE : MAN. GUITAR 6E, 5A, 4D, 3G, 2B, 1E, 7B<br />
MAN. BASS 4E, 3A, 2D, 1G, HC, LB<br />
c FUNCTION : PITCH, NOTE, FLAT<br />
d #/ : Lorsque l'accordage est correct, l'aiguille s'arrête au milieu de<br />
l'écran et les indications " " et "#" s'affichent. L'indication " "<br />
s'affiche si la note est plus <strong>bass</strong>e que la note affichée.<br />
L'indication "#" s'affiche si la note est plus haute.<br />
e : Indique que le réglage de l'accordage est trop bas. Vous<br />
pouvez ainsi savoir si la tonalité réelle de votre instrument est<br />
trop <strong>bass</strong>e par rapport à la note affichée.<br />
f Diapason de référence : Indique le diapason de référence<br />
actuellement spécifié.<br />
7 Prise INPUT<br />
Vous pouvez brancher votre instrument à cette prise d'entrée.<br />
Si vous accordez une <strong>guitar</strong>e électrique, électro-acoustique ou une<br />
<strong>bass</strong>e électrique, branchez la sortie de votre instrument à la prise<br />
INPUT du GU30.<br />
Toutefois, dans ce cas, vous ne pouvez pas utiliser le microphone<br />
interne du GU30.<br />
cordeur<br />
8 Prise OUTPUT<br />
Cette prise retransmet directement le signal de l'instrument. Vous<br />
pouvez brancher votre amplificateur à cette prise. Veillez toutefois à<br />
mettre l'<strong>accordeur</strong> hors tension pour éviter les bourdonnements ou<br />
autres bruits pendant que vous jouez.<br />
9 MICROPHONE<br />
Utilisez le microphone interne lorsque vous souhaitez accorder un<br />
instrument sans micro comme une <strong>guitar</strong>e acoustique.<br />
Vous ne pouvez toutefois pas utiliser le microphone interne si un<br />
instrument est branché à la prise INPUT.<br />
0 Témoins de référence pour l'accordage<br />
Le témoin vert au centre s'allume lorsque votre accordage<br />
correspond à la note affichée. Si la note est trop <strong>bass</strong>e, le témoin<br />
rouge de gauche s'allume. Si elle est trop haute, le témoin rouge de<br />
droite s'allume.<br />
Procédure d'accordage<br />
Pour accorder votre instrument avec précision<br />
• Evitez d'utiliser cet <strong>accordeur</strong> à proximité d'un poste de radio ou<br />
de télévision.<br />
• Lorsque vous accordez une <strong>guitar</strong>e/<strong>bass</strong>e électrique, réglez le<br />
volume de façon modérée pour obtenir un accordage précis.<br />
• Pour accorder les cordes plus vite, atténuez le son de toutes les<br />
cordes avec la main après avoir accordé chacune d'elles.<br />
Accordage en mode <strong>auto</strong>matique<br />
1. Instruments électriques : Branchez la sortie de votre instrument à<br />
la prise d'entrée de l'<strong>accordeur</strong>.<br />
Instruments acoustiques : Utilisez le microphone interne.<br />
2. Lorsque vous mettez le GU30 sous tension, il sélectionne<br />
<strong>auto</strong>matiquement MODE=AUTO GUITAR et PITCH=440 Hz.<br />
3. Modifiez les réglages PITCH et FLAT le cas échéant.<br />
4. Si vous accordez une <strong>guitar</strong>e <strong>bass</strong>e, utilisez le bouton MODE pour<br />
sélectionner AUTO BASS.<br />
5. Si la tonalité de la corde est supérieure à ±50 cents par rapport à<br />
la tonalité juste, accordez la corde jusqu'à ce que le nom de la<br />
note correcte s'affiche sur l'écran LCD et que l'un des témoins<br />
s'allume.<br />
Lorsque la tonalité de la corde se trouve à moins de ±50 cents<br />
de la tonalité correcte, accordez la corde jusqu'à ce que l'aiguille<br />
s'arrête sur la position "0".<br />
6. Lorsque l'aiguille de l'<strong>accordeur</strong> s'arrête sur "0", le témoin vert au<br />
milieu s'allume. L'accordage est terminé.<br />
Accordage en mode manuel<br />
1. Instruments électriques : Branchez la sortie de votre instrument à<br />
la prise d'entrée de l'<strong>accordeur</strong>.<br />
Instruments acoustiques : Utilisez le microphone interne.<br />
2. Lorsque vous mettez le GU30 sous tension, il sélectionne<br />
<strong>auto</strong>matiquement MODE=AUTO GUITAR et PITCH=440 Hz.<br />
3. Modifiez les réglages PITCH et FLAT le cas échéant.<br />
4. Utilisez le bouton MODE pour sélectionner MAN. GUITAR ou MAN.<br />
BASS.<br />
Le bouton FUNCTION permet de sélectionner NOTE. Les boutons<br />
▲▼ permettent de sélectionner la note à accorder.<br />
5. Si la tonalité de la corde est supérieure à ±50 cents par rapport à<br />
la tonalité juste, accordez la corde jusqu'à ce que le nom de la<br />
note correcte s'affiche sur l'écran LCD et que l'un des témoins<br />
s'allume.<br />
Lorsque la tonalité de la corde se trouve à moins de ±50 cents<br />
de la tonalité correcte, accordez la corde jusqu'à ce que l'aiguille<br />
s'arrête sur la position "0".<br />
6. Lorsque l'aiguille de l'<strong>accordeur</strong> s'arrête sur "0", le témoin vert au<br />
milieu s'allume. L'accordage est terminé.<br />
Accordage avec notes pilotes<br />
1. Lorsque vous appuyez sur le bouton SOUND, MODE est défini sur<br />
MAN. GUITAR ou MAN. BASS, FUNCTION est défini sur NOTE,<br />
NOTE indique 5A (GUITAR) ou 3A (BASS) et la tonalité<br />
sélectionnée retentit.<br />
2. Accordez votre instrument selon la tonalité qui retentit du hautparleur<br />
interne du GU30.<br />
3. Modifiez les réglages NOTE ou FLAT en conséquence.<br />
Installation/remplacement des piles<br />
Fiche technique<br />
1. Appuyez fermement sur le<br />
centre du couvercle des piles<br />
situé au dos de l'appareil et<br />
faites-le glisser dans le sens de<br />
la flèche.<br />
2. Insérez deux piles de type AAA<br />
dans le bon sens et replacez le<br />
couvercle.<br />
Modes : Accordage <strong>auto</strong>matique et Accordage manuel<br />
Fréquences reconnues : A0 (27,50 Hz) ~ C8 (4 186 Hz)<br />
Notes d'accordage : 5A, 4D, 3G, 2B, 1E, 7B, 6E<br />
(<strong>guitar</strong>e électrique, <strong>guitar</strong>e acoustique)<br />
3A, 2D, 1G, HC, LB, 4E<br />
(<strong>bass</strong>e électrique, <strong>bass</strong>e acoustique)<br />
Accordage bémol : 1~5 demi-tons<br />
Précision : ±1 cent ou moins<br />
Calibrage : 435 Hz ~ 445 Hz<br />
Témoins : écran LCD et témoins<br />
Entrée : microphone interne, prise INPUT<br />
Sortie : haut-parleur interne, prise OUTPUT<br />
Alimentation : deux piles de type AAA (3V)<br />
Dimensions : 105 (L) x 68 (P) x 25 (H) mm<br />
Poids : 120 g (piles comprises)<br />
* Les caractéristiques et la présentation sont susceptibles d'être<br />
modifiées sans avis préalable pour l'amélioration du produit.<br />
Par la présente, nous certifions que l’<strong>accordeur</strong> pour Guitar & Bass<br />
Tuner GU30 se conforme à: Directive du Conseil 89/336/EEC<br />
(directive EMC)<br />
Normes étant d’application :<br />
EN55013 : 2001 + A1 : 2003<br />
Compatibilité électromagnétique – norme générale d’émission.<br />
Partie 1:<br />
Résidentiel, commercial, industrie légère.<br />
EN55020 : 2002 + A1 : 2003<br />
Compatibilité électromagnétique – norme générale d’immunité.<br />
Partie 1:<br />
Résidentiel, commercial, industrie légère.<br />
AUTOMATISCHES STIMMGERÄT FÜR GITARRE UND BASS<br />
GU30<br />
BEDIENUNGSANLEITUNG<br />
Vorsicht<br />
1 Um Kurzschlüsse, elektrische Schläge oder Funktionsstörungen zu<br />
vermeiden<br />
Nehmen Sie das Gerät nicht auseinander und versuchen Sie nicht, es<br />
zu reparieren.<br />
Platzieren Sie dieses Gerät nicht an extrem heißen oder feuchten<br />
Orten (zum Beispiel in der Nähe von Heizungen, in direktem<br />
Sonnenlicht, im Bad oder auf einem feuchten Fußboden).<br />
Setzen Sie dieses Gerät keinen starken Erschütterungen aus!<br />
Platzieren Sie dieses Gerät nicht an staubigen oder schmutzigen<br />
Orten!<br />
Bedienen Sie dieses Gerät nicht mit nassen Händen!<br />
2 Um Beschädigungen zu vermeiden<br />
Üben Sie keine übermäßigen Druck auf die Schalter oder andere<br />
Bedienungselemente aus.<br />
Lassen Sie dieses Gerät nicht fallen!<br />
3 Reinigung<br />
Verwenden Sie zum Reinigen keine Lösungsmittel, Alkohol oder<br />
andere Reinigungsmittel.<br />
4 Um Schäden an der Batterie zu vermeiden<br />
Nehmen Sie die Batterie heraus, wenn Sie das Gerät längere Zeit<br />
nicht benutzen.<br />
Merkmale und Funktionen<br />
1 POWER-Taste<br />
Schaltet das Gerät ein und aus.<br />
Wenn Sie das Gerät etwa zwanzig Minuten eingeschaltet lassen,<br />
schaltet es sich <strong>auto</strong>matisch aus.<br />
2 MODE-Taste<br />
Schaltet den Tuning-Modus um. Mit jedem Drücken auf die MODE-<br />
Taste schaltet der Tunig-Modus zwischen den folgenden beiden<br />
Einstellungen um.<br />
AUTO GUITAR - MAN.GUITAR - AUTO BASS - MAN.BASS<br />
3 FUNCTION-Taste<br />
Wählt die Art der Einstellungen, die Sie vornehmen möchten: PITCH,<br />
NOTE oder FLAT. (NOTE können Sie nur dann wählen, wenn sich das<br />
Gerät im Modus MAN. (manueller Tuning-Modus) befindet.<br />
4 ▲▼-Tasten<br />
Stellen den Parameter ein, den Sie mit der FUNCTION-Taste<br />
ausgewählt haben.<br />
i) PITCH: Einstellung der Referenztonhöhe (Kalibrierung)<br />
Stellt die Referenztonhöhe (A5) im Bereich von 435~445 Hz ein (in<br />
Schritten von 1 Hz).<br />
ii) NOTE: Einstellung der Note<br />
Wählen Sie im MAN-Modus (manuell) aus den folgenden<br />
Möglichkeiten die Note aus, die Sie stimmen möchten.<br />
NOTE: 6E, 5A, 4D, 3G, 2B, 1E, 7B (E-Gitarre, akustische Gitarre)<br />
4E, 3A, 2D, 1G, HC, LB(Bassgitarre)<br />
iii) FLAT: Tiefalteration<br />
Geben Sie eine Änderung relativ zur angezeigten Note an. Sie<br />
können eine Alteration von einem bis zu fünf Halbtönen unter der<br />
angezeigten Note einstellen.<br />
5 SOUND-Taste<br />
Gibt einen Bezugston über den internen Lautsprecher aus. Dadurch<br />
können Sie Ihr Instrument akustisch auf diesen Bezugston stimmen.<br />
Mit der FUNCTION-Taste und den ▲▼-Tasten können Sie die Note<br />
und die Tiefalteration für den Bezugston einstellen.<br />
Hinweis) Bei Verwendung der SOUND-Ausgabe ist die Tonhöhe<br />
(PITCH) auf 440 Hz festgelegt. Dies kann nicht geändert werden.<br />
6 Flüssigkristallanzeige (LCD)<br />
* Wenn Sie das Gerät einschalten, erscheinen im LCD die folgenden<br />
Einstellungen.<br />
MODE = AUTO GUITAR<br />
FUNCTION = PITCH<br />
PITCH = 440 Hz<br />
a MODE: AUTO GUITAR, MAN GUITAR, AUTO BASS, MAN BASS<br />
b NOTE: MAN.GUITAR 6E, 5A, 4D, 3G, 2B, 1E, 7B<br />
MAN.BASS 4E, 3A, 2D, 1G, HC, LB<br />
c FUNCTION: PITCH, NOTE, FLAT<br />
d #/ : Wenn die Stimmung richtig ist, stoppt die Nadel in der Mitte,<br />
und beide Anzeigen “ ” und “#” leuchten auf. Die Anzeige<br />
“ ” erscheint, wenn Ihr Instrument tiefer gestimmt ist als die<br />
angezeigte Note, die Anzeige “#” erscheint, wenn Ihr<br />
Instrument höher gestimmt ist.<br />
e : Zeigt die Einstellung der Tiefalteration an. Dies zeigt an, um wie<br />
viel tiefer die tatsächliche Stimmung Ihres Instruments<br />
gegenüber der angezeigten Note ist.<br />
f Bezugstonhöhe: Zeigt die aktuell eingestellte Bezugstonhöhe an.<br />
7 INPUT-Buchse<br />
An dieser Buchse können Sie Ihr Instrument anschließen.<br />
Wenn Sie eine E-Gitarre, eine akustisch-elektrische Gitarre oder<br />
einen E-Bass stimmen möchten, verbinden Sie den Ausgang Ihres<br />
Instruments mit der Eingangsbuchse INPUT des GU30.<br />
In diesem Fall lässt sich das eingebaute Mikrofon des GU30 nicht benutzen.<br />
8 OUTPUT-Buchse<br />
Diese Buchse gibt das Signal genauso aus, wie es empfangen<br />
wurde. Sie können an dieser Buchse Ihren Verstärker anschließen.<br />
Um jedoch während des Spiels Brummen oder Rauschen zu<br />
vermeiden, schalten Sie das Stimmgerät aus.<br />
9 MICROPHONE<br />
Bentzen Sie das interne Mikrofon, wenn Sie ein akustisches<br />
Instrument ohne Tonabnehmer stimmen möchten, z. B. eine<br />
akustische Gitarre.<br />
Das eingebaute Mikro kann nicht benutzt werden, wenn ein Stecker<br />
in der Buchse INPUT eingesteckt wurde.<br />
0 Stimm-LEDs<br />
Die grüne LED in der Mitte leuchtet auf, wenn Ihr Instrument auf die<br />
angezeigte Note gestimmt ist. Die rote LED links leuchtet auf, wenn<br />
Ihr Instrument zu tief gestimmt ist, die rote LED rechts leuchtet auf,<br />
wenn es zu hoch gestimmt ist.<br />
Stimmen<br />
Für präzises Stimmen beachten<br />
• Verwenden Sie das Stimmgerät möglichst nicht in unmittelbarer<br />
Nähe möglicher Störquellen wie Radios oder Fernsehgeräten.<br />
• Spielen Sie für beste Ergebnisse beim Stimmen einer E-Gitarre<br />
oder eines E-Basses mit verringerter Lautstärke.<br />
• Um die jeweils nächste Saite schneller stimmen zu können,<br />
sollten Sie zuvor nachklingende Saiten mit der Hand abdämpfen.<br />
Automatisches Stimmen in der Betriebsart AUTO<br />
1. Elektrische Instrumente: Verbinden Sie den Ausgang Ihres<br />
Instruments mit der Eingangsbuchse des Stimmgerätes.<br />
Akustische Instrumente: Benutzen Sie das eingebaute Mikrofon.<br />
2. Nach dem Einschalten befindet sich das GU30 <strong>auto</strong>matisch im<br />
Modus “AUTO GUITAR” und die Tonhöhe (PITCH) ist auf 440 Hz<br />
eingestellt.<br />
3. Nehmen Sie die gewünschten Einstellungen für PITCH und FLAT<br />
vor.<br />
4. Wenn Sie eine Bassgitarre stimmen möchten, wählen Sie mit der<br />
Taste MODE die Einstellung “AUTO BASS”.<br />
5. Wenn die Höhe der zu stimmenden Saite mehr als 50 Cents von<br />
der korrekten Höhe abweicht, stimmen Sie die Saite, bis der<br />
richtige Notenname in der Anzeige erscheint und eine der Stimm-<br />
LEDs aufleuchtet.<br />
Wenn die Höhe der zu stimmenden Saite weniger als 50 Cents<br />
von der korrekten Höhe abweicht, stimmen Sie die Saite, bis die<br />
Nadel an der “0”-Stellung stoppt.<br />
6. Wenn die Nadel des Stimmgeräts bei “0” stoppt, leuchtet zusätzlich<br />
die grüne LED in der Mitte auf. Der Stimmvorgang ist beendet.<br />
Manuelles Stimmen in der Betriebsart MANUAL (MAN.)<br />
1. Elektrische Instrumente: Verbinden Sie den Ausgang Ihres<br />
Instruments mit der Eingangsbuchse des Stimmgerätes.<br />
Akustische Instrumente: Benutzen Sie das eingebaute Mikrofon.<br />
2. Nach dem Einschalten befindet sich das GU30 <strong>auto</strong>matisch im<br />
Modus “AUTO GUITAR” und die Tonhöhe (PITCH) ist auf 440 Hz<br />
eingestellt.<br />
3. Nehmen Sie die gewünschten Einstellungen für PITCH und FLAT vor.<br />
4. Wählen Sie mit der MODE-Taste die Betriebsart MAN. GUITAR<br />
oder MAN. BASS.<br />
Wählen Sie mit der FUNCTION-Taste die Einstellung NOTE aus, und<br />
verwenden Sie die ▲▼-Tasten zur Auswahl der zu stimmenden Note.<br />
5. Wenn die Höhe der zu stimmenden Saite mehr als 50 Cents von<br />
der korrekten Höhe abweicht, stimmen Sie die Saite bis der<br />
richtige Notenname in der Anzeige erscheint und eine der Stimm-<br />
LEDs aufleuchtet.<br />
Wenn die Höhe der zu stimmenden Saite weniger als 50 Cents<br />
von der korrekten Höhe abweicht, stimmen Sie die Saite, bis die<br />
Nadel an der “0”-Stellung stoppt.<br />
6. Wenn die Nadel des Stimmgeräts bei “0” stoppt, leuchtet zusätzlich<br />
die grüne LED in der Mitte auf. Der Stimmvorgang ist beendet.<br />
Stimmen nach Referenzton<br />
1. Wenn Sie die SOUND-Taste drücken, wird die Betriebsart (MODE)<br />
auf MAN, GUITAR oder MAN.BASS eingestellt, FUNCTION auf<br />
NOTE, die NOTE-Anzeige ist 5A (GUITAR) oder 3A (BASS), und es<br />
erklingt ein Ton mit dieser Tonhöhe.<br />
2. Stimmen Sie Ihr Instrument nach Gehör so, dass dessen Tonhöhe<br />
mit dem Ton aus dem Lautsprecher des GU30 übereinstimmt.<br />
3. Ändern Sie die Einstellungen bei NOTE oder FLAT wie gewünscht.<br />
Einsetzen/Wechseln der Batterien<br />
Technische Daten<br />
1. Drücken Sie fest auf die Mitte der<br />
Batteriefachabdeckung an der<br />
Unterseite des Gerätes, und<br />
schieben Sie diese in Pfeilrichtung.<br />
2. Legen Sie zwei AAA-Batterien mit der<br />
richtigen Polarität ein, und setzen Sie<br />
die Batteriefachabdeckung wieder<br />
auf.<br />
Betriebsarten: <strong>auto</strong>matisches und manuelles Stimmen (AUTO und MAN)<br />
Stimmbereich: A0 (27,50 Hz) ~ C8 (4.186,00 Hz)<br />
Stimmnoten: 5A, 4D, 3G, 2B, 1E, 7B, 6E<br />
(elektrische/akustische Gitarre)<br />
3A, 2D, 1G, HC, LB, 4E<br />
(elektrischer/akustischer Bass)<br />
Tiefalterationsmodus: 1~5 Halbtöne<br />
Genauigkeit: ±1 Cent oder weniger<br />
Kalibrierung: 435 Hz ~ 445 Hz<br />
Anzeigen: LCD und LEDs<br />
Eingang: Internes Mikro, INPUT-Buchse<br />
Ausgang: Eingebauter Lautsprecher, OUTPUT-Buchse<br />
Stromversorgung: Zwei AAA-Batterien (3 V)<br />
Abmessungen: 105 (B) x 68 (T) x 25 (H) mm<br />
Gewicht: 120 g (mit Batterien)<br />
* Ausführung und Technische Daten können sich aus Gründen der<br />
Weiterentwicklung des Produkts ohne Ankündigung ändern.<br />
Hiermit wird die Konformität des Gitarren- & Bass-Stimmgeräts<br />
GU30 mit der EU-Richtlinie 89/336/EEC bestätigt.<br />
Relevante Vorschriften:<br />
EN55013 : 2001 + A1 : 2003<br />
Elektromagnetische Kompatibilität – allgemeiner Emissionsvorschriften.<br />
Teil 1:<br />
Haushaltsgeräte, gewerbliche und leichtindustrielle Ausrüstung.<br />
EN55020 : 2002 + A1 : 2003<br />
Elektromagnetische Kompatibilität – allgemeine<br />
Verträglichkeitsvorschriften.<br />
Teil 1:<br />
Haushaltsgeräte, gewerbliche und leichtindustrielle Ausrüstung.