March 2011

You also want an ePaper? Increase the reach of your titles
YUMPU automatically turns print PDFs into web optimized ePapers that Google loves.
Newsletter Of The<br />
Forty-Niners Chapter Of<br />
The Cadillac & LaSalle Club<br />
Joe Cutler – President<br />
E-mail: 49caddyman@gmail.com<br />
Art Gardner – Editor<br />
E-mail: agardner@gardnergroff.com<br />
Jay Friedman – Membership / Treasurer<br />
E-mail: jaysfriedman@yahoo.com<br />
Frank Lindauer – Editor Emeritus<br />
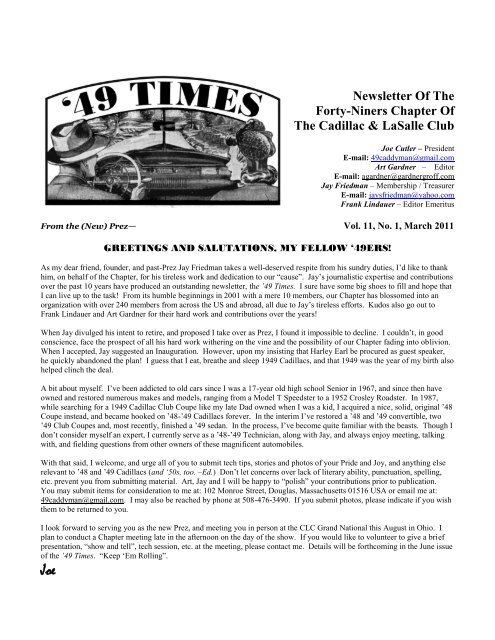
From the (New) Prez— Vol. 11, No. 1, <strong>March</strong> <strong>2011</strong><br />
GREETINGS AND SALUTATIONS, MY FELLOW ‘49ERS!<br />
As my dear friend, founder, and past-Prez Jay Friedman takes a well-deserved respite from his sundry duties, I‟d like to thank<br />
him, on behalf of the Chapter, for his tireless work and dedication to our “cause”. Jay‟s journalistic expertise and contributions<br />
over the past 10 years have produced an outstanding newsletter, the ’49 Times. I sure have some big shoes to fill and hope that<br />
I can live up to the task! From its humble beginnings in 2001 with a mere 10 members, our Chapter has blossomed into an<br />
organization with over 240 members from across the US and abroad, all due to Jay‟s tireless efforts. Kudos also go out to<br />
Frank Lindauer and Art Gardner for their hard work and contributions over the years!<br />
When Jay divulged his intent to retire, and proposed I take over as Prez, I found it impossible to decline. I couldn‟t, in good<br />
conscience, face the prospect of all his hard work withering on the vine and the possibility of our Chapter fading into oblivion.<br />
When I accepted, Jay suggested an Inauguration. However, upon my insisting that Harley Earl be procured as guest speaker,<br />
he quickly abandoned the plan! I guess that I eat, breathe and sleep 1949 Cadillacs, and that 1949 was the year of my birth also<br />
helped clinch the deal.<br />
A bit about myself. I‟ve been addicted to old cars since I was a 17-year old high school Senior in 1967, and since then have<br />
owned and restored numerous makes and models, ranging from a Model T Speedster to a 1952 Crosley Roadster. In 1987,<br />
while searching for a 1949 Cadillac Club Coupe like my late Dad owned when I was a kid, I acquired a nice, solid, original ‟48<br />
Coupe instead, and became hooked on ‟48-‟49 Cadillacs forever. In the interim I‟ve restored a ‟48 and ‟49 convertible, two<br />
‟49 Club Coupes and, most recently, finished a ‟49 sedan. In the process, I‟ve become quite familiar with the beasts. Though I<br />
don‟t consider myself an expert, I currently serve as a ‟48-‟49 Technician, along with Jay, and always enjoy meeting, talking<br />
with, and fielding questions from other owners of these magnificent automobiles.<br />
With that said, I welcome, and urge all of you to submit tech tips, stories and photos of your Pride and Joy, and anything else<br />
relevant to ‟48 and ‟49 Cadillacs (and ‘50s, too. –Ed.) Don‟t let concerns over lack of literary ability, punctuation, spelling,<br />
etc. prevent you from submitting material. Art, Jay and I will be happy to “polish” your contributions prior to publication.<br />
You may submit items for consideration to me at: 102 Monroe Street, Douglas, Massachusetts 01516 USA or email me at:<br />
49caddyman@gmail.com. I may also be reached by phone at 508-476-3490. If you submit photos, please indicate if you wish<br />
them to be returned to you.<br />
I look forward to serving you as the new Prez, and meeting you in person at the CLC Grand National this August in Ohio. I<br />
plan to conduct a Chapter meeting late in the afternoon on the day of the show. If you would like to volunteer to give a brief<br />
presentation, “show and tell”, tech session, etc. at the meeting, please contact me. Details will be forthcoming in the June issue<br />
of the ’49 Times. “Keep „Em Rolling”.<br />
Joe
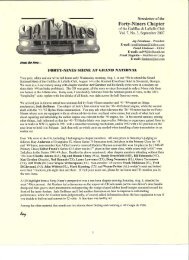
INSTALLING UNIVERSAL JOINTS ON YOUR ‘49<br />
By Art Gardner<br />
If you start getting a “clanking” noise under your car, particularly when you step on or release the gas pedal, your universal<br />
joints may be worn and in need of replacement. I recently installed a set of U-joints on my car‟s driveshaft. It took about 30<br />
minutes to drive out the old ones and install the new ones. All you need to replace them is a screwdriver, a hammer, a large<br />
socket to support the end of the driveshaft and receive the "cups" and a 17 mm impact socket (I think 11/16) to use with the<br />
hammer to drive out the cups.<br />
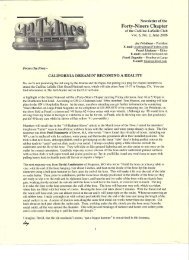
You remove the clips and drive one cup in (part at top left in the illustration below), which forces the opposite cup out. Then<br />
grab the cup that is jutting out with a pair of pliers and twist it until it is removed. Then tap the cross piece (part at lower left)<br />
back in to drive the other cup out the other way, then grab and remove the second cup with pair of pliers. Now just position the<br />
new cross in the yoke (part at lower right) and tap in the new cups, being careful to make sure that the needle bearings all stay<br />
in place. Once you have the cups tapped into position, lock them in place by installing the new C-clips (2.1440).<br />
EXPLODED VIEW OF A TYPICAL UNIVERSAL JOINT<br />
TECH TIP: IF YOUR REAR AXLE IS NOISY<br />
By Jay Friedman<br />
The first thing to do is check the gear oil level in the differential. Lack of oil can cause a noise in the differential gears. It<br />
should be within a ½ inch of the upper hole and should be 80/90 weight oil. If oil is low, check your pinion seal as well as the<br />
large, round gasket where the differential meets the axle housing and the outside of your rear brake backing plates for leaks. If<br />
your pinion seal is leaking, unless you have the necessary tools and equipment it is best replaced by a professional, as the<br />
bearing and pinion nut need to be specially dealt with. The shop manual has details. The large gasket, sold by Olson‟s<br />
Gaskets, can be replaced without special equipment by removing the differential, though be careful as it is very heavy.<br />
If there is a leak on the rear brake backing plates, (4.0010 in the diagram below.) ascertain whether it's brake fluid or gear oil.<br />
If gear oil, there are oil seals on the outer ends of the axles (2.0093 in the diagram.), which when faulty will permit leaks of<br />
gear oil into the wheel area which will then drain out a hole where the axle meets the outside of the backing plate. To replace<br />
the seal, you must remove the axle, pull out the seal with a seal removing tool (or pry it out with the end of the axle) and drive<br />
the new seal all the way in with a large socket wrench or similar tool. (I can lend members my home-made tool if need be.)<br />
When you re-install the axle, spread some chassis grease on the rubber part of the seal so the axle doesn‟t scrape and damage it.<br />
Such a leak can also be caused by a faulty gasket between the backing plate and the axle housing (4.0018). To replace this<br />
gasket, remove the axle, unscrew the hydraulic brake line from the wheel cylinder and remove the backing plate.<br />
Check the axle bearings by driving the car when the noise is present. One way to tell if an axle bearing is causing the noise is<br />
to turn the car sharply in one direction and then the other. If the noise varies in intensity while doing this, it could signify a bad<br />
bearing. To replace an axle bearing (22.0240), you must remove the axle. It is not essential to remove and replace the seal at<br />
the same time, but it would be prudent to do so. The bearing must be pressed on the axle by a machine shop, being careful not<br />
to score the surface on the end of the axle that the seal rides on. (Now that cars are mostly front wheel drive, there are fewer<br />
auto machine shops that press on rear axle bearings.) These bearings and seals are sold by Olcar Bearings, Southern Pines NC<br />
for a reasonable cost, though you may find them at a modern auto parts supplier as they are standard for many cars. .
If you eliminate an axle bearing as the cause of the noise, the remaining possibility, of course, is that the noise is in the<br />
differential assembly. Assuming you've fixed any leak, if the noise is just a hum the differential can go for years without<br />
failing or causing any further problems, other than being annoying. (My own has been making such a noise for 20 years.) If<br />
you feel you must fix a noisy '49 Cadillac differential, besides replacing the pinion bearing the shop manual recommends you<br />
not try to work on it and, in any case, does not tell you how to do so. Apparently, the problem is that some of the internal parts<br />
are held together by special pins that can only be removed by destroying them and some other parts nearby. The only possible<br />
fix is to replace it. Prez Joe Cutler has several '49 parts cars and can probably sell you a good (quiet) used one.<br />
JUST ANOTHER DAY IN PARADISE<br />
By Joe Cutler<br />
The day dawned bright and clear, the sweet smell of old (and new) money wafting in the gentle breeze, and a forecast of<br />
plentiful sunshine and temps in the „80s. As I left the hotel lobby I was greeted by a row of stately Rolls Royce and Bentley<br />
automobiles parked just outside the entrance. As you may have surmised by now, I wasn‟t in New England, nor was I<br />
attending a local show. This event was the prestigious 5 th annual Boca Raton Concours d‟Elegance held on the beautiful<br />
grounds of the Boca Raton Club and Resort in the Florida city of that name on February 27 th . As luck would have it, the date<br />
coincided perfectly with my annual February vacation and week-long stay with my sister, Cheryl, who resides in St. Cloud,<br />
Florida. I invited her and her fiancé to go with me, and we proceeded to book a night at the magnificent Waldorf Astoria, built<br />
in 1926, and adjacent to the plush golf course where the show is held.<br />
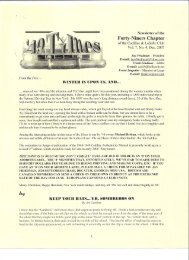
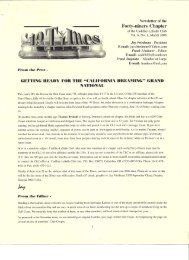
This year‟s show had special significance for me, as I learned that a 1949 Cadillac convertible, named The Contessa, which I<br />
finished a ground-up restoration on in 2008, had been invited by the Concours Selection Committee to participate. (See photo<br />
next page.) This car is owned by „49ers Randy and Susan Denchfield from Chevy Chase, Maryland. Though the car didn‟t<br />
win and award, it was an honor simply to be invited to a show of this caliber, and The Contessa certainly garnered her fair<br />
share of admirers and compliments!<br />
Also in attendance was Jay Leno, comedian and host of the Tonight Show. Jay happens to be an aficionado of old cars and<br />
motorcycles, and possesses an impressive collection of Duesenbergs and Stanley Steamers, amongst other things. He was<br />
spotted throughout the day traversing the grounds in his own golf cart complete with chauffeur, followed by his entourage,<br />
viewing the 200+ vehicles on display. At the awards ceremony that afternoon, Jay presented his own award, “The Big Dog<br />
Garage Award” to the vehicle he most liked personally. Fittingly, the award went to a stunning 1957 Eldorado Brougham, the<br />
nut-and-bolt restoration of which was completely done by the owner.<br />
There was something for everyone at this show, including a separate display of over 40 vintage motorcycles. The European<br />
makes were well represented by several Rolls Royce, Bentleys, MGs, Triumphs, Maseratis, Aston Martins an extremely rare<br />
and unusual 1930 Minerva with custom coachwork, made in Belgium and one of only seven known to exist. In addition, there<br />
were classes for Muscle Cars, Model Ts and As, classics such as Auburn, Cord Duesenberg, Packard and, of course, Cadillac.<br />
We all had an absolutely wonderful time, and I highly recommend this event to anyone who can attend it. As we reluctantly<br />
left the premises and boarded our Honda Pilot for the 3-hour drive back to St. Cloud, we were abruptly and harshly jolted back<br />
to reality, but appreciative of our opportunity to hob-nob with the “rich and famous”.
RANDY DENCHFIELD & HIS „49 CONVERTIBLE, "THE CONTESSA"<br />
AT THE RECENT BOCA RATON CONCOURS D'ELEGANCE.<br />
PREZ JOE CUTLER DID ITS 1999-2008 GROUND-UP RESTORATION<br />
TECH TIP: IF YOUR DOME LIGHT DOESN’T WORK…<br />
By Jay Friedman<br />
.., don‟t lose your cool, but do open your ‟49 shop manual to page 201, which shows the “Circuit Diagram” of the electrical<br />
system. The dome light is powered by a "hot" (always has current in it) wire, labeled 14RXT, going to it from Terminal 5 of<br />
the headlight switch. The wire passes through a large multi-pronged male/female connection under the dash that connects to<br />
most wires going to the back of the car. In a '49, this large plug is held to the inner firewall (under the dash) by a clip at the<br />
upper left of the inner firewall (directly in back of the hand brake mechanism). From the connecting plug, the dome light wire<br />
runs up the driver's door post and under the headliner to the light, which is not grounded, and then to the dome light switch.<br />
When you turn on the dome light switch it grounds itself, completing the circuit and the dome light goes on.<br />
The dome light circuit can be checked by removing the 2 screws holding on the dome light switch and its chrome bezel. Then,<br />
pull the switch with its male connection off the wire behind it which has a female connection plug. Then, attach a test light's<br />
alligator connection to any metal ground point and poke the needle end of the test light into the female connection on the wire.<br />
The test light should illuminate; if not, that means current isn't getting to that point and the dome light won't work. This could<br />
be due to a problem with the large connecting plug under the dash, or the wire is broken somewhere along its length or it has<br />
become disconnected from the headlight switch.<br />
Note that the front door opening switches do NOT operated the dome light switch on any 2 or 4-door ‟49 Cadillac. An<br />
exception is that the front door switches will operate the “corner lamps” at the corner of the rear of the roof and the body on a<br />
Coupe De Ville. On the other hand, the rear doors on a 4-door sedan will operate the dome light switch<br />
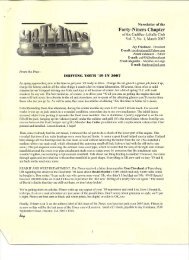
SERIES 61 AND 62 COUPE AND SEDAN DOME LIGHT<br />
(SERIES 75, SERIES 60, AND CONVERTIBLE DOME LIGHTS ARE DIFFERENTLY SHAPED)
TECH TIP: IF YOU HAVE 6 VOLT STARTING PROBLEMS<br />
By Jay Friedman<br />
When I first got my ‟49, after running for a while on hot days, if I turned off the engine for 15-30 minutes it would frequently<br />
refuse to re-start. The starter would turn ever so slowly and the only way I could get the car going again would be to jump start<br />
it or let it to cool off. This is a common problem with 6 volt cars and, of course, always happens when admiring onlookers are<br />
standing around. I took the advice of the proprietor of an auto electric and improved my 6 volt system. This involved:<br />
1. Installing a 6 volt battery with at least 600 cold cranking amps, which are readily available. 6 volt lead-acid batteries are<br />
sold by several manufacturers for less than $100, though authentic looking Delco batteries are more expensive. Mine is an<br />
"Optima", which are now available at www.amazon.com for about $125. Optimas use a different technology than lead-acid<br />
batteries and have more than 800 cold cranking amps. An Optima‟s downside is that it is much smaller in size than an ordinary<br />
6 volt battery, so I had to fabricate a rectangular piece of plywood to go over its top and hold it down in the car's battery box;<br />
2. Having my starter re-built by an auto electric shop with heavy duty field coils and, to assure a good ground, removing all<br />
paint from the areas where the starter, its bolts and the flywheel housing meet;<br />
3. Installing a custom-made extra-thick positive battery cable made up from 600 volt welding cable. Similar thick cables can<br />
be bought ready-made from McVey‟s, The Brillman Company and Cole's Ignition and Electric, Rochester NY;<br />
4. Installing a brand new negative battery cable, after scraping clean the negative battery post, as well as the place on the frame<br />
and the starter bolt it is attached to. These can be bought from McVey's and, I think, from Cole's;<br />
5. Making sure that the small ground straps from the back of the cylinder heads to bolts on the nearby firewall are in good<br />
shape. If not, new ones can be bought from McVey's in Kansas and, I think, from Cole's. As with the starter, scrape any paint<br />
off the cylinder head and firewall where these small straps mount.<br />
After doing the above, when I press its button the starter jumps to attention and says "yes sir", while onlookers, if any, applaud.<br />
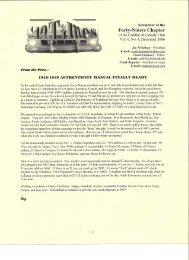
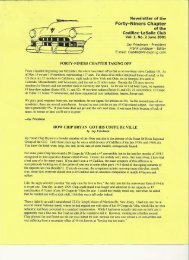
TWO 6 VOLT 6107s AT A RECENT OUTING: BACKGROUND - JAY FRIEDMAN‟S “GREEN QUEEN”<br />
FOREGROUND - ART GARDNER‟S NEWLY PURCHASED “JUNIOR”
1949 CADILLAC DEALER-INSTALLED ACCESSORIES<br />
By Jay Friedman<br />
If you bought your new ‟49 without many options and decided later that you just had to have one or more of these goodies, all<br />
was not lost. On December 2, 1948, in the “Parts and Accessories Bulletin” below, the Cadillac factory informed distributors<br />
and dealers that many of these were available for sale. The “net” price in the bulletin is what the dealer paid for the item, while<br />
the car owner paid the “list” price.<br />
CADILLAC MOTOR CAR DIVISION<br />
GENERAL MOTORS CORPORATION<br />
DETROIT 32, MICHIGAN<br />
PARTS AND ACCESSORIES BULLETIN, No. 494, December 2, 1948<br />
TO ALL DISTRIBUTORS AND DEALERS:<br />
Subject: 1949 Accessories Prices<br />
Accessory Name Part # Net List Installation<br />
Radio, Front Compartment 49-60S,61 ,62,75 7258155 62.80 81.00 4.50<br />
Antenna; Fender Mtg. 49-60s,61,62 1455342 8.65 12.00 1.60<br />
Antenna, Fender Mtg. 49-75 1455343 8.65 12.00 1.60<br />
Radio, Rear Compartment 49-75 7241938 93.50 115.00<br />
Installation Kit, Rear Radio (Without E1ec. Div. Lift) 1453217 16.50 20.00<br />
Installation Kit, Rear Radio (With E1ec. Div. Lift) 1453218 16.50 20.00<br />
Radio & Kit, Rear Compt. 49-75 --- 110.00 135.00 12.00<br />
Antenna, Trunk Mtg. 49-75 1444172 10.00 13.50 3.50<br />
Auxiliary Radio Speaker 7258495 12.35 18.85 6.00<br />
Automatic Heating System 49-605.61,62 3122353 79.00 98.50 8.50<br />
Automatic Heating System 49-75 3122354 110.00 132.00 8.50<br />
Standard Heating System 49-60s,61.62 3122931 40.00 50.00 5.00<br />
Fog Lamps (Pair) 49-605,61,62 929089 32.00 40.00 0<br />
Fog Lamps (Pair) 49-75 929122 32.00 40.00 0<br />
Back-Up Lights (Dual) 49-60S, 61, 62 929151 11.50 15.00 3.50<br />
Back-Up Lights (Single) 49-75 929150 7.20 9.50 2.50<br />
Spotlight with Mirror (Left) 49-60S, 61, 62 929117 18.25 25.95 3.25<br />
Spotlight with Mirror (Right) 49-60S, 61, 62 929106 18.25 25.95 3.25<br />
Glareproof Mirror 145416 5.20 6.50 0<br />
Outside Rear View Mirror 1454905-6 3.85 6.00 0.50<br />
Special Steering Wheel 3630079 18.00 22.50 0<br />
Sun Visor 1455598-99 7.50 12.50 2.50<br />
Chrome Wheel Disc (Sombrero Hub Cap) 3508244-821 6.80 8.00 0<br />
Chrome Trim Ring (With Small Hub Cap) 1097728 1.52 1.90 0<br />
Windshield Washer 1455132 5.75 8.25 2.75<br />
There seems to be a 35% mark-up between the two prices. Of even more interest is the relative difference between what these<br />
items cost when our cars were new and what you might pay for them today, either NOS or second-hand. For example, a front<br />
compartment radio listed for $81 in December 1948, while its vacuum antenna cost only $12. A working ‟49 Cadillac radio<br />
usually can be bought today for between $50 and $200 depending on your luck or bargaining skills, but a vacuum antenna with<br />
a good mast and which works well is at least that much, if not hundreds of dollars more. Also, while a non-working radio can<br />
probably be repaired for no more than a couple of hundred bucks, to have your antenna restored is equally expensive.<br />
Similarly, a windshield washer set up is $8.25 on the list. While a windshield washer pump is inexpensive today, an authentic
square bottle is hard to find and can cost hundreds of dollars.<br />
Another item of interest is the Automatic Heating System, which lists for $132 on a Series 75 limo and $98.50 on lesser cars.<br />
Installation of either was only $8.50 back then, but it is very telling that this is the second most expensive installation job on<br />
the list; the first being the $12 cost of installing the rear radio on a Series 75. Though I‟ve never worked on a Series 75 rear<br />
radio, as anyone who has worked on the complicated Automatic Heating System can tell you, 8½ bucks to install it is probably<br />
the biggest bargain on the list.<br />
Another item that seems relatively expensive is the Auxiliary Radio Speaker which mounts on the rear package shelf. At<br />
$18.85 it cost more than a vacuum antenna back then, yet today these can be purchased relatively cheaply; for example, I<br />
bought one for $10 several years ago. However, the installation of a rear speaker is the third most expensive installation job on<br />
the list at $6. This is understandable, since it is time consuming to cut a hole for the speaker in the rear package shelf, then run<br />
a wire from its dash switch up inside the windshield post and then between the headliner and the roof of the car into the trunk<br />
area, somehow without harming the headliner.<br />
The same is true of back up lights, a pair of which for Series 60, 61 and 62 listed for $11.50, also more than an antenna. Yet<br />
today a pair of back up lights are not expensive to buy. At $3.50 their installation in 1948 cost less than installing a speaker,<br />
since their wire simply runs out in the open from the coil, then down the firewall to a fuse, then under the car to the<br />
transmission switch and back to the trunk.<br />
An item that seems about right in relative terms is sombrero hub caps. At 8 bucks each, a set of them would set you back $32,<br />
which was lots of money back then. A set of new sombreros today costs hundreds of dollars, making it about the same cost in<br />
terms of <strong>2011</strong> dollars.<br />
Conspicuous by their absence on this Dec. ‟48 list are fuel filters and oil filters. However, later in the model year they were<br />
both offered as a dealer option. As an option, , the list price of the fuel filter was $3.20, but from about VIN number<br />
49xx33500, which would be cars built in May 1949 and later, fuel filters became standard factory equipment. Oil filters, on<br />
the other hand, only became standard factory equipment in 1954, though research by „49er Fred Hammerle has shown that a<br />
few ‟49 Cads did have factory installed oil filters.<br />
‟49 4-DOOR (OR LATE CONVERTIBLE) TRUNK COMPARTMENT WITH SOME ORIGINAL TOOLS<br />
NOTE WEDGE SHAPED WOODEN “CHOCK” TO PREVENT THE CAR FROM ROLLING WHEN ON A JACK<br />
IF YOU HAVEN’T ALREADY DONE SO, PLEASE SEND YOUR <strong>2011</strong> $8 DUES TO:<br />
JAY FRIEDMAN, 1530 SEPTEMBER CHASE, DECATUR, GEORGIA 30033<br />
OR THIS WILL BE THE LAST ISSUE OF THE ’49 TIMES YOU’LL GET