iGrafx Designer 1 - PH-1 Phono preamp.dsf - Tube CAD Journal
iGrafx Designer 1 - PH-1 Phono preamp.dsf - Tube CAD Journal
iGrafx Designer 1 - PH-1 Phono preamp.dsf - Tube CAD Journal

Create successful ePaper yourself
Turn your PDF publications into a flip-book with our unique Google optimized e-Paper software.
Aikido Stereo <strong>Phono</strong> PCB<br />
USER GUIDE<br />
Introduction<br />
Overview<br />
Schematics<br />
Recommended Configurations<br />
<strong>Tube</strong> Lists<br />
Assembly Instructions<br />
06/28/2008<br />
GlassWare<br />
AUDIO DESIGN<br />
Copyright 2006-2008© All Rights Reserved
GlassWare Audio Design<br />
Warning!<br />
This PCB is for use with a high-voltage power supply; thus, a real shock hazard exists.<br />
Once the power supply is attached, be cautious at all times. In fact, always assume<br />
that capacitors will have retained their charge even after the power supply is<br />
disconnected or shut down.<br />
If you are not an experienced electrical practitioner, before applying the B-plus<br />
voltage have someone who is experienced review your work. There are too few tubeloving<br />
solder slingers left; we cannot afford to lose any more.<br />
<strong>PH</strong>-1 Aikido <strong>Phono</strong> Preamp Overview<br />
Thank you for your purchase of the TCJ Aikido phono <strong>preamp</strong> PCB. Despite<br />
predictions to the contrary, spinning black vinyl by the warm glow of vacuum tubes<br />
persists. In spite of the popularly-held belief that both LPs and tubes are dead, long<br />
dead—most believe that the vacuum tube died about 50 years ago and that the LP<br />
record died 25 years ago at the birth of the CD—both tubes and LPs grow more<br />
popular with each coming day. <strong>Tube</strong>s refuse to fade to black and solid-state audio<br />
gear is still embarrassingly being advertised as sounding tube-like; and Marantz once<br />
again sells turntables and new records are pressed daily. Adding the Aikido topology<br />
to a phono <strong>preamp</strong> makes perfect sense. The Aikido’s low distortion, noise, and<br />
output impedance, without the use of negative feedback—all are desirable attributes in<br />
a phono <strong>preamp</strong>.<br />
PCB Features<br />
Overview This FR-4 PCB is extra thick, 0.094 inches (inserting and pulling tubes<br />
from their sockets won’t bend or break this board), double-sided, with plated-through<br />
2oz copper traces, and the boards are made in the USA. The <strong>PH</strong>-1 PCB holds two<br />
Aikido phono-stage <strong>preamp</strong>lifiers, with each phono <strong>preamp</strong> holding two Aikido gain<br />
stages with a passive RIAA equalization circuit in between. Thus, one board is all that<br />
is needed for stereo unbalanced use or two boards for balanced <strong>preamp</strong>lification. The<br />
boards are six inches by eleven inches, with ten mounting holes that help to prevent<br />
excessive PCB bending, while inserting and pulling tubes from their sockets.<br />
Multiple Heater Arrangements The <strong>PH</strong>-1 PCB allows either 6.3V or 12.6V or 25.2V<br />
heater power supplies to be used and 6V tubes, such as the 6N1P, can be used with<br />
12V tubes, such as the 12AU7.<br />
Power-Supply-Decoupling Capacitors <strong>PH</strong>-1 PCB provides space for four sets of<br />
capacitors to decouple each Aikido gain stage from the B+ connection. This<br />
arrangement allows a large-valued electrolytic capacitor and small-valued film<br />
capacitor to be used in parallel, while a series voltage-dropping resistor completes the<br />
RC filter.<br />
Redundant Solder Pads This board holds two sets of differently-spaced solder pads<br />
for each critical resistor, so that radial and axial resistors can easily be used (bulk-foil<br />
resistors and carbon-film resistors, for example). In addition, most capacitor locations<br />
find many redundant solder pads, so wildly differing-sized coupling capacitors can be<br />
placed neatly on the board, without excessively bending their leads.
GlassWare Audio Design<br />
Introduction to the Aikido<br />
The Aikido amplifier delivers the sonic goods. It offers low distortion, low output<br />
impedance, a great PSRR figure, and feedback-free amplification. The secret to its<br />
superb performance—in spite not using global feedback—lies in its internal symmetry,<br />
which balances imperfections with imperfections. As a result, the Aikido circuit works<br />
at least a magnitude better than the equivalent SRPP or grounded-cathode amplifier.<br />
Aikido Amplifier<br />
C<br />
B+<br />
12AX7<br />
Rgs<br />
12AU7<br />
R1<br />
Rk<br />
Rk<br />
out<br />
in<br />
Rgs<br />
12AX7<br />
12AU7<br />
Rg<br />
Rk<br />
Rk<br />
R2<br />
Universal Topology In the schematic above, the triodes are so specified as an<br />
example only. Although they would never fit on the printed circuit board (PCBs), 211<br />
and 845 triodes could be used to make an Aikido amplifier. The circuit does not rely<br />
on these triodes or any other specific triodes to work correctly. It’s the topology, not<br />
the tubes that make the Aikido special. (Far too many believe that a different triode<br />
equals a different topology; it doesn't. Making this mistake would be like thinking<br />
that the essential aspect of being a seeing-eye dog rested in being a Golden Lab.)<br />
Low Distortion For example, the Aikido circuit produces far less distortion than<br />
comparable circuits by using the triode’s own nonlinearity against itself. The triode is<br />
not as linear as a resistor, so ideally, it should not see a linear load, but a<br />
corresponding, complementary, balancing non-linear load. An analogy is found in<br />
someone needing eyeglasses; if the eyes were perfect, then perfectly flat (perfectly<br />
linear) lenses would be needed, whereas imperfect eyes need counterbalancing lenses<br />
(non-linear lenses) to see clearly. Now, loading a triode with the same triode—under<br />
the same cathode-to-plate voltage and idle current and with the same cathode resistor—<br />
works well to flatten the transfer curve out of that triode.<br />
PSRR The Aikido circuit sidesteps power supply noise by incorporating the noise<br />
into its normal operation. The improved PSRR advantage is important, for it greatly<br />
unburdens the power-supply. With no tweaking or tube selecting, you should easily be<br />
able to get a -30dB PSRR figure (a conventional grounded-cathode amplifier with the<br />
same tubes and current draw yields only a -6dB PSRR); and with some tweaking of<br />
resistor R1’s value, -60dB—or more—is possible. Additionally, unless regulated power<br />
supplies are used for the plate and heater, these critical voltages will vary as the power<br />
line’s voltage falls and climbs your house’s and neighbors’ house’s use, usually<br />
throwing the supposedly fixed wall-voltage askew. Nevertheless, the Aikido amplifier<br />
will still function flawlessly, as it tracks these voltage changes symmetrically.
Age Tolerant Remember, tubes are not yardsticks, being more like car tires—they<br />
wear out. Just as a tire’s weight and diameter decrease over time, so too the tube’s<br />
conductance. In other words, a fresh 12AX7 is not the same as that same 12AX7 after<br />
2,000 hours of use. But as long as the two triodes within the 12AX7 age in the same<br />
way—which they are inclined to do—the Aikido amplifier will always bias up<br />
correctly, splitting the B+ voltage between the triodes.<br />
No Negative Feedback Loop The Aikido topology does not use any negative<br />
feedback, other than the local degenerative feedback because of the unbypassed<br />
cathode resistors in the input stage and the active load presented by the bottom<br />
triode of the output stage. In fact, the Aikido topology makes use of feedforward<br />
noise canceling at the output. Unlike negative feedback that has to wait until<br />
something goes wrong before it can work to undo the damage, feedforward feedback<br />
anticipates what will go wrong before it does. It is proactive, not reactive, to borrow<br />
the terms of pop-psychology.<br />
The Aikido circuit eliminates power-supply noise from its output, by injecting the<br />
same amount of PS noise at the inputs of the top and bottom tubes in the two-tube<br />
cathode follower circuit. Since both of these signals are equal in amplitude and<br />
phase, they cancel each other out, as each triodes sees an identical increase in plate<br />
current—imagine two equally strong men in a tug of war contest. So, shouldn’t<br />
resistors R1 and R2 share the same value, thereby also splitting the power-supply<br />
noise at 50%? No. If triode did not present a low plate resistance, then the 50% ratio<br />
would apply. Because of the low rp, the correct relationship between resistors R1 and<br />
R2 is given by the following formula: R1 = R2[(mu - 2)/(mu + 2)]<br />
Low Output Impedance The Aikido topology uses a modified cathode follower<br />
circuit as the output stage. Cathode follower are famous for providing low distortion<br />
and low output impedances, but no voltage gain. This modified cathode follower<br />
scrubs away the power-supply noise from its output and provides a complementarily<br />
non-linear load for the top triode’s cathode. The top triode’s capacitor resistor is in<br />
series with the output, so its resistance must be added to the cathode follower output<br />
impedance. Had the output connection been taken from the top triode’s cathode,<br />
then the output impedance would be slightly lower, but the symmetry would be<br />
broken and the PSRR enhancement would be lost.<br />
Gain Calculating the gain from an Aikido amplifier is easy, as it roughly equals half<br />
the mu of the input triode used. The gain from a simple grounded-cathode amplifier<br />
(with an un-bypassed cathode resistor) is<br />
Gain = muRa/[Ra + (mu + 1)Rk + rp]<br />
In the Aikido, the resistance presented by the top tube and its cathode resistor is<br />
R' = (mu + 1)Rk + rp. So if you substitute R' for Ra in the above equation and<br />
simplify you get<br />
Gain = mu[(mu + 1)Rk + rp ] / [(mu + 1)Rk + rp + (mu + 1)Rk + rp] = mu/2<br />
Of course there is a slight loss though the Aikido’s modified-cathode-follower output<br />
stage, whose gain usually falls between 0.93 to 0.98.
GlassWare Audio Design<br />
Heater Issues<br />
Heater Power Supply The board assumes that a well-regulated DC 12V power supply<br />
will be used for the heaters; both 6V and 12 tubes can be used with a 12V power<br />
supply. A 6V heater power supply, however, can be used with the PCB, as long as all<br />
the tubes used hold 6.3V heaters.<br />
Even 5V or 8V or 18V power supplies can be used, if all the tubes share the same 5V or<br />
8V or 18V heater voltage. Just use jumpers J1, J3, J4, J6, J7, J9, J10, and J12 only. Note:<br />
Perfectly good tubes with uncommon heater voltages can often be found at swap<br />
meets, eBay, and surplus stores for a few dollars each. Thinking outside the 6.3V box<br />
can save a lot of money. Do remember that heater bypass capacitor, C16, must be rated<br />
greater than the power supply voltage.<br />
A 25.2V (or 24v) heater power supply can be used, if only 12.6V tubes are used; for<br />
example, if the input tubes [V2 and V3] are 12AX7s and the output tubes are 12AU7s<br />
[V1 and V4]. Just use the jumper J2, J5, J8, and J11 only and C16’s voltage rating<br />
should be at least 35V.<br />
AC heater power supply Although a truly terrible idea, an AC heater power supply<br />
(6.3V or 12.6V) can be used, if the heater shunting capacitor C16 is left off the<br />
board, or is replaced by 0.01µF ceramic capacitor.<br />
Filament Jumper Wire Schedule<br />
V5<br />
V6<br />
V7<br />
V8<br />
4<br />
5<br />
4<br />
5<br />
4<br />
5<br />
4<br />
5<br />
+H<br />
J1<br />
J2 J3<br />
J4<br />
J5 J6<br />
J7<br />
J8 J9<br />
J10<br />
J11<br />
J12<br />
C16<br />
5 4<br />
5 4<br />
5 4<br />
5 4<br />
-H<br />
V1<br />
V2<br />
V3<br />
V4<br />
With a 12.6V PS<br />
<strong>Tube</strong>s V1 & V5 V2 & V6 V3 & V7 V4 & V8<br />
If tubes are 6.3V: J2 only J5 only J8 only J11 only<br />
If 12.6V: J1 & J3 J4 & J6 J7 & J9 J10 & J12<br />
With a 6.3V PS<br />
<strong>Tube</strong>s V1 & V5 V2 & V6 V3 & V7 V4 & V8<br />
All tubes = 6.3V: J1 & J3 J4 & J6 J7 & J9 J10 & J12<br />
If 12.6V: Cannot be used with 6.3V power supply<br />
Do not use capacitor C16 with an AC heater PS (NOT RECOMMENDED)
GlassWare Audio Design<br />
Since one triode stands atop another, the heater-to-cathode voltage experienced<br />
differs between triodes. The safest path is to reference the heater power supply to a<br />
voltage equal to one fourth the B+ voltage; for example, 75V, when using a 300V<br />
power supply. The ¼ B+ voltage ensures that both top and bottom triodes see the<br />
same magnitude of heater-to-cathode voltage. The easiest way to set this voltage<br />
relationship up is the following circuit:<br />
B+<br />
Alternatively, you might experiment with<br />
floating the heater power supply, by<br />
“grounding” the heater power supply via<br />
only a 0.1µF film or ceramic capacitor.<br />
The capacitor will charge up through the<br />
leakage current between heater and<br />
cathodes. Not only is this method cheap,<br />
it is often quite effective in reducing<br />
hum.<br />
DC<br />
Heater<br />
PS<br />
0.1µF<br />
250V<br />
300k<br />
2W<br />
B+<br />
4<br />
100k<br />
1/2W<br />
Power Supply<br />
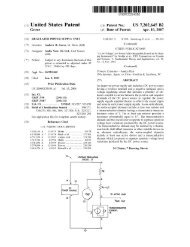
The power supply is external to the Aikido phono <strong>preamp</strong> PCB and can be mounted<br />
in, or outside, the chassis that houses the PCB. The optimal power supply voltage<br />
depends on the tubes used. For example, 6DJ8/6922 tubes can be used with a low<br />
200V power supply, while 12AX7s work better with a 250-300V B-plus voltage. The<br />
sky is not the limit here, as the heater-to-cathode voltage sets an upward limit of<br />
about 300V.<br />
The genius of the Aikido circuit is found in both its low distortion and great PSRR<br />
figure. Nonetheless, a good power supply helps (there is a practical limit to how large<br />
a power-supply noise signal can be nulled). I recommend you use at least a solid,<br />
choke-filtered, tube-rectified or fast-diode rectified power supply. If you insist on<br />
going the cheap route, try the circuit below, as it yields a lot of performance for little<br />
money. FRED rectifiers are expensive, but make an excellent upgrade to the lowly<br />
1N4007; and high-voltage, high-speed rectifiers are not that much more expensive.<br />
.01µF<br />
1KV<br />
.01µF<br />
1KV<br />
+310 to 330Vdc<br />
100mA<br />
high-DCR<br />
.01µF<br />
1KV<br />
.01µF<br />
1KV<br />
All Diodes = 1N4007<br />
All Resistors = 1 ohm 1/2W<br />
Transformer secondary = 230Vac to 240Vac
GlassWare Audio Design<br />
I have found that just about any choke, of any inductance or DCR, is better than not<br />
using a choke in a power supply, even if that power supply terminates in a voltage<br />
regulator. One inductor and one extra capacitor added to the simple power supply<br />
will make a big difference in performance. Because the current draw for the entire<br />
phono <strong>preamp</strong> is relatively slight, the inductor’s DCR is not the usual liability. In<br />
other words, a high-DCR is quite usable. Try to use a choke with a DCR of 1k -2k<br />
ohms. An RC filter also works well. In fact the <strong>PH</strong>-1 PCB holds two RC filters per<br />
channel, so that using the following power supply would effectively make the a total<br />
of three RC filters. Resistor R’s value should equal the desired voltage drop divided by<br />
the total current drawn by the phono stage. For example, 30V / 0.03A = 1,000 ohms.<br />
Be sure to grossly over specify this resistor, as it can get quite hot at startup, while the<br />
large power supply capacitors charge up.<br />
.01µF<br />
1KV<br />
.01µF<br />
1KV<br />
R<br />
+300Vdc<br />
.01µF<br />
1KV<br />
.01µF<br />
1KV<br />
All Diodes = HV High-speed<br />
All Resistors = 1 ohm 1/2W<br />
Transformer secondary = 230Vac to 240Vac<br />
Rectifiers I recommend using tube rectifiers or ultra-fast rectifiers, such as the<br />
popular HEXFREDs. (Developed by International Rectifier, in the 1970s, “FRED”<br />
stands for Fast Recovery Epitaxial Diode, thus the trade name “HEXFRED.” Today,<br />
manufacturers include Harris, International Rectifier, IXYS and others.<br />
Heater Regulator A low-voltage, linear-regulated power supply is easy to build, as<br />
shown below. Care must be taken not to exceed the regulator’s maximum<br />
output current and ensure adequate heat-sinking.<br />
Heater/B+<br />
12.6V<br />
1000µF<br />
16V<br />
1N4002<br />
1N4002<br />
Out<br />
124<br />
REG<br />
Adj<br />
In<br />
4kµF<br />
25V<br />
C1<br />
D1<br />
AC<br />
D2<br />
C2<br />
C3<br />
D3<br />
D4<br />
C4<br />
1.13K<br />
470µF<br />
16V<br />
Regulator = LM317 or LM350 or LT1085<br />
C1, C2, C3, C4 = 0.001 to 0.1µF, 100V<br />
D1, D2, D3, D4 = 1N5404 or FRED or MUR 410G
GlassWare Audio Design<br />
<strong>Tube</strong> Selection<br />
By using different tubes, different bias points, different B+ voltages, a nearly infinite<br />
number of different Aikido amplifiers can be built. But with a phono <strong>preamp</strong>, our<br />
choices are limited, as high-gain, and low-noise are our key requirements, not highcurrent<br />
or low output impedance. The input tubes (V1, V5, V3, V7) provide all the<br />
gain in this <strong>preamp</strong>. Thus, we can ignore the 6H30 and concentrate on the 6AQ8,<br />
6DJ8, 6N1P, 12AT7, 12AV7 12AX7, 12BZ7, 5751, 6072…. For example, a 12AX7<br />
input tube will yield a gain close to 50 (mu/2) per Aikido stage, which perfect for a<br />
phono <strong>preamp</strong>; the 6DJ8/6922, 16 (mu of 33), which is a little weak, but if a step-up<br />
transformer is used, the 6DJ8’s lower noise contribution would certainly override the<br />
concern about its low gain.<br />
The output tubes (V2, V6, V4, V8) isolate the input tubes and deliver a low output<br />
impedance, yet they are not required to deliver high current into high-capacitance<br />
cables or headphones. Thus, a larger list of possible tubes is available: 6AQ8, 6BC8,<br />
6BK7, 6BQ7, 6BS8, 6DJ8, 6FQ7, 6GC7, 6H30, 6KN8, 6N1P, 12AT7, 12AU7, 12AV7,<br />
12AY7, 12AX7, 12BH7, 12BZ7, 12DJ8, 12FQ7, 5751, 5963, 5965, 6072, 6922,<br />
E188CC, ECC88, ECC99… The only stipulations are that the two triodes within the<br />
envelope be similar and that the tube conforms to the 9A or 9AJ base pin-out. A tube<br />
lineup of 12AX7 12AT7 passive equalization 12AX7 12AT7 or 12AX7 12AU7 passive<br />
equalization 12AX7 12AU7 works well and yields a final gain of over +45dB.<br />
Cartridge Capacitance Loading<br />
Capacitor C1 is an optional cartridge shunting capacitor. Usually, it is best left off<br />
the board, as the phono interconnect is already capacitance laden. If more is needed,<br />
however, use the two pads nearest the “C1” marking. If an RC Zorbel network is<br />
needed to tame a step-up transformer, use the two pads nearest the “C2” making and<br />
use resistor R26.<br />
Internal Shields<br />
If the triode’s pin number 9 attaches to an internal shield, as it does with the 6DJ8<br />
and 6N1P, then capacitors, C2, C5, C10, C13 can be replaced with a jumper wire,<br />
which will directly ground the shield. However, using the capacitors will also ground<br />
the shield (in AC terms.<br />
Cathode Resistor Values<br />
The cathode resistor and plate voltage set the idle current for the triode: the larger<br />
the value of the resistor, less current; the higher the plate voltage, more current. In<br />
general, high-mu triodes require high-value cathode resistors (1-2K) and low-mu<br />
triodes require low-valued cathode resistors (100-1k). the formula is an easy one:<br />
Iq = B+/2(rp + [mu + 1]Rk)<br />
So, for example, a 12AX7 in an Aikido circuit with a B+ voltage of +300V and 1k<br />
cathode resistors will draw 300/2(60k + [100 + 1]1k) amperes of current, or<br />
0.93mA. because the cathode resistors are unbypassed, they will add noise to the<br />
signal, so lower values are preferable. I recommend between 680 to 1k for the<br />
12AX7, 5751, 6072 input tubes and between 100 to 330 for the 6DJ8 and 6N1P.<br />
Output tubes, such as the 6CG7, 12AT7, 12AU7, 12BH7 work well with 470-ohm<br />
cathode resistors.
GlassWare Audio Design<br />
RIAA Equalization<br />
Regardless of the underling technology used, tube or solid-state, a phono <strong>preamp</strong> must<br />
undo the RIAA (Recording Institute Association of America) equalization curve or the<br />
CCIR (Comité Consultatif International des Radiocommunications) or IEC<br />
(International Electrotechnical Commission) the European versions of the RIAA)<br />
curve used in making the record. Why was this curve imposed on the records? Using it<br />
improved the signal-to-noise ratio of the record by boosting the highs going to the<br />
cutting head, while greatly extending the play-back time by cutting the lows. The end<br />
result was a fairly even grove cut, regardless of the frequency. The inverse of the RIAA<br />
curve returns the signal to flat by cutting the highs and boosting the bass. (Bare in<br />
mind that most records made before 1950 may not have followed the RIAA curve, but<br />
some other proprietary-to-the-record-label curve.)<br />
This <strong>preamp</strong> uses passive equalization, rather than active, feedback-based equalization.<br />
The passive equalization network sits in between two Aikido gain stages. Two<br />
variations on the same equalization network are shown below. The advantage the<br />
lower-resistance version enjoys over the higher-resistance version on the right is that the<br />
lower resistor values will add less noise to the signal. The advantage the higherresistance<br />
version holds over the version on the left is that the high resistor values will<br />
diminish the role the first Aikido gain stage’s output impedance; in addition, the<br />
equalization capacitors will be smaller (and cheaper).<br />
in R1<br />
out in R1<br />
out<br />
75k<br />
21.87k<br />
R2<br />
3.18k<br />
R2<br />
10.91k<br />
C2<br />
C2<br />
C1<br />
.1µF<br />
.0343µF<br />
C1<br />
.02916µF<br />
.01µF<br />
The Aikido gain stage uses a modified cathode follower as the output stage, so the<br />
output impedance is fairly low. Nonetheless, this extra resistance must be factored into<br />
the equations, as must the 1M grid resistor to ground at the input of second Aikido<br />
gain stage. The network values shown above are idealized; below are real-world values<br />
that include output impedance and a 1M grid resistor. (Resistor R1 is obviously the<br />
varied component, but C2 must include the Miller-effect capacitance from the second<br />
Aikido gain stage.)<br />
in R1<br />
out in R1<br />
out<br />
21k or 21.8k<br />
R2<br />
3.16k<br />
79.6 or 80.5k<br />
R2<br />
10.9k<br />
C2<br />
C2<br />
C1<br />
.1µF<br />
.0343µF<br />
C1<br />
.0292µF<br />
.01µF
GlassWare Audio Design<br />
The following two tables lists some of the possible RIAA equalization network values<br />
based on C1 and C2 as the moving variables. On the <strong>PH</strong>-1 PCB, capacitor C1 is<br />
marked C8 and capacitor C2 is made up from two capacitor in parallel, C7 and C17.<br />
with C1 as the moving variable<br />
with C2 as the moving variable<br />
C in µF Absolute Values 1% Values C in µF<br />
Absolute Values 1% Values<br />
C1 C2 R1 R2 R1 R2 C1 C2 R1 R2 R1 R2<br />
0.09 0.0309 24300 3533 24.3k 3.57k 0.08019 0.0275 28040 3966 28k 3.92k<br />
0.091 0.0312 24033 3495 24k 3.48k 0.081648 0.0280 27520 3895 27.4k 3.9k<br />
0.092 0.0316 23772 3457 23.7k 3.48k 0.083106 0.0285 27030 3826 27k 3.83k<br />
0.093 0.0319 23516 3419 23.7k 3.4k 0.084564 0.0290 26550 3760 26.7k 3.74k<br />
0.094 0.0322 23266 3383 23.2k 3.4k 0.086022 0.0295 26090 3697 26.1k 3.65k<br />
0.095 0.0326 23021 3347 23.2k 3.32k 0.08748 0.0300 25640 3635 25.5k 3.65k<br />
0.096 0.0329 22781 3313 22.6k 3.32k 0.088938 0.0305 25210 3576 25.5k 3.6k<br />
0.097 0.0333 22546 3278 22.6k 3.3k 0.090396 0.0310 24790 3518 24.9k 3.57k<br />
0.098 0.0336 22316 3245 22.1k 3.24k 0.091854 0.0315 24390 3462 24.3k 3.48k<br />
0.099 0.0340 22091 3212 22.1k 3.24k 0.093312 0.0320 24000 3408 24k 3.4k<br />
0.1 0.0343 21870 3180 22k 3.16k 0.09477 0.0325 23620 3355 23.7k 3.32k<br />
0.101 0.0346 21653 3149 21.5k 3.16k 0.096228 0.0330 23260 3305 23.2k 3.3k<br />
0.102 0.0350 21441 3118 21.5k 3.16k 0.097686 0.0335 22900 3255 23.2k 3.24k<br />
0.103 0.0353 21233 3087 21k 3.09k 0.099144 0.0340 22560 3207 22.6k 3.24k<br />
0.104 0.0357 21029 3058 21k 3.09k 0.100602 0.0345 22220 3161 22.1k 3.16k<br />
0.105 0.0360 20829 3029 21k 3k 0.10206 0.0350 21900 3116 22k 3.16k<br />
0.106 0.0364 20632 3000 20.5k 3k 0.103518 0.0355 21580 3072 21.5k 3.09k<br />
These two tables include the effect of the 1M grid resistor, R16. the absolute resistor<br />
values are just that absolute and they assume a an output impedance of zero from the<br />
output of V2 and V6. In reality, the output impedance ranges from a low of 200<br />
ohms with a 6DJ8/6922 based cathode follower stage to a high of 2.8k with a 12AX7-<br />
based cathode follower. The output impedance is roughly equal to the triode’s rp<br />
divided by its mu plus the cathode resistor’s value. For example, a 6N1P with a 200-<br />
ohm cathode resistor, will result in an output impedance equal to about 430 ohms,<br />
which must be subtracted from the equalization networks R1’s value (resistor R12 on<br />
the PCB). The table below lists many common triodes.<br />
<strong>Tube</strong> mu rp Rk Ik(mA) B+ R10 R11 Gain dB Zo<br />
6AQ8 57 9700 100 10.0 300 93220 100k 0.97 -0.24 248<br />
6BK7 43 4600 200 10.0 300 91111 100k 0.97 -0.27 279<br />
6BQ7 38.00 5900 191 10.0 300 90000 100k 0.96 -0.32 311<br />
6BS8 36.00 5000 220 10.0 300 89474 100k 0.96 -0.33 321<br />
6CG7 20.50 10200 583 3.0 150 82222 100k 0.93 -0.59 827<br />
6CG7 21.10 8960 397 5.0 200 82684 100k 0.93 -0.59 657<br />
6CG7 21.00 9250 626 5.0 250 82609 100k 0.94 -0.56 820<br />
6CG7 20.80 9840 1000 4.5 300 82456 100k 0.94 -0.53 1063<br />
6CG7 21.40 8370 470 7.3 300 82906 100k 0.94 -0.56 686<br />
6CG7 21.90 7530 243 10.0 300 83264 100k 0.93 -0.60 489<br />
6CG7 21.80 7680 352 10.0 350 83193 100k 0.94 -0.57 576<br />
6DJ8 30.20 3670 182 5.0 100 87578 100k 0.96 -0.39 273<br />
6DJ8 30.70 2870 124 10.0 150 87768 100k 0.96 -0.39 199<br />
6DJ8 30.00 2960 205 10.0 200 87500 100k 0.96 -0.37 274<br />
6DJ8 29.60 3060 291 10.0 250 87342 100k 0.96 -0.36 350<br />
6DJ8 28.60 3980 673 5.0 250 86928 100k 0.96 -0.35 667<br />
6DJ8 28.30 4080 845 5.0 300 86799 100k 0.96 -0.34 787<br />
6DJ8 28.90 3400 481 8.0 300 87055 100k 0.96 -0.35 511<br />
6FQ7<br />
6N1P<br />
See 6CG7<br />
39.8 12200 328 3.0 200 89189 100k 0.96 -0.32 539<br />
6N1P 36.00 9480 221 5.0 250 93548 100k 0.96 -0.36 422<br />
6N1P 35.00 956 642 5.0 300 89189 100k 0.97 -0.25 569<br />
12AT7 60.00 15000 270 3.7 200 93548 100k 0.98 -0.21 457<br />
12AT7 60.00 15000 470 3.5 300 93548 100k 0.98 -0.19 610<br />
12AU7 17.00 9560 427 2.5 100 78947 100k 0.92 -0.75 757<br />
12AU7 16.60 9570 741 3.0 150 78495 100k 0.92 -0.71 959<br />
12AU7 16.70 9130 768 4.0 200 78610 100k 0.92 -0.69 959<br />
12AU7 17.90 7440 336 8.0 250 79899 100k 0.92 -0.71 601<br />
12AU7 18.10 7120 328 10.0 300 80100 100k 0.92 -0.70 581<br />
12AV7 37.00 6100 120 9.0 200 89744 100k 0.96 -0.36 258<br />
12AV7 41.00 4800 56 18.0 300 90698 0.96 -0.35 160<br />
12AZ7<br />
12AX7<br />
See 12AT7<br />
100.00 80000 2000 0.5 200 96078 100k 0.99 -0.11 1719<br />
12AX7 100.00 62500 1100 1.0 300 96078 100k 0.99 -0.12 1238<br />
12BH7 16.10 5480 340 4.0 100 77901 100k 0.92 -0.76 549<br />
12BH7 15.70 6090 706 4.0 150 77401 100k 0.92 -0.71 826<br />
12BH7 15.90 6140 787 5.0 200 77654 100k 0.92 -0.68 877<br />
12BH7 17.40 4870 383 10.0 250 79381 100k 0.93 -0.67 541<br />
12BH7 18.40 4300 267 15.0 300 80392 100k 0.93 -0.65 422<br />
12BZ7 100.00 31800 300 96078 100k 0.98 -0.17 292<br />
5751 70.00 58000 1250 0.8 200 94444 100k 0.98 -0.17 1407<br />
5963 21.00 6600 200 10.0 250 82609 100k 0.93 -0.63 433<br />
5965 47.00 7250 220 8.2 300 91837 100k 0.97 -0.26 337<br />
6072 44.00 25000 1250 2.0 300 91304 100k 0.97 -0.25 1272
GlassWare Audio Design<br />
L-in<br />
C1<br />
R26<br />
Turntable<br />
Ground<br />
R-in<br />
C1<br />
R26<br />
R5<br />
R18<br />
6<br />
1<br />
6<br />
1 C12<br />
C6 C4 C3<br />
C14<br />
7<br />
R6 2<br />
R19<br />
7<br />
2<br />
C11<br />
R10<br />
R22<br />
8<br />
3<br />
8<br />
3<br />
R4<br />
R7<br />
R17<br />
R20<br />
R12<br />
C15<br />
L-out<br />
1<br />
6<br />
6<br />
R3<br />
R8 C8 C9<br />
1<br />
2<br />
R15 2<br />
R23<br />
7<br />
7<br />
9<br />
V5 V6 V7 V8<br />
3<br />
R1 C2 R2 R9 C5 R11<br />
8<br />
9<br />
C10<br />
R13 C7 C17 R16 R14<br />
9<br />
3<br />
8<br />
9<br />
C13<br />
R24 R21 R25<br />
R5<br />
R18<br />
1<br />
6<br />
1<br />
6 C12<br />
C6 C4 C3<br />
C14<br />
R6<br />
R19<br />
C11<br />
2<br />
7<br />
2<br />
7<br />
3<br />
8 R10<br />
3<br />
R22<br />
8<br />
R4<br />
R7<br />
R17<br />
R20<br />
R12<br />
C15<br />
R-out<br />
6<br />
1<br />
6<br />
1<br />
R3<br />
R8 C8 C9<br />
7<br />
2<br />
R15 7<br />
R23<br />
2<br />
9 V1 8<br />
3<br />
V2 9<br />
9<br />
V3 8<br />
3<br />
V4<br />
9<br />
C10<br />
C13<br />
R1 C2 R2 R9 C5 R11 R13 C7 C17 R16 R14<br />
R24 R21 R25<br />
B+
Typical Part Values<br />
GlassWare Audio Design<br />
() Parentheses denote recommended values<br />
12AX7-12AT7-12AX7-12AT7<br />
6N1P-6N1P-12AX7-12AU7<br />
B+ Voltage =<br />
Heater Voltage =<br />
250V - 400V (335V)<br />
200V - 400V (335V)<br />
12.6V 12.6V<br />
R1 =<br />
R2, 4 =<br />
R3 =<br />
R5 =<br />
R6, 8, 15, 19, 23 =<br />
R7, 9 =<br />
R10 =<br />
R11 =<br />
R12 =<br />
R13 =<br />
R14, 17 =<br />
R16, 25 =<br />
R18 =<br />
R20, 24 =<br />
R21 =<br />
R22 =<br />
C1 =<br />
C2, 5, 10, 13 =<br />
C3, 11 =<br />
C4, 6, 12, 14 =<br />
C7 =<br />
C8 =<br />
C9 =<br />
C15 =<br />
C17 =<br />
47k* 47k*<br />
470 - 2k (1k 1mA) 100 - 470 (200 6mA)<br />
100 - 1k (178)* 100 - 300 (178)*<br />
2K 1W<br />
2K 1W<br />
100 - 1k (300) 100 - 1k (300)<br />
300 - 1k (470 3.5mA) 300 - 1k (200 6mA)<br />
93.1k 83.2k<br />
100k<br />
100k<br />
21k/MF or 20k/CF<br />
21k/MF or 20k/CF<br />
3.16k/MF or 3.2k/CF<br />
3.16k/MF or 3.2k/CF<br />
470 - 2k (1k 1mA) 470 - 2k (1k 1mA)<br />
1M<br />
1M<br />
3.9k 3W 2k 3W<br />
470 - 2k (1k 1mA) 470 -1k (1k 5mA)<br />
100k<br />
100k<br />
93.1k 78k<br />
*High-quality resistors essential in this position. All resistors 1/2W or higher where specified<br />
Optional, 50 -1,000pF<br />
Optional, 50 -1,000pF<br />
Optional, 0.01µF 250V<br />
Optional, 0.01µF 250V<br />
150µF, 400V Electrolytic<br />
150µF, 400V Electrolytic<br />
0.1 - 1µF (0.33µF)* 0.1 - 1µF (0.33µF)*<br />
0.033µF Flim or PIO*<br />
0.033µF Flim or PIO*<br />
0.1µF Flim or PIO*<br />
0.1µF Flim or PIO*<br />
0.047µF - 1µF* Film or oil*<br />
0.047µF - 1µF* Film or oil*<br />
0.22 - 4.7µF Film or PIO* 0.22 - 4.7µF Film or PIO*<br />
0.001µF (trim)*<br />
0.001µF (trim)*<br />
*Voltage rating must equal or exceed B+ voltage. C17 is a trim capacitor that in parallel with<br />
C7 brings the combined capacitance up to 0.34µF.<br />
Assembly<br />
Before soldering, be sure to clean both sides of the PCB with 90% isopropyl alcohol,<br />
wiping away all fingerprints. First, solder the shortest parts (usually the resistors) in<br />
place, then the next tallest parts, and then the next tallest... Make sure that both the<br />
solder and the part leads are shiny and not dull gray. Steel wool can restore luster and<br />
sheen by rubbing off oxidation.<br />
As the PCB is doubled sided, parts can be soldered in place from either side. In fact,<br />
many of the parts can be positioned on the bottom side of the PCB; the exception<br />
being the tubes, as they must always be positioned on the top of the board.<br />
Important: Be sure to observe the electrolytic capacitors' polarity and glue or<br />
double-sided tape heavy coupling and bypass capacitors to the PCB.<br />
Grounding Unlike all the other GlassWare PCBs, there is no grounding jumper that<br />
connects the PCB’s ground to the chassis through a mounting hole. Unfortunately,<br />
grounding is an art. My preference is to ground the chassis at the turntable’s<br />
grounding jack. The PCB holds a grounding solder pad in between the two inputs;<br />
use this pad to connect to the grounding jack and chassis.<br />
RFI Radio interference can be a headache for the vinyl lover. One solution is the use<br />
large shunting capacitors across the input resistor, R1; this remedy seldom works.<br />
Instead, place small ferrite beads over the wires leaving the input RCA jacks and the<br />
PCB; add small ceramic capacitors (say, 200pF) from the input RCA jacks ground<br />
(and maybe hot) to the shared grounding jack and chassis ground point.
GlassWare Audio Design<br />
0.25"<br />
2.00"<br />
2.00"<br />
2.00"<br />
0.25"<br />
2.25"<br />
2.0"<br />
5.75"<br />
8 VACUUM TUBE LOCATIONS<br />
3.5" 2.0"<br />
10.5"<br />
4.75"<br />
2.75"<br />
3.0"<br />
3.0"<br />
0.25"
GlassWare<br />
AUDIO DESIGN<br />
www.glass-ware.com<br />
www.tubecad.com<br />
sales@glass-ware.com<br />
Copyright © 2008<br />
All Rights Reserved