Programmable Thermostat - Robertshaw Thermostats
Programmable Thermostat - Robertshaw Thermostats
Programmable Thermostat - Robertshaw Thermostats

Create successful ePaper yourself
Turn your PDF publications into a flip-book with our unique Google optimized e-Paper software.
<strong>Programmable</strong> <strong>Thermostat</strong><br />
Owners Manual<br />
Model: RS3210 Series<br />
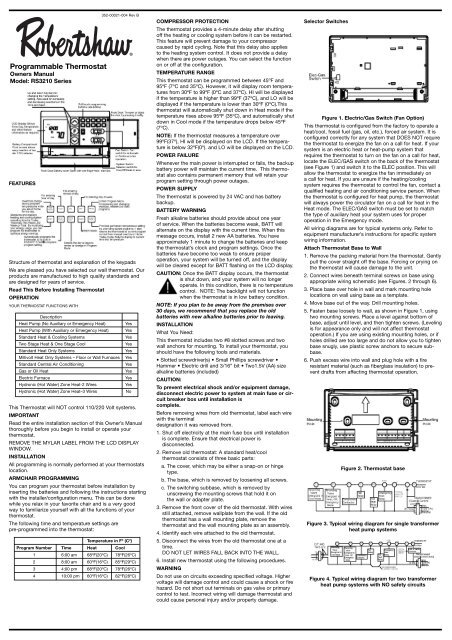
FEATURES<br />
Structure of thermostat and explanation of the keypads<br />
We are pleased you have selected our wall thermostat. Our<br />
products are manufactured to high quality standards and<br />
are designed for years of service.<br />
Read This Before Installing <strong>Thermostat</strong><br />
OPERATION<br />
YOUR THERMOSTAT FUNCTIONS WITH<br />
352-00021-004 Rev B<br />
Description<br />
Heat Pump (No Auxiliary or Emergency Heat)<br />
Heat Pump (With Auxiliary or Emergency Heat)<br />
Standard Heat & Cooling Systems<br />
Two Stage Heat & One Stage Cool<br />
Standard Heat Only Systems<br />
Millivolt Heat Only Systems – Floor or Wall Furnaces<br />
Standard Central Air Conditioning<br />
Gas or Oil Heat<br />
Electric Furnace<br />
Hydronic (Hot Water) Zone Heat-2 Wires<br />
Hydronic (Hot Water) Zone Heat–3 Wires<br />
Yes<br />
Yes<br />
Yes<br />
Yes<br />
Yes<br />
Yes<br />
Yes<br />
Yes<br />
Yes<br />
Yes<br />
No<br />
This <strong>Thermostat</strong> will NOT control 110/220 Volt systems.<br />
IMPORTANT<br />
Read the entire installation section of this Owner’s Manual<br />
thoroughly before you begin to install or operate your<br />
thermostat.<br />
REMOVE THE MYLAR LABEL FROM THE LCD DISPLAY<br />
WINDOW.<br />
INSTALLATION<br />
All programming is normally performed at your thermostats<br />
location.<br />
ARMCHAIR PROGRAMMING<br />
You can program your thermostat before installation by<br />
inserting the batteries and following the instructions starting<br />
with the installer/configuration menu. This can be done<br />
while you relax in your favorite chair and is a very good<br />
way to familiarize yourself with all the functions of your<br />
thermostat.<br />
The following time and temperature settings are<br />
pre-programmed into the thermostat:<br />
Temperature in Fº (Cº)<br />
Program Number Time Heat Cool<br />
1 6:00 am 68ºF(20ºC) 78ºF(26ºC)<br />
2 8:00 am 60ºF(16ºC) 85ºF(29ºC)<br />
3 4:00 pm 68ºF(20ºC) 78ºF(26ºC)<br />
4 10:00 pm 60ºF(16ºC) 82ºF(28ºC)<br />
COMPRESSOR PROTECTION<br />
The thermostat provides a 4-minute delay after shutting<br />
off the heating or cooling system before it can be restarted.<br />
This feature will prevent damage to your compressor<br />
caused by rapid cycling. Note that this delay also applies<br />
to the heating system control. It does not provide a delay<br />
when there are power outages. You can select the function<br />
on or off at the configuration.<br />
TEMPERATURE RANGE<br />
This thermostat can be programmed between 45ºF and<br />
95ºF (7ºC and 35ºC). However, it will display room temperatures<br />
from 30ºF to 99ºF (0ºC and 37ºC). HI will be displayed<br />
if the temperature is higher than 99ºF (37ºC), and LO will be<br />
displayed if the temperature is lower than 30ºF (0ºC).This<br />
thermostat will automatically shut down in Heat mode if the<br />
temperature rises above 95ºF (35ºC), and automatically shut<br />
down in Cool mode if the temperature drops below 45ºF<br />
(7ºC).<br />
NOTE: If the thermostat measures a temperature over<br />
99ºF(37º), HI will be displayed on the LCD. If the temperature<br />
is below 32ºF(0º). and LO will be displayed on the LCD.<br />
POWER FAILURE<br />
Whenever the main power is interrupted or fails, the backup<br />
battery power will maintain the current time. This thermostat<br />
also contains permanent memory that will retain your<br />
program setting through power outages.<br />
POWER SUPPLY<br />
The thermostat is powered by 24 VAC and has battery<br />
backup.<br />
BATTERY WARNING<br />
Fresh alkaline batteries should provide about one year<br />
of service. When the batteries become weak, BATT will<br />
alternate on the display with the current time. When this<br />
message occurs, install 2 new AA batteries. You have<br />
approximately 1 minute to change the batteries and keep<br />
the thermostat’s clock and program settings. Once the<br />
batteries have become too weak to ensure proper<br />
operation, your system will be turned off, and the display<br />
will be cleared except for BATT flashing on the LCD display.<br />
CAUTION: Once the BATT display occurs, the thermostat<br />
is shut down, and your system will no longer<br />
operate. In this condition, there is no temperature<br />
control. NOTE: The backlight will not function<br />
when the thermostat is in low battery condition.<br />
NOTE: If you plan to be away from the premises over<br />
30 days, we recommend that you replace the old<br />
batteries with new alkaline batteries prior to leaving.<br />
INSTALLATION<br />
What You Need:<br />
This thermostat includes two #8 slotted screws and two<br />
wall anchors for mounting. To install your thermostat, you<br />
should have the following tools and materials.<br />
• Slotted screwdriver(s) • Small Phillips screwdriver •<br />
Hammer • Electric drill and 3/16” bit • Two1.5V (AA) size<br />
alkaline batteries (included)<br />
CAUTION:<br />
To prevent electrical shock and/or equipment damage,<br />
disconnect electric power to system at main fuse or circuit<br />
breaker box until installation is<br />
complete.<br />
Before removing wires from old thermostat, label each wire<br />
with the terminal<br />
designation it was removed from.<br />
1. Shut off electricity at the main fuse box until installation<br />
is complete. Ensure that electrical power is<br />
disconnected.<br />
2. Remove old thermostat: A standard heat/cool<br />
thermostat consists of three basic parts:<br />
a. The cover, which may be either a snap-on or hinge<br />
type.<br />
b. The base, which is removed by loosening all screws.<br />
c. The switching subbase, which is removed by<br />
unscrewing the mounting screws that hold it on<br />
the wall or adapter plate.<br />
3. Remove the front cover of the old thermostat. With wires<br />
still attached, remove wallplate from the wall. If the old<br />
thermostat has a wall mounting plate, remove the<br />
thermostat and the wall mounting plate as an assembly.<br />
4. Identify each wire attached to the old thermostat.<br />
5. Disconnect the wires from the old thermostat one at a<br />
time.<br />
DO NOT LET WIRES FALL BACK INTO THE WALL.<br />
6. Install new thermostat using the following procedures.<br />
WARNING<br />
Do not use on circuits exceeding specified voltage. Higher<br />
voltage will damage control and could cause a shock or fire<br />
hazard. Do not short out terminals on gas valve or primary<br />
control to test. Incorrect wiring will damage thermostat and<br />
could cause personal injury and/or property damage.<br />
Selector Switches<br />
Figure 1. Electric/Gas Switch (Fan Option)<br />
This thermostat is configured from the factory to operate a<br />
heat/cool, fossil fuel (gas, oil, etc.), forced air system. It is<br />
configured correctly for any system that DOES NOT require<br />
the thermostat to energize the fan on a call for heat. If your<br />
system is an electric heat or heat-pump system that<br />
requires the thermostat to turn on the fan on a call for heat,<br />
locate the ELEC/GAS switch on the back of the thermostat<br />
(see Figure 1) and switch it to the ELEC position. This will<br />
allow the thermostat to energize the fan immediately on<br />
a call for heat. If you are unsure if the heating/cooling<br />
system requires the thermostat to control the fan, contact a<br />
qualified heating and air conditioning service person. When<br />
the thermostat is configured for heat pump, the thermostat<br />
will always power the circulator fan on a call for heat in the<br />
Heat mode. The ELEC/GAS switch must be set to match<br />
the type of auxiliary heat your system uses for proper<br />
operation in the Emergency mode.<br />
All wiring diagrams are for typical systems only. Refer to<br />
equipment manufacturer’s instructions for specific system<br />
wiring information.<br />
Attach <strong>Thermostat</strong> Base to Wall<br />
1. Remove the packing material from the thermostat. Gently<br />
pull the cover straight off the base. Forcing or prying on<br />
the thermostat will cause damage to the unit.<br />
2. Connect wires beneath terminal screws on base using<br />
appropriate wiring schematic (see Figures. 2 through 6).<br />
3. Place base over hole in wall and mark mounting hole<br />
locations on wall using base as a template.<br />
4. Move base out of the way. Drill mounting holes.<br />
5. Fasten base loosely to wall, as shown in Figure 1, using<br />
two mounting screws. Place a level against bottom of<br />
base, adjust until level, and then tighten screws. (Leveling<br />
is for appearance only and will not affect thermostat<br />
operation.) If you are using existing mounting holes, or if<br />
holes drilled are too large and do not allow you to tighten<br />
base snugly, use plastic screw anchors to secure subbase.<br />
6. Push excess wire into wall and plug hole with a fire<br />
resistant material (such as fiberglass insulation) to prevent<br />
drafts from affecting thermostat operation.<br />
Figure 2. <strong>Thermostat</strong> base<br />
Figure 3. Typical wiring diagram for single transformer<br />
heat pump systems<br />
Figure 4. Typical wiring diagram for two transformer<br />
heat pump systems with NO safety circuits
Figure 5. Typical wiring diagram for two transformer<br />
heat pump systems with safety circuits in BOTH<br />
systems<br />
Figure 6. Typical wiring diagram for single<br />
transformer multi-stage systems<br />
Heat Pump Terminal Outputs<br />
Refer to equipment manufacturer’s instructions for specific<br />
system wiring information. You can configure the thermostat<br />
for use with the following heat pump system types: HEAT<br />
PUMP TYPE 1 1. Single stage compressor system; gas or<br />
electric backup. This thermostat is designed to operate a<br />
single-transformer system. If you have a two-transformer<br />
system, cut and tape off one transformer. If transformer<br />
safety circuits are in only one of the systems, remove the<br />
transformer of the system with NO safety circuits. If<br />
required, replace remaining transformer with a 75VA Class II<br />
transformer. After disconnecting one transformer, the two<br />
commons must be jumpered together.<br />
Use the terminal output information below to help you wire<br />
the thermostat properly for your heat pump system. After<br />
wiring, see CONFIGURATION section for proper thermostat<br />
configuration.<br />
THERMOSTAT TERMINALS (HEAT PUMP)<br />
SYSTEM Heat Pump 1<br />
L<br />
Malfunction<br />
C* 24 Volt (common)<br />
R<br />
24 Volt Emergency (hot)<br />
E/W1<br />
Emergency Mode 1st stage<br />
W2<br />
HP 1 and Emergency 2nd stage<br />
Y1<br />
Heat and Cool mode 1st stage (compressor)<br />
G<br />
Blower/Fan Energized on call for Heat and Cool<br />
Set GAS/ELEC switch for Emergency mode<br />
O<br />
Energized in Cool Mode<br />
B<br />
Energized in Heat Emergency mode<br />
CHECK THERMOSTAT OPERATION<br />
Note:<br />
To prevent static discharge problems, touch side of<br />
thermostat to release static build-up before touching<br />
any keys.<br />
If at any time during testing your system does not<br />
operate properly, contact a qualified service person.<br />
Fan Operation<br />
If your system does not have a G terminal connection, skip<br />
to Heating System.<br />
1. Turn on power to system.<br />
2. Move Fan switch to ON position. The blower should<br />
begin to operate.<br />
3. Move Fan switch to AUTO position. The blower should<br />
stop immediately<br />
Heating System<br />
1. Move System switch to Heat mode. If the auxiliary<br />
heating system has a standing pilot, be sure to light it.<br />
2. Press to adjust thermostat setting to 1ºF/1°C above room<br />
temperature. The heating system should begin to operate.<br />
The display should show STG1. However, if the setpoint<br />
temperature display is flashing, the compressor<br />
lockout feature is operating (see Configuration Menu,<br />
item 5).<br />
3. Adjust temperature setting to 3ºF/3°C above room temperature.<br />
If your system configuration is set at MS2, HP2<br />
or HP1, the auxiliary heat system should begin to operate<br />
and the display should show STG1+2.<br />
4. Press to adjust the thermostat below room temperature.<br />
The heating system should stop operating.<br />
Emergency System<br />
EMER bypasses the heat pump to use the heat source<br />
wired to terminal E on the thermostat. EMER is typically<br />
used when compressor operation is not desired, or you<br />
prefer back-up heat only.<br />
1. Press System switch to select Heat mode. then press<br />
EMER key. EMER will show on the display.<br />
2. Press to adjust thermostat setting above room temperature.<br />
The auxiliary heating system will begin to operate.<br />
The display will show STG1 EMER to indicate that the<br />
auxiliary system is operating.<br />
3. Adjust temperature setting to 2ºF/2°C above room<br />
temperature. The auxiliary heat system should begin<br />
to operate and the display should show STG1+2.<br />
4. Press to adjust the thermostat below room temperature.<br />
The auxiliary heating system should stop operating.<br />
Cooling System<br />
1. Move System switch to select the Cool mode.<br />
2. Press to adjust thermostat setting below room temperature.<br />
The blower should come on immediately on high<br />
speed, followed by cold air circulation. The display<br />
should show STG1.<br />
3. Press to adjust the temperature setting above room temperature.<br />
The cooling system should stop operating.<br />
CONFIGURATION MENU<br />
Step<br />
Press<br />
Button<br />
INSTALLER/CONFIGURATION MENU<br />
Displayed<br />
(Factory<br />
Default)<br />
1 F MS 2<br />
Press<br />
down key<br />
to select<br />
SS1, HP2,<br />
HP1<br />
Comments<br />
Selects Single stage,<br />
Multi-stage or Heat<br />
Pump (Single stage or<br />
2-stage) System<br />
Configuration<br />
2 F (DIFF)2 1,3 DIFF (one stage)<br />
3 F (BLIT)on off BackLight<br />
4 F (SP2)2 1,3 DIFF (Two Stage)<br />
5 F (TEMP)F C<br />
6 F HOUR(12) 24<br />
7 F COMP(OFF) ON<br />
8 F FACT(0) 1,2<br />
Selects temperature<br />
display °F or °C<br />
Selects time format<br />
display 12 hours or<br />
24 hours<br />
Selects Compressor<br />
Lockout OFF or ON<br />
Select 1 to reset to<br />
factory defaults<br />
The configuration menu allows you to set certain thermostat<br />
operating characteristics to your system or personal<br />
requirements. Set System switch to OFF, then simultaneously<br />
press up and down keys to enter configuration menu.<br />
The display will show the first item in the configuration<br />
menu. The configuration menu table summarizes the configuration<br />
options. An explanation of each option follows.<br />
Press F key to change to the next menu item. To exit the<br />
menu and return to the program operation, press Hold/Run<br />
key. If no keys are pressed within fifteen seconds, the<br />
thermostat will revert to normal operation.<br />
1) Single Stage, Multi-stage or Heat Pump System<br />
Configuration<br />
This control can be configured for Heat Pump or two<br />
stage heat/one stage cool multi-stage operation. The<br />
display indicates MS 2 (default for multi-stage mode) in<br />
the display. The multi-stage configuration can be toggled<br />
to SS1, or HP1 by pressing the up or down key. In<br />
multi-stage configuration, EMER mode is not used.<br />
In this model, the HP2 is not used.<br />
2) Fast or slow cycle selection (one stage)<br />
3) Select backlight function OFF or on<br />
4) Fast or slow cycle selection (two stage)<br />
5) Select °F or °C readout. When you change this parameter,<br />
the programming returns to default. You have to set<br />
the program again.<br />
6) Selects time format to display in 12-hour or 24-hour<br />
clock<br />
7) Select compressor lockout (COMP OFF or ON)<br />
Selecting COMP ON will cause the thermostat to wait 4<br />
minutes before turning on the compressor if the heating<br />
and cooling system loses power. It will also wait 5 minutes<br />
minimum between cooling and heating cycles. This<br />
is intended to help protect the compressor from short<br />
cycling. Some newer compressors already have a time<br />
delay built in and do not require this feature. Your compressor<br />
manufacturer can tell you if the lockout feature<br />
is already present in their system. When the thermostat<br />
compressor time delay occurs it will flash the setpoint<br />
for about four minutes.<br />
8) Select 1 to reset to factory defaults.<br />
Setting Time And Day<br />
Remove the mylar label covering the LCD<br />
display window before operating thermostat.<br />
• Initial display after power-up. The temperature<br />
will update after a few seconds.<br />
• During Time and Day Setting mode, the<br />
temperature and program display will go<br />
blank.<br />
• Press and hold HOUR to rapid advance<br />
to the current hour. Tap to advance one hour at a<br />
time. Note the AM/PM indicator, as the display will<br />
cycle through 24 hours.<br />
• Press and hold MIN to rapid advance to the current<br />
minute.<br />
• Tap to advance one minute at a time.<br />
• Tap DAY to advance one day at a time.<br />
• When finished press HOLD/RUN to return to normal<br />
mode. After 15 seconds, the thermostat will return to normal<br />
automatically.<br />
Auto Programming<br />
Studies conducted by the Department of Energy<br />
estimate that setting your thermostat back 10ºF<br />
(6°C) for two 8-hour periods during winter can<br />
reduce your fuel bill by as much as much as<br />
33%. Setting your thermostat up 5ºF (3°C) for<br />
two 8-hour periods during summer can reduce<br />
your fuel bill up to 25%.<br />
Your thermostat is capable of holding up to<br />
4 separate programs for each day of the week.<br />
You can program all weekdays, Monday to<br />
Friday, to the same 4 programs as shown in the table,<br />
or each weekday can have a different set of 4 programs.<br />
Similarly weekend programs, (Saturday and Sunday) can<br />
be the same 4 programs or each weekend day can have<br />
a different set of 4 programs.<br />
Your thermostat is pre-programmed to meet the ENERGY<br />
STAR guidelines for energy efficiency. Note that it is<br />
easier to modify these programs than to program the<br />
thermostat manually.<br />
• Press once. During Auto Programming,<br />
the display will change as shown.<br />
• The thermostat will be programmed for<br />
all 7 days of the week as shown below.<br />
Temperature in Fº (Cº)<br />
Program Number Time Heat Cool<br />
1 6:00 am 68ºF(20ºC) 78ºF(26ºC)<br />
2 8:00 am 60ºF(16ºC) 85ºF(29ºC)<br />
3 4:00 pm 68ºF(20ºC) 78ºF(26ºC)<br />
4 10:00 pm 60ºF(16ºC) 85ºF(28ºC)<br />
• Refer to Manual Programming for entering or changing<br />
the programs.<br />
PROGRAMMING<br />
Before programming or changing programs, use this<br />
Personal Program Schedule to determine which times and<br />
temperature settings will best satisfy both your comfort and<br />
energy saving requirements. Use a pencil so you can revise<br />
yours records each time you change your temperature<br />
settings.<br />
Heating<br />
DAY Program 1 Program 2 Program 3 Program 4<br />
Mon Time Time Time Time<br />
Temp Temp Temp Temp<br />
Tue Time Time Time Time<br />
Temp Temp Temp Temp<br />
Wed Time Time Time Time<br />
Temp Temp Temp Temp<br />
Thu Time Time Time Time<br />
Temp Temp Temp Temp<br />
Fri Time Time Time Time<br />
Temp Temp Temp Temp<br />
Sat Time Time Time Time<br />
Temp Temp Temp Temp<br />
Sun Time Time Time Time<br />
Temp Temp Temp Temp<br />
Cooling<br />
DAY Program 1 Program 2 Program 3 Program 4<br />
Mon Time Time Time Time<br />
Temp Temp Temp Temp<br />
Tue Time Time Time Time<br />
Temp Temp Temp Temp<br />
Wed Time Time Time Time<br />
Temp Temp Temp Temp<br />
Thu Time Time Time Time<br />
Temp Temp Temp Temp<br />
Fri Time Time Time Time<br />
Temp Temp Temp Temp<br />
Sat Time Time Time Time<br />
Temp Temp Temp Temp<br />
Sun Time Time Time Time<br />
Temp Temp Temp Temp<br />
Manual Programming<br />
• Your thermostat can be programmed for weekdays and<br />
weekends. Use Weekday/Weekend Programs to enter<br />
or revise programs to match your Personal Program<br />
Schedule. The same steps are used when entering<br />
programs for the first time or revising programs entered<br />
during Auto Programming.<br />
• Familiarize yourself with Manual Programming, so that<br />
you can easily modify your programs as your comfort<br />
needs change. The example below demonstrates the<br />
Manual Programming method.<br />
NOTE:<br />
1. The program time can be set in 10-minute increments,<br />
and remains the same for both Heat and Cool programs.<br />
2. The program temperature can be set in increments of 1ºF<br />
(1ºC).<br />
3. The heat setpoint cannot be set higher than the cool<br />
setpoint, and the cool setpoint cannot be set lower than<br />
the heat setpoint.<br />
352-00021-004 Rev B 5/08
4. If the system selector is in AUTO mode, the current<br />
operating mode will be used for programming.<br />
5. After 15 seconds without a key press, the thermostat<br />
will return to normal display mode.<br />
6. When setting the program time, note the AM/PM indicator.<br />
7. With the Auto Recovery feature enabled, you do not need<br />
to set your comfort program times early. Auto Recovery<br />
will turn your system on so that the room is comfortable<br />
at the program time.<br />
Weekday/Weekend Programming<br />
Weekday Programs<br />
Display Reads<br />
• Normal display of time, temperature, and<br />
day of the week.<br />
Step 1<br />
• Selects days Mon. to Fri. for same set<br />
of 4 programs each day.<br />
Step 2<br />
• Program indicator (1) is displayed.<br />
• 68ºF is displayed.<br />
• Mon. to Fri. is displayed.<br />
Step 3<br />
• Press and hold until 6:00 is displayed.<br />
• Note AM/PM<br />
Step 4<br />
• Press once to change temperature to 69ºF.<br />
• Weekday program 1 is complete.<br />
• Press PROG to move to program 2, 3, and 4<br />
and follow the same steps.<br />
Use<br />
to insert or change time and<br />
temperature of other programs.<br />
• Selects weekend days Sat. and Sun.<br />
for same set of 4 programs each<br />
weekend day.<br />
• Follow steps 2-4 to enter programs.<br />
Similar to weekday programming.<br />
Use<br />
to insert weekend programs.<br />
Individual Day Programming<br />
To program each individual day separately by a differnet<br />
set of programs, first select day by displaying the day of<br />
program, then insert the desired times and temperatures.<br />
Press<br />
Display<br />
Reads<br />
• Mon. to Fri. are selected. Mon. to Fri.<br />
will have same programs.<br />
Use<br />
• Sat. to Sun. will have same programs.<br />
• Mon. is seleted, program for Mon. only.<br />
Similarly<br />
to enter programs for Monday.<br />
• Tue. to Sun. can be selected.<br />
Display the day to be programmed and use<br />
to enter programs.<br />
NOTE: Another approach to programming is to first<br />
program all weekdays Mon. through Fri. and Sat. and<br />
Sun. as same programs. Then, display and change the<br />
programs of only those days which willhave different<br />
programs.<br />
Reviewing Programs<br />
You may want to review the programs to see that the<br />
settings are compatible with your lifestyle.<br />
• Normal display of current time, day of week<br />
temperature, and day of week.<br />
• 1st weekday program is displayed.<br />
• Program indicator (1) appears.<br />
• Mon to Fri indication appears.<br />
• Continue pressing<br />
• Continue pressing<br />
to view each day.<br />
to view each period.<br />
If you are armchair programming the thermostat, turn the<br />
System Selector to the OFF position<br />
Reviewing the Current Temperature Setting<br />
Current time and temperature.<br />
• Press less than 1 second.<br />
• Set temperature is shown above<br />
current room temperature.<br />
OPERATION<br />
System Selector Switch<br />
The System Selector switch on the front of the<br />
thermostat determines the operating mode of<br />
the thermostat. You may select COOL, OFF,<br />
HEAT, or AUTO. In order to take full advantage<br />
of this thermostat’s features, we recommend using<br />
the AUTO mode. Refer to the Auto Season Changeover<br />
information for using this feature.<br />
NOTE: Anytime you install or remove the<br />
thermostat from the wallplate, slide the<br />
System Selector to the OFF position to<br />
prevent the possibility of a rapid system<br />
on-off.<br />
Fan Switch<br />
The Fan switch should normally be set in the AUTO position.<br />
The fan will be turned on along with normal operation of<br />
your system. In a normal gas or oil furnace, the fan will<br />
be turned on by your furnace after its warm-up delay. For<br />
electric heat, air conditioning, and heat pump operation, the<br />
fan will turn on with the system. To run the fan continuously,<br />
slide the Fan switch to the ON position.<br />
Temporary Manual Override<br />
To temporarily change the current set<br />
temperature without affecting your program:<br />
• Press and hold or for less than 1<br />
second to enter Manual Override mode.<br />
• Press and to change to your desired new<br />
temperature.<br />
• Press to RUN to normal mode or wait 15 seconds<br />
for it to return automatically.<br />
• The current program number will flash to signify<br />
the Temporary Override.<br />
At the next program change, the Temporary Override is<br />
canceled, and the next program temperature becomes the<br />
setpoint temperature.<br />
To end the Temporary Manual Override:<br />
• Press and wait for HOLD to display on the LCD.<br />
• Press HOLD key twice. This will return the set<br />
temperature to the current program set temperature.<br />
NOTE: The Auto Season Changeover feature will not operate<br />
while the thermostat is in Temporary Manual Override.<br />
Refer to the Auto Season Changeover feature for more<br />
information.<br />
Permanent Override or a Designated Day Override<br />
To hold your Manual Override for vacation or until a<br />
Designated Day.<br />
• Press to make the current program temperature<br />
the HOLD temperature. HOLD<br />
will be displayed on the LCD, and the<br />
program number will disappear.<br />
• Follow the Temporary Manual Override instructions<br />
above to change the Permanent Manual Override<br />
temperature.<br />
• You can confirm the setpoint by pressing HOLD/RUN<br />
for less than 1 second.<br />
• Press again. Hold day will be displayed on the LCD<br />
and the clock will disappear<br />
• Press Day key to add override days. Press Hour key<br />
to reduce override days.<br />
• Follow the Temporary/Designated Day<br />
Override instructions above to change<br />
the Permanent Manual Override<br />
temperature.<br />
To End Override:<br />
Under Permanent Override press hold/return key twice.<br />
Under a Designated Day Override press the hold once. The<br />
thermostat will return to the current program, and the HOLD<br />
display will be canceled.<br />
NOTE: The Auto Season Changeover feature will not operate<br />
while the thermostat is in permanent Manual Override. Refer<br />
to the Auto Season Changeover<br />
feature for more information.<br />
Auto Season Changeover<br />
When the System Selector is in AUTO position, the thermostat<br />
will automatically change between heating and cooling<br />
systems, depending on your program. We recommend keeping<br />
your programmed heating and cooling temperature at<br />
least 4ºF (2ºC) apart to allow the Auto Season Changeover<br />
to occur when the appropriate temperature span has been<br />
reached. If your heating and cooling programs have setpoints<br />
that are close, there is a built-in program to prevent<br />
the thermostat from going into Temporary, Designated Day<br />
Override, or Permanent Override, as these overrides are<br />
energy saving settings. Auto Season Changeover will still<br />
function in Home Today mode, as this is a comfort setting.<br />
For example, you may have the following temperatures programmed<br />
at a given time: Heat Set Temp=68ºF, Cool Set<br />
Temp=78ºF.<br />
If the room temperature rises above 78ºF, then the thermostat<br />
will automatically change to cool mode and turn on the<br />
air conditioner.<br />
Likewise, the thermostat will automatically change to heat<br />
mode and turn on heat when the room temperature falls<br />
below 68ºF.<br />
HOME TODAY<br />
This feature allows you to quickly and temporarily override<br />
your energy saving program setting on days when you are<br />
normally away from home with one key press.<br />
• Press to enter the Home Today override.<br />
When in Home Today override, the<br />
thermostat will use the previous manual<br />
override temperature setpoint for the<br />
remainder of the day.<br />
• The display will alternate between HOME and the<br />
current time.<br />
• When pressed during the day, the thermostat will<br />
remain in Home Today mode until the first program<br />
of the next day.<br />
• If the system is changed between Heat and Cool<br />
modes (either manually or by Auto Season<br />
Changeover) during the Home Today Override period,<br />
the setpoint temperature will be automatically<br />
update. It will automatically change from the lowest<br />
cool program setpoint to the highest heat program<br />
setpoint.<br />
• Press to exit Home Today mode before the schedule<br />
ending time. HOME is no longer displayed on the<br />
LCD screen, and the thermostat returns to the<br />
current program.<br />
• You can manually change the setpoint temperature<br />
while in Home Today mode. Refer to the Temporary<br />
Manual Override instructions. Manually changing the<br />
set temperature while in Home Today mode will not<br />
affect the Home Today ending time, however, the set<br />
temperature will not change automatically with a<br />
manual or automatic change between heating and<br />
cooling.<br />
Energy Monitor<br />
• The Energy monitor feature measures<br />
and stores the amount of time the heating<br />
and air conditioning system operates.<br />
Usage can be displayed for Today<br />
(since 12 am), Yesterday, This Week (since Monday),<br />
Last Week (last Monday through Sunday), and Total<br />
(up to 999 Hrs). By monitoring your energy usage,<br />
you see how much the setback periods are saving,<br />
and you can test program adjustment to save even<br />
more. To review energy usage, press to cycle<br />
through Today, Yesterday, This Week, Last Week,<br />
and Total. Press again to return to normal mode, or<br />
wait 15 seconds for the display to return to normal<br />
mode. You can also return to normal mode at any<br />
time by pressing RUN.<br />
• For example: This LCD display shows Today’s<br />
usage to be 10 Hours, 26 minutes.<br />
• Press and hold for 3 seconds to reset the Energy<br />
Monitor’s counters.<br />
The display will blink, and counters will be cleared<br />
to zero.<br />
NOTE: Clearing the Energy Monitor counter will also clear<br />
the Filter Monitor counter, as Filter usage and Total Energy<br />
usage are the same. Also, clearing the Filter Monitor counter<br />
will clear ALL Energy Monitor counters as well.<br />
Filter Monitor<br />
Your thermostat also keeps a record of the<br />
number of hours your filter has been in use. To<br />
maximize your system’s performance and energy<br />
efficiency, change or clean your filter regularly.<br />
• When the total system run time for heat and<br />
cool reaches 500 hours, you need to clean or<br />
change your system’s filter. FILT will continue<br />
to flash until the counter is set back to zero.<br />
• Press FILTER to review total filter usage. The display will<br />
blink FILT, then show the Filter Monitor counter. After 15<br />
seconds, the display will return to normal mode, or you<br />
can hit RUN to exit immediately.<br />
The Filter Monitor will display up to 999 hours and 59<br />
minutes of usage.<br />
• To reset the Filter Monitor counter, depress FILTER for<br />
3 seconds. The display will blink, and the counter will be<br />
reset to zero.<br />
NOTE: Clearing the Filter Monitor counter will also clear ALL<br />
Energy Monitor counters, as Filter usage and Total Energy<br />
usage are the same. Also, clearing the Energy Monitor<br />
counters will clear the Filter Monitor counter as well.<br />
Auto Recovery<br />
Auto Recovery calculates how early to turn your<br />
system back on, so that the room temperature is<br />
already comfortable by the start of the program<br />
period. Auto Recovery works in both Heat and<br />
Cool modes.<br />
• When the thermostat is in Auto Recovery mode, the<br />
display will alternate RECO with time, and the program<br />
indicator will flash.<br />
352-00021-004 Rev B 5/08
• Auto Recovery can be disabled by sliding the Recovery<br />
switch on the circuit board to disable.<br />
• Auto Recovery will not operate if Permanent Hold or<br />
Temporary Hold is in operation.<br />
• Auto Recovery can be canceled manually if HOLD is<br />
pressed during the recovery process. If a recovery<br />
process is canceled manually then the recovery process<br />
will not start again until the next program period starts<br />
(an exception is that if time or program is changed then<br />
the thermostat will check Auto Recovery conditions<br />
immediately).<br />
• Auto Recovery will be canceled and change to next<br />
period.<br />
• Auto Recovery will be canceled and change to Home<br />
Today mode if HOME TODAY is pressed during the<br />
recovery process.<br />
Keyboard lock<br />
The keyboard can be locked to prevent<br />
unauthorized changes to the thermostat.<br />
To lock or unlock the keyboard, press and hold<br />
hold/run key for 3 seconds. The keyboard is locked<br />
when LOCK appears on the display.<br />
• When all keys are locked, LOCK will appear on the<br />
display for 1 second any time a key is pressed.<br />
Backlighting<br />
Your thermostat has an electroluminescent lamp that<br />
backlights the display for easy viewing in the dark. When<br />
any key is pressed the display is illuminated.<br />
The display will remain illuminated for 8 seconds after the<br />
last key is pressed. This allows the light to stay on if you<br />
need to operate several keys.<br />
NOTE: If the thermostat is in Low Battery warning<br />
condition, the backlight will not operate. Replace with 2<br />
new AA alkaline batteries to restore the Backlight function.<br />
Low Battery Warning<br />
Your thermostat has a two-stage lower battery<br />
warning system. When the batteries are first<br />
detected to be weak, the first stage low battery<br />
warning is indicated by BATT flashing on the<br />
LCD display. Replace the batteries with 2 new<br />
AA alkaline batteries.<br />
When the batteries become too weak for normal operation,<br />
the thermostat enters the second stage low battery warning<br />
which shuts down the thermostat. In this condition, BATT<br />
flashes alone on the display, and the thermostat will turn<br />
your system off. Your system will remain off until the<br />
batteries are replaced.<br />
NOTE: The thermostat will still keep the current Set<br />
Temperature and Filter run time in memory until new<br />
batteries are installed. After confirming that new batteries<br />
have been inserted, the thermostat will return to normal<br />
operation.<br />
Error Mode<br />
If the thermostat is unable to control your<br />
system due to an unexpected battery problem,<br />
the thermostat will enter Error Mode. In this<br />
condition, the thermostat flashes E1, E2, E3<br />
or E4 on the LCD display, and shuts off your<br />
system. To correct this problem, replace the<br />
batteries with 2 new AA alkaline batteries, even<br />
if you have recently replaced them. Press the reset<br />
button once with a small pin and hold for two seconds<br />
then reprogram.<br />
If Error Mode returns, please contact us for further<br />
information.<br />
Warning Mode<br />
If the Malfunction Input (L) from the heat pump<br />
is active, the thermostat flashes E5on the LCD<br />
display.<br />
Auto Cut Off<br />
Your thermostat will automatically shut down in Heat mode<br />
if the room temperature rises above 95ºF (35ºC). It will shut<br />
down in Cool mode if the room temperature drops below<br />
40ºF (4ºC).<br />
Note that if your system has malfunctioned and no longer<br />
responds to thermostat controls, the Auto Cut-Off will have<br />
no effect.<br />
TROUBLESHOOTING<br />
Problem<br />
SCRAMBLED OR<br />
DOUBLE DISPLAY<br />
(numbers over numbers)<br />
NO DISPLAY<br />
ENTIRE DISPLAY DIMS<br />
PROGRAM DOES NOT<br />
CHANGE AT YOUR<br />
DESIRED SETTINGS<br />
AUTO/FAN DOES NOT<br />
TURN ON<br />
ERRATIC DISPLAY<br />
UNIT CONTINUES TO<br />
OPERATE IN THE OFF<br />
POSITION<br />
THERMOSTAT<br />
PERMANENTLY READS E1,<br />
E2, E3, E4<br />
Solution<br />
1. Remove clear mylar sticker.<br />
1. Check battery connections and batteries.<br />
2. Press the reset button once with a small pin<br />
and hold for two seconds then reprogram.<br />
1. Replace batteries.<br />
1. Check that the time is set properly to AM or<br />
PM.<br />
2. Check that the thermostat is not in HOLD<br />
or Home Today mode.<br />
3. Check for the correct day settings.<br />
1. Move Elec/Gas selector to opposite position.<br />
2. The thermostat may be in Auto mode. Look<br />
for AUTO on the LCD display. If the heat or<br />
cool program temperatures are close, the<br />
thermostat requires a larger temperature<br />
change before switching systems.<br />
3. There may be as much as 4 minute delay<br />
before the heat or cool system turns on. Wait<br />
and check. (Compressor protection delay)<br />
4. Check your circuit breakers and switches to<br />
ensure there is power to the system.<br />
5. Replace batteries.<br />
6. Make sure your furnace blower door is closed<br />
properly.<br />
7. Check the position of the Furnace or Heat<br />
Pump selector switches: Normal/O/B.<br />
1. Press the reset button once with a small pin<br />
and hold for two seconds then reprogram.<br />
1. Replace unit.<br />
1. Replace unit.<br />
If you experience any other problems, contact Technical Support at:<br />
www.invensyscontrols.com or (800) 445-8299<br />
Two Year Limited Warranty<br />
Invensys Controls warrants to the original contractor installer<br />
or to the original consumer user that each new <strong>Robertshaw</strong><br />
Product shall be free from defects in materials and workmanship<br />
under normal use and service for a period of two (2)<br />
years from the date of manufacture (“Warranty Period”).<br />
If any Product fails within the applicable Warranty Period,<br />
Invensys Controls shall, at its sole option, repair or replace<br />
the Product, provided that the Product is returned to<br />
Invensys Controls’ facility or designated agent within the<br />
Warranty Period, with transportation charges prepaid, and<br />
that the Product, upon examination by Invensys Controls, is<br />
found to conform to this warranty. The above warranty does<br />
not apply to: i) batteries; ii) improper installation; iii) Products<br />
that have been damaged, misused, neglected, mishandled,<br />
or altered in any manner whatsoever, and/or; iv) defects or<br />
damage that result from use of the Product in other than its<br />
normal and customary manner or in any manner not in<br />
accordance with Invensys Controls’ recommendations<br />
and/or instructions. Any and all costs of labor, thermostat<br />
removal, or reinstallation are not covered under this warranty<br />
and shall be the sole responsibility of the consumer or<br />
installer, as applicable.<br />
THE FOREGOING WARRANTY IS IN LIEU OF AND<br />
EXCLUDES ALL OTHER WARRANTIES, WHETHER VERBAL<br />
OR WRITTEN, EXPRESS OR IMPLIED INCLUDING, EXCEPT<br />
TO THE EXTENT PROHIBITED BY APPLICABLE LAW, THE<br />
IMPLIED WARRANTIES OF MERCHANTABILITY AND<br />
FITNESS FOR A PARTICULAR PURPOSE. IN NO EVENT<br />
SHALL INVENSYS CONTROLS BE LIABLE TO CONSUMER,<br />
CONTRACTOR OR ANY THIRD PARTY FOR ANY<br />
CONSEQUENTIAL, INCIDENTIAL, SPECIAL OR PUNITIVE<br />
DAMAGES ARISING FROM OR RELATING TO USE OF THE<br />
PRODUCT INCLUDING, BUT NOT LIMITED TO, LOSS OF<br />
GOODWILL, LOSS OF PROFIT OR REVENUE, AND<br />
PROPERTY DAMAGE, REGARDLESS WHETHER SUCH<br />
LOSS OR DAMAGE IS BASED IN CONTRACT, WARRANTY,<br />
TORT, NEGLIGENCE, STRICT LIABILITY, INDEMNITY,<br />
PRODUCT LIABILITY, OR OTHERWISE AND EVEN IF<br />
INVENSYS CONTROLS HAS BEEN ADVISED OF THE<br />
POSSIBILITY OF SUCH DAMAGES.<br />
191 E. North Avenue<br />
Carol Stream, Illinois 60188<br />
www.invensyscontrols.com<br />
©2008 Invensys Controls 352-00021-004 Rev B 5/08