Circle Track Crate Engine Technical Manual - Chevrolet Performance
Circle Track Crate Engine Technical Manual - Chevrolet Performance
Circle Track Crate Engine Technical Manual - Chevrolet Performance

Create successful ePaper yourself
Turn your PDF publications into a flip-book with our unique Google optimized e-Paper software.
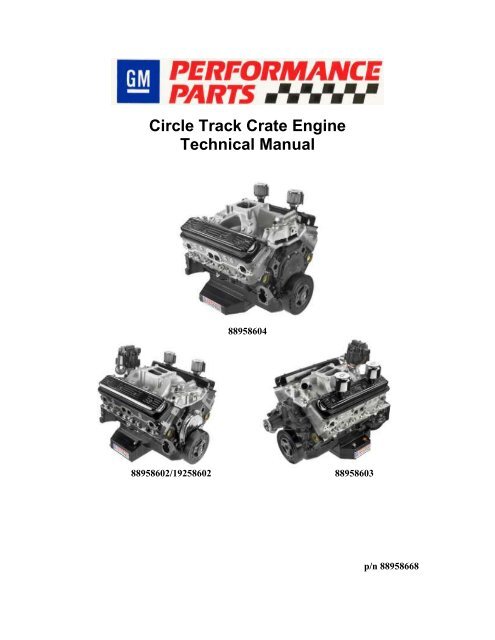
<strong>Circle</strong> <strong>Track</strong> <strong>Crate</strong> <strong>Engine</strong><br />
<strong>Technical</strong> <strong>Manual</strong><br />
88958604<br />
88958602/19258602 88958603<br />
p/n 88958668
Contents<br />
Introduction & Legal Information Pg 3<br />
History, Where to Buy, Warranty Pg 4<br />
Sealing Bolt Description Pg 5<br />
<strong>Circle</strong> <strong>Track</strong> <strong>Engine</strong> Packages Pg 6 - 7<br />
88958602/19258602 350 HP <strong>Engine</strong> Assembly<br />
88958603 355 HP <strong>Engine</strong> Assembly<br />
88958604 400 HP <strong>Engine</strong> Assembly<br />
Installation Information Pg 8 - 12<br />
Valve Lash Instructions<br />
Break-In Procedure<br />
Tune Up Specifications<br />
<strong>Engine</strong> Components Pg 13 - 16<br />
Blocks & Pistons<br />
Cylinder Heads<br />
Intakes & Front Covers<br />
Rocker Arms & Oil Pans<br />
<strong>Engine</strong> Specifications Pg 17 - 23<br />
<strong>Engine</strong> Specifications Chart<br />
Valve Seat Machining<br />
Valve Springs<br />
Camshaft Specifications<br />
Torque Specifications & Sealers Pg 24 - 26<br />
Page 1
Contents Continued<br />
Flywheel & Transmission Components Pg 27 - 28<br />
<strong>Technical</strong> Inspection Procedures Pg 29 – 35<br />
Additional Sealing Methods<br />
P&G - Compression Ratio Checking.<br />
Whistler – Combustion Chamber Volume<br />
Valve Spring Rate<br />
Rocker Arm Ratio Checking<br />
<strong>Engine</strong> Parts Number Lists Pg 36 - 39<br />
Listing of Original Part Numbers<br />
List of Rebuild Part Numbers<br />
Complete List of Bolt Part Numbers<br />
List of Updates from Previous <strong>Manual</strong> Pg 40<br />
This <strong>Technical</strong> <strong>Manual</strong> is dedicated to the memory of<br />
Robert E. (Bob) Cross<br />
1957-2010<br />
Copyright July 2006<br />
General Motors Corporation<br />
Revised May – 2010<br />
Page 2
Introduction<br />
GM <strong>Performance</strong> Parts is committed to providing proven, innovative performance<br />
technology that is truly “More than just Power.” GM <strong>Performance</strong> Parts are engineered,<br />
developed and tested by the factory to exceed your expectations for fit and function. To<br />
contact us call 1-800-577-6888 for the GM <strong>Performance</strong> Parts authorized Center near you<br />
or visit our website at www.gmperformanceparts.com.<br />
This book provides general information on components and procedures that may be useful<br />
for technical inspection of the engines. It is also intended as a guide for rebuilding<br />
specifications.<br />
Refer to service manual for comprehensive and detailed service practices. Observe all<br />
safety precautions and warnings in the service manual for installation in the vehicle. Wear<br />
eye protection and appropriate protective clothing. When working under or around the<br />
vehicle support it securely with jack-stands. Use only the proper tools. Exercise extreme<br />
caution when working with flammable, corrosive, and hazardous liquids and materials.<br />
Some procedures require special equipment and skills. If you do not have the appropriate<br />
training, expertise, and tools to perform any part of the installation then contact a<br />
professional.<br />
Legal Information<br />
This publication is intended to provide information about your circle track engine and related<br />
components. The publication also describes procedures and modifications that may be useful<br />
during the installation. It is not intended to replace the comprehensive service manuals or parts<br />
catalogs which cover General Motors engines and components. Rather, it is designed to provide<br />
supplemental information in areas of interest and to “do-it-yourself” enthusiasts and mechanics.<br />
This publication pertains to engines and vehicles which are used off the public highways except<br />
where specifically noted otherwise. Federal law restricts the removal of any part of a federally<br />
required emission control system on motor vehicles. Further, many states have enacted laws which<br />
prohibit tampering with or modifying any required emission or noise control system. Vehicles<br />
which are not operated on public highways are generally exempt from most regulations. As are<br />
some special interest and pre-emission vehicles. The reader is strongly urged to check all<br />
applicable local and state laws.<br />
Page 3
History<br />
GM has a long history of providing the engine of choice for circle track racing. The introduction of<br />
the small block Chevy in 1955 started it all. Production parts were durable, and the engines were<br />
plentiful. In the 1960’s, GM started producing HD parts for racing activities and a whole industry<br />
was started.<br />
Over time, the competitive nature of racing drove costs increasingly higher and sanctioning bodies<br />
found it increasingly difficult to police the competitors. In the 1990’s, several tracks and<br />
individuals took GM’s successful crate engines designed for the street and adapted them for circle<br />
track applications. The potential for cost savings was tremendous.<br />
Based on the success of those racers, GM Racing and GM <strong>Performance</strong> Parts engineers spent time<br />
in 2001 developing several circle track engine packages based on their proven small block Chevy<br />
crate engines. That development led to 3 engines released in 2002: (88958602, 88958603, and<br />
88958604). Commonly known as the 602, 603 & 604 (the last 3 digits of the part number), these<br />
three engines fit easily into most existing racing classes with minor adjustments to the rules<br />
(typically weight breaks).<br />
Each engine is assembled with all new parts on a production line to keep costs down. The engines<br />
then are up-fitted with special oil pans, valve covers and sealing bolts. Factory sealing of the engines<br />
are one of the keys to the success of the program as this makes it difficult to tamper with the engine<br />
and helps maintain equality among the competitors. If used as directed, the engines should provide<br />
several seasons of use with minimal maintenance.<br />
Where to Buy<br />
<strong>Circle</strong> track crate engines can be purchased from any GM Dealer in the USA, Canada and other<br />
countries. Our recommendation is to contact an authorized GM <strong>Performance</strong> Parts dealer which is<br />
more familiar with GM’s high-performance parts line. Contact 1 (800) 468-7387 or<br />
www.gmperformanceparts.com to find a dealer near you.<br />
Warranty<br />
<strong>Circle</strong> track crate engines have no warranty. They are sold for off-road<br />
racing activities.<br />
Page 4
Sealing Bolts<br />
The <strong>Circle</strong> <strong>Track</strong> <strong>Crate</strong> engines are sealed from the factory with 8 bolts in key locations. The<br />
locations are such that tampering with the engine is unlikely without destroying or damaging the<br />
bolt head. Each bolt has the familiar GM logo laser etched on the head as a quick identifier (Note:<br />
the GM logo is trademarked and there are penalties for copying the trademark). In 2005, GM<br />
started using a clear zinc coating on the bolts and added an additional anti-counterfeiting process<br />
called “Info-Glyph”. This process allows information to be encoded into a “square of dots” laser<br />
etched on the bolt.<br />
The 8 bolt locations are: 2 bolts in the intake manifold, 2 bolts in the front cover, 2 bolts in the oil<br />
pan & one bolt in each cylinder head.. The valve covers are not sealed as it is important to properly<br />
lash the valves. (See valve lash procedure on page 9)<br />
The bolts are designed so that during installation, the head breaks off at the proper torque.<br />
(Example: On the sealed cylinder head bolt, the hex head portion of the bolt breaks away at 65 ft lbs.)<br />
Each bolt is designed specifically for that location and torque. The head is “rounded off” so it<br />
difficult to remove without damaging the head and sending up a “red flag” that the engine has been<br />
tampered with.<br />
Replacement bolts are not sold to the public. This ensures the integrity of the program. See the<br />
Rebuild section to understand repairs, rebuilds and replacement bolts.<br />
This photo shows the GM Logo and Info-<br />
Glyph dot-matrix.<br />
Page 5
GM <strong>Circle</strong> <strong>Track</strong> <strong>Engine</strong>s<br />
This section is a brief overview of the 3 engine packages that are available from GM. The following<br />
pages outline the highlights of each engine including torque and horsepower figures. The final page<br />
has a chart that covers the technical specifications of each engine.<br />
P/N 88958602 and 19258602 (602)<br />
88958602 and 19258602 are rated at 350 hp<br />
@ 5000 rpm. The 602 makes 390 ft lbs torque<br />
@ 3800 rpm. It fits well in lower level<br />
introductory classes that are looking for<br />
affordable horsepower, such as factory stock,<br />
modified, and truck. It comes complete<br />
intake to pan and includes an HEI<br />
distributor. It does not include a flywheel or<br />
water pump. The engine uses a<br />
4 bolt block, cast iron crank, powder metal<br />
rods, and cast pistons. The 9.1:1 compression<br />
ratio with iron Vortec heads offer a good<br />
balance of power and durability. The 8 1/2”<br />
deep oil pan holds 8 quarts including the<br />
filter. The engine has a dual-plane, high-rise,<br />
aluminum intake. This engine weighs 434 lbs<br />
as delivered.<br />
P/N 88959603 (603)<br />
88958603 is rated at 355 hp @ 5250 rpm. It<br />
makes 405 ft lbs torque@ 3500 rpm. It fits<br />
well in mid level classes such as limited late<br />
model and late models. The engine comes<br />
complete intake to pan and includes water<br />
pump, HEI distributor, and a flywheel. The<br />
4 bolt block, steel crank, powder metal rods,<br />
and high-silicon pistons make a great<br />
foundation. The 10.1:1 compression ratio<br />
from the aluminum heads makes good power.<br />
The 7” deep oil pan holds 8 quarts including<br />
the filter. The engine has a dual-plane,<br />
medium-rise aluminum intake. This engine<br />
weighs 400 lbs. as delivered.<br />
Page 6
GM <strong>Circle</strong> <strong>Track</strong> <strong>Engine</strong>s continued<br />
Notes<br />
P/N 88959604 “604”<br />
88958604 is rated at 400 hp @ 5500 rpm. It<br />
makes 400 ft lbs torque @ 4500 rpm. It fits<br />
well in late models and other classes that run<br />
on longer tracks. The engine comes complete<br />
intake to pan. It does not include distributor,<br />
flywheel, or water pump. The 4 bolt block,<br />
steel crank, powder metal rods, and highsilicon<br />
pistons make a great foundation. The<br />
9.6:1 compression ratio with “Fast Burn”<br />
aluminum heads and roller rockers make<br />
great power and lots of torque. The 7” deep<br />
oil pan holds 8 quarts including the filter.<br />
This engine has a high-rise, single plane,<br />
aluminum intake manifold. This engine<br />
weighs 375 lbs as delivered.<br />
Page 7
Installation Instructions<br />
Each engine comes with detailed instruction sheets. This section includes some of the information<br />
that is included in those instruction sheets. It is imperative that the startup procedures are followed<br />
before starting the engine. Failure to do so may result in catastrophic engine failure. These<br />
procedures are designed to ensure engines are properly broke in for maximum engine life. Two key<br />
factors affect engine life; proper valve lash and keeping rpm’s within specified limits.<br />
Valve Lash<br />
Valve lash is critical. Read the procedures closely. All three engines do not have oil restrictors.<br />
This insures ample oil is available to cool the valve springs and pull heat from the valves.<br />
Break-In Procedures<br />
GM has detailed break-in procedures to ensure the life of your engine is maximized. Failure to<br />
follow these break-in procedures will shorten the life of the engine. Make sure you read this page<br />
completely before attempting to start your new engine.<br />
Tune Up Specifications<br />
Tune up specifications are provided for each engine to insure that they are tuned to factory<br />
specifications. Altitude, humidity, and other factors will affect performance. Do not increase<br />
timing more than factory recommendations. All three engines have had extensive dyno & track<br />
testing to maximize horsepower using these parameters. Maximum performance will be achieved if<br />
you keep the tune-up within factory recommendations.<br />
RPM Limits<br />
RPM limits are critical to engine life. Catastrophic engine failure can occur if the engines are run<br />
above the factory recommended limits. Extensive dyno & track testing has determined the limits of<br />
the engine. Under no circumstances is it recommended to exceed these limits. GM recommends<br />
that all sanctioning bodies, track operators or promoters have rev-limits written in their rule book.<br />
Maximum limit for 602 engine is 5500 rpm.<br />
Maximum limit for 603 engine is 5800 rpm.<br />
Maximum limit for 604 engine is 5800 rpm.<br />
Page 8
Valve Lash Procedure<br />
This page covers the proper procedure to lash the valves. It is imperative to set the valve lifter lash<br />
properly on each of the engines. All three engines use the same procedure. It is also critical that<br />
the rocker arm nuts are properly secured so they do not loosen during operation. The 602 & 603<br />
engines use “Kool-Nuts” and the 604 uses aluminum roller rockers. Each has a locking nut with set<br />
screw. The set screw is the only way to keep valve lash secured. Refer to Tune-up section for photo<br />
of cool nut and set screw.<br />
Recommended Lash is Zero to ¼” turn Hot.<br />
To properly set the valve lash, warm up the engine to normal operating temperature (180 – 190<br />
degrees F water temp) and follow the procedure below.<br />
Remove the valve covers and disconnect power to distributor.<br />
Important: When lashing valves, it is best to loosen the rocker arm nut slightly while rotating<br />
the pushrod with your other hand between two fingers until the pushrod rotates easily. Then set<br />
the valve lash by tightening the rocker arm nut while rotating the push rod between your fingers<br />
until you feel it stop rotating. When it stops rotating you are at zero lash. Next, tighten the set<br />
screw in the rocker arm nut against the rocker arm stud. Then rotate the rocker arm nut and the<br />
set screw at the same time ¼ turn maximum. This will allow the set screw to lock properly and<br />
hold the valve lash at ¼ turn. Use the sequence below for each rocker arm.<br />
Valve Lash Adjustment:<br />
1. Position engine at TDC on # 1 cylinder in firing position.<br />
Adjust Intake valves on # 2 & # 7 cylinders.<br />
Adjust Exhaust valve on # 4 & # 8 cylinders.<br />
2. Rotate Crankshaft ½ Revolution Clockwise.<br />
Adjust Intake Valves on # 1 & # 8 cylinders.<br />
Adjust Exhaust Valves on # 3 & # 6 cylinders.<br />
3. Rotate Crankshaft ½ Revolution Clockwise.<br />
Adjust Intake Valves on # 3 & # 4 cylinders.<br />
Adjust Exhaust Valves on # 5 & # 7 cylinders.<br />
4. Rotate Crankshaft ½ Revolution Clockwise.<br />
Adjust Intake Valves on # 5 & # 6 cylinders.<br />
Adjust Exhaust Valves on # 1 & # 2 cylinders.<br />
Reinstall valve covers, connect distributor and start engine to check for loose valve lash.<br />
Page 9
Recommended Break-In Procedure<br />
Start-up is critical to ensure engine life. This procedure was written with the intent to provide a<br />
quick reference and guideline to starting a new or rebuilt engine if a dyno is not available. If you<br />
are using a dyno, refer to the dyno operator’s guidelines for start up and initial break in of the<br />
engine.<br />
1. Safety First! Make sure you have proper tools as well as eye protection.<br />
If the car is on the ground, be sure the wheels are chocked and the transmission is in<br />
neutral.<br />
2. Be sure to check the oil level in the engine and prime the oil system.<br />
3. Run the engine between 2,000 and 2,500 rpm, with no-load for first 30 minutes.<br />
4. Refer to valve lash procedure and lash valves.<br />
5. Adjust the distributor timing to recommended specifications.<br />
6. Adjust Carburetor settings. Idle mixture screws, base idle, floats, etc.<br />
7. After first 30 minutes of the engine running, re-set ignition timing and carb adjustments.<br />
8. Drive the vehicle at varying speeds and loads for first 30 laps. Be sure not to use a lot of<br />
throttle or high rpm’s.<br />
9. Run 5-6 medium-throttle accelerations to about 4500 rpm and letting off in gear and<br />
coasting back down to 2000 rpm.<br />
10. Run a couple of hard-throttle acceleration to about 5000 rpm then letting off in gear and<br />
coasting back down to 2000 rpm.<br />
11. Change the oil and filter, a PF1218 AC Delco oil filter (P/N 25160561) or<br />
PF45 (P/N 25324052) and Mobil 1 Synthetic oil (P/N 12347284) are recommended.<br />
12. Drive the next 25 laps without high rpm’s (below 5000 rpm), hard use, or extended periods<br />
of high loading.<br />
13. Change the oil and filter again.<br />
14. Your engine is now ready for racing.<br />
Page 10
Tune Up Specifications<br />
Tune Up Specifications<br />
Description (<strong>Engine</strong>) 8602 8603 8604<br />
Firing Order:<br />
1 - 8 - 4 - 3 - 6 - 5 - 7 - 2<br />
Recommended Fuel:<br />
92-93 Unleaded<br />
Timing: (set @ 4000 rpm) 32 degrees 34 degress 32 degrees<br />
Recommended Carburetor:<br />
Holley 650 HP p/n 80541-1<br />
Jetting: Front / Rear 73 / 73 73 / 73 73 / 73<br />
Spark Plugs: MR43LTS MR43LTS MR43LTS<br />
Spark Plug Gap: .045" .045" .045"<br />
Recommended Oil:<br />
15W-50 Synthetic Mobil 1<br />
Recommended Filters:<br />
AC PF-35 or PF35L<br />
Recommended Valve Lash:<br />
See Valve Lash Proceedure<br />
Distributor Advance Settings:<br />
See Below<br />
Mechanical Advance: 0 degrees @ 1100 RPM<br />
12 degrees @ 1600 RPM<br />
16 degrees @ 2400 RPM<br />
22 degrees @ 4600 RPM<br />
Vacuum Advance: Not Used.<br />
Recommended Header Size: 1 5/8" to 1 3/4" stepped header with 3 1/2"<br />
collector 33" total length.<br />
NOTES<br />
Page 11
Tune Up Specifications Continued<br />
Carburetor & Adjustments<br />
The Holley 80541-1 carburetor is rated at 650 cfm. <strong>Track</strong> testing showed the 650 HP series was the<br />
best carburetor choice for all three applications. A 750 cfm HP series carb was also tested. It<br />
didn’t make any more horsepower on the dyno and when it was track tested it was too rich and<br />
loaded up in the corners.<br />
Because all three engines make power well before 5500 rpm, the larger carburetor can actually<br />
hurt performance. The Holley HP series is designed with most racing modifications done. There are<br />
other very good high performance aftermarket carburetors available as well that may be used with<br />
proper testing and tuning.<br />
After installing your carburetor, make sure the float levels are set properly, the idle mixtures<br />
adjusted, and idle rpm set. Depending on the weather and altitude you may have to change the jet<br />
size up or down. Do not make large jumps in jet sizes without consulting the carburetor<br />
manufacturer or an engine builder. Most of the time only a couple of jet sizes is all that is necessary<br />
for proper performance. Make sure you take care of the carburetor when the season ends. Drain<br />
the fuel and put the carburetor in a plastic bag or sealed container. Do not leave it on the engine,<br />
the fuel will evaporate and leave a residue in the metering galleries.<br />
<strong>Engine</strong> Timing<br />
32-34 degrees of advance should be all that is needed. The combustion chambers are very efficient<br />
so it doesn’t take much timing to make power. Don’t run more than 34 degrees as detonation can<br />
occur.<br />
Fuel Requirements<br />
91-93 Octane Unleaded fuel is recommended. No need to run leaded fuel or 101-104 octane.<br />
Leaded fuel contaminates the oil and can foul the spark plugs. All three engines have compression<br />
ratios of 10:1 or less, so the higher octane is of little value. The valve seats are designed to run on<br />
unleaded fuel, plus unleaded fuel cost less and saves money each night. Some of the tracks &<br />
sanctioning bodies add traces of lead for “Off Road Use” which should not affect performance.<br />
Headers<br />
In GM testing, the engines were tested with stepped headers. The headers were 1 5/8” primary<br />
tubes 10” long, and then stepped to a 1 3/4” tube. The total length was 33” with a 3 1/2” collector.<br />
All three engines have efficient combustion chambers and exhaust ports. Therefore, it’s normal to<br />
see flames out the back of the car during deceleration. The more efficient the headers the worse the<br />
flames will be. Most 2bbl classes need headers that are designed to scavenge the exhaust to make<br />
power and this pulls more fuel through the engine. That is not necessary when using the<br />
recommended 4 bbl carburetor on GM engines.<br />
Recommended Oil<br />
GM recommended Mobil 1 synthetic oil for all three engines. Extensive testing has proved that<br />
synthetic oil provides better lubrication qualities under extreme conditions and lasts longer.<br />
Page 12
<strong>Engine</strong> Components<br />
A lot of engineering & extensive testing goes into each component in the GM circle track engines.<br />
The parts are tested to production standards and pass hundreds of thousands of miles before being<br />
released. Quality control standards are maintained during assembly of each engine. This section<br />
covers some of the differences between the major components in the three engines.<br />
<strong>Engine</strong> Blocks<br />
All three engines are assembled with brand new 4 bolt main blocks with cast iron caps. The main<br />
caps are straight bolts. They are machined to factory specifications. The blocks are designed to use<br />
1 pc rear seal crankshafts. Photo to the right shows the 1 pc rear seal adapter which reduces oil<br />
leaks. It does require a special flywheel that is balanced correctly for these applications.<br />
Pistons<br />
p/n 14088556 rear seal retainer<br />
The piston on the far left (below) is installed in 19258602 engines. This piston has a grafal coating<br />
on the skirt. The piston in the center (below) does not have a skirt coating and is installed in<br />
88958602 engines. They both are a cast aluminum dished piston with 4 valve reliefs.<br />
The piston on the right (below) is installed in 603 & 604 engines. It’s a flat top piston with 4 valve<br />
reliefs made from high-silicon aluminum.<br />
Piston in 19258602 Piston in 88958602 Piston in 88958603/604<br />
Page 13
<strong>Engine</strong> Components Continued<br />
Cylinder Heads.<br />
P/N 12558060. Photo’s show the cast iron cylinder head & combustion chamber used on the 602<br />
engine. Head casting number is 10239906 or 12558062. Valve sizes are 1.94” intake & 1.50”<br />
exhaust.<br />
P/N 12556463. Photo’s show the aluminum cylinder head & combustion chamber used on the 603<br />
engine. Head casting number is 10088113. Valve sizes are 1.94” intake & 1.50” exhaust.<br />
P/N 12464298. Photo’s show aluminum “fast burn” cylinder head and combustion chamber used<br />
on the 604 engines. Head casting number is 12367712. Valve sizes are 2.00” intake & 1.55”<br />
exhaust.<br />
Push Rods.<br />
GM uses part number 14044874 HD .075” wall pushrods in the 88958602 engines. The pushrod is<br />
7.724” long and 5/16” diameter.<br />
P/N 10241740 is used in 88958603 & 88958604 engines. It is a HD pushrod that has a .060” wall<br />
and 7.122” long and 5/16” diameter.<br />
Page 14
<strong>Engine</strong> Components Continued<br />
Intake Manifolds<br />
P/N 12366573 intake on the left is used on 602<br />
engines. It’s a dual plane, high rise intake. It<br />
has the 8 bolt Vortec mounting pattern.<br />
P/N 10185063 intake on the right is used on<br />
603 engines. It is a dual plane medium rise<br />
style. It uses 12 bolt traditional mounting.<br />
P/N 12496822 intake pictured to the left is<br />
used on 604 engines. It’s single plane, high<br />
rise intake. It has the 8 bolt Vortec mounting<br />
pattern.<br />
Front Covers<br />
GM uses two different types of front covers on the 3 engines. The photo on the left shows a stamped steel<br />
cover that is installed on 602 engines. The photo on the right shows the plastic cover that is installed on 603<br />
& 604 engines.<br />
12342089 steel cover 12562818 plastic cover<br />
Page 15
<strong>Engine</strong> Components Continued<br />
Rocker Arms<br />
The photo at far left show the<br />
stamped steel rockers and kool nuts<br />
that are installed on the 88958602<br />
& 88958603 engines. The photo on<br />
the immediate left shows the kool<br />
nut used on all 19258602 engines<br />
and any 88958603 engine built after<br />
May 1, 2010. Rocker arm<br />
adjustment is critical. (See page 9)<br />
This photo shows the aluminum roller rocker arms that are installed<br />
on 604 engines.<br />
602 & 603 engines use stamped steel rocker arms.<br />
Rocker arm adjustment is critical. (See page 9)<br />
Oil Pans<br />
The 602 engine uses an 8 quart pan (including filter) that is 8” deep. The sump is 9 ½” long and 11” wide.<br />
It fits stock front sub cars (with stock engine location). The right side of the pan is kicked out 3 ¼” and has<br />
3 trap doors to control oil. It has a built-in crankshaft scraper and comes with a louvered windage tray.<br />
The 603 & 604 engines use an 8 quart pan (including filter) that is 7” deep. The sump is 12” long and 14”<br />
wide. It fits stock Camaro front subs and most fabricated subs (with stock engine location). It has 6 trap<br />
doors for oil control, 3 crankshaft scrapers, oil temp fitting and a louvered windage tray. Below is a photo<br />
of the louvered windage tray.<br />
Photo of the 603 & 604 oil pan. Photo of the louvered windage tray.<br />
Page 16
<strong>Engine</strong> Specifications<br />
This section covers recommended rebuild specifications. All three engines are assembled with brand new<br />
parts. Each engine will be within a tight horsepower range from the factory. Customers typically get 2<br />
seasons of service from each new engine.<br />
GM does not recommend rebuilding engines. We recommend purchasing a new engine and selling the used<br />
engine to the hot-rod, street rod or drag racing community. This will ensure 100% integrity of the<br />
program.<br />
If rebuilds are allowed, It is up to the track owner or sanctioning body to manage<br />
the rebuilders and closely monitor the rebuilt engines.<br />
The key to maintaining close competition between new engines and rebuilt engines is to make sure rebuild<br />
specifications are kept close to factory tolerances. These specifications are only guidelines. If the engine is<br />
rebuilt to these specifications minimal horsepower differences should be noticed. These specifications also<br />
provide a reference point for inspection of suspected modifications to the factory engine.<br />
Valve angles and depths are critical to valve life and horsepower levels. The valve seat width and angle<br />
affects airflow. It’s also a crucial part of removing heat from the valve and extending valve life. The<br />
balance of keeping good air flow in all the lift ranges, as well as getting the heat out of the valve is necessary<br />
to extend the life of the valve and seat. <strong>Engine</strong> rpm’s also affect the valve and seat life. When the<br />
harmonics of the valvetrain overcomes the valve spring, the valve bounces off the seat and the valvetrain<br />
becomes unstable, this reduces the amount of time the valve contacts the seat and transfers heat. Every<br />
millisecond the valve is bouncing it reduces the seat contact and heat transfer.<br />
RPM recommendations need to be strictly enforced to prolong valve life. These recommendations were<br />
tested and designed to extend the life of the valve train components as well as the complete engine. Do not<br />
exceed the recommended rpm limits.<br />
The following page covers the details of the valve seat area. These are the factory machining specifications.<br />
Anytime the valve seat and valve is “touched up” it may affect the height of the valve in the combustion<br />
chamber. This will have a negative effect on the compression ratio but not enough to make a large<br />
horsepower difference.<br />
Reference the page on valve springs for factory specifications when new. Valve springs lose strength<br />
during the life of an engine. The major factor in reducing valve spring life is heat, therefore no oil<br />
restrictors are installed in the engine. Oil restrictors are not necessary when the rpm’s are kept within<br />
factory recommendations. All three engines have excellent drain back to the oil pan. As long as the<br />
breathers are functioning properly and the engine has minimal ring blow-by, oil drainage to the pan will be<br />
good.<br />
Some engine builders have learned from experience the negative effects that improper valve seat machining<br />
has on the engine. Make sure your engine re-builder follows these specifications.<br />
Page 17
<strong>Engine</strong> Specifications Continued<br />
Factory <strong>Engine</strong> Specifications - New<br />
Description 88958602 / 19258602* 88958603 88958604<br />
<strong>Engine</strong> Weight (As Sold) 434 Lbs 400 Lbs 375 Lbs<br />
HP & Torque 350 @ 5000 rpm 355 @ 5250 rpm 400 @ 4500 rpm<br />
Torque 390 @ 4000 rpm 405 @ 3500 rpm 400 @ 5500 rpm<br />
Bore 3.998" - 4.001" 3.998" - 4.001" 3.991" - 4.001"<br />
Compression Ratio 9.1-1 10.1-1 9.6-1<br />
Block Casting Number 10243880 or 14093638 10243880 10243880<br />
Deck Height 9.025" +/- .001" 9.025" +/- .001" 9.025" +/- .001"<br />
Crankshaft Type Cast Iron Forged Steel Forged Steel<br />
Crankshaft Casting Number 14082586 14088532 14088532<br />
Piston Type Cast Aluminum Hi-Silicon Alum Hi-Silicon Alum<br />
Diameter 3.996" 3.998" - 3.999" 3.998" - 3.999"<br />
Valve Relief Type 4 reliefs 4 reliefs 4 reliefs<br />
Dished or Dome Dished Flat Flat<br />
Piston Weight (Piston Only) 598 / 512 * grams 533 grams 533 grams<br />
Piston Pin Weight 144 / 159 * grams<br />
Connecting Rod Length 5.7" 5.7" 5.7"<br />
Connecting Rod total wt +/- 10.0 grm 604.15 Grams 604.15 Grams 604.15 Grams<br />
Connecting Rod Upper End 180.3 Grams 180.3 Grams 180.3 Grams<br />
Connecting Rod Lower End 424.1 Grams 424.1 Grams 424.1 Grams<br />
Camshaft Type Hyd Hyd Roller Hyd Roller<br />
Camshaft Lift (int / exh measured @ valve) .435" / .460" .474" / .510" .474" / .510"<br />
Camshaft Lobe Lift: ( int / exh) .290" / 306" .316" / 340" .316" / .340"<br />
Duration @ .050" ( int / exh) 212 / 222 208 / 221 208 / 221<br />
Camshaft Lobe Centerline 112.5 degrees 112 degrees 112 degrees<br />
Rocker Arm Type Stamped Steel Stamped Steel Roller Rocker<br />
Rocker Arm Ratio 1.5 1.5 1.5<br />
Head Gasket Type Composite / Steel Composite Composite<br />
Thickness .028" .051" .051"<br />
Cylinder Head Type Iron Vortec Aluminum Aluminum<br />
Casting Number 12558062 10088113 12367712<br />
Valve Sizes 1.94" / 1.50" 1.94" / 1.50" 2.00" / 1.55"<br />
Combustion Chamber CC's (+/- 1-2 cc) 64 56 62<br />
Intake Port CC's ( +/- 1-2 cc) 170 163 205<br />
Exhaust Port CC's ( +/- 1-2 cc) 77<br />
Normal Oil Pressures 40 psi @ 2000 rpm 40 psi @ 2000 rpm 40 psi @ 2000 rpm<br />
Note: * signifies 19258602 engine part specification<br />
No Deck Surfacing after 1st Rebuild<br />
No Angle Milling of Cylinder Heads to Increase Compression Ratio.<br />
No Modifications to: Crank, Rods or Pistons.<br />
Page 18
<strong>Engine</strong> Specifications Continued<br />
Recommended Rebuild Specifications & Tolerances<br />
Maximum Bore Allowed:<br />
Description 88958602 / 19258602 88958603 88958604<br />
Standard Block Deck Height +/-.001" 9.025"<br />
Otherwise new block required<br />
9.025" 9.025"<br />
Maximum Deck Surfacing of Block .005" .005" .005"<br />
Minimum Block Deck Height +/- .001" 9.020" 9.020" 9.020"<br />
Minimum Crank Bearing Size: .010" under .010 under .010" under<br />
Minimum Rod Bearing Size: .010" under .010 under .010" under<br />
Minimun Rod Weight: 595 grams 595 grams 595 grams<br />
Crankshaft Balancing: Factory External Factory External Factory External<br />
Maximum / Minimum Crank Stroke: 3.48" 3.48" 3.48"<br />
No offset grinding of crank during rebuild<br />
No Modifications Allowed to:<br />
Maximum Deck Surfacing of Head:<br />
Maximum of .008" all Bores<br />
Crank, Rods or Pistons<br />
.005" to Square Surface During 1st rebuild<br />
No Deck Surfacing After 1st Rebuild.<br />
Throughout the book we have tried to define “minimal allowable modifications” recommended. This<br />
common theme is intended to be strong. The industry is where it’s at today because of lax rules<br />
enforcement, increased costs of components and the pressure to win. The competitors are shelling out lots<br />
of money to purchase parts that may not be necessary for close competition. In some cases those parts hurt<br />
performance.<br />
The short track industry needs to keep costs under control. Rebuilding of engines seems like the least<br />
expensive way to go. In some cases that maybe true depending on the class and allowable rules, but in most<br />
cases it allows purchase of parts that are expensive and that drives up the cost of the engines. It is<br />
imperative that tracks do not relax the rules. Increased inspections and checks must be part of the<br />
program. <strong>Crate</strong> engines were born out of a need to make racing affordable again. It’s in the hands of the<br />
tracks to contain the modifications to engines.<br />
If the track allows any of these specifications to be relaxed then costs will begin to increase. Keep tight<br />
checks on your “approved re-builder.” It might be a good idea to stop in and check on your “approved rebuilder”<br />
from time to time when an engine is in his shop. GM engines are designed to be reliable and<br />
withstand normal racing use. Following these guidelines will ensure that horsepower gains will be minimal<br />
on rebuilds.<br />
Rebuild Sealing Bolts: Contact your local track and/or the track’s authorized rebuilder when you<br />
need to have your engine serviced. They will be responsible for resealing the engine for competition and<br />
may wish to incorporate their own sealing methods.<br />
NOTE: Effective June 1, 2008 GM will no longer provide RM bolts for resealing rebuilt engines. If your<br />
track is going to continue to allow rebuilds, they should use an alternate sealing method as described later<br />
in this manual on page 30.<br />
Page 19
<strong>Engine</strong> Specifications Continued<br />
Valve seat Machining.<br />
This drawing covers the valve & valve seat machining angles & widths as well as factory valve margin. Note: No<br />
modifications should be allowed to factory valve seat machining angles to increase flow.<br />
Factory Valve Angle Specifications<br />
1. Refer to the chart “A, B, C” for<br />
proper valve angles.<br />
2. Refer to the chart “D, E, F” for<br />
seat machining angles.<br />
3. Refer to the chart “H, G, J” for<br />
valve & seat widths.<br />
5. Refer to chart “K” for valve<br />
margin.<br />
Description 88958602 / 19258602 88958603 88958604<br />
Notes: No modifications allowed to factory valve seat machining angles to increase flow.<br />
No angle milling of cylinder heads to increase compression ratio.<br />
Valve Angle (from deck to valve C/L) 23 degrees 23 degrees 23 degrees<br />
Intake Valve Stem Clearance .0009".001" .0009"-.0027" .0009"-.0027"<br />
Exhaust Valve Stem Clearance .001" - .0012" .0009"-.0027" .0009"-.0027"<br />
Intake Valve Angle Backcut #2 (A) N/A N/A N/A<br />
Exhaust Valve Angle Backcut #2 (A) N/A N/A N/A<br />
Intake Valve Angle Backcut #1 (B) 20 degrees 20 degrees 30 degrees<br />
Exhaust Valve Angle Backcut #1 (B) 25 degrees 25 degrees 30 degrees<br />
Intake Valve Angle (C ) 45 degrees 45 degrees 45 degrees<br />
Exhaust Valve Angle (C ) 45 degrees 45degrees 45 degrees<br />
Valve Angle Width (Intake / Exhaust) (G) .100" / .140" .100" / .140" .090" / .125"<br />
Intake / Exhaust Backcut Width (H) Blend out Blend out Blend out<br />
Margin Width, Intake / Exhaust Valve (K) .040" / .080" .040" / .080" .050" / .060"<br />
Intake Valve Seat Width (J) .045" .040" .035"<br />
Intake Valve Seat Angles (F) 46 degrees 46 degrees 45 degrees<br />
(M) Not shown. Factory chamfer at seat land (M) 30 degrees 30 degrees 30 degrees<br />
Valve Seat Insert Angles above Seat Land (D) 65 degrees 65 degrees 60 degrees<br />
2nd Valve Seat Angle to Seat Land (E) 75 degrees 75 degrees radius seat<br />
Exhaust Valve Seat Width (J) .060" .070" .060"<br />
Exhaust Valve Seat Angles (F) 46 degrees 46 degrees 45 degrees<br />
(M) Not shown. Factory chamfer at seat land (M) 30 degrees 30 degrees 30 degrees<br />
Valve Seat Insert Angles above Seat Land (E) 55 degrees 65 degrees 60 degrees<br />
2nd Valve Seat Angle To Seat Land (D) 82 degrees 82 degrees radius seat<br />
Minimum Valve Seat ID Intake (see note below) N/A 1.720"-1.745" 1.785"- 1.810"<br />
Minimum Valve Seat ID Exhaust (see note below) N/A 1.241"-1.266" 1.305"-1.330"<br />
Note: Minimum Valve Seat I.D is measured at the center point of steel valve seat where seat is smallest.<br />
No Modifications are Allowed Below Valve Seat Land, in Bowl Area or Any part of the Ports.<br />
Page 20
<strong>Engine</strong> Specifications Continued<br />
Valve Spring Specifications<br />
Below is illustration of a typical valve spring. Match up the locations and engine part number with the<br />
chart below for the correct specification.<br />
Note: These specifications are for new valve<br />
springs.<br />
The specification chart shows free height,<br />
installed height, spring o.d., installed<br />
pressure, open pressure, etc.<br />
Valve Spring Specifications - New<br />
Keep in mind that new spring pressures<br />
have some variances. The chart notes the<br />
two important variances. Installed pressure<br />
& open pressure.<br />
Valve spring pressures will change<br />
depending on length of time engine is in<br />
service, temperature during that period, and<br />
if the engine has been excessively overrevved.<br />
It is acceptable to add maximum of<br />
a .020” shim when valve seats are recut or to<br />
get spring pressures back to proper factory<br />
specifications. Care must be taken to make<br />
sure retainer to guide clearance is adequate.<br />
No Titanium Retainers Allowed.<br />
Description 88958602 / 19258602 88958603 88958604<br />
Valve Spring P/N 10212811 12551483 12551483<br />
Diameter (A) 1.250" 1.32" 1.32"<br />
Free Height (B) 2.021" 2.145" 2.154"<br />
Installed Height (C) 1.70" 1.78" 1.78"<br />
Lbs @ Installed Height (+/- 4 lbs) (D) 80 lbs 101 lbs 101 lbs<br />
Open Height (E) 1.270" 1.300" 1.300"<br />
Open Pressure (+/- 8 lbs) (F) 195 lbs 260 lbs 260 lbs<br />
Coil Bind (G) 1.20" 1.21" 1.21"<br />
Wire Diameter .177" .178" .178"<br />
Page 21
<strong>Engine</strong> Specifications Continued<br />
88958602 / 19258602 <strong>Engine</strong> Camshaft Specifications<br />
P/N 24502476 camshaft is installed in a 602 engines. It is a flat tappet camshaft and uses standard<br />
hydraulic lifters. See section on valve lash for proper lash procedure.<br />
Valve Lift: .435 intake and .460 exhaust.<br />
Duration @ .050”: 212 degrees intake and 222 degrees exhaust.<br />
Cam lobe centerline is: 112.5 degrees.<br />
Intake lobe lift .290”. Exhaust lobe lift .307”<br />
Intake base circle radius: .633” Exhaust base circle radius: .616”<br />
Dowel pin hole: Retarded 5 degrees from centerline of # 1 cylinder exhaust lobe, advanced 107.5 degrees<br />
from centerline of # 1 cylinder intake lobe. (107.5 +5 = 112.5 degrees lobe separation.)<br />
Note: +/- .010” all dimensions and +/- 5 degrees angularity.<br />
Shown below is a graph of the cam profile for cam p/n 24502476 as used in 88958602 and 19258602 engines.<br />
24502476 camshaft specifications<br />
Page 22
<strong>Engine</strong> Specifications Continued<br />
88958603 & 604 <strong>Engine</strong> Camshaft Specifications.<br />
P/N 10185071 camshaft is installed in both the 603 & 604 engines. It is a roller camshaft design and uses<br />
hydraulic roller lifters. This camshaft has a red dab of paint located near the camshaft gear for<br />
identification. See section on valve lash for proper lash and procedure.<br />
Valve Lift: .474” intake and .510” exhaust.<br />
Duration @ .050”: 208 degrees intake and 221 degrees exhaust.<br />
Cam lobe centerline is: 112 degrees.<br />
Intake lobe lift .316”. Exhaust lobe lift .340”.<br />
Intake base circle radius: .60684”. Exhaust base circle radius: .583”.<br />
Dowel pin hole: Retarded 5 degrees from centerline of # 1 cylinder exhaust lobe, advanced 107 degrees<br />
from centerline of # 1 cylinder intake lobe. (107 +5 = 112 degrees lobe separation)<br />
Note: +/- .010” all dimensions and +/- 5 degrees angularity.<br />
Shown below is a graph of the cam profile for cam p/n 10185071 as used in 88958603 and 88958604<br />
engines.<br />
10185071 camshaft specifications<br />
Page 23
Torque Specifications & Sealers<br />
All of the torque specifications are in one location to be used as a “Quick Guide” during rebuilds. Also<br />
included in this section are proper torque sequence guidelines. GM has spent extensive time on<br />
engineering, metallurgy, and physical testing to achieve proper clamping loads on bolts. Any deviation of<br />
these specifications will affect the life of the engine.<br />
Sealers also affect clamp loads. The proper sealer should be used for each bolt where applicable. It is<br />
imperative that torque specifications and sealer recommendations be followed closely. All surfaces must be<br />
clean and free of debris. All tapped holes should have thread chasers run through them to clean old<br />
residue from the threads before re-assembly. Make sure you wear proper eye protection at all times.<br />
Because the cylinder block does not have blind head bolts, all the head bolts will require sealer. Factory<br />
new head bolts come with the proper sealer applied. Break-off sealing bolts installed from the factory have<br />
sealer applied. Replacement sealing bolts do not have sealer factory applied.<br />
Main Cap Bolts & <strong>Engine</strong> Galley Plugs<br />
Use light engine oil or CMD #3 on all main cap bolts during assembly.<br />
Use P/N 12346004 Teflon sealer on all oil passageway galley plugs. Do not over apply as it may clog lifters<br />
and other engine components. See next page for torque specifications.<br />
Head and Intake Bolts.<br />
1. Use P/N 12346004 Teflon sealer on head bolts and intake bolts.<br />
2. Use P/N 12346192 in tube form or 12346193 in cartridge form for intake china rails. A<br />
bead 3/8” wide and 3/8” tall should be all that is necessary to seal the intake rails. The<br />
sealer should be applied slightly up the cylinder head to “encase” the intake gasket and seal<br />
the corner where the intake/head and block come together. Make sure intake is clean.<br />
Camshaft Retainer & Gear Bolts<br />
When tightening camshaft bolts we recommend you use Blue Loctite on the threads.<br />
Oil Pan Bolts & Oil Pan Gasket<br />
No sealer is needed on oil pan bolts. They should be installed with light engine oil on threads.<br />
All three engines use one-piece oil pan gaskets. No sealer is necessary except in 3 areas.<br />
1. Add a slight amount of sealer to the 4 corners of the pan where at the 5/16 bolt holes.<br />
2. After pan is installed put silicon sealer around the front of the pan where it meets the timing<br />
cover. The sealer should “encapsulate” the gasket between the pan and the timing cover.<br />
3. Add sealer at the rear of the pan where it meets the seal adapter. This should also<br />
“encapsulate” the gasket between the pan and the aluminum part of the rear seal adapter.<br />
Front Cover<br />
1. The “602” engine uses a paper style gasket and will require a dab of P/N 12346192 silicon sealer<br />
at the bottom where the steel cover meets the block and oil pan.<br />
2. The “603 & 604” engines have plastic covers with a built-in seal. They too require a dab of<br />
silicon sealer in the area where block, front cover and pan meet.<br />
Page 24
Torque Specifications & Sealers Continued<br />
Torque Specifications<br />
Description 88958602 / 19258602 88958603 88958604<br />
Main Bearing Bolt - Inner 70 ft lbs 70 ft lbs 70 ft lbs<br />
Main Bearing Bolt - Outer 65 ft lbs 65 ft lbs 65 ft lbs<br />
Connecting Rod Bolts<br />
.006" bolt stretch preferred 20 ft. lbs + additional 55 degree<br />
Angle Gauge Required<br />
Note: use CMD#3 on rod bolts @ 45 ft lbs<br />
(45 ft lbs if no angle gauge is available) / 27 N-m + additional<br />
55 degrees (61 N-m if no angle gauge is available)<br />
Oil Galley Plugs 15 ft lbs 15 ft lbs 15 ft lbs<br />
Oil Pump Bolt 66 ft lbs 66 ft lbs 66 ft lbs<br />
Oil Pump Cover Bolts 80 inch lbs 80 inch lbs 80 inch lbs<br />
Balancer Bolt 63 ft Lbs 63 ft Lbs 63 ft Lbs<br />
Balancer Pulley Bolt 3/8" x 24 35 ft lbs 35 ft lbs 35 ft lbs<br />
Rear Seal Adapter nut / bolt / screw 11 ft lbs 11 ft lbs 11 ft lbs<br />
Camshaft Sprocket Bolts 18 ft lbs 18 ft lbs 18 ft lbs<br />
Valve Lifter Retainer Bolt N/A 18 ft lbs 18 ft lbs<br />
Cylinder Head Bolts 65 ft lbs 65 ft lbs 65 ft lbs<br />
Rocker Arm Stud N/A 60 ft lbs 60 ft lbs<br />
Front Cover Steel 97 inch lbs 97 inch lbs 97 inch lbs<br />
Front Cover Plastic 97 inch lbs 97 inch lbs 97 inch lbs<br />
Intake Bolts, (602 & 604 engines) 11 ft lbs 11 ft lbs 11 ft lbs<br />
Intake Bolts, (603 engine)<br />
15 ft lbs first round, 35 ft lbs final torque.<br />
Distributor Holddown Bolt 25 ft lbs 25 ft lbs 25 ft lbs<br />
Oil Filter Adapter<br />
Oil Pan<br />
18 ft lbs 18 ft lbs 18 ft lbs<br />
Nut or Bolt @ Corner of pan 15 ft lbs 15 ft lbs 15 ft lbs<br />
Side Rail Bolt 97 inch lbs 97 inch lbs 97 inch lbs<br />
Oil Baffel Nut 100 inch lbs 100 inch lbs 100 inch lbs<br />
Oil Drain Plug 15 ft lbs 15 ft lbs 15 ft lbs<br />
Flywheel Bolts 65-70 ft lbs 65-70 ft lbs 65-70 ft lbs<br />
Starter Bolts 35 ft lbs 35 ft lbs 35 ft lbs<br />
Spark Plug 15 ft lbs 15 ft lbs 15 ft lbs<br />
Valve Cover Bolts 100 inch lbs 100 inch lbs 100 inch lbs<br />
Water Pump Bolts 30 ft lbs 30 ft lbs 30 ft lbs<br />
Fuel Pump Cover Bolts 100 inch lbs 100 inch lbs 100 inch lbs<br />
Fuel Pump Bolts 25 ft lbs 25 ft lbs 25 ft lbs<br />
Page 25
Torque Specifications & Sealers Continued<br />
Sealing bolt installation: Torque heads, intakes, front cover and oil pan with stock bolts in all locations<br />
prior to installing sealing bolts. After final torque is done, remove stock bolt and install sealing bolt and<br />
tighten until head breaks off. Do not install sealing bolt first.<br />
Cylinder Head Torque Sequence.<br />
The diagram to the left shows the proper<br />
torque sequence for all three engines.<br />
Torque bolts to 65 ft lbs. (Torque @ 40 ft<br />
lbs, then 50 ft lbs and 65 ft lbs final pass.)<br />
Use 12346004 Teflon sealer on all bolts<br />
unless new.<br />
Intake Torque Sequence for 88958602, 19258602 & 88958604 <strong>Engine</strong>s.<br />
Intake Torque Sequence for 88958603.<br />
The torque sequence to the left is for intakes used<br />
on 8602 & 8604 engines<br />
Torque to 11 ft lbs all bolts. Use 12346004 Teflon<br />
sealer on bolts unless new. Let intake set a short<br />
period and re-torque.<br />
The torque sequence to the left is for intake<br />
manifolds used on 8603 engines.<br />
Torque to 35 ft lbs. (torque to 15 ft lbs first pass<br />
then 35 ft lbs final pass) Use 12346004 Teflon<br />
sealer on all bolts unless new.<br />
Page 26
Flywheel & Transmission Components<br />
This section is intended to identify the flywheel components that GM recommends. The aftermarket has<br />
designed small clutch packs that fit smaller bell housings used in some applications. This section will also<br />
will help clarify the confusion between 1-pc & 2pc rear seals and flywheel balance.<br />
All three circle track crate engines use 1pc rear seals. It’s a much better seal and was introduced in<br />
production engines in 1986. When using a 1pc rear seal, the flywheel must have a counterbalance. All<br />
three engines are “internal/external” balanced. It’s not like the old 400 engines. They had both a<br />
counterbalanced flywheel and balancer. You cannot use a 400 flywheel on circle track engines. The<br />
balance is in a different location and the bolt pattern is different. You must use the correct, balanced<br />
flywheel.<br />
The front balancers on the circle track crate engines are zero balanced. Therefore the internal components<br />
of the engine are zero balanced like a pre 1986 engine. The only difference is the rear flywheel has a<br />
counterbalance. This is because the rear of the crankshaft is machined for the 1pc seal. One-piece rear<br />
seal engines do not have the counterbalanced flange like pre 1986 engines.<br />
Photo to the left shows a flexplate that fits all three engines.<br />
The counterweight is shown in the 10 o’clock area of the photo. It is<br />
welded in the proper location which makes sure the engine balance is<br />
correct.<br />
Make sure whatever flywheel you use has a counterbalance on it or<br />
the engine will have a vibration.<br />
This photo shows an aftermarket drive hub.<br />
It combines the ring gear, transmission input spline and proper<br />
counterbalance location.<br />
This is a great photo of how one aftermarket manufacturer<br />
address’s the external balance required at the rear of the engine.<br />
When the one piece seal was introduced, GM implemented a change to the bolt pattern diameter. The bolt<br />
pattern diameter changed from 3 ¼” to 3”. This was done to insure that older flexplates would not be<br />
installed by mistake and cause imbalance issues. Make sure if you are using an aftermarket component, it<br />
has the correct balance.<br />
Page 27
Flywheel & Transmission Components<br />
Transmission Installation Components<br />
Description 88958602 / 19258602 88958603 88958604<br />
Flexplate 12-3/4" 153 tooth Automatic 14088765 14088765 14088765<br />
Flexplate 14" 168 tooth Automatic HD 12554824 12554824 12554824<br />
Flexplate 14" 168 tooth Automatic 14088761 14088761 14088761<br />
Flywheel 12-3/4" 153 tooth standard 14088650 14088650 14088650<br />
Flywheel 14" 168 tooth Std 14088648 14088648 14088648<br />
Flywheel 14" 168 tooth lightweight 14088646 14088646 14088646<br />
Note: 14088646 weighs approximately 15 lbs.<br />
Pilot Bearing 14061685 14061685 14061685<br />
Pilot Bushing 3752487 3752487 3752487<br />
Dowel Pin, Bellhousing (2) - 12338119 (2) - 12338119 (2) - 12338119<br />
Starter, Standard Duty 1876552 1876552 1876552<br />
Starter, Corvette 153 tooth 10475702 10475702 10475702<br />
Bolt, Starter Long (fits 14095702) 14097278 14097278 14097278<br />
Bolt, Starter Short (fits 14095702) 14097279 14097279 14097279<br />
Bolt, Flywheel (6) - 12337973 (6) - 12337973 (6) - 12337973<br />
Bolt, Flexplate (Automatic) (6) - 372707 (6) - 372707 (6) - 372707<br />
Torque Specifications<br />
Flywheel Bolts 65-70 ft lbs 65-70 ft lbs 65-70 ft lbs<br />
Starter Bolts 35 ft lbs 35 ft lbs 35 ft lbs<br />
The photo to the left shows a p/n 14061685<br />
crankshaft bushing. Install this roller<br />
bearing bushing in the rear of the crankshaft<br />
to minimize friction losses.<br />
Page 28
Tech Inspection Procedures<br />
This section covers technical procedures. To keep competition equal, tracks must put proper<br />
procedures in place to police their engines. If track owners or promoters do not keep a close watch<br />
on engine modifications, then competitors will exploit every opportunity to make modifications and<br />
the savings from the crate engine program will be lost. Every track must take seriously the<br />
integrity of the program and be willing to implement strong penalties for those caught tampering<br />
with bolts or modifying engines.<br />
Study these procedures closely. Take time to practice the tests on a known engine. Make sure you<br />
are familiar with the test and the equipment before testing in the field. Any signs of inexperience or<br />
lack of confidence may cause the tech inspector and track to lose credibility.<br />
As you review the tests, you will find one common theme: <strong>Engine</strong> Temperature, it is the most<br />
critical item with most of the tests. One mistake here and your numbers will be off.<br />
Sealing Bolts<br />
Sealing bolts are the area of most concern for everyone. Every engine GM sells is fully<br />
sealed from the factory. Each engine is built to the same standards and specifications.<br />
After it leaves the factory it is up to the tracks to police them. GM is not responsible for<br />
engines that have been tampered, repaired or rebuilt.<br />
GM Factory Sealing Bolt Inspection Procedures:<br />
Inspection of the sealing bolts is simple. All 8 bolts in each engine have the GM logo laser etched on<br />
the head of the bolt. In May of 2005, GM started installing bolts with a zinc coating on them. This<br />
makes the “GM” logo easier to read and reduces rusting of the bolt.<br />
The photo on the left shows: (1)The GM logo to the left of the square of dots. (2)The square of dots<br />
which is the Info-Glyph encrypted message. Info-Glyph encrypting is described next. The photo on<br />
the right shows a head bolt installed on an engine.<br />
Page 29
Additional Sealing & <strong>Track</strong>ing Methods.:<br />
There are several other ways to seal and track engines. Some are simple, and some are more<br />
complex. By adding another level of seals, this reduces chances the engine is modified.<br />
<strong>Track</strong>ing engines by serial numbers is the best way to understand who has what engine and when it<br />
is serviced. The local track can issue serial numbers and stamp them on the block and heads. That<br />
engine will be required to be registered on the track web site. This will allow the track to determine<br />
how long an engine is in service and who owns it. A registration fee maybe required to cover<br />
overhead costs.<br />
Shown is Drill bolt fixture, stainless wire & safety wire pliers.<br />
Drilled bolt seals. You can install additional seals by<br />
installing a couple of drilled bolts in key locations (intake, front<br />
cover & oil pan) then run a stainless wire between the bolts<br />
and use a crimp seal. The crimp seal can be as simple as the<br />
track logo on a pair of vice-grips where you crimp a large<br />
fishing sinker. Some bolts can be purchase off the shelf<br />
already drilled, making installation easier.<br />
Wire Lock Seals. One of the major sanctioning bodies uses<br />
seals that involve a seal that locks the wire inside preventing<br />
removal. It also has enough area on the lock to serialize<br />
and/or add a logo. This sanctioning body has tough rules<br />
regarding rebuilds does extensive tech inspections. There<br />
resealed engines are monitored closely. They also use the cup<br />
plug as shown below as a secondary seal. Both seals are<br />
marked, serialized and registered.<br />
Shown is a Wire lock seal. www.vmsproducts.net www.stoffel.com<br />
Cup plug seals. This method uses a special base that is secured by the bolt. A cap is pressed on to<br />
the base and encapsulates the bolt head. Fingers on the base grab the outer rim of the cup and<br />
prevent removal without signs of damage. These seals can be serialized and/or a logo added. They<br />
are simple to use when a standard size bolt is required. It is more difficult when you have specialty<br />
bolts or in tight areas. www.americancasting.com<br />
Cup plug system that can be serialized and track logo installed.<br />
Page 30
Tech Inspection Procedures Continued<br />
One of the earliest series to embrace the circle track crate engine program was the USPRO Series,<br />
now known as the ASA Late Model Series. GM Racing and GM <strong>Performance</strong> Parts has worked<br />
with them to provide some of the procedures listed below. Refer to the actual instructions from<br />
each manufacture for 100% accuracy of the test procedures. These are only guidelines.<br />
P&G Procedure: www.precisionmeasure.com<br />
The P&G tester is one of the best “on site checks” of checking engine displacement. It provides a<br />
means to check engine displacement without tearing down the engine.<br />
Note: <strong>Engine</strong> temperature is critical with this test.<br />
Whistler Procedure: www.katechengines.com<br />
The Whistler is used to check compression ratio. It’s a tool used to check compression ratio of<br />
completely assembled engines at the track.<br />
Note: <strong>Engine</strong> temperature is critical with this test.<br />
Valve Spring Inspection: www.moroso.com<br />
Valve springs are an area that teams try and increase the spring pressure to increase PRM limits of<br />
the engine. This sheet covers a quick way to check spring pressures on the engine. Refer to the<br />
spring chart for proper specifications. Moroso P/N 62391 spring rate checker.<br />
Rocker Arm Testing: 604 engine only. Contact local GM dealer<br />
GM sells a rocker arm checking fixture. It’s a simple fixture for testing the roller rockers on the<br />
604 engine. This page covers how to check for correct rocker ratio. The p/n for the fixture is<br />
88958663.<br />
Page 31
P&G Test Procedure<br />
The P/G tester is used to check engine displacement. This is a quick on-site tool for checking<br />
displacement to determine if it is in the allowable cubic inch range.<br />
Important Information<br />
The P/G tester must be kept clean. Before each use,<br />
lubricate the nylon piston, tube and o-ring with fine oil.<br />
If tester is to be used for continuous testing, it should be<br />
oiled after every tenth (10 th ) engine is checked.<br />
<strong>Engine</strong> Preparation<br />
� Remove all spark plugs.<br />
� Select the cylinder number to be checked.<br />
� Have the crew chief remove the both rocker arms<br />
and both push rods from selected cylinder.<br />
Testing Procedures<br />
� Insert the spark plug screw adapter into the<br />
selected cylinder. If this operation is done by the crew<br />
chief, make sure that no washers or spacers are added to<br />
the adapter.<br />
� Make sure that the nylon piston is bottomed out<br />
in the tester tube. Insert the push rod gently into the<br />
tube and slide the piston to the bottom of the tube.<br />
� Note the engine temperature as this will be<br />
needed to determine the total cubic inch displacement<br />
and for the Whistler Test.<br />
� Important – If the engine is cold, use the same<br />
temperature as the outdoor temperature to read the<br />
listed cubic inch number adjacent to the temperature. If<br />
the engine temperature is warmer than the outdoor<br />
temperature read the % correction factor on the chart.<br />
� With the ignition off, crank the engine, at cranking speed for approximately 2 seconds or<br />
until the engine has been spun at cranking speed approximately 10 times.<br />
� Read the number where the nylon piston stops. Convert this number to cubic inch<br />
displacement using the P&G Conversion Chart.<br />
� Maximum allowable cubic inch displacement for Chevy is: 350.0<br />
o If on conversion from P&G Conversion Chart is larger than maximum allowable<br />
reading, retest immediately. If reading is still over the legal maximum allowable<br />
limit, the Whistler Test or cc testing of the heads is necessary.<br />
Page 32
Whistler Procedure<br />
The Whistler measures combustion chamber volume. Using the volume achieved with the tester<br />
along with the chart provided by the company, you will know the correct engine displacement.<br />
Measuring Combustion Chamber Volume for <strong>Engine</strong> Displacement<br />
Requirements<br />
� 110v Power supply<br />
� Portable Air Tank or Compressor<br />
<strong>Engine</strong> Preparation<br />
� Remove spark plug<br />
� With ignition off and distributor unplugged, crank engine<br />
to locate Top Dead Center (TDC) of piston in selected cylinder.<br />
� Purge any remaining gas vapors from selected cylinder<br />
using compressed air.<br />
� Insert Whistler adapter into spark plug hole.<br />
o When selecting cylinder to test, be aware that some<br />
engines require the removal of the header to accommodate the insertion of the<br />
whistler probe.<br />
� Check water temperature via gauge or thermometer.<br />
Testing Procedures<br />
� Plug Whistler into 110 volt power supply.<br />
� Turn on Whistler –<br />
� Adjust display as follows:<br />
o Re-Set the 3 switches as follows.<br />
� Left hand switch – set for numbers 4-6-8.<br />
� Center switch has 3 functions.<br />
� Center position – Set Temperature of engine.<br />
� Bottom position – Set displacement as determined by P&G test.<br />
o Maximum Reading for Chevy: 350.0<br />
� Top Position – this is where the actual reading will appear.<br />
o Right hand switch is used to set reading – either up or down to change readings.<br />
� Once the engine temperature and engine cubic inches have been entered – move the center<br />
switch to top.<br />
� Insert whistler probe into adapter in selected cylinder.<br />
� Make sure that the piston is at TDC.<br />
� Hook up air line to portable air tank.<br />
� Adjust air flow to 20 SCFH.<br />
� Rotate engine slowly in either direction to determine if TDC has been reached.<br />
� At TDC note the highest compression ration reading. Rotate the engine slowly in the other<br />
direction to determine the highest reading. Maximum allowable static reading is 10:1 as<br />
shown on the readout. If the reading is larger, cc the heads to determine the legality of the<br />
engine.<br />
Page 33
Valve Spring Inspection Procedure<br />
This section helps identify those teams that have changed valve springs in an effort to gain<br />
additional rpm’s. It is important to keep rpm’s within GM recommended numbers. <strong>Engine</strong> life<br />
and wear is severely reduced for every 100 rpm’s that an engine is over-revved.<br />
Purpose<br />
Check for proper stock valve spring<br />
specifications. Use Moroso p/n 62390.<br />
Step 1. Have the crew chief remove all<br />
debris in and around the engine<br />
Step 2. Have the crew chief remove the<br />
valve cover being careful not to<br />
contaminate the cylinder head<br />
Step 3. Have the crew chief remove<br />
both rocker arms from the selected<br />
cylinder & make sure piston is at BDC.<br />
Step 4. Slide the Moroso valve spring<br />
tester into position so that intake valve<br />
spring sits in tester pocket<br />
Step 5. Pull the handle to compress the<br />
valve spring to full compression and<br />
note the reading. Repeat the test for<br />
the exhaust valve spring and note the<br />
reading<br />
Step 6. Refer to chart in rebuild<br />
section for correct valve spring<br />
pressures for the intake & exhaust.<br />
Use the space below to reference the<br />
numbers for your application.<br />
Int.________ Exh.________<br />
Page 34
Rocker Arm Check Procedure<br />
GM Racing designed a checking fixture for the aluminum roller rockers used on 604 engines. It<br />
can be purchased at your local dealer. The p/n is 88958663.<br />
The GM P/N 88958663 roller rocker inspection fixture is designed as a quick Go-No Go gauge for<br />
verifying roller rocker arm ratio’s. It does not include rocker arms.<br />
Both Sides of the fixture are marked for easy<br />
identification of a 1.5 or 1.6 rocker arm ratio.<br />
The fixture is designed to check a GM roller<br />
rocker arm by placing the rocker arm on the stud<br />
and seating the roller tip on the pedestal, then<br />
checking the pushrod to the rocker arm cup seat.<br />
The bottom photos show the difference between the 2 sides of the fixture using a 1.5 roller rocker<br />
arm. The left photo shows proper fit for the GM 1.5 roller rocker arm on the fixture. The pushrod<br />
seats into the rocker arm cup properly. The right photo shows the same 1.5 roller rocker arm<br />
sitting on the 1.6 side of the fixture, as you can see the pushrod does not fit the rocker arm cup<br />
properly. The reverse would be true for a 1.6 rocker arm. The pushrod cup will not fit properly on<br />
the 1.5 side.<br />
Correct Pushrod Fit 1.5 ratio Rocker Incorrect Pushrod Fit for 1.5 Rocker<br />
Please note: There is only a .050” difference between the center stud and the pushrod cup center on<br />
a 1.5 and 1.6 rocker arm. The 1.6 rocker arm distance being shorter.<br />
Page 35
<strong>Engine</strong> Parts List<br />
<strong>Engine</strong> Block Components<br />
Description 88958602 19258602 88958603 88958604<br />
Short Block Assembly Not Serviced Not Serviced 12561723 12561723<br />
Cylinder Block 10105123 10105123 10105123 10105123<br />
Main Caps Not Serviced Not Serviced Not Serviced Not Serviced<br />
Rear Seal Housing 14088556 14088556 14088556 14088556<br />
Dowel Pin, Rear Crank Seal Housing 9441003 9441003 9441003 9441003<br />
Dowel Pin, Front Cover (2) - 12554553 (2) - 12554553 (2) - 12554553 (2) - 12554553<br />
Stud, Rear Adap. (2) - 14101058 (2) - 14101058 (2) - 14101058 (2) - 14101058<br />
Nut, Rear Adap 9439915 9439915 9439915 9439915<br />
Bolt, Rear Adap. (2) - 14088561 (2) - 14088561 (2) - 14088561 (2) - 14088561<br />
Bolt, Rear Adap. 14088561 14088561 14088561 14088561<br />
Rear Cam Plug 10241154 10241154 10241154 10241154<br />
Cam Bearings<br />
Use p/n 12453170 for 1 &4. P/n 12453171 for #2,3,5<br />
Dowel Pin, Bellhousing (2) - 12338119 (2) - 12338119 (2) - 12338119 (2) - 12338119<br />
Crankshaft<br />
Connecting Rod. Powdered Metal<br />
14088526<br />
10108688<br />
10243068<br />
10108688<br />
12556307<br />
10108688<br />
12556307<br />
10108688<br />
Piston (Std) 12514101 88894280 10159436 10159436<br />
Balancer, 8" diameter<br />
Cylinder Head Components<br />
88960604 88960604 88960604 88960604<br />
Cylinder Head Assembly 12558060 12558060 12556463 12464298<br />
Cylinder Head Bare 12529093 12529093 N/S N/S<br />
Intake Valve 10241743 10241743 10241743 12555331<br />
Exhaust Valve 12550909 12550909 12550909 12551313<br />
Valve Spring 10212811 10212811 12551483 12551483<br />
Retainer, Valve Spring 10241744 10241744 10212808 10212808<br />
Key, Valve Retainer 24503856 24503856 24503856 24503856<br />
Shim, Valve Spring N/A N/A 10212809 10212809<br />
Stud, Rocker Arm N/S N/S 12552126 12552126<br />
Rocker Arm (1 per package) 10089648 10089648 10089648 19210724<br />
Kool Nut Kit 88961233 88961233 88961233 N/A<br />
Push Rod 14095256 14095256 10241740 10241740<br />
Dowel Pin, Cylinder Head (4) - 585927 (4) - 585927 (4) - 585927 (4) - 585927<br />
Intake Manifold Components<br />
Intake Manifold 12366573 12366573 10185063 12496822<br />
Distributor 93440806 93440806 93440806 N/A<br />
Distributor Hold Down 10096197 10096197 10096197 10096197<br />
Page 36
<strong>Engine</strong> Parts Lists Continued<br />
Camshaft Components<br />
Description 88958602 / 19258602 88958603 88958604<br />
Camshaft 24502476 10185071 10185071<br />
Lifter 5232720 17120735 17120735<br />
Camshaft Gear 340235 12552129 12552129<br />
Timing Chain 14088783 14088783 14088783<br />
Crankshaft Gear 10128346 14088784 14088784<br />
Camshaft Thrust Retainer N/A 10168501 10168501<br />
Timing Cover 12342089 12562818 12562818<br />
Timing Tab 8" Balancer 3991436 3991436 3991436<br />
Timing Tab 6 3/4" Balancer 3991435 3991435 3991435<br />
Oil Pan Components<br />
Oil Pan N/A N/A N/A<br />
Oil Pan Gasket One Piece Design 10108676 10108676 10108676<br />
Oil Pump 93442037 14044872 14044872<br />
Shaft, Oil Pump Drive 3998287 3998287 3998287<br />
Retainer, Nylon oil pump drive 3764554 3764554 3764554<br />
Oil Pan & Screen 25534353 25534354 25534354<br />
Reinforcement, Oil Pan LH 12553058 12553058 12553058<br />
Reinforcement, Oil Pan RH 12553059 12553059 12553059<br />
Adapter, Oil Filter 3952301 3952301 3952301<br />
Bolt, Oil Filter Adapter 3951644 3951644 3951644<br />
<strong>Engine</strong> Dress Items<br />
Rod, Fuel Pump 3704817 3704817 3704817<br />
Cover, Fuel Pump Opening 14094069 14094069 14094069<br />
Water Pump Cast Iron (Long) 88894341 88894341 88894341<br />
Water Pump Alum (Long) N/A N/A N/A<br />
Water Pump Alum (Short) 19168604 19168604 19168604<br />
Valve Cover Kit 25534359 25534359 25534359<br />
Valve Cover Breather Kit 25534355 25534355 25534355<br />
Miscellaneous Parts<br />
Balancer, 8" Diameter 88960604 88960604 88960604<br />
Balancer, 6 3/4" Diameter 12551537 12551537 12551537<br />
Key, Crankshaft Woodruff (2) - 106751 (2) - 106751 (2) - 106751<br />
Key, Balancer Woodruff (2) - 106751 (2) - 106751 (2) - 106751<br />
Thermostat 180 degree 12555290 12555290 12555290<br />
Spark Plug Wires, 135 degree boot N/A N/A N/A<br />
Spark Plug Wires, 90 degree boot 12361051 12361051 12361051<br />
Spark Plug MR43LTS 5614210 5614210 5614210<br />
Page 37
<strong>Engine</strong> Parts Lists Continued<br />
Factory Rebuild Components - In Kit Form<br />
Description 88958602 19258602 88958603 88958604<br />
Main Bearing 1-4 STD 89060460 12594874 89060460 89060460<br />
Main Bearing Rear (.001 U/S) 89060460 12594873 89060460 89060460<br />
Main Bearings 1-4 (.001 U/S) 12531215 12531215 12531215 12531215<br />
Rod Bearings (Std) (16 req) 12523924 12561341 12523924 12523924<br />
Ring Package (8) - 88894219 12522848 (8) - 12528817 (8) - 12528817<br />
Ring Package Set (.005" O/S) (8) - 12507985 12524205 (8) - 12528818 (8) - 12528818<br />
Piston Set (8 pcs) N/S N/S N/S N/S<br />
Piston High limit (1 pc) 12514102 88894280 10159437 10159437<br />
Connecting Rod Set (8 pcs) 12495071 10108688 12495071 12495071<br />
Valve, Intake (8 req) 10241743 10241743 10241743 12555331<br />
Valve, Exhaust (8 req) 12550909 12550909 12550909 12551313<br />
Valve Spring Set 19154761 19154761 12495494 (note 1) 12495494 (Note 1)<br />
Valve Spring Retainer (16) - 10241744 (16) 10241744 12495492 19169661 (Note 2)<br />
Push Rod Kit (16 pcs) 12495491 14095256 12371041 12371041<br />
Lifter Kit (16 pcs) 12371044 12371044 12371042 12371042<br />
Rocker Arm Kit 12495490 (note 3) 12495490 (note 3) 12495490 (note 3) 19210738 (note 4)<br />
Cylinder Head Bolt Kit 12495499 12495499 12495499 12495499<br />
Factory Rebuild Gasket List<br />
Description 88958602 19258602 88958603 88958604<br />
Rebuild Gasket Kit 19201171 19201171 19201172 19201172<br />
Head Gasket (each) 10105117 10105117 12557236 12557236<br />
Intake Gasket Set 89017465 89017465 10147994 89017465<br />
Oil Pan Gasket One piece gasket 10108676 19212594 10108676 10108676<br />
Oil Drain Plug Gasket N/S N/S N/S N/S<br />
Rear Main Seal 12554314 12554314 12554314 12554314<br />
Optional Rear Main Seal 10088158 10088158 10088158 10088158<br />
Rear Crank Adapter Gasket 12555771 12555771 12555771 12555771<br />
Front Timing Cover Seal 14090906 14090906 14090906 14090906<br />
Valve Cover Gasket 10046089 10046089 10046089 10046089<br />
Front Timing Cover Gasket 10108435 10108435 RTV RTV<br />
Seal, Intake Valve 10212810 10212810 10212810 10212810<br />
Seal, Exhaust Valve 12564852 12564852 10212810 10212810<br />
Distributor Gasket 10108445 10108445 10108445 10108445<br />
Water Outlet Gasket 10105135 10105135 10105135 10105135<br />
Water Pump Gasket 3754587 3754587 3754587 3754587<br />
Gasket, Fuel Pump Cover Opening 12560223 12560223 12560223 12560223<br />
Gasket, Fuel Pump 10114141 10114141 10114141 10114141<br />
Oil Filter PF-25 25324052 25324052 25324052 25324052<br />
Note 1. 12495494 contains 16 of 12551483 springs<br />
Note 2. Requires 16 pcs of 1916961 HD retainers or 1pc 19171528 kit.<br />
Note 3. 12495490 contains 16 of 10089648 rocker arms<br />
Note 4. 19210728 contains 16 of 19210724 rocker arms.<br />
Page 38
<strong>Engine</strong> Parts Lists Continued<br />
Factory Service Bolt List<br />
Description 88958602 / 19258602 88958603 88958604<br />
Factory Sealed Bolt Kit N/S N/S N/S<br />
Rebuild Sealed Bolt Kit N/S N/S N/S<br />
Bolt, Main Cap Inner 12561388 12561388 12561388<br />
Bolt, Main Cap Outer 3877669 3877669 3877669<br />
Windage Tray Stud 12561389 12561389 12561389<br />
Bolt, Oil Pump 10046007 10046007 10046007<br />
Bolt, Oil Pan (14) - 9440033 (14) - 9440033 (14) - 9440033<br />
Stud, Oil Pan (2) - 9424877 (2) - 9424877 (2) - 9424877<br />
Nut, Oil Pan Stud (2) - 12338130 (2) - 12338130 (2) - 12338130<br />
Bolt, Oil Filter Adapter (2) - 3951644 (2) - 3951644 (2) - 3951644<br />
Bolt, Timing Cover Kit (8 bolts) 12497980 N/A N/A<br />
Bolt, Timing Cover Plastic Cover Short N/A (6) - 10213293 (6) - 10213293<br />
Bolt, Timing Cover Plastic cover Long N/A (2) - 12551135 (2) - 12551135<br />
Bolt, Head (short) (16) -10168527 (16) -10168527 (16) -10168527<br />
Bolt, Head, (medium) (4) - 10168526 (4) - 10168526 (4) - 10168526<br />
Bolt, Head (long) (14) - 10168525 (14) - 10168525 (14) - 10168525<br />
Factory Service Bolt List - Continued<br />
Description 88958602 / 19258602 88958603 88958604<br />
Bolt, Cam Retainer N/A (2) - 14093637 (2) - 14093637<br />
Bolt, Valve Cover each 12338092 12338092 12338092<br />
Bolt, Flywheel 12337973 12337973 12337973<br />
Bolt, Flexplate (automatic) 373707 373707 373707<br />
Bolt, Intake (8) - 12550027 (4) - 14091544 (8) - 12550027<br />
Bolts, Intake 88958603 continued (4) - 88891769<br />
Bolts, Intake 88958603 continued (4) - 9439918<br />
Bolt, Distributor Hold Down 14091544 14091544 14091544<br />
Bolt, Water Outlet (2) - 10198997 (2) - 10198997 (2) - 10198997<br />
Bolt, Fuel Pump Cover (2) - 9440033 (2) - 9440033 (2) - 9440033<br />
Bolt, Fuel Pump Holddown (2) - 14081295 (2) - 14081295 (2) - 14081295<br />
Bolt, Balancer 3815833 3815933 3815933<br />
Washer, Balancer 14001829 14001829 14001829<br />
Bolt, Water Pump (Short Pump) (4) - 9424877 (4) - 9424877 (4) - 9424877<br />
Bolt, Water Pump (Long Pump) (4) - 9442012 (4) - 9442012 (4) - 9442012<br />
Page 39
Notes<br />
Catalog Changes.<br />
10-19-09 changes to page 45 part numbers. Main and rod bearings.<br />
3-1-10 changes.<br />
1. Page 18 corrected crank forging number on 603 & 604 engines from 10243880 to<br />
14088532.<br />
2. Page 43. Changed crankshaft service number from 12566307 to 12556307 (typo)<br />
4-27-10 changes.<br />
3. Added engine 19258602 throughout manual<br />
4. Page 18. Corrected 8603 Chamber Volume.<br />
5. Add 19258602 story to last page.<br />
6. Add crankshaft bob weights to last page.<br />
7. Page 13. Picture of piston added and description modified.<br />
8. Page 16. Picture of kool nut added and description modified.<br />
9. Pages 36-39 update all part numbers to current.<br />
10. Remove references to fuel testing, noise testing, and carburetor tech procedures<br />
11. Updated table of contents pages<br />
Page 40
<strong>Engine</strong><br />
Crankshaft<br />
Part Number<br />
Crankshaft Weight (grams)<br />
Bob<br />
Weight<br />
Pin 1<br />
Bob<br />
Weight<br />
Pin 2<br />
Bob<br />
Weight<br />
Pin 3<br />
Bob<br />
Weight<br />
Pin 4<br />
19258602 10243068 1657.3 1835.5 1835.5 1269.1<br />
88958602 14088526 1742.2 1932.8 1932.8 1362.6<br />
88958603 12556307 1803.5 1963.6 1963.6 1414.8<br />
88958604 12556307 1803.5 1963.6 1963.6 1414.8<br />
8602 <strong>Engine</strong>s Crank and Piston Changes<br />
General Motors has taken great pride in the crate engine program since its inception in 2002 by<br />
being able to provide proven, reliable, and affordable engine packages to grass roots racers. The<br />
main goal always has been to produce a line of engines that were all built with the exact same<br />
parts to keep a level playing field for all competitors. Over the years, the parts content of these<br />
engines have remained the same with no significant changes in content.<br />
However, in the summer of 2009 the piston supplier for the 8602 engine approached General<br />
Motors and explained that they were no longer able to continue to produce the piston. This was<br />
a business decision based on the material availability and process used in manufacturing the<br />
piston. General Motors (and the supplier) were aware of the implications to the circle track<br />
engine program and tried to find an alternative method to make this piston. The results of the<br />
investigation soon boiled down to one of two choices: Either change the piston to a more<br />
commonly available material or increase the cost of the engine significantly.<br />
Cost is a major factor in the success of the engine program so the only real choice was to change<br />
the piston material and leave the cost of the engine unchanged. Due to the piston change, the<br />
crankshaft balance also had to change. There was initially a concern that there would be a<br />
possible power difference or advantage between the two piston designs so GM began some<br />
extensive testing to find out. The results of this testing proved that no perceivable advantage or<br />
disadvantage could be measured between engines equipped with either piston design.<br />
General Motors decided that since parts in the engine are slightly different and that these parts of<br />
the engine will not interchange with each other, there had to be a part number change to the<br />
engine itself. Since the history of the crate engine program has shown that “8602” (the last 4<br />
digits of the original 88958602 GM part number) was so entrenched in the racing community,<br />
the decision was made to search for an available part number that used the same last 4 digits.<br />
Thus the new part number became 19258602.<br />
So no matter what “8602” engine you or your competitor may have under the hood, be certain<br />
that the playing field is still as level as it always was.<br />
This technical manual has been modified to show where this change designates a physical<br />
difference between the two engine part numbers.<br />
Page 41