Guitar Workout - Guitar Alliance
Guitar Workout - Guitar Alliance
Guitar Workout - Guitar Alliance

Create successful ePaper yourself
Turn your PDF publications into a flip-book with our unique Google optimized e-Paper software.
GUITARWORKOUTB Y K E N N Y M A N N<strong>Guitar</strong> <strong>Alliance</strong> Inc.
Publisher:<strong>Guitar</strong> <strong>Alliance</strong> Inc.1518 McBee St.Malvern AR 72104Web Site: http://guitaralliance.comE-Mail: kenny@guitaralliance.comCopyright © 2013 <strong>Guitar</strong> <strong>Alliance</strong> Inc.All Rights Reserved. No part of this publication may be reproduced, stored in a retrievalsystem or transmitted in any form by any means without prior permission of thecopyright owner.Enquires Should be Made to the Publisher.Every effort has been made to ensure that this book is free from error or omissions.However, the Publisher, the Author, the Editor or their respective employees or agents,shall not accept responsibility for injury, loss or damage occasioned to any person actingor refraining from action as a result of material in this book whether or not such injury,loss or damage is in any way due to any negligent act or omission, breach of duty ordefault on the part of the Publisher, the Author, the Editor or their respective employeesor agents.
I N T R O D U C T I O NT H E Q U E S T FOR C H O P SOk, so you want to play faster. You've got a goal and I'm about totell you how to go about it, but let's get a few things out of the way...The main thing to remember is that building speed takes time.Lots of time. You may not notice marked improvement from day today, but you will be making progress if you put in the time.To really gauge your success, try making an audio recording ofyourself playing some of the exercises in this book on your first day ofplaying them. You can make subsequent recordings in the weeks thatfollow. You'll find that your skills have been increasing all along.It's kind of like a 'before' and 'after' shot from just about any fitnesscraze product- except this 'before' and 'after' will be sonic innature and not visual.The exercises in this book will help you develop confidence inyour playing and will help make you aware of weak areas of yourplaying that need concentrated effort.They are great way to start out a practice session as they helploosen your fingers and stretch your hand muscles to get you ready topractice other material.These exercises should be part of your regular practice routine,but you don’t want to practice them to the point where you may injureyour hands. If you feel a little too much discomfort or cramping
in your hands, by all means cut back a little. Like at the gym, yourmuscles and tendons need time to recuperate in between workouts.You should always play each exercise at a speed that you arecomfortable with. If cannot play the exercises smoothly and withoutmistakes, then you are going too fast and you need to slow it down alittle. Start out slow and slowly build speed. We’re striving for goodtechnique, not fast bad technique. Remember, speed comes withtime.I can't tell you how many students come up to me to show mehow fast they've gotten only to mangle an exercise with terrible technique.You might fool some of the people, but you won't fool a musician.Just take your time and do it right. Don't worry about showingoff at first.Again, you may not see improvement overnight, but you will seeimprovement eventually. If you practice these exercises just 15minutes a day for a week, at the end of the week you will have improvedguaranteed. With practice you can only get better, not worse.U S I N G A M E T R O N O M EAn invaluable tool is what is called a metronome. It's a simpledevice that keeps time by creating a regular beat.You will find using one in conjunction with the <strong>Guitar</strong> <strong>Workout</strong>exercises very beneficial To practice with a metronome simply playone, two, or three notes per beat. When you are able to play an exercisewithout error at one speed, then you just speed the metronomeup a little.You can get a metronome at any music store. They come in allshapes and sizes, most notable is the traditional piano metronomewith it’s swinging pendulum. Prices range from about $10 all the wayto $100+. There’s no need to spend more than $20 for one.
<strong>Guitar</strong> <strong>Workout</strong>Illustration: The "oldschool", swinging pendulummetronome.Illustration: A more modernmetronome....
It's really important to use a metronome. Most of us lack the skillof keeping perfect time, so what will eventually happen is that you'llget stuck at a certain speed and then not be able to get any faster thanif you don't use one.I've got a video for those of you would like more help using ametronome with your exercises at the link below:http://guitaralliance.com/guitar-exercises/the-metronome/Chromatic Alternate Picking Exercises
1C H R O M AT I CA LT E R N AT EP I C K I N GE X E R C I S E SA LT E R N AT E PICKINGFor our first set of exercises we will use a picking techniquecalled alternate picking where you pick in an down, up, down, up pattern.It allows you to play a series of picked notes fluently and cleanly.It helps develop a good sense of rhythm because the regular pickingmotion helps acquire an evenness of timing that is absolutely essential.
<strong>Guitar</strong> <strong>Workout</strong>Some important point about alternate picking to remember are...• Everyone holds a pick a little bit differently. Most people findthat holding your pick with the tips of the thumb and forefingersufficient.• How you hold your pick to the strings is what is important here.You don’t want the top of your pick to lean too far towards theceiling or towards the floor. You may want to position you pickat a slight angle.• You should limit arm movement to your wrist. Your thumb, finger,elbow, or arm should not move when picking. Keep yourwrist movement to a minimum to achieve maximum speed.You're picking motion will look something like this:Illustration: The down, up, down, upmotion.You can count along as '1 and 2 and 3 and 4 and'. You'll pickdown on each beat and pick up in-between.
low:Watch a video demonstration of alternate picking at the link be-http://guitaralliance.com/guitar-exercises/exercises-1-4/T H E C H R O M AT I C S C A L EFor these exercises we'll be using the chromatic scale. It's a fancyterm for a scale that includes every note. These exercises will not havevery much musical value to them in that they'll sound like a song oranything you would normally play during a song.The point of our exercises is to work technique, after all.Chromatic Alternate Picking Exercises
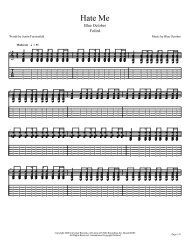
<strong>Guitar</strong> <strong>Workout</strong>E X E R C I S E 1For this exercise practice the down, up, down, up alternate pickingpattern on the open high E string. Start slowly! You want thenotes to be as even as possible. Once you’re able to play the patternevenly slowly increase the tempo. This may seem like a boring exercise,but it’s very beneficial to build alternate picking skills.When I first started speed training many, many moons ago, Iused to practice my alternate picking (as in exercise 1) while doingcommon things like watching TV. It doesn't require much focus, soIllustration: Exercise 1you can passively practice it whenever you like.
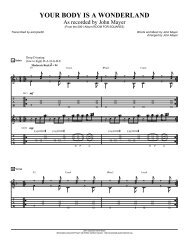
EXERCISE 2Now we’re going to alternate pick on all 6 strings. This one isn’tas easy as it looks. Remember to keep the notes even. Once you canplay through the exercise without a mishap and all the notes are even,try playing it faster and faster. Don’t get sloppy! Maintain a clean attack.Illustration: Exercise 2Once you get to the end try immediately playing the exercisebackwards!Chromatic Alternate Picking Exercises
<strong>Guitar</strong> <strong>Workout</strong>E X E R C I S E 3Let's get our left hand involved now!Concentrate on keeping this exercise clean and even. It doesn’tmatter if you have to go real slow at first. You’ll build speed with time.If you try to rush into playing fast before you are ready it will justsound sloppy.Notice that there are 3 notes per string on this one and somestrings begin with an upstroke. We don’t change the alternate pickingpattern even when we switch strings.
E X E R C I S E 4This is more of a challenge exercise. I don’t think you’ll be able toplay this one very fast without a lot of practice. It’s a alternate pickingstring switching exercise. Instead of alternate picking on one stringwe’re going to alternate between to adjacent strings. Hard!Visit the link below to see video demonstrations of exercises 1-4:http://guitaralliance.com/guitar-exercises/exercises-1-4/Chromatic Alternate Picking Exercises
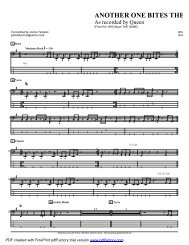
<strong>Guitar</strong> <strong>Workout</strong>E X E R C I S E 5This is simply a chromatic run up the 1st 4 frets on each string.It’s a great warm-up exercise because it warms both your left andright hand, but it’s also great for building speed. Use all 4 of your fingerson your left hand.Use your 1st finger for notes on the 1st fret, 2nd finger for noteson the 2nd, 3rd finger for notes on the 3rd fret, and 4th finger fornotes on the 4th fret.Illustration 1: 1, 2, 3, 4, 1, 2, 3, 4...
E X E R C I S E 6This exercise is performed on a single string. It’s a 4 note ascendingpattern. Use the correct fingerings as illustrated below:Illustration: AscendingThe actual exercise is on the following page. Keep it as clean aspossible. Make sure the notes are even!Chromatic Alternate Picking Exercises
<strong>Guitar</strong> <strong>Workout</strong>
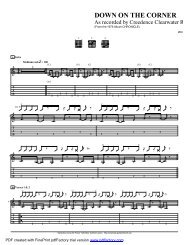
E X E R C I S E 7This one is pretty fun to play. You'll actually see several songswith licks played that are similar to this exercise. Keep a steady pickingmotion during this exercise. Don’t let the notes run into each other.Illustration: Exercise 7: It's got bounce!You should play around with variations of this exercise by changingthe fretted notes, or playing a similar pattern on a differentstring. Be creative and see what you can come up with!Chromatic Alternate Picking Exercises
<strong>Guitar</strong> <strong>Workout</strong>E X E R C I S E 8This one is harder than it looks. It will give your left hand a goodwork out as well as develop your alternate picking. Play this exerciseuntil you turn blue in the face. Repeat the same pattern over and overnon-stop until your hands can’t handle it any more. Take a minute torecoup and then do it again. When you can play it cleanly and evenly,try the next exercise.Illustration: Exercise 8: Feel the burn!It might seem like torture, but we're building technique. Handcramps are common, so fight through it! We're not only working ourspeed, but we're working our endurance. You don't want to cramp upduring your big solo, do you? No one does, so you've got to train likeit's a 12 round fight and be prepared.exercise.We'll play off of the pattern presented in exercise 8 with our next
E X E R C I S E 9This one is a monster, but you can do it!It’s the same pattern as the previous exercise, but we’re ascendingup the neck and descending down the neck.Notice that the tablature stops at the 15th fret. If you get braveyou can go all the way up to the highest fret and then back downagain. In fact, you can play it any way you want. Go as high up thefretboard as you dare. Go back down again. Go back in forth betweentwo positions. Just have fun with it, but maintain that 3 note pattern.It gets quite challenging to play fast because it's a three note patternbeing played in standard 4/4 time. A different note of the sequenceis always falling on the beat.Remember if you get frustrated while trying to play a hard exercise,take a break for a minute and then come back and try. Tensionbuilds up in our neck, shoulders, hands, and arms. A lot of timeswhen you come back after your break the tension will be not be as intenseand you might find yourself performing the exercise 10 timesbetter on the first try back.Chromatic Alternate Picking Exercises
<strong>Guitar</strong> <strong>Workout</strong>Illustration: Exercise 9: Have fun with it!For video demonstration of exercises 7-9, please visit the link below:http://guitaralliance.com/guitar-exercises/exercises-7-9-singlestring/
E X E R C I S E 10Here's a twist on the simple 1, 2, 3, 4. For each rising string we'llbump it up one fret. In the descent we'll bump it down one fret.Illustration: Exercise 10: With a twist!Chromatic Alternate Picking Exercises
<strong>Guitar</strong> <strong>Workout</strong>E X E R C I S E 11You'll just need your 1 st finger to play this one, or you could playit using one of your other fingers. Just use the same finger throughoutonce you start.Illustration: Exercise 11: Pick a finger.
E X E R C I S E 12This exercise is built off of the pentatonic scale which you'll endup using a lot for solos.Illustration: Exercise 12: It's a pentatonic thang...below:For video demonstrations of exercises 10-12, please visit the linkhttp://guitaralliance.com/guitar-exercises/exercises-10-12-advanced-alternate-picking/Chromatic Alternate Picking Exercises
2F I N G E RI S O L AT I O NE X E R C I S E SE A S Y AS 1, 2, 3, 4frets.The set of exercises we'll learn in this chapter occur on the first 4You'll use the following fingerings for each exercise:• 1 st fret = 1 st finger• 2 nd fret = 2 nd finger• 3 rd fret = 3 rd finger• 4 th fret = 4 th fingerIt doesn't matter what string you're on. Just follow prescribedfingerings and you can't go wrong. It's as easy as that.
<strong>Guitar</strong> <strong>Workout</strong>These exercises are easy in concept, but that does not mean theyare just for beginners. Beginners can use them as well as advancedplayers. Everyone benefits because the playing difficulty is determinedby the tempo you set.For example, a beginner might practice the exercises at 60 beatsper minute and work their way up from there. Advanced playersmight play them at speeds approaching 200 bpm (or more!). And ifthat' too easy, you can always turn the eighth notes into sixteenthnotes and go for a world record.The best part about these isolation exercises is that we can findour weak spots and work on them. You'll find that some of your fingersare faster than the others. You may find that your pinky acts as ifit's not attached to your body.E X E R C I S E 13Your 1 st and 2 nd fingers are probably your most responsive fingers,so we'll start with an exercise that uses them.Illustration: Exercise 13
E X E R C I S E 14Your 1 st finger and 3 rd finger will get a workout in this one. The3 rd finger is actually the weakest finger in the hand (I bet you thoughtit was the pinky). You won't feel the weakness in your 3 rd finger asmuch in this exercise as you will in a subsequent exercise.Illustration: Exercise 14E X E R C I S E 15This one is a bit of a stretch. 1 st and 4 th fingers only!Illustration: Exercise 15Finger Isolation Exercises
<strong>Guitar</strong> <strong>Workout</strong>E X E R C I S E 16This time we won't lead with our 1 st finger.Illustration: Exercise 16E X E R C I S E 17A variation of exercise 14...Illustration: Exercise 17
E X E R C I S E 18Here we go with the pinky again...Illustration: Exercise 18E X E R C I S E 19Just use your 2 nd and 3 rd fingers. This one is pretty tough andhighlights the weakness of the 3 rd finger.Illustration: Exercise 19Finger Isolation Exercises
<strong>Guitar</strong> <strong>Workout</strong>E X E R C I S E 20Try playing this one right after exercise 19. It's going to hurt!Illustration: Exercise 20E X E R C I S E 21This one is not so bad compared to the last 2 exercises.Illustration: Exercise 21
E X E R C I S E 22This exercises focuses on the two most common weak spots. The3 rd and 4 th finger.Illustration: Exercise 22E X E R C I S E 23Ok, we're going to digress from our previous fingering formula.You'll use your 3 rd finger for the notes on the 3 rd fret and your 4 th fingerfor the notes on the 5 th fret. You'll feel a bit of a stretch.Illustration: Exercise 23Finger Isolation Exercises
<strong>Guitar</strong> <strong>Workout</strong>E X E R C I S E 24Here's the last exercise of this chapter and probably the hardestto play. It's just a variation of exercise 23. Just use your 3 rd and 4 th fingers!Illustration: Exercise 24
3L E G AT OE X E R C I S E SW H AT IS L E G AT O ?Legato means that musical notes are to be played smoothly andconnected. That is to transition from note to note with no interveningsilence. On the guitar we can use hammer-ons and pull-offs to createlegato. The following series of exercises uses legato throughout. Thatmeans that there will be lots of hammer-ons and pull-offs.One of the main differences between this method and strictlypicking throughout is that the hammer-ons and pull-offs require alittle more strength to pull of properly. If you don't pull-off hardenough the next note will not produce much of a sound, hence youwould 'lose' a note.You'll use the same fingering structure that we outlined in theprevious chapter. Remember it's as easy as 1, 2, 3, 4.
<strong>Guitar</strong> <strong>Workout</strong>E X E R C I S E 25Make sure the even notes ring out as loud as the odd notes whenyou hammer-on.Illustration: Exercise 25E X E R C I S E 26This will work that 1 st finger 3 rd finger connection.Illustration: Exercise 26
E X E R C I S E 27This one can be tricky. You really have to work at it to get enoughmomentum going to sound the notes on the 4 th fret. Keep at it, becauseit CAN be done.Illustration: Exercise 27E X E R C I S E 28Now we'll lead with our 2 nd finger.Illustration: Exercise 28Legato Exercises
<strong>Guitar</strong> <strong>Workout</strong>E X E R C I S E 29The pull-offs in this exercise are tough at first. Remember thatthe 3 rd finger is the weakest and you really have to work on it to get agood sounding pull-off using it.Illustration: Exercise 29E X E R C I S E 30If you thought exercise 27 was tough, wait till you try this ...Illustration: Exercise 30
E X E R C I S E 31Here's the hardest series of hammer-ons you'll play.Illustration: Exercise 31E X E R C I S E 32And now, the hardest pull-offs. Ouch!Illustration: Exercise 32Legato Exercises
<strong>Guitar</strong> <strong>Workout</strong>E X E R C I S E 33Don't cheat and use your 1 st and 3 rd fingers. Use your 2 nd and 4 thfingers only!Illustration: Exercise 33E X E R C I S E 34Here's a workout for the two weakest fingers.Illustration: Exercise 34
E X E R C I S E 35Ok, now use your 3 rd and 4 th fingers only for this one.Illustration: Exercise 35E X E R C I S E 36And your 3 rd and 4 th fingers for this one as well. If you didn'talready hate me enough at this point...Legato Exercises
<strong>Guitar</strong> <strong>Workout</strong>E X E R C I S E 37Are you ready to play something that doesn't hurt quite asmuch? This exercise is a series of three notes. You can play this oneall the way up the fretboard if you wish.Illustration: Exercise 37E X E R C I S E 38Here's an exercise that plays around with the pentatonic.Illustration: Exercise 38
E X E R C I S E 39This exercise might sound like something you've heard in a song.Just use your 1 st and 3 rd fingers to play the fretted notes. The openstring helps you move to the next note.You can move it all the way up the fretboard or all the way down.Just maintain the pattern throughout.Illustration: Exercise 39Legato Exercises
<strong>Guitar</strong> <strong>Workout</strong>E X E R C I S E 40Here's a series of hammer-ons that will challenge you. Use your1 st , 2 nd , and 4 th fingers for fingerings.Illustration: Exercise 40
E X E R C I S E 41Here you'll find a slight variation on the last exercise. 1 St , 3 rd , and4 th fingers only!Illustration: Exercise 41Legato Exercises
<strong>Guitar</strong> <strong>Workout</strong>E X E R C I S E 42Here's a tough one. Use your 1 st , 3 rd , and 4 th fingers. It's going tohurt going up, but it will hurt more going down.Illustration: Exercise 42
E X E R C I S E 43You'll use all four fingers for this exercise. Try to play so thateach note rings out clearly.Illustration: Exercise 43Legato Exercises
<strong>Guitar</strong> <strong>Workout</strong>E X E R C I S E 44This variation on exercise 43 will throw a little bit of finger confusionin the mix.Illustration: Exercise 44
E X E R C I S E 45This one is a monster! It's quite a stretch for you poor fingers, soif you're don't feel agile enough to tackle it, please don't trouble yourselfjust yet. We don't want you to damage your hand.I'm just give you fair warning, because you're using your 1 st fingerfor the notes on the 1 st fret, 2 nd finger for notes on the 3 rd fret, 3 rdfinger for notes on the 4 th fret, and your 4 th finger for the notes on the6 th fret.Illustration: Exercise 45Legato Exercises
<strong>Guitar</strong> <strong>Workout</strong>E X E R C I S E 46Here's an exercise that doubles as a cool lick. It's an ascendingpattern I've seen many players, such as Randy Rhoads, use. You cancontinue to play it all the way up the fretboard if you wish.Illustration: Exercise 46E X E R C I S E 47Once you go up as in exercise 46, you've got to come down...Illustration: Exercise 47
4P E N TAT O N I CE X E R C I S E ST H E PENTAT O N I C SCALEThe word pentatonic gets it’s name from the Greek word “penta”which means 5 and tonic which stands for tone. That’s what pentatonicscales are: 5 tone scales.The pentatonic scales are widely used for guitar leads and solos.Practicing the pentatonic scale patterns is a great exercise thatprovides technical training as well as helps you memorize practicalscales that have a use in the real world.You won't find much in the way in variation in this chapter. Just12 pentatonic scale patterns, so let's get started...
<strong>Guitar</strong> <strong>Workout</strong>E X E R C I S E 48Illustration: Exercise 48: G pentatonicE X E R C I S E 49Illustration: Exercise 49: G# pentatonic
E X E R C I S E 50Illustration: Exercise 50: A pentatonicE X E R C I S E 51Illustration: Exercise 51: A# pentatonicPentatonic Exercises
<strong>Guitar</strong> <strong>Workout</strong>E X E R C I S E 52Illustration: Exercise 52: B pentatonicE X E R C I S E 53Illustration : Exercise 53: C pentatonic
E X E R C I S E 54Illustration: Exercise 54: C# pentatonicE X E R C I S E 55Illustration: Exercise 55: D pentatonicPentatonic Exercises
<strong>Guitar</strong> <strong>Workout</strong>E X E R C I S E 56Illustration: Exercise 56: D# pentatonicE X E R C I S E 57Illustration: Exercise 57: E pentatonic
E X E R C I S E 58Illustration: Exercise 58: F pentatonicE X E R C I S E 59Illustration: Exercise 59: F# pentatonicPentatonic Exercises
<strong>Guitar</strong> <strong>Workout</strong>E X E R C I S E 60Illustration: Exercise 60: G pentatonic
5E N D U R A N C EE X E R C I S E SF E E L THE BURNThe exercises in this chapter are designed to bring the pain.You're hands will be cramping! The purpose is to develop stamina.Fingers and hands get tired quickly, so you've got to train the musclesfor endurance.These exercises are meant to be played for as long as you can.Each contains a repeating pattern. Just repeat the pattern over andover until you just can't stand it anymore.Also, keep in mind that you can only pick the very first note.Each note after that must be executed with hammer-ons and pull-offsonly.
<strong>Guitar</strong> <strong>Workout</strong>E X E R C I S E 61Keep the trill going for as long as you can. Eventually you'll startmissing notes and hand cramps will invade. Use your 1 st and 4 th fingersfor fretting purposes.Illustration: Exercise 61E X E R C I S E 62This one is similar to the last, but just use your 2 nd and 3 rd fingersto fret it. You won't be able to play it as long as the last one.Illustration: Exercise 62
E X E R C I S E 63Use your 2 nd and 4 th fingers. Fight through the burn for a fewseconds before you stop.Illustration: Exercise 63E X E R C I S E 64This one is really hard to keep going. Use your 3 rd and 4 th fingers.Illustration: Exercise 65Endurance Exercises
<strong>Guitar</strong> <strong>Workout</strong>E X E R C I S E 65Here's you'll use your 1 st and 4 th fingers. This one is also hard tokeep going for very long.Illustration: Exercise 65E X E R C I S E 66Here's a slight variation using three fingers.Illustration: Exercise 66
E X E R C I S E 67This one is similar to the last. Only in this one we'll ascend thefretboard. Go as high or as low as you want.Illustration: Exercise: 67E X E R C I S E 68Keep repeating the three measures below. See how long you canlast. You can also play it going up or even add your own variations.Illustration: Exercise 68Endurance Exercises
6S T R E N G T HB U I L D I N GE X E R C I S E SL E T'S GET PUMPED!I've just got a trio of exercises in this chapter. They are extremelychallenging, so proceed with caution!
<strong>Guitar</strong> <strong>Workout</strong>E X E R C I S E 69This is probably the weirdest exercise in this book. You'll playthe 3 rd fret with your 1 st finger, the 5 th fret with your 3 rd , and use your4 th finger to slide from the 7 th fret to the 9 th . Use similar fingeringsthroughout the exercise and you'll have it made!Illustration: Exercise 69
E X E R C I S E 70This is the exercise I like most. You cross the string quickly andit sound real cool. It's tricky to play at first. You'll end up playing onthe wrong strings and hitting the wrong notes, but it's worth the effortas I have noticed how it's improved my playing, and and other'splaying, throughout the years.Illustration: Exercise 70Strength Building Exercises
<strong>Guitar</strong> <strong>Workout</strong>E X E R C I S E 71Our last strength building exercise doesn't look too difficult atfirst, but upon a further look we'll realize that it's a doozy.We're going to perform a series of hammer-ons and pull-offs,like a trill, but we're going to shift the high note.The basic patter is 5 th fret, 7 th fret, 5 th , fret, 8 th fret, 5 th , fret, 10 thfret, and then back down again. It's very tough to reach for a higherand higher note. Just keep your 1 st finger glued to the 5 th fret.
6F I N G E RC O N F U S I O NE X E R C I S E SW H O? W H AT? W H E R E?Your fingers sometime seem like they have a brain of their own,but it's the brain in your head that is getting confused. These exerciseschallenge you by playing weird finger combinations. They willstress your concentration, but don't let it get to you!
<strong>Guitar</strong> <strong>Workout</strong>E X E R C I S E 72Play through this one slowly at first to determine if you're actuallyplaying it right. I've had several students look at it and assumethings about it and then go on to play something totally different.Just use the old 1, 2, 3, 4 fingerings, but pay attention to wherethe hammer-ons and pull offs are and what notes you're actually using.Illustration: Exercise 72
E X E R C I S E 73Our last few exercises use a lot of hammer-ons and pull-offs. Youcan also play a variation of it by just picking the notes.Use the same fingerings as before and concentrate on clearlysounding each note.Illustration: Exercise 73Finger Confusion Exercises
<strong>Guitar</strong> <strong>Workout</strong>E X E R C I S E 74Illustration: Exercise 74E X E R C I S E 75Illustration: Exercise 75
Finger Confusion Exercises
7R E S O U R C E SO N THE WEBYou'll find resources for this e-book on the web at the link below:http://guitaralliance.com/guitar-exercises/Feel free to use the comments system at the website to leavecomments or to suggest any additions to <strong>Guitar</strong> <strong>Workout</strong>.You can also download any revisions of this e-book as they becomeavailable.I N CLOSINGWell, that's about it for now. I'll certainly revisit this topic in thefuture to add even more exercises, so check the website out frequentlyto scout for updates.Sincerely,Kenny Mann
<strong>Guitar</strong> <strong>Workout</strong>