sunlight murrine english.pdf
- No tags were found...

You also want an ePaper? Increase the reach of your titles
YUMPU automatically turns print PDFs into web optimized ePapers that Google loves.
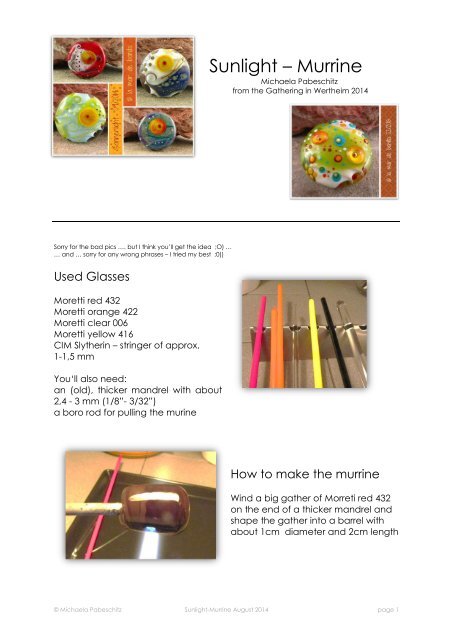
Sunlight – MurrineMichaela Pabeschitzfrom the Gathering in Wertheim 2014Sorry for the bad pics …. but I think you’ll get the idea ;O) …… and … sorry for any wrong phrases – I tried my best ;0))Used GlassesMoretti red 432Moretti orange 422Moretti clear 006Moretti yellow 416CIM Slytherin – stringer of approx.1-1,5 mmYou‘ll also need:an (old), thicker mandrel with about2,4 - 3 mm (1/8”- 3/32”)a boro rod for pulling the murineHow to make the <strong>murrine</strong>Wind a big gather of Morreti red 432on the end of a thicker mandrel andshape the gather into a barrel withabout 1cm diameter and 2cm length© Michaela Pabeschitz Sunlight-Murrine August 2014 page 1
Encase this red base with stripes ofMoretti orange 422. Take care thateach new stripe touches the edges ofthe previous one, to avoid trappedair. When the whole barrel isencased, melt in to a smooth surface.Add a second layer of Moretti orangeand melt in again.Encase the orange with one thin layerof Moretti clear (I’m using 006).The hotter you make the gather ofclear, the thinner your stripes will get.Melt in again to a smooth surface.Add a thin layer of Moretti yellow 416.The thinner the layer of yellowbecomes, the more the surface ofyour finished murine will break up andbring forward the orange and redlayers from below when you apply itto your bead.Melt in to a smooth surface.Take care, that the gather is fairly stiffbefore you place stringers of CIMSlytherin to your base. Do this bywarming up a length of your basefrom left to right, apply the stringerfrom the beginning of the yellow layeron the one side until at least the endof the yellow layer (better the middle)of the top side. Push down the endsof your stringer on both sides to avoidthat they splinter off.© Michaela Pabeschitz Sunlight-Murrine August 2014 page 2
Repeat this process (warming up,apply stringer, press down ends) forthe next stringers, until the wholebarrel is full of stringers. Try to achievea consistent distance between themand apply as much stringers aspossible. The stringer will help theyellow layer to break up.Melt in the stringers slowly.Afterwards cover the front sides of thebarrel with clear glass and melt in.Let it cool down a bit and keep itwarm in the back of the flame.In the meantime heat a clear bororod and form a maria on yourgraphite paddle.Heat the top part of the barrel andattach the maria to it – this works bestin a vertical position (sorry picturesshow the contrary, but shootingpictures in a vertical position of yourgather wasn’t possible for me withoutloosing control over the maria ;0))© Michaela Pabeschitz Sunlight-Murrine August 2014 page 3
Heat up the barrel until the core. Dothis by twisting the mandrel and theboro rod in the same direction. Putthe flame on all parts of the barreland go out of the flame from time totime to let the heat sink in. The gatheris ready for pulling, when it starts totwist and gets lengthen on its own.Go out of the flame, and change in avertical position (mandrel at thebottom, boro rod on the top or viceversa). Wait 2-3 seconds, start to pulla short piece slowly, change thepositon of mandrel and boro rod toopposite (mandrel on top, boro onthe bottom or vice versa), pull more,change postion …... When the gathergets cooler with time force your pull,until you got a <strong>murrine</strong> rod of about 4to 6 mm thickness.(… in lack of a third hand I wasn’table to make pictures while pullingmy rod)Cut your murrini rod in pieces of 5 to6mm length. And that’s how it shouldlook like now.© Michaela Pabeschitz Sunlight-Murrine August 2014 page 4
How to apply the <strong>murrine</strong>Grab a <strong>murrine</strong> piece with a plier and preheat it in the back of the flame.Superheat the spot where you want to place it and push the <strong>murrine</strong> straightinto the bead . Return to the back of the flame and preheat the upper egdeof the <strong>murrine</strong>. Afterwards heat the murrini itself and the surrounding arreaslowly, go out of the flame and press it just for about 1mm. Make this at eyelevel – so you can see, if you’re parallel to your bead surface. Repeat thisprocess for about 2-3 times. Increase the last push to an even surface with thebead, this forces the yellow layer to break up.Et voilà – see the <strong>sunlight</strong> :0)If you didn’t succeed with breaking up the yellow layer with this last push, youcould reheat just parts of the <strong>murrine</strong> to raise that effect too.If you would like, you can now poke the center of the <strong>murrine</strong> and encase itwith clear glass (picture on the right on the first page)Wish you a lot of joy with reproducing and catching the <strong>sunlight</strong>!Yours, Michi© Michaela Pabeschitz Sunlight-Murrine August 2014 page 5