

Battle of Jussy

You also want an ePaper? Increase the reach of your titles
YUMPU automatically turns print PDFs into web optimized ePapers that Google loves.
The Fighting 5th (21-23 March 1918)<br />
Factors affecting Germany’s decision to attack:<br />
After several defeats in 1915, Russia retreated from Galicia and Poland. This was followed by several failed<br />
<strong>of</strong>fensives against the Germans in 1916 resulting in heavy casualties. The hardships suffered by the civilian<br />
population coupled with unrest amongst the Army led to widespread strikes and mutiny.<br />
In February 1917 a revolution occurred in Russia, the Army leadership were unable to use a mutinous Army<br />
to quash it resulting in the abdication <strong>of</strong> Tsar Nicholas II. A Provisional Government was formed but instead<br />
<strong>of</strong> ending the war with Germany they chose to continue. There were many strikes and protests, the Army<br />
frequently mutinied until the Bolsheviks overthrew the Provisional Government in October 1917. Keen to<br />
end the war with Germany the Bolsheviks quickly entered into talks with Germany and an armistice was<br />
signed on the 15 th December 1917.<br />
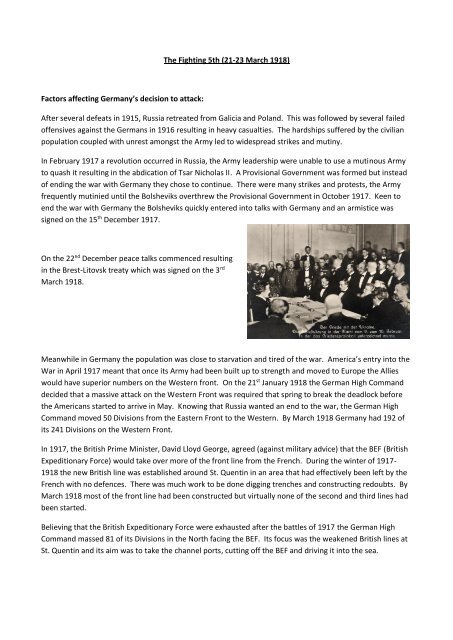
On the 22 nd December peace talks commenced resulting<br />
in the Brest-Litovsk treaty which was signed on the 3 rd<br />
March 1918.<br />
Meanwhile in Germany the population was close to starvation and tired <strong>of</strong> the war. America’s entry into the<br />
War in April 1917 meant that once its Army had been built up to strength and moved to Europe the Allies<br />
would have superior numbers on the Western front. On the 21 st January 1918 the German High Command<br />
decided that a massive attack on the Western Front was required that spring to break the deadlock before<br />
the Americans started to arrive in May. Knowing that Russia wanted an end to the war, the German High<br />
Command moved 50 Divisions from the Eastern Front to the Western. By March 1918 Germany had 192 <strong>of</strong><br />
its 241 Divisions on the Western Front.<br />
In 1917, the British Prime Minister, David Lloyd George, agreed (against military advice) that the BEF (British<br />
Expeditionary Force) would take over more <strong>of</strong> the front line from the French. During the winter <strong>of</strong> 1917-<br />
1918 the new British line was established around St. Quentin in an area that had effectively been left by the<br />
French with no defences. There was much work to be done digging trenches and constructing redoubts. By<br />
March 1918 most <strong>of</strong> the front line had been constructed but virtually none <strong>of</strong> the second and third lines had<br />
been started.<br />
Believing that the British Expeditionary Force were exhausted after the battles <strong>of</strong> 1917 the German High<br />
Command massed 81 <strong>of</strong> its Divisions in the North facing the BEF. Its focus was the weakened British lines at<br />
St. Quentin and its aim was to take the channel ports, cutting <strong>of</strong>f the BEF and driving it into the sea.
British Response:<br />
British Intelligence learnt <strong>of</strong> a planned large scale attack in late 1917, the exact time and location were<br />
unknown at this stage. By March 1918 air reconnaissance and information obtained from German deserters<br />
led British Intelligence to predict an attack in the Arras (3 rd Army) to St. Quentin (5th Army) area.<br />
The 5 th Army at St. Quentin held a 42-mile front line recently taken over from the French. The front line<br />
defences were being constructed at the fastest possible rate and were near to (but not totally) complete.<br />
Work on the second and third lines had not yet started (except for some strong points at key locations). The<br />
5 th Army was also the only section <strong>of</strong> the British lines that had no general reserves behind it. This prompted<br />
the commander <strong>of</strong> the under strength and over stretched 5 th Army (Lt. Gen. Gough) to request<br />
reinforcements. A request that was denied.<br />
History records that the reason behind this decision was that Sir Douglas Haig felt he could not move<br />
reserves from the North (which were protecting the shortest route to the Channel ports) until he knew for<br />
certain that the attack would take place to the South <strong>of</strong> the British line.<br />
A few days prior to the attack, German deserters spoke <strong>of</strong> troops, artillery and mortars massing on the<br />
German front line at St. Quentin.<br />
On the night <strong>of</strong> 19/20 th March 1918 men <strong>of</strong> the 61 st Division raided the German lines to take prisoners for<br />
the purpose <strong>of</strong> extracting intelligence information. They learned that the attack would commence on the<br />
21st. By this stage it was too late to reinforce the British line in time for the inevitable attack. The role <strong>of</strong><br />
sacrificing itself in order to gain time to move the necessary reinforcements fell to the 5 th Army.<br />
Facing the British 3 rd and 5 th Armies were the German 2 nd , 6 th , 7 th , 17 th & 18 th Armies.
British troop positions March 1918:<br />
The British 5 th Army had the British 3 rd<br />
Army on its left flank in the North and the<br />
French 3 rd Army on its right flank in the<br />
South. The extreme right flank <strong>of</strong> the 5 th<br />
Army was held by III Corps from the area<br />
South <strong>of</strong> St. Quentin down to St. Gobain.<br />
III Corps front line area was held by the 14 th Division in<br />
the North (just South <strong>of</strong> St. Quentin), the 18 th Division in<br />
the centre and the 58 th Division in the South. The 2 nd<br />
Cavalry Division were in reserve immediately to the rear<br />
<strong>of</strong> the front line at Quesmy (10 miles from <strong>Jussy</strong>).
General situation in III Corps area:<br />
During Germany’s planned withdrawal to the Hindenburg Line in February/March 1917, all <strong>of</strong> the area<br />
around St. Quentin had been laid to waste in a ‘scorched earth’ policy. Villages were destroyed, water<br />
supplies poisoned and booby traps laid.<br />
This March 1917 photograph shows the village<br />
<strong>of</strong> <strong>Jussy</strong> occupied by French troops after the<br />
Germans destroyed it.<br />
The failure <strong>of</strong> the French Army to construct an effective, in depth defensive line around St. Quentin meant<br />
that the British Fifth Army had a massive task ahead <strong>of</strong> itself when it arrived late 1917.<br />
Work commenced immediately. Infantry and dismounted cavalry were formed into work parties employed<br />
on various tasks which were made very difficult by the freezing conditions. The war diary <strong>of</strong> a dismounted<br />
Company <strong>of</strong> the Royal Scots Greys (2 nd Dragoons) records their nightly work parties constructing barbed wire<br />
entanglements on the front line in rain, snow, strong winds and “frozen land”.<br />
The withdrawing German Army destroyed the canal and river<br />
bridges as they went. Those that could not be repaired were<br />
replaced and numerous new bridges were built to allow troops<br />
and equipment to move forward to the new front line.<br />
Royal Engineers constructing a pontoon bridge<br />
Royal Engineers repairing a bridge.
This January 1918 trench map shows the British (in blue) and German (in red) front lines<br />
with the Oise Canal and extensive Oise River water system (paler blue) between them.<br />
Although shown on this trench map, it is<br />
unclear from the war diaries whether the<br />
original bridge at <strong>Jussy</strong> was repaired or even<br />
replaced. There are a number <strong>of</strong> trenches in<br />
the <strong>Jussy</strong> area (not all connected) creating a<br />
strong point to the rear <strong>of</strong> the front line.<br />
There are no other trench systems shown<br />
along the St. Quentin (Crozat) canal,<br />
presumably, given the time, a second line <strong>of</strong><br />
defence would have been constructed along<br />
this natural barrier.<br />
The only known operational bridge in the <strong>Jussy</strong> area on the morning <strong>of</strong> the 21 st March was 2000 metres<br />
South East along the canal at the La Montagne locks.
The 2 nd Cavalry Division:<br />
In March 1918 the 2 nd Cavalry Division were being held in reserve at Quesmy. Most <strong>of</strong> the Divisional Infantry<br />
were dismounted and being used as working parties either on the front line or constructing strong points at<br />
key locations for the proposed second line.<br />
On the 18 th March 1918 a cavalry working party consisting <strong>of</strong> 3 Officers and 153 other ranks were sent to<br />
<strong>Jussy</strong>.<br />
The Divisional Engineers (2 nd Field Squadron, Royal Engineers) were also dismounted and working on front<br />
line redoubt’s and preparing bridges on the Oise (river and canal) for demolition.
Operation Michael (German attack):<br />
Having captured German soldiers on the night <strong>of</strong> the 19/20 th March and learning <strong>of</strong> the impending attack the<br />
following day, the order “prepare for attack” was issued to the BEF at 1500hrs on the 20th.<br />
21 st March 1918<br />
The attack began at 0435hrs with the largest barrage <strong>of</strong> the first world war. Over 3.5 million shells were<br />
fired in five hours along the 40 mile St. Quentin front. The front line was badly damaged and<br />
communications to the rear were cut. At 0940hrs the German infantry assaulted the incomplete front line,<br />
in some places white tape marked trenches that were yet to be dug.<br />
By 1200hrs the Essigny redoubt on the St. Quentin road had fallen with the entire garrison <strong>of</strong> the 12 th Irish<br />
Rifles being wiped out. 180 men from the 3 rd Rifle Brigade held ‘Cookers Quarry’ until 2000hrs with only 11<br />
wounded survivors withdrawing to safety. By the end <strong>of</strong> the first day all troops were either engaged or<br />
covering the withdrawing Divisions.<br />
In III Corps area a new line was hastily being formed along the St. Quentin (Crozat) canal. The 11 th (Service)<br />
Battalion, Royal Fusiliers took up position between <strong>Jussy</strong> and the still intact La Montagne bridge. The 7 th<br />
(Service) Battalion, Bedfordshire Regiment between the bridge and Mennessis. The 8 th (Service) Battalion,<br />
Northamptonshire Regiment were held in reserve and sheltered as best they could in woods to the West <strong>of</strong><br />
the canal.<br />
The 2 nd Cavalry Division being dismounted were bused up to the canal during the afternoon <strong>of</strong> the 21 st and<br />
took up defensive positions around <strong>Jussy</strong>. The Division consisted <strong>of</strong> the 3 rd , 4 th and 5 th Cavalry Brigades each<br />
<strong>of</strong> which had one troop from the 2 nd Field Squadron, Royal Engineers attached to it. HQ Troop went to the<br />
Oise canal to destroy bridges.<br />
Number One Troop under command <strong>of</strong> Lt. Kezar MC R.E. were at <strong>Jussy</strong> with the Royal Scots Greys (2 nd<br />
Dragoons) manning their post in the newly formed defensive line.<br />
22/23rd March 1918<br />
By 7am on the 22 nd the Division was in position having spent the night digging in. Despite the desperate<br />
need to blow the La Montagne bridge a lack <strong>of</strong> explosives made this impossible. The Bedford’s even<br />
exploded trench mortar shells but were unable to bring the bridge down. Heavy fog reduced visibility to<br />
between twenty and fifty yards.<br />
The Germans attempted to cross the bridge on numerous occasions throughout the day but were pushed<br />
back with heavy losses; finally after a heavy German attack they took the bridge at 1745hrs. Two hours later<br />
the British counter attacked and re-took the bridge. Further South, British units were forced from the canal<br />
and a gap in the line developed. Every available unit not already engaged was thrown into the gap to halt<br />
the German advance. No man was spared from the fighting. Cooks, saddlers, transport drivers and all<br />
available non-combatants went forward to hold the line.
In <strong>Jussy</strong>, Lt. Kezar and his Troop <strong>of</strong> Sappers were pushed back from their defensive strong point and cut <strong>of</strong>f<br />
from the Infantry. They fought their way back to the edge <strong>of</strong> a wood where he collected 100 Infantry<br />
(possibly from the 8 th Northamptonshire Regiment held in reserve in the woods to the West <strong>of</strong> <strong>Jussy</strong>) and<br />
counter attacked. The Infantry Officers were cut down and their attack did not succeed. Lt. Kezar MM R.E.,<br />
however, reached his post and held it until he only had two men left. He was awarded a Bar to his Military<br />
Cross for his actions that day.<br />
The unit war diary records “No 1. Troop gallantly defended post at <strong>Jussy</strong> under lieut. KEZAR MC RE No 1 lost<br />
10 O.R. killed, wounded & missing”. No casualties from other Troops are specifically mention in the 2 nd Field<br />
Squadron R.E. war diary therefore it is assumed that the 4 casualties buried at Grand Seraucourt British<br />
Cemetery are those from 1 Troop. They are:<br />
Sapper William Albert Cooper<br />
Sapper Charles Howell<br />
Sapper Harold Clifft<br />
Sapper George Field
By the morning <strong>of</strong> the 23 rd , the 2nd Division was being pushed backwards and badly mauled by the German<br />
Army. <strong>Jussy</strong> was now held by a large German force and the 14 th Division to their left had withdrawn (after<br />
heavy losses) leaving the 54 th Brigade left flank exposed. At about 1100hrs on the 23 rd , the Bedfordshire’s<br />
reported the enemy had crossed the canal in strength to their South meaning the right flank was also<br />
exposed. The 54 th Brigade HQ ordered a withdrawal to the ridge East <strong>of</strong> Faillouel. The Bedford’s covered the<br />
Northampton’s withdrawal but were unable to extricate themselves from the line without being badly<br />
mauled by the Germans crossing the bridge to their rear. Similarly, the Fusiliers between <strong>Jussy</strong> and the La<br />
Montagne bridge did not receive the order to withdraw. By the time they eventually took the decision<br />
themselves it was too late. Forced to cover 800m <strong>of</strong> open ground they were cut down in swathes by<br />
machine gun fire from both their flanks. By nightfall the Bedford’s and Northampton’s could only muster<br />
200 men each. The Fusiliers however had been virtually wiped out with only 2 Officers and 26 other ranks<br />
left.<br />
Aftermath:<br />
Official figures published in 1935 state that the Allies lost 255,000 men who were killed, wounded or missing<br />
during the German Spring Offensive. Of those 177,739 were British and 90,882 from the 5 th Army.<br />
Two German Armies were launched at the British 5 th Army at a time when they were under strength, over<br />
stretched and (through no fault <strong>of</strong> their own) un-prepared. General Ludendorff knew this which is why he<br />
chose to concentrate his main effort at St. Quentin.<br />
Immediately cut <strong>of</strong>f from high command the battle came down to individual Regiments, Platoons and men.<br />
Although faced with an overwhelming force the 5 th Army fought stubbornly to hold its position, only<br />
relinquishing it once it became clear that their left flank was exposed (due to the withdrawal <strong>of</strong> the 3 rd<br />
British Army) and their right flank was exposed (due to the withdrawal <strong>of</strong> the French 3 rd Army).<br />
Executing a fighting withdrawal and rear guard they took up position and faced the enemy time and time<br />
again only withdrawing when their flanks were once again exposed. It wasn’t until the 5 th <strong>of</strong> April that the<br />
German advance was finally halted.<br />
Had Ludendorff been successful, Germany would have won the war which in turn means that had the 5 th<br />
Army not held its ground, Germany would have won the war.