
You also want an ePaper? Increase the reach of your titles
YUMPU automatically turns print PDFs into web optimized ePapers that Google loves.
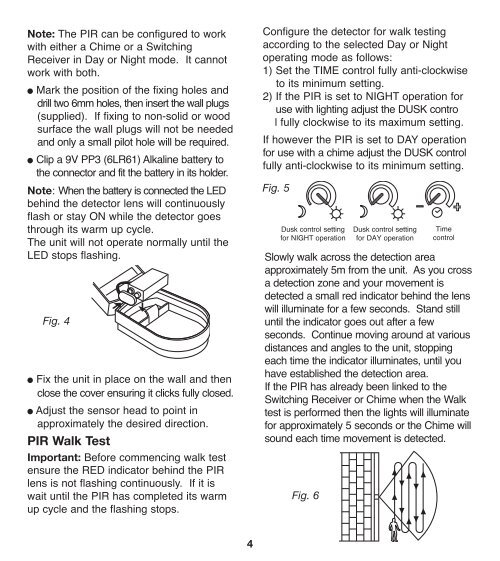
Note: The PIR can be configured to work<br />
with either a Chime or a Switching<br />
Receiver in Day or Night mode. It cannot<br />
work with both.<br />
● Mark the position of the fixing holes and<br />
drill two 6mm holes, then insert the wall plugs<br />
(supplied). If fixing to non-solid or wood<br />
surface the wall plugs will not be needed<br />
and only a small pilot hole will be required.<br />
● Clip a 9V PP3 (6LR61) Alkaline battery to<br />
the connector and fit the battery in its holder.<br />
Note: When the battery is connected the LED<br />
behind the detector lens will continuously<br />
flash or stay ON while the detector goes<br />
through its warm up cycle.<br />
The unit will not operate normally until the<br />
LED stops flashing.<br />
Fig. 4<br />
● Fix the unit in place on the wall and then<br />
close the cover ensuring it clicks fully closed.<br />
● Adjust the sensor head to point in<br />
approximately the desired direction.<br />
PIR Walk Test<br />
Important: Before commencing walk test<br />
ensure the RED indicator behind the PIR<br />
lens is not flashing continuously. If it is<br />
wait until the PIR has completed its warm<br />
up cycle and the flashing stops.<br />
4<br />
Configure the detector for walk testing<br />
according to the selected Day or Night<br />
operating mode as follows:<br />
1) Set the TIME control fully anti-clockwise<br />
to its minimum setting.<br />
2) If the PIR is set to NIGHT operation for<br />
use with lighting adjust the DUSK contro<br />
l fully clockwise to its maximum setting.<br />
If however the PIR is set to DAY operation<br />
for use with a chime adjust the DUSK control<br />
fully anti-clockwise to its minimum setting.<br />
Fig. 5<br />
Dusk control setting Dusk control setting<br />
for NIGHT operation for DAY operation<br />
Time<br />
control<br />
Slowly walk across the detection area<br />
approximately 5m from the unit. As you cross<br />
a detection zone and your movement is<br />
detected a small red indicator behind the lens<br />
will illuminate for a few seconds. Stand still<br />
until the indicator goes out after a few<br />
seconds. Continue moving around at various<br />
distances and angles to the unit, stopping<br />
each time the indicator illuminates, until you<br />
have established the detection area.<br />
If the PIR has already been linked to the<br />
Switching Receiver or Chime when the Walk<br />
test is performed then the lights will illuminate<br />
for approximately 5 seconds or the Chime will<br />
sound each time movement is detected.<br />
Fig. 6