Care and maintenance Operation G H 1 2 4 - Rothenberger
Care and maintenance Operation G H 1 2 4 - Rothenberger
Care and maintenance Operation G H 1 2 4 - Rothenberger

Create successful ePaper yourself
Turn your PDF publications into a flip-book with our unique Google optimized e-Paper software.
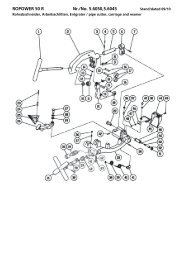
To adjust h<strong>and</strong>le D<br />
R 650<br />
The h<strong>and</strong>le can be fitted either at the top or at the<br />
side.<br />
Move to the side position: Push the sleeve<br />
downwards, pull out the lever <strong>and</strong> insert it into the<br />
side opening.<br />
Move to the top position: Pull out the lever, pull<br />
the sleeve downwards, insert the lever <strong>and</strong> lock the<br />
sleeve again.<br />
R 750<br />
The h<strong>and</strong>le can be turned forwards to allow the<br />
machine to be pulled more easily.<br />
Push the sleeve downwards, pull out the lever, turn<br />
it through 180° <strong>and</strong> insert it again.<br />
Carry position E<br />
The h<strong>and</strong>le can be locked for carrying. To do this<br />
push the h<strong>and</strong>le <strong>and</strong> pull the lock. To release the<br />
lock, press the h<strong>and</strong>le briefly.<br />
Start / Stop F<br />
Switch the motor on <strong>and</strong> off at the switch:<br />
Motor off.<br />
Turn clockwise; remove blockages.<br />
Turn anti-clockwise, return jammed spirals.<br />
Start the spirals turning by pressing the h<strong>and</strong>le.<br />
<strong>Operation</strong> G<br />
Insert a suitable spiral, secure the protective pipe<br />
<strong>and</strong> secure a suitable tool.<br />
1 Position the machine approx. 50-80 cm in<br />
front of the opening of the pipe you wish to<br />
clean.<br />
Set the machine to turn clockwise at the<br />
On/Off switch.<br />
2 Insert the spiral approx. 500 mm into the<br />
pipe. Press the h<strong>and</strong>le. The spiral will start to<br />
turn.<br />
Guide the spiral only with the supplied<br />
special safety glove.<br />
Release the h<strong>and</strong>le <strong>and</strong> push the spiral further<br />
into the pipe.<br />
Repeat this process until you feel resistance;<br />
this means you have reached the blockage.<br />
10 ENGLISH<br />
3 Pull the spiral out of the machine until the<br />
spiral is prestressed into a bend (working<br />
bend).<br />
Press the h<strong>and</strong>le <strong>and</strong> press the spiral against<br />
the blockage using the working bend.<br />
When the spiral has moved into the pipe so<br />
far that the working bend is relieved, pull the<br />
spiral out of the machine <strong>and</strong> form a new<br />
working bend.<br />
4 Repeat this process until the blockage has<br />
been removed, then release the h<strong>and</strong>le <strong>and</strong><br />
pull out the spiral. If it does not move easily,<br />
press the h<strong>and</strong>le <strong>and</strong> allow the spiral to turn<br />
briefly.<br />
If the tool becomes fastened to the<br />
blockage, release the h<strong>and</strong>le <strong>and</strong> switch the<br />
machine to turn anti-clockwise.<br />
Release the tool from the blockage by moving<br />
the spiral to <strong>and</strong> fro whilst pressing the<br />
h<strong>and</strong>le.<br />
<strong>Care</strong> <strong>and</strong> Maintenance H<br />
Pull the mains plug before carrying out any work<br />
on the machine.<br />
Grease the machine with universal grease at the<br />
two lubrication points:<br />
Lubrication point 1: every 5 hours of service.<br />
Lubrication point 2: every 100 hours of<br />
service. Unscrew the left cover to access this<br />
point.<br />
Clean the machine at regular intervals.<br />
Clean <strong>and</strong> preserve the spirals <strong>and</strong> tools each time<br />
after you have used the machine. We recommend<br />
our special<br />
“ROWONAL” care product for this purpose.<br />
All other servicing, <strong>maintenance</strong> <strong>and</strong> repair work<br />
may only be carried out by an authorised<br />
ROTHENBERGER workshop.<br />
Replace the calmp jaws I<br />
If the spiral no longer turns or slips, the clamp jaws<br />
are worn <strong>and</strong> must be replaced.<br />
1 Unscrew the right cover<br />
2 Remove the sealing stopper. Undo the lock<br />
nut <strong>and</strong> undo the adjusting screw until the<br />
clamp jaw springs are no longer stressed.<br />
3 Pull the h<strong>and</strong>le upwards <strong>and</strong> hold it in this<br />
position.Remove the clamp jaws. Press the<br />
clamp jaws together to release them.<br />
4 Fit new clamp jaws.