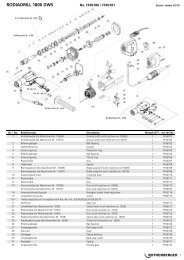
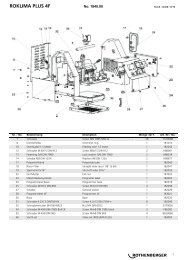
BA RODIACUT 131-202 DWS Umschlag PaketC-0908 - Rothenberger
BA RODIACUT 131-202 DWS Umschlag PaketC-0908 - Rothenberger
BA RODIACUT 131-202 DWS Umschlag PaketC-0908 - Rothenberger

Create successful ePaper yourself
Turn your PDF publications into a flip-book with our unique Google optimized e-Paper software.
Remove the equipment from the wall immediately in the event of a power<br />
failure. Danger due to the equipment falling off. Vacuum neutralised. Only work using<br />
slight feed pressure.<br />
Please read and be sure to understand the supplied vacuum pump instruction<br />
manual<br />
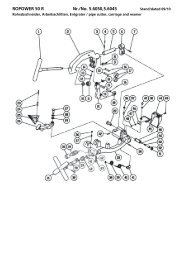
3.4 Handling<br />
Changing the side of the hand wheel:<br />
Make sure the feed gear cannot be operated unintentionally. Use the locking button<br />
(1) to secure the feed unit.<br />
� Withdraw the black cap nut and remove the hand adapter (11).<br />
� Insert on the desired side and re-secure using the cap nut.<br />
Setting the drill angle:<br />
� Loosen the toggle (7) and set the guide column (3) at the desired angle (15°- 30°- 45°).<br />
� Re-tighten the toggle (7).<br />
Applying the diamond drill:<br />
Make sure the feed gear cannot be operated unintentionally. Use the locking button<br />
(1) to secure the feed unit.<br />
� <strong>RODIACUT</strong> <strong>131</strong> <strong>DWS</strong>: Insert the motor into the receptacle (2) of the drill rig from the top and<br />
fasten by means of the screw.<br />
� <strong>RODIACUT</strong> <strong>202</strong> <strong>DWS</strong>: Slide the motor from the top as far as it will go (stop 15) into the feed<br />
unit (10) of the drill rig and tighten using both star handles (14).<br />
� Proceed in the reverse order in order to remove.<br />
Setting the depth control stop:<br />
� Release the screw at the depth control stop (4) and set the desired drill depth.<br />
� Re-tighten the screw firmly.<br />
Water extraction device (accessory picture B-4):<br />
� <strong>RODIACUT</strong> <strong>131</strong> <strong>DWS</strong>: Unscrew both front ring bolts (5). Turn the knurled screws on the<br />
water extraction device into the ring bolts and re-insert in the base plate.<br />
� <strong>RODIACUT</strong> <strong>202</strong> <strong>DWS</strong>: Turn both screws with knurled screws on the water extraction device<br />
into the boreholes (19) in the base plate intended for this purpose.<br />
� Fasten the water extraction device over the ring bolts (5) by means of the spring lock or lock<br />
the screws in place and fasten by means of the knurled screws.<br />
� Connect the water extractor and attach the suction hose to the connecting piece of the water<br />
extraction ring.<br />
� Create a water intake.<br />
-hose feed directly at water supply or<br />
-immersion pump with bucket<br />
PLEASE NOTE: Adequate water supply for cooling the drill bit must always be ensured,<br />
as otherwise the drill bits can overheat very quickly and segments can come away.<br />
Information: We strongly advise against the use of “water pressure reservoirs“ as from a drill<br />
diameter of 200 mm, as adequate control of the water supply is very restricted in this case.<br />
� Cut a hole in the rubber sheet appropriate to the drill bit diameter (air gap between the cutout<br />
rubber seal and drill bit approx. 2-3 mm).<br />
� Place the rubber sheet on the water extraction ring.<br />
ENGLISH 13