Dr. Hahn Einstellanleitung Standardtuerband 4 2-tlg.pdf - alu-one ...
Dr. Hahn Einstellanleitung Standardtuerband 4 2-tlg.pdf - alu-one ...
Dr. Hahn Einstellanleitung Standardtuerband 4 2-tlg.pdf - alu-one ...

Create successful ePaper yourself
Turn your PDF publications into a flip-book with our unique Google optimized e-Paper software.
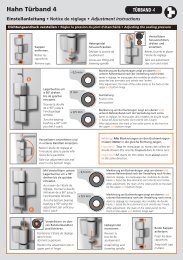
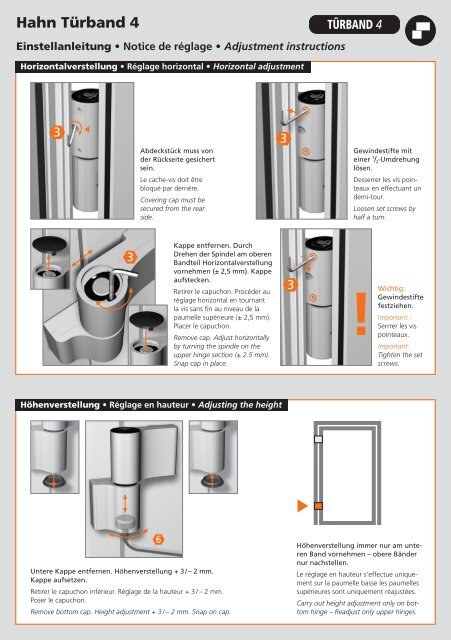
<strong>Hahn</strong> Türband 4Einstell anleitung • Notice de réglage • Adjustment instructionsHorizontalverstellung • Réglage horizontal • Horizontal adjustmentTÜRBAND 43Abdeckstück muss vonder Rückseite gesichertsein.Le cache-vis doit êtrebloqué par derrière.Covering cap must besecured from the rearside.3Gewindestifte miteiner 1 / 2 -Umdrehunglösen.Desserrer les vis pointeauxen effectuant undemi-tour.Loosen set screws byhalf a turn.3Kappe entfernen. Durch<strong>Dr</strong>ehen der Spindel am oberenBandteil Horizontal ver stellungvornehmen (± 2,5 mm). Kappeaufstecken.Retirer le capuchon. Procéder auréglage horizontal en tournantla vis sans fin au niveau de lapaumelle supérieure (± 2,5 mm).Placer le capuchon.Remove cap. Adjust horizontallyby turning the spindle on theupper hinge section (± 2.5 mm).Snap cap in place.3Wichtig:Gewindestiftefestziehen.Important :Serrrer les vispointeaux.Important:Tighten the setscrews.Höhenverstellung • Réglage en hauteur • Adjusting the heightUntere Kappe entfernen. Höhenverstellung + 3 / – 2 mm.Kappe aufsetzen.Retirer le capuchon inférieur. Réglage de la hauteur + 3 / – 2 mm.Poser le capuchon.Remove bottom cap. Height adjustment + 3 / – 2 mm. Snap on cap.6Höhenverstellung immer nur am unterenBand vornehmen – obere Bändernur nachstellen.Le réglage en hauteur s’effectue uniquementsur la paumelle basse les paumellessupérieures sont uniquement réajustées.Carry out height adjustment only on bottomhinge – Readjust only upper hinges.
Dichtungsandruck verstellen • Régler la pression du joint d’étanchéité • Adjust sealing pressure6Untere Kappe entfernen.Nur am zu verstellendenBand Hebespindel herausschrauben.Bandweisevorgehen.Retirer le capuchon inférieur.Dévisser la broche de soulèvementuniquement sur lapaumelle à régler. Procéderpaumelle par paumelle.Remove bottom cap. Onlyscrew-out lifting and loweringspindle on the hinge needingadjusting. Proceed in thismanner, hinge by hinge.6Lagerbuchse um ± 90°drehen bis sie spürbareinrastet (Dichtungsandruck± 0,5 mm)Tourner la douille de± 90° jusqu’àl’encliquetage sensible(pression du jointd’étanchéité± 0,5 mm).Turn the bearing bushing± 90° until you feel itcatch (sealing pressure± 0,5 mm)Hebespindel wiedereinschrauben.Kappe aufsetzen.Revisser la broche desoulèvement.Poser le capuchon.Screw lifting andlowering spindle back in.Snap on cap.Lagerbuchse aus wartungs freiem teflon haltigenKunststoff – keinesfalls schmieren!Douille en matière plastique à teneur en téflon nerequérant aucun entretien – ne graisser en aucun cas !Bearing bushes made of maintenance-free PVCcontaining Teflon – do not lubricate!– 0,5 mm0 mm+ 0,5 mmMarkierung am Buchsenkragenzeigt nach der Verstellung nachhinten.Après le réglage, les marquages desrondelles de douille sont orientésvers l’arrière.After adjustment, the mark of thecollar points to the back.NullstellungPosition zérozero positionMarkierung am Buchsenkragenzeigt nach der Verstellung nachvorne.Après le réglage, les marquages desrondelles de douille sont orienté versl’avant.After adjustment, the mark of thecollar points to the front.<strong>alu</strong>-<strong>one</strong> Metallbaupartner GmbHHeroalstraße 1 · 4870 VöcklamarktFon: +43 7682 / 3670 · Fax: +43 7682 / 6214Email: office@<strong>alu</strong>-<strong>one</strong>.at© <strong>Dr</strong>. <strong>Hahn</strong> GmbH & Co. KG