HP9012 HP9019 - Service - Black & Decker
HP9012 HP9019 - Service - Black & Decker
HP9012 HP9019 - Service - Black & Decker

Create successful ePaper yourself
Turn your PDF publications into a flip-book with our unique Google optimized e-Paper software.
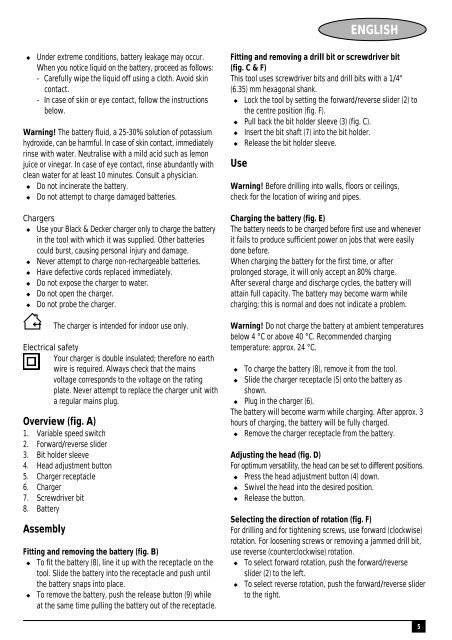
ENGLISH◆Under extreme conditions, battery leakage may occur.When you notice liquid on the battery, proceed as follows:- Carefully wipe the liquid off using a cloth. Avoid skincontact.- In case of skin or eye contact, follow the instructionsbelow.Warning! The battery fluid, a 25-30% solution of potassiumhydroxide, can be harmful. In case of skin contact, immediatelyrinse with water. Neutralise with a mild acid such as lemonjuice or vinegar. In case of eye contact, rinse abundantly withclean water for at least 10 minutes. Consult a physician.◆ Do not incinerate the battery.◆ Do not attempt to charge damaged batteries.Chargers◆ Use your <strong>Black</strong> & <strong>Decker</strong> charger only to charge the batteryin the tool with which it was supplied. Other batteriescould burst, causing personal injury and damage.◆ Never attempt to charge non-rechargeable batteries.◆ Have defective cords replaced immediately.◆ Do not expose the charger to water.◆ Do not open the charger.◆ Do not probe the charger.The charger is intended for indoor use only.Electrical safetyYour charger is double insulated; therefore no earthwire is required. Always check that the mainsvoltage corresponds to the voltage on the ratingplate. Never attempt to replace the charger unit witha regular mains plug.Overview (fig. A)1. Variable speed switch2. Forward/reverse slider3. Bit holder sleeve4. Head adjustment button5. Charger receptacle6. Charger7. Screwdriver bit8. BatteryAssemblyFitting and removing the battery (fig. B)◆ To fit the battery (8), line it up with the receptacle on thetool. Slide the battery into the receptacle and push untilthe battery snaps into place.◆ To remove the battery, push the release button (9) whileat the same time pulling the battery out of the receptacle.Fitting and removing a drill bit or screwdriver bit(fig. C & F)This tool uses screwdriver bits and drill bits with a 1/4"(6.35) mm hexagonal shank.◆ Lock the tool by setting the forward/reverse slider (2) tothe centre position (fig. F).◆ Pull back the bit holder sleeve (3) (fig. C).◆ Insert the bit shaft (7) into the bit holder.◆ Release the bit holder sleeve.UseWarning! Before drilling into walls, floors or ceilings,check for the location of wiring and pipes.Charging the battery (fig. E)The battery needs to be charged before first use and wheneverit fails to produce sufficient power on jobs that were easilydone before.When charging the battery for the first time, or afterprolonged storage, it will only accept an 80% charge.After several charge and discharge cycles, the battery willattain full capacity. The battery may become warm whilecharging; this is normal and does not indicate a problem.Warning! Do not charge the battery at ambient temperaturesbelow 4 °C or above 40 °C. Recommended chargingtemperature: approx. 24 °C.◆ To charge the battery (8), remove it from the tool.◆ Slide the charger receptacle (5) onto the battery asshown.◆ Plug in the charger (6).The battery will become warm while charging. After approx. 3hours of charging, the battery will be fully charged.◆ Remove the charger receptacle from the battery.Adjusting the head (fig. D)For optimum versatility, the head can be set to different positions.◆ Press the head adjustment button (4) down.◆ Swivel the head into the desired position.◆ Release the button.Selecting the direction of rotation (fig. F)For drilling and for tightening screws, use forward (clockwise)rotation. For loosening screws or removing a jammed drill bit,use reverse (counterclockwise) rotation.◆ To select forward rotation, push the forward/reverseslider (2) to the left.◆ To select reverse rotation, push the forward/reverse sliderto the right.5