sef dk d s gb - exhausto.de
sef dk d s gb - exhausto.de
sef dk d s gb - exhausto.de

Create successful ePaper yourself
Turn your PDF publications into a flip-book with our unique Google optimized e-Paper software.
3002314-2010-03-01.fm Fitting<br />
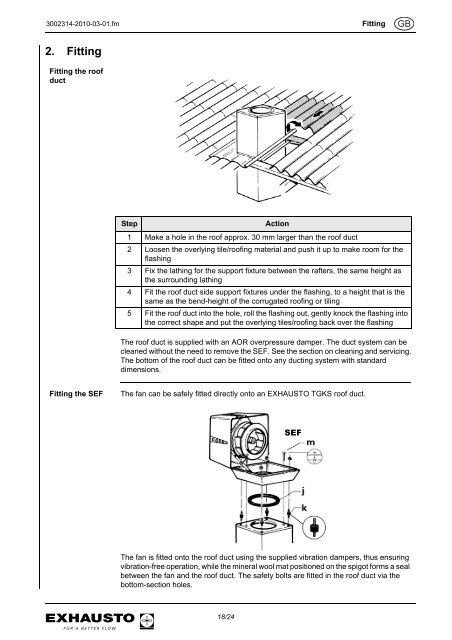
2. Fitting<br />
Fitting the roof<br />
duct<br />
Step Action<br />
1 Make a hole in the roof approx. 30 mm larger than the roof duct<br />
2 Loosen the overlying tile/roofing material and push it up to make room for the<br />
flashing<br />
3 Fix the lathing for the support fixture between the rafters, the same height as<br />
the surrounding lathing<br />
4 Fit the roof duct si<strong>de</strong> support fixtures un<strong>de</strong>r the flashing, to a height that is the<br />
same as the bend-height of the corrugated roofing or tiling<br />
5 Fit the roof duct into the hole, roll the flashing out, gently knock the flashing into<br />
the correct shape and put the overlying tiles/roofing back over the flashing<br />
The roof duct is supplied with an AOR overpressure damper. The duct system can be<br />
cleaned without the need to remove the SEF. See the section on cleaning and servicing.<br />
The bottom of the roof duct can be fitted onto any ducting system with standard<br />
dimensions.<br />
Fitting the SEF The fan can be safely fitted directly onto an EXHAUSTO TGKS roof duct.<br />
The fan is fitted onto the roof duct using the supplied vibration dampers, thus ensuring<br />
vibration-free operation, while the mineral wool mat positioned on the spigot forms a seal<br />
between the fan and the roof duct. The safety bolts are fitted in the roof duct via the<br />
bottom-section holes.<br />
18/24<br />
GB


![3003415_ins_vex270hx_de.pdf [Download] - exhausto.de](https://img.yumpu.com/8086300/1/184x260/3003415-ins-vex270hx-depdf-download-exhaustode.jpg?quality=85)