HOBBY MASTER MANUAL - Gallagher.eu
HOBBY MASTER MANUAL - Gallagher.eu
HOBBY MASTER MANUAL - Gallagher.eu

Erfolgreiche ePaper selbst erstellen
Machen Sie aus Ihren PDF Publikationen ein blätterbares Flipbook mit unserer einzigartigen Google optimierten e-Paper Software.
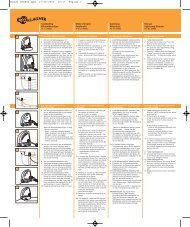
Step 1: Install the HobbyMaster Energizer<br />
6<br />
Install under cover, out of reach of children, next to a mains<br />
power outlet. Using the 2 screws provided, screw the mounting<br />
bracket to the wall. Attach the HobbyMaster to the bracket by<br />
hooking it over the 2 prongs and snapping the bottom into<br />
place. Do not switch the energizer on until the fence has been<br />
constructed. To remove, first disconnect from power supply and<br />
then use a slotted screwdriver to release the bottom clip and lift<br />
the HobbyMaster off the wall mount.<br />
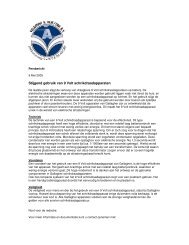
Step 2: Install the Earth Stake<br />
Install a galvanized earth stake (at least 60cm long) into the<br />
ground, until only 5cm remain above the earth. The most<br />
effective place for an earth system is in continuously damp soil.<br />
Using double insulated cable (G609 or G627), remove 5 cm of<br />
plastic coating from one end of the cable wire. Press the green<br />
(EARTH) terminal button and insert the wire into the terminal.<br />
Secure the cable to the wall (e.g. with a staple) so the cable does<br />
not put any strain on the energizer terminal. Attach the other<br />
end of the cable to the earth stake using an earth clamp.<br />
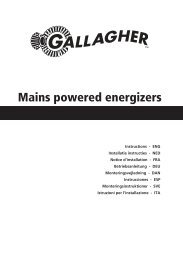
Step 3: Install Fibreglass Fence Stakes<br />
Install fence stakes (at least 60cm long and at least 10cm into the<br />
ground). Attach clips to each post at the required height. The<br />
bottom wire should be low enough to ensure that the animal<br />
cannot crawl under the fence without touching the wire. The<br />
top wire should be positioned between chest and nose height of<br />
the animal.<br />
Step 4: Install Insulators<br />
Use Screw-in Ring insulators (G666) or Pinlock insulators (G687)<br />
to insulate the start and end points and the corners.<br />
Step 5: Install the Polywire<br />
Tie Polywire (G621) to the insulators at the start of the fence.<br />
Roll out the Polywire and tie to the insulators at the end of the<br />
fence. Hand tension the Polywire until it is taut (no sag), then<br />
attach to each clip on the fence.<br />
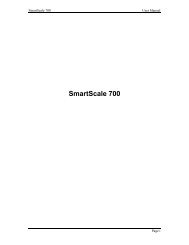
Step 6: Connect Cable to the Fence Terminal<br />
Connect the Energizer’s red (FENCE) terminal to the fence using<br />
double insulated cable (G609 or G627). Remove 5cm (2”) of<br />
plastic coating from one end of the cable. Press the RED (fence)<br />
terminal button and insert the wire into the terminal.<br />
Step 7: Connect Cable to the Fence<br />
Attach the other end of the cable to the fence. To ensure a good<br />
connection, wrap one loop of the Polywire between the washers<br />
of the Joint Clamp (G603), and insert the cable between the<br />
head and closest washer.<br />
Step 8: Connect to Mains Power Supply and Switch On<br />
Check that the light on the front of the HobbyMaster is flashing.