CLEARAUDIO MM-Tonabnehmersysteme ... - Vinyl Engine
CLEARAUDIO MM-Tonabnehmersysteme ... - Vinyl Engine
CLEARAUDIO MM-Tonabnehmersysteme ... - Vinyl Engine

Sie wollen auch ein ePaper? Erhöhen Sie die Reichweite Ihrer Titel.
YUMPU macht aus Druck-PDFs automatisch weboptimierte ePaper, die Google liebt.
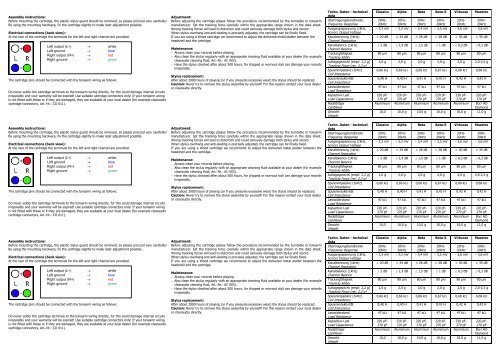
Assembly instructions:<br />
Before mounting the cartridge, the plastic stylus guard should be removed, so please procced very carefullly!<br />
By using the mounting hardware, fix the cartridge slightly to make later adjustment possible.<br />
Electrical connections (back view):<br />
At the rear of the cartridge the terminals for the left and right channel are provided.<br />
Left output (L+) → white<br />
Left ground → blue<br />
Right output (R+) → red<br />
Right ground → green<br />
The cartridge pins should be connected with the tonearm wiring as follows:<br />
Do never solder the cartridge terminals to the tonearm wiring directly, for this could damage internal circuits<br />
irreparably and your warranty will be expired! Use suitable cartridge connectors only! If your tonearm wiring<br />
is not fitted with these or if they are damaged, they are available at your local dealer (for example clearaudio<br />
cartridge-connectors, Art.-Nr.: CO 011).<br />
Adjustment:<br />
Before adjusting the cartridge please follow the procedure recommended by the turntable or tonearm<br />
manufacturer. Set the tracking force carefully within the appropriate range shown in the data sheet.<br />
Wrong tracking forces will lead to distortion and could seriously damage both stylus and record.<br />
When stylus overhang and anti-skating is precisely adjusted, the cartridge can be finally fixed.<br />
If you are using a Wood cartridge we recommend to adjust the delivered metal platter between the<br />
headshell and the cartridge.<br />
Maintenance:<br />
− Always clean your records before playing.<br />
− Also clean the stylus regularly with an appropriate cleaning fluid available at your dealer (for example<br />
clearaudio cleaning fluid, Art.-Nr.: AC 003).<br />
− Have the stylus checked after about 500 hours, for chipped or wornout styli can damage your records<br />
irreparably.<br />
Stylus replacement:<br />
After about 2000 hours of playing (or if you presume excessive wear) the stylus should be replaced.<br />
Caution: Never try to remove the stylus assembly by yourself! For this reason contact your local dealer<br />
or clearaudio directly.<br />
Techn. Daten - technical<br />
data<br />
Übertragungsbandbreite<br />
Frequency Response<br />
Ausgangsspannung (1kHz,<br />
5cm/s) Output Voltage<br />
Kanaltrennung (1kHz)<br />
Channel Separation<br />
Kanalbalance (1kHz)<br />
Channel Balance<br />
Trackingfähigkeit<br />
Tracking Ability<br />
Auflagegewicht (empf. 2,2 g)<br />
Tracking Force (rec. 2,2 g)<br />
Spulenimpedanz (1kHz)<br />
Coil Impedance<br />
Spuleninduktivität<br />
Coil Inductance<br />
Lastwiderstand<br />
Load Resistance<br />
Kapazitive Last<br />
Load Capacitance<br />
Nadelträger<br />
Cantilever<br />
Gewicht<br />
Weight<br />
Classics Alpha Beta Beta-S Virtuoso Maestro<br />
20Hz- 20Hz- 20Hz- 20Hz- 20Hz- 20Hz-<br />
20kHz 20kHz 20kHz 20kHz 20kHz 20kHz<br />
∼ 3,3 mV ∼ 3,3 mV ∼ 3,4 mV ∼ 3,5 mV ∼ 3,6 mV ∼ 3,6 mV<br />
> 20 dB > 24 dB > 26 dB > 28 dB > 30 dB > 35 dB<br />
≤ 2 dB ≤ 1,9 dB ≤ 1,5 dB ≤ 1 dB ≤ 0,3 dB ≤ 0,3 dB<br />
80 µm 80 µm 80 µm 80 µm 80 µm 80 µm<br />
2,0 g 2,0 g 2,0 g 2,0 g 2,0 g 2,0-2,5 g<br />
0,66 kΩ 0,66 kΩ 0,66 kΩ 0,67 kΩ 0,68 kΩ 0,68 kΩ<br />
0,40 H 0,40 H 0,41 H 0,41 H 0,42 H 0,42 H<br />
47 kΩ 47 kΩ 47 kΩ 47 kΩ 47 kΩ 47 kΩ<br />
220 pF- 220 pF- 220 pF- 220 pF- 220 pF- 220 pF-<br />
270 pF 270 pF 270 pF 270 pF 270 pF 270 pF<br />
Aluminium Aluminium Aluminium Aluminium Aluminium Bor/ HD<br />
Diamond<br />
10,0 10,0 g 10,0 g 10,0 g 10,0 g 11,0 g<br />
Classics Alpha Beta Beta-S Virtuoso Maestro<br />
20Hz- 20Hz- 20Hz- 20Hz- 20Hz- 20Hz-<br />
20kHz 20kHz 20kHz 20kHz 20kHz 20kHz<br />
∼ 3,3 mV ∼ 3,3 mV ∼ 3,4 mV ∼ 3,5 mV ∼ 3,6 mV ∼ 3,6 mV<br />
> 20 dB > 24 dB > 26 dB > 28 dB > 30 dB > 35 dB<br />
≤ 2 dB ≤ 1,9 dB ≤ 1,5 dB ≤ 1 dB ≤ 0,3 dB ≤ 0,3 dB<br />
80 µm 80 µm 80 µm 80 µm 80 µm 80 µm<br />
2,0 g 2,0 g 2,0 g 2,0 g 2,0 g 2,0-2,5 g<br />
0,66 kΩ 0,66 kΩ 0,66 kΩ 0,67 kΩ 0,68 kΩ 0,68 kΩ<br />
0,40 H 0,40 H 0,41 H 0,41 H 0,42 H 0,42 H<br />
47 kΩ 47 kΩ 47 kΩ 47 kΩ 47 kΩ 47 kΩ<br />
220 pF-<br />
270 pF<br />
220 pF-<br />
270 pF<br />
220 pF-<br />
270 pF<br />
220 pF-<br />
270 pF<br />
220 pF-<br />
270 pF<br />
220 pF-<br />
270 pF<br />
Aluminium Aluminium Aluminium Aluminium Aluminium Bor/ HD<br />
Diamond<br />
10,0 10,0 g 10,0 g 10,0 g 10,0 g 11,0 g