Honeywell - Elektromechanisches Sperrelement 3 - IGS-Industrielle ...
Honeywell - Elektromechanisches Sperrelement 3 - IGS-Industrielle ...
Honeywell - Elektromechanisches Sperrelement 3 - IGS-Industrielle ...

Erfolgreiche ePaper selbst erstellen
Machen Sie aus Ihren PDF Publikationen ein blätterbares Flipbook mit unserer einzigartigen Google optimierten e-Paper Software.
Mounting and Connection Instructions Blocking Element 3<br />
19<br />
3.3 Installation aid for positioning the bolt counter unit<br />
For determining exactly the position of the<br />
counter unit in the door leaf, we offer the<br />
following aid:<br />
- Installation aid, Item no. 019028<br />
(for controlling the bolt )<br />
After successfully installing the blocking element<br />
in the door frame, proceed as follows:<br />
- Open the door<br />
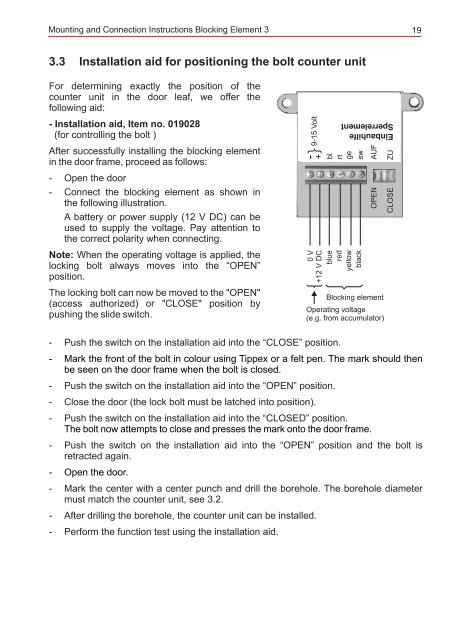
- Connect the blocking element as shown in<br />
the following illustration.<br />
A battery or power supply (12 V DC) can be<br />
used to supply the voltage. Pay attention to<br />
the correct polarity when connecting.<br />
Note: When the operating voltage is applied, the<br />
locking bolt always moves into the “OPEN”<br />
position.<br />
The locking bolt can now be moved to the "OPEN"<br />
(access authorized) or "CLOSE" position by<br />
pushing the slide switch.<br />
+ - } 9-15 Volt<br />
0 V<br />
+12 V DC<br />
blue<br />
red<br />
yellow<br />
black<br />
Einbauhilfe<br />
<strong>Sperrelement</strong><br />
bl<br />
rt<br />
ge<br />
sw<br />
AUF<br />
OPEN<br />
Blocking element<br />
Operating voltage<br />
(e.g. from accumulator)<br />
ZU<br />
CLOSE<br />
- Push the switch on the installation aid into the “CLOSE” position.<br />
-<br />
Mark the front of the bolt in colour using Tippex or a felt pen. The mark should then<br />
be seen on the door frame when the bolt is closed.<br />
- Push the switch on the installation aid into the “OPEN” position.<br />
- Close the door (the lock bolt must be latched into position).<br />
- Push the switch on the installation aid into the “CLOSED” position.<br />
The bolt now attempts to close and presses the mark onto the door frame.<br />
- Push the switch on the installation aid into the “OPEN” position and the bolt is<br />
retracted again.<br />
- Open the door.<br />
- Mark the center with a center punch and drill the borehole. The borehole diameter<br />
must match the counter unit, see 3.2.<br />
- After drilling the borehole, the counter unit can be installed.<br />
- Perform the function test using the installation aid.