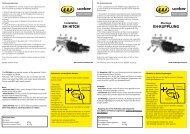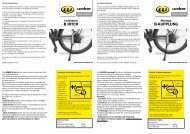
Kupplung E, EL, ES – Montageanleitung (PDF) - Weber Products
Kupplung E, EL, ES – Montageanleitung (PDF) - Weber Products
Kupplung E, EL, ES – Montageanleitung (PDF) - Weber Products

Sie wollen auch ein ePaper? Erhöhen Sie die Reichweite Ihrer Titel.
YUMPU macht aus Druck-PDFs automatisch weboptimierte ePaper, die Google liebt.
Mit den <strong>Weber</strong> E- <strong>EL</strong>- <strong>ES</strong>-<strong>Kupplung</strong>en erhalten Sie<br />
eine unkomplizierte und sehr sichere <strong>Kupplung</strong>.<br />
Im Lieferumfang sind neben der <strong>Kupplung</strong> drei<br />
Verdrehsicherungen aus Metall für Fahrradnaben<br />
enthalten. Die Verdrehsicherungen (Polygoneinsätze)<br />
passen für Naben mit Vollachse (großes Loch)<br />
und für Schnellpannachsen (kleines Loch, in 2<br />
verschiedenen Dicken). Passt kein Polygon, siehe<br />
Absatzweiter unten.<br />
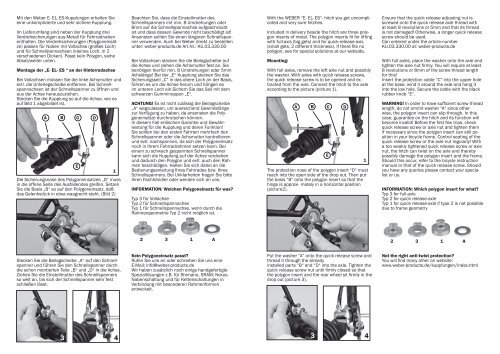
Montage der „E- <strong>EL</strong>- <strong>ES</strong> “ an der Hinterradachse<br />
Bei Vollachsen müssen Sie die linke Achsmutter und<br />
evtl. die Unterlegscheibe entfernen. Bei Schnellspannachsen<br />
ist der Schnellspanner zu öffnen und<br />
aus der Achse herauszuziehen.<br />
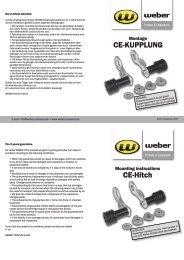
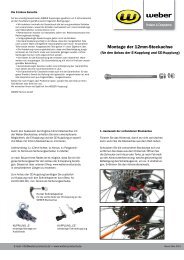
Stecken Sie die <strong>Kupplung</strong> so auf die Achse, wie es<br />
auf Bild 1 abgebildet ist.<br />
A<br />
B C D<br />
Die Sicherungsnase des Polygoneinsatzes „D“ muss<br />
in die offene Seite des Ausfallendes greifen. Setzen<br />
Sie die Basis „B“ so auf den Polygoneinsatz, daß<br />
das Gelenkstück in etwa waagrecht steht. (Bild 2)<br />
E<br />
1<br />
Beachten Sie, dass die Einstellmutter des<br />
Schnellspanners mit min. 8 Umdrehungen oder<br />
8mm auf die Schnellspannachse aufgeschraubt<br />
ist und dass dessen Gewinde nicht beschädigt ist!<br />
Ansonsten sollten Sie einen längeren Schnellspanner<br />
verwenden. Auch bei <strong>Weber</strong> direkt zu bestellen<br />
unter: weber-products.de Art.Nr.: KU.03.330.00<br />
Bei Vollachsen stecken Sie die Beilagscheibe auf<br />
die Achse und ziehen die Achsmutter fest an. Sie<br />
benötigen hierfür min. 8 Umdrehungen oder 5mm<br />
Achslänge! Bei der „E“ <strong>Kupplung</strong> stecken Sie das<br />
Sicherungsseil „C“ in das obere Loch an der Basis,<br />
führen es um die Achse herum und hängen es<br />
im unteren Loch ein.Sichern Sie das Seil mit dem<br />
schwarzen Gumminoppen „E“.<br />
AchTung! Es ist nicht zulässig die Beilagscheibe<br />
„A“ wegzulassen, um ausreichend Gewindelänge<br />
zur Verfügung zu haben, da ansonsten die Polygoneinsätze<br />
durchrutschen können.<br />
In diesem Fall erlöschen Garantie und Gewährleistung<br />
für die <strong>Kupplung</strong> und deren Funktion!<br />
Sie sollten bei den ersten Fahrten mehrfach den<br />
Schnellspanner oder die Achsmutter kontrollieren<br />
und evtl. nachspannen, da sich der Polygoneinsatz<br />
noch in Ihrem Fahrradrahmen setzen kann. Bei<br />
einem zu schwach gespannten Schnellspanner<br />
kann sich die <strong>Kupplung</strong> auf der Achse verdrehen<br />
und dadurch den Polygon und evtl. auch den Rahmen<br />
beschädigen. Halten Sie sich dabei an die<br />
Bedienungsanleitung Ihres Fahrrades bzw. Ihres<br />
Schnellspanners. Bei Unklarheiten fragen Sie bitte<br />
Ihren Fachhändler oder wenden sich an uns.<br />
INFORMATION: Welchen Polygoneinsatz für was?<br />
Typ 3 für Vollachse<br />
Typ 2 für Schnellspannachse<br />
Typ 1 für Schnellspannachse, wenn durch die<br />
Rahmengeometrie Typ 2 nicht möglich ist.<br />
With the WEBER “E- <strong>EL</strong>- <strong>ES</strong>“- hitch you get uncomplicated<br />
and very sure hitches.<br />
Included in delivery beside the hitch are three polygon<br />
inserts of metal. The polygon inserts fit for lifting<br />
with full-axis (big gets) and for quick-release-axis<br />
(small gets, 2 different thickness). If there fits no<br />
polygon, see for special solutions at our webside.<br />
Mounting:<br />
With full axles, remove the left axle nut and possibly<br />
the washer. With axles with quick release screws,<br />
the quick release screw is to be opened and extracted<br />
from the axle. Connect the hitch to the axle<br />
according to the picture (picture 1).<br />
A<br />
B C D<br />
The protection nose of the polygon insert “D“ must<br />
reach into the open side of the drop out. Then put<br />
the basis “B“ onto the polygon insert so that the<br />
hinge is approxi- mately in a horizontal position<br />
(picture2).<br />
E<br />
1<br />
Ensure that the quick release adjusting nut is<br />
screwed onto the quick release axle thread with<br />
at least 8 revolutions or 5mm and that its thread<br />
is not damaged! Otherwise, a longer quick release<br />
screw should be used.<br />
Can ordered under the article-number<br />
KU.03.330.00 at: weber-products.de<br />
With full axles, place the washer onto the axle and<br />
tighten the axle nut firmly. You will require at least<br />
8 revolutions or 8mm of the screw thread length<br />
for this!<br />
Insert the protection cable “C“ into the upper hole<br />
at the base, wind it around the axle and hang it<br />
into the low hole. Secure the cable with the black<br />
rubber knob “E“.<br />
WARNING! In order to have sufficient screw thread<br />
length, do not ommit washer “A“ since otherwise,<br />
the polygon insert can slip through. In this<br />
case, guarantee on the hitch and its function will<br />
become invalid! Before the first few trips, check<br />
quick release screw or axle nut and tighten them<br />
if necessary since the polygon insert can still position<br />
in your bicycle frame. Control seating of the<br />
quick release screw or the axle nut regularly! With<br />
a too weakly tightened quick release screw or axle<br />
nut, the hitch can twist on the axle and thereby<br />
possibly damage the polygon insert and the frame.<br />
Should this occur, refer to the bicycle instruction<br />
manual or that of the quick release screw. Should<br />
you have any queries please contact your specialist<br />
or us.<br />
INFORMATION: Which polygon insert for what?<br />
Typ 3 for full-axle<br />
Typ 2 for quick release-axle<br />
Typ 1 for quick release-axle if type 2 is not possible<br />
due to frame geometry<br />
Stecken Sie die Beilagscheibe „A“ auf den Schnellspanner<br />
und führen Sie den Schnellspanner durch<br />
die schon montierten Teile „B“ und „D“ in die Achse.<br />
Ziehen Sie die Einstellmutter des Schnellspanners<br />
so weit an, bis sich der Schnellspanner sehr fest<br />
schließen lässt.<br />
2<br />
2 3 1 A<br />
Kein Polygoneinsatz passt?<br />
Rufen Sie uns an oder schreiben Sie uns eine<br />
E-Mail: info@weber-products.de<br />
Wir haben zusätzlich noch einige handgefertigte<br />
Speziallösungen z.B. für Shimano, SRAM; Nexus-<br />
Nabenschaltung und für Kettenschaltungen in<br />
Verbindung mit besonderen Rahmenformen<br />
entwickelt.<br />
Put the washer “A“ onto the quick release screw and<br />
thread it through the already<br />
installed parts “B“ and “D“ into the axle. Tighten the<br />
quick release screw nut until firmly closed so that<br />
the polygon insert and the rear wheel sit firmly in the<br />
drop out (picture 3).<br />
2<br />
2 3 1 A<br />
Not the right anti-twist protection?<br />
You will find many other on website:<br />
www.weber-products.de/kupplungen/index.html<br />
3 4<br />
3 4