Montageanleitung für Zubehör Stecksystem
Montageanleitung für Zubehör Stecksystem
Montageanleitung für Zubehör Stecksystem

Sie wollen auch ein ePaper? Erhöhen Sie die Reichweite Ihrer Titel.
YUMPU macht aus Druck-PDFs automatisch weboptimierte ePaper, die Google liebt.
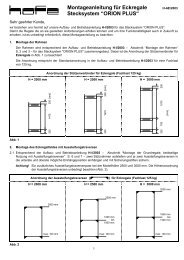
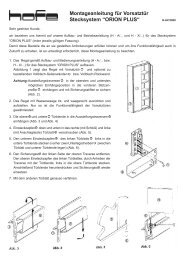
Dear Customer,<br />
Rear wall grilles<br />
1. Place the rear wall grille between the<br />
frame elements.<br />
2. Position the upper safety strip approx. 300<br />
m from the top edge of the shelving unit<br />
from the outside. Suspend slightly<br />
diagonally between the frame profiles and<br />
the rear wall grille (see Fig. 1).<br />
If a shelf is positioned at the same<br />
location(s) the safety strip should be fitted<br />
above or below the shelf.<br />
3. Fit the bottom safety strip in the same way<br />
as described in Item 2, approx. 200 mm<br />
from the floor.<br />
4. Distribute the remaining safety strip(s)<br />
evenly between the top and bottom rails,<br />
following the instructions in Item 2 (see<br />
Fig. 2).<br />
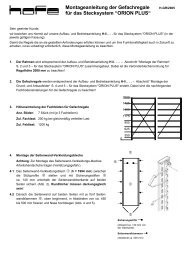
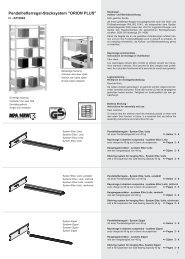
Assembly instructions for the accessories for the “ORION<br />
PLUS“ push together system<br />
Please note our installation and operating instructions (H - A/... and H - X/...) for the "ORION PLUS" pushtogether<br />
system (in the relevant current version).<br />
It is absolutely necessary to follow the installation instruction exactly, in order that the components meet<br />
your needs and maintain their functionality in future.<br />
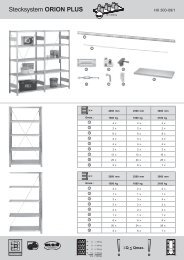
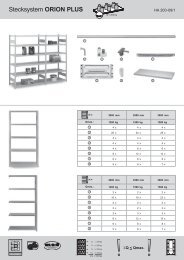
Shelving unit<br />
height<br />
mm<br />
2000<br />
2500<br />
3000<br />
Safety strips<br />
pieces<br />
fig.1 fig. 2 (Englisch 12/2007)<br />
3<br />
3<br />
4<br />
Safety strip