


Erfolgreiche ePaper selbst erstellen
Machen Sie aus Ihren PDF Publikationen ein blätterbares Flipbook mit unserer einzigartigen Google optimierten e-Paper Software.
en<br />
Maintenance and daily cleaning<br />
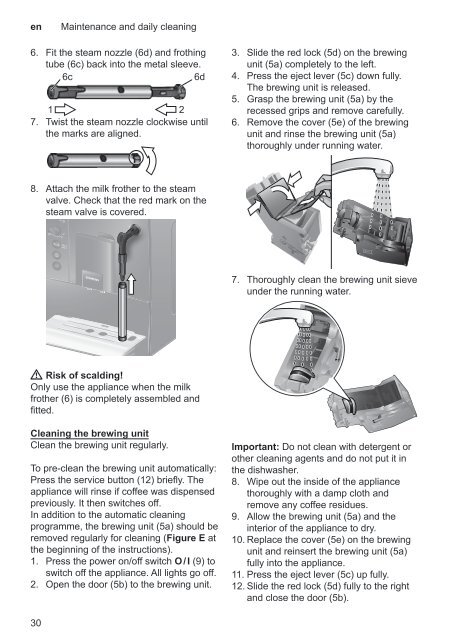
6. Fit the steam nozzle (6d) and frothing<br />
tube (6c) back into the metal sleeve.<br />
6c<br />
6d<br />
1 2<br />
7. Twist the steam nozzle clockwise until<br />
the marks are aligned.<br />
3. Slide the red lock (5d) on the brewing<br />
unit (5a) completely to the left.<br />
4. Press the eject lever (5c) down fully.<br />
The brewing unit is released.<br />
5. Grasp the brewing unit (5a) by the<br />
recessed grips and remove carefully.<br />
6. Remove the cover (5e) of the brewing<br />
unit and rinse the brewing unit (5a)<br />
thoroughly under running water.<br />
8. Attach the milk frother to the steam<br />
valve. Check that the red mark on the<br />
steam valve is covered.<br />
7. Thoroughly clean the brewing unit sieve<br />
under the running water.<br />
WWRisk of scalding!<br />
Only use the appliance when the milk<br />
frother (6) is completely assembled and<br />
fitted.<br />
Cleaning the brewing unit<br />
Clean the brewing unit regularly.<br />
To pre-clean the brewing unit automatically:<br />
Press the service button (12) briefly. The<br />
appliance will rinse if coffee was dispensed<br />
previously. It then switches off.<br />
In addition to the automatic cleaning<br />
programme, the brewing unit (5a) should be<br />
removed regularly for cleaning (Figure E at<br />
the beginning of the instructions).<br />
1. Press the power on/off switch O / I (9) to<br />
switch off the appliance. All lights go off.<br />
2. Open the door (5b) to the brewing unit.<br />
Important: Do not clean with detergent or<br />
other cleaning agents and do not put it in<br />
the dishwasher.<br />
8. Wipe out the inside of the appliance<br />
thoroughly with a damp cloth and<br />
remove any coffee residues.<br />
9. Allow the brewing unit (5a) and the<br />
interior of the appliance to dry.<br />
10. Replace the cover (5e) on the brewing<br />
unit and reinsert the brewing unit (5a)<br />
fully into the appliance.<br />
11. Press the eject lever (5c) up fully.<br />
12. Slide the red lock (5d) fully to the right<br />
and close the door (5b).<br />
30