My Conversion to the Church of Ducati Always leave ... - US Desmo
My Conversion to the Church of Ducati Always leave ... - US Desmo
My Conversion to the Church of Ducati Always leave ... - US Desmo

You also want an ePaper? Increase the reach of your titles
YUMPU automatically turns print PDFs into web optimized ePapers that Google loves.
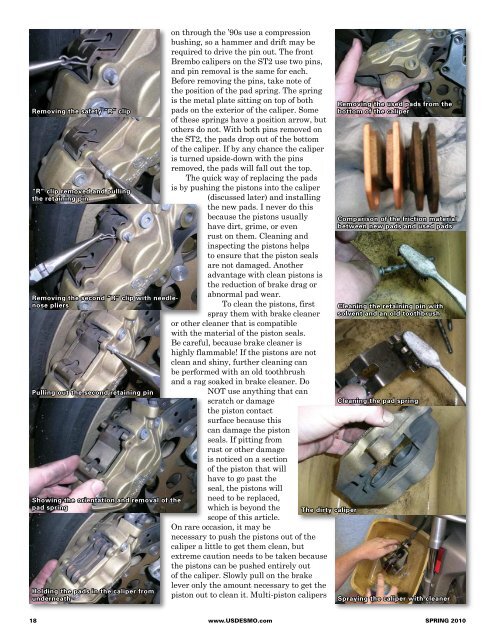
Removing <strong>the</strong> safety “R” clip<br />
“R” clip removed and pulling<br />
<strong>the</strong> retaining pin<br />
Removing <strong>the</strong> second “R” clip with needlenose<br />
pliers<br />
Pulling out <strong>the</strong> second retaining pin<br />
Showing <strong>the</strong> orientation and removal <strong>of</strong> <strong>the</strong><br />
pad spring<br />
Holding <strong>the</strong> pads in <strong>the</strong> caliper from<br />
underneath<br />
on through <strong>the</strong> ’90s use a compression<br />
bushing, so a hammer and drift may be<br />
required <strong>to</strong> drive <strong>the</strong> pin out. The front<br />
Brembo calipers on <strong>the</strong> ST2 use two pins,<br />
and pin removal is <strong>the</strong> same for each.<br />
Before removing <strong>the</strong> pins, take note <strong>of</strong><br />
<strong>the</strong> position <strong>of</strong> <strong>the</strong> pad spring. The spring<br />
is <strong>the</strong> metal plate sitting on <strong>to</strong>p <strong>of</strong> both<br />
pads on <strong>the</strong> exterior <strong>of</strong> <strong>the</strong> caliper. Some<br />
<strong>of</strong> <strong>the</strong>se springs have a position arrow, but<br />
o<strong>the</strong>rs do not. With both pins removed on<br />
<strong>the</strong> ST2, <strong>the</strong> pads drop out <strong>of</strong> <strong>the</strong> bot<strong>to</strong>m<br />
<strong>of</strong> <strong>the</strong> caliper. If by any chance <strong>the</strong> caliper<br />
is turned upside-down with <strong>the</strong> pins<br />
removed, <strong>the</strong> pads will fall out <strong>the</strong> <strong>to</strong>p.<br />
The quick way <strong>of</strong> replacing <strong>the</strong> pads<br />
is by pushing <strong>the</strong> pis<strong>to</strong>ns in<strong>to</strong> <strong>the</strong> caliper<br />
(discussed later) and installing<br />
<strong>the</strong> new pads. I never do this<br />
because <strong>the</strong> pis<strong>to</strong>ns usually<br />
have dirt, grime, or even<br />
rust on <strong>the</strong>m. Cleaning and<br />
inspecting <strong>the</strong> pis<strong>to</strong>ns helps<br />
<strong>to</strong> ensure that <strong>the</strong> pis<strong>to</strong>n seals<br />
are not damaged. Ano<strong>the</strong>r<br />
advantage with clean pis<strong>to</strong>ns is<br />
<strong>the</strong> reduction <strong>of</strong> brake drag or<br />
abnormal pad wear.<br />
To clean <strong>the</strong> pis<strong>to</strong>ns, first<br />
spray <strong>the</strong>m with brake cleaner<br />
or o<strong>the</strong>r cleaner that is compatible<br />
with <strong>the</strong> material <strong>of</strong> <strong>the</strong> pis<strong>to</strong>n seals.<br />
Be careful, because brake cleaner is<br />
highly flammable! If <strong>the</strong> pis<strong>to</strong>ns are not<br />
clean and shiny, fur<strong>the</strong>r cleaning can<br />
be performed with an old <strong>to</strong>othbrush<br />
and a rag soaked in brake cleaner. Do<br />
NOT use anything that can<br />
scratch or damage<br />
<strong>the</strong> pis<strong>to</strong>n contact<br />
surface because this<br />
can damage <strong>the</strong> pis<strong>to</strong>n<br />
seals. If pitting from<br />
rust or o<strong>the</strong>r damage<br />
is noticed on a section<br />
<strong>of</strong> <strong>the</strong> pis<strong>to</strong>n that will<br />
have <strong>to</strong> go past <strong>the</strong><br />
seal, <strong>the</strong> pis<strong>to</strong>ns will<br />
need <strong>to</strong> be replaced,<br />
which is beyond <strong>the</strong><br />
scope <strong>of</strong> this article.<br />
On rare occasion, it may be<br />
necessary <strong>to</strong> push <strong>the</strong> pis<strong>to</strong>ns out <strong>of</strong> <strong>the</strong><br />
caliper a little <strong>to</strong> get <strong>the</strong>m clean, but<br />
extreme caution needs <strong>to</strong> be taken because<br />
<strong>the</strong> pis<strong>to</strong>ns can be pushed entirely out<br />
<strong>of</strong> <strong>the</strong> caliper. Slowly pull on <strong>the</strong> brake<br />
lever only <strong>the</strong> amount necessary <strong>to</strong> get <strong>the</strong><br />
pis<strong>to</strong>n out <strong>to</strong> clean it. Multi-pis<strong>to</strong>n calipers<br />
The dirty caliper<br />
Removing <strong>the</strong> used pads from <strong>the</strong><br />
bot<strong>to</strong>m <strong>of</strong> <strong>the</strong> caliper<br />
Comparison <strong>of</strong> <strong>the</strong> friction material<br />
between new pads and used pads<br />
Cleaning <strong>the</strong> retaining pin with<br />
solvent and an old <strong>to</strong>othbrush<br />
Cleaning <strong>the</strong> pad spring<br />
Spraying <strong>the</strong> caliper with cleaner<br />
Cleaning inside<br />
<strong>the</strong> caliper and exposed pis<strong>to</strong>ns<br />
with an old <strong>to</strong>othbrush<br />
The cleaned caliper<br />
Pushing <strong>the</strong> pis<strong>to</strong>ns in<strong>to</strong> <strong>the</strong> caliper<br />
using <strong>the</strong> old brake pads and a large<br />
screwdriver<br />
Showing <strong>the</strong> pis<strong>to</strong>ns pushed back<br />
in<strong>to</strong> <strong>the</strong> caliper<br />
Positioning <strong>the</strong> new pads in <strong>the</strong> caliper<br />
Showing <strong>the</strong> pad spring in place and<br />
its orientation<br />
may require using fingers,<br />
wedging a socket, piece <strong>of</strong> wood,<br />
or o<strong>the</strong>r object against those<br />
pis<strong>to</strong>ns that you do not want <strong>to</strong><br />
move. [Lowe’s sells packages <strong>of</strong><br />
wooden wedges for shimming<br />
door frames that can be used for<br />
this—Ed.]<br />
Once <strong>the</strong> pis<strong>to</strong>ns<br />
and caliper are clean,<br />
installation <strong>of</strong> <strong>the</strong><br />
new pads can be<br />
performed. Pay very<br />
close attention <strong>to</strong> <strong>the</strong> fluid level<br />
in <strong>the</strong> reservoir and slowly push<br />
all <strong>the</strong> pis<strong>to</strong>ns in<strong>to</strong> <strong>the</strong> caliper.<br />
The pis<strong>to</strong>ns will need <strong>to</strong> be<br />
retracted far enough <strong>to</strong> provide<br />
adequate clearance <strong>to</strong> slide<br />
<strong>the</strong> caliper back on<br />
<strong>the</strong> ro<strong>to</strong>r with <strong>the</strong><br />
new pads installed.<br />
With multi-pis<strong>to</strong>n calipers,<br />
pushing all <strong>the</strong> pis<strong>to</strong>ns in<strong>to</strong> <strong>the</strong><br />
caliper can become frustrating<br />
because as one pis<strong>to</strong>n is<br />
pushed in, ano<strong>the</strong>r can push<br />
back out. Dropping <strong>the</strong> old<br />
pads in<strong>to</strong> <strong>the</strong> caliper and using<br />
a screwdriver between <strong>the</strong><br />
pads <strong>to</strong> pry <strong>the</strong> pis<strong>to</strong>ns as far<br />
back as necessary can make<br />
this task easier. Remember:<br />
KEEP AN EYE ON THE<br />
FLUID LEVEL!<br />
With <strong>the</strong> pis<strong>to</strong>ns retracted, slide <strong>the</strong><br />
new pads in<strong>to</strong> place, position <strong>the</strong> pad<br />
spring on <strong>the</strong> caliper, and slide <strong>the</strong> pin(s)<br />
in<strong>to</strong> place. It is at this time you<br />
may notice that <strong>the</strong> spring really<br />
is a spring because <strong>the</strong> pin does<br />
not simply slide in. To get <strong>the</strong><br />
holes aligned, you may need <strong>to</strong><br />
apply downward pressure on<br />
<strong>the</strong> spring while pushing <strong>the</strong> pin<br />
through <strong>the</strong> caliper, pads, and<br />
spring. With <strong>the</strong> pin in position,<br />
reinstall <strong>the</strong> “R” clips, but be<br />
careful. If you load <strong>the</strong> clip but<br />
do not get it on<strong>to</strong> <strong>the</strong> pin, <strong>the</strong><br />
clip can shoot <strong>of</strong>f and land in <strong>the</strong><br />
most remote spot in your garage.<br />
If this happens, expect <strong>to</strong> spend more time<br />
looking for <strong>the</strong> tiny clip than it <strong>to</strong>ok <strong>to</strong><br />
work on <strong>the</strong> brakes <strong>to</strong> this point. For older<br />
pins with <strong>the</strong> compression ring, a light<br />
tap with a hammer will help seat <strong>the</strong> pins<br />
in<strong>to</strong> place. With <strong>the</strong> pads installed, roll <strong>the</strong><br />
caliper back on<strong>to</strong> <strong>the</strong> ro<strong>to</strong>r and reinstall<br />
Sliding <strong>the</strong> first retinaing pin back in<strong>to</strong> <strong>the</strong><br />
assembly<br />
Installing <strong>the</strong> “R” clip<br />
Pushing <strong>the</strong> retaining pin in<strong>to</strong> <strong>the</strong><br />
assembly with a thumb<br />
Showing <strong>the</strong> reinstallation <strong>of</strong> <strong>the</strong><br />
“R” clip<br />
Showing <strong>the</strong> upper “R” clip position<br />
once back in <strong>the</strong> caliper<br />
Showing <strong>the</strong> lower “R” clip in<br />
position after reinstallation<br />
1 www.<strong>US</strong>DESMO.com SPRING 2010 SPRING 2010 www.<strong>US</strong>DESMO.com 1