TAFE wet area text.pdf - Mike's Trade Wiki
TAFE wet area text.pdf - Mike's Trade Wiki
TAFE wet area text.pdf - Mike's Trade Wiki

Create successful ePaper yourself
Turn your PDF publications into a flip-book with our unique Google optimized e-Paper software.
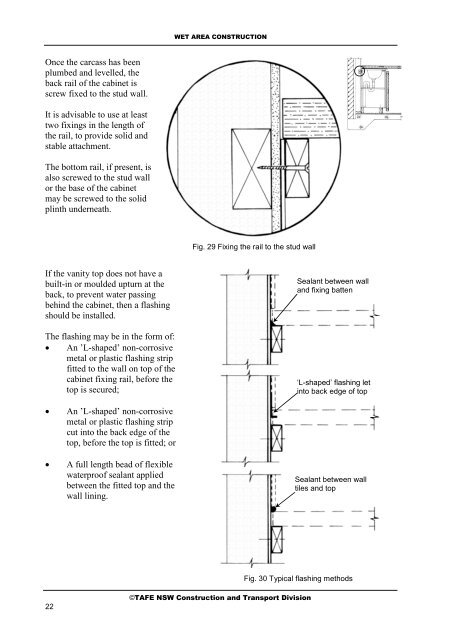
Once the carcass has been<br />
plumbed and levelled, the<br />
back rail of the cabinet is<br />
screw fixed to the stud wall.<br />
It is advisable to use at least<br />
two fixings in the length of<br />
the rail, to provide solid and<br />
stable attachment.<br />
The bottom rail, if present, is<br />
also screwed to the stud wall<br />
or the base of the cabinet<br />
may be screwed to the solid<br />
plinth underneath.<br />
If the vanity top does not have a<br />
built-in or moulded upturn at the<br />
back, to prevent water passing<br />
behind the cabinet, then a flashing<br />
should be installed.<br />
The flashing may be in the form of:<br />
� An ’L-shaped’ non-corrosive<br />
metal or plastic flashing strip<br />
fitted to the wall on top of the<br />
cabinet fixing rail, before the<br />
top is secured;<br />
� An ’L-shaped’ non-corrosive<br />
metal or plastic flashing strip<br />
cut into the back edge of the<br />
top, before the top is fitted; or<br />
� A full length bead of flexible<br />
waterproof sealant applied<br />
between the fitted top and the<br />
wall lining.<br />
22<br />
WET AREA CONSTRUCTION<br />
Fig. 29 Fixing the rail to the stud wall<br />
Fig. 30 Typical flashing methods<br />
©<strong>TAFE</strong> NSW Construction and Transport Division<br />
Sealant between wall<br />
and fixing batten<br />
‘L-shaped’ flashing let<br />
into back edge of top<br />
Sealant between wall<br />
tiles and top