Underwater Photography Underwater Photography
Underwater Photography Underwater Photography
Underwater Photography Underwater Photography

You also want an ePaper? Increase the reach of your titles
YUMPU automatically turns print PDFs into web optimized ePapers that Google loves.
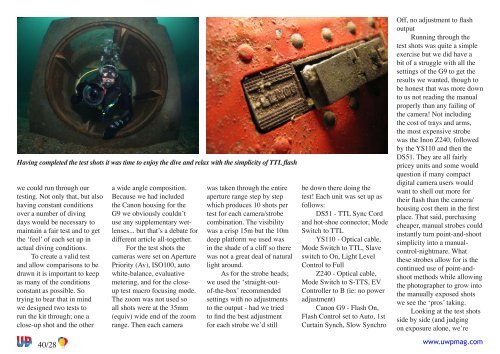
Having completed the test shots it was time to enjoy the dive and relax with the simplicity of TTL flash<br />
we could run through our<br />
testing. Not only that, but also<br />
having constant conditions<br />
over a number of diving<br />
days would be necessary to<br />
maintain a fair test and to get<br />
the ‘feel’ of each set up in<br />
actual diving conditions.<br />
To create a valid test<br />
and allow comparisons to be<br />
drawn it is important to keep<br />
as many of the conditions<br />
constant as possible. So<br />
trying to bear that in mind<br />
we designed two tests to<br />
run the kit through; one a<br />
close-up shot and the other<br />
40/28<br />
a wide angle composition.<br />
Because we had included<br />
the Canon housing for the<br />
G9 we obviously couldn’t<br />
use any supplementary wetlenses...<br />
but that’s a debate for<br />
different article all-together.<br />
For the test shots the<br />
cameras were set on Aperture<br />
Priority (Av), ISO100, auto<br />
white-balance, evaluative<br />
metering, and for the closeup<br />
test macro focusing mode.<br />
The zoom was not used so<br />
all shots were at the 5mm<br />
(equiv) wide end of the zoom<br />
range. Then each camera<br />
was taken through the entire<br />
aperture range step by step<br />
which produces 10 shots per<br />
test for each camera/strobe<br />
combination. The visibility<br />
was a crisp 15m but the 10m<br />
deep platform we used was<br />
in the shade of a cliff so there<br />
was not a great deal of natural<br />
light around.<br />
As for the strobe heads;<br />
we used the ‘straight-outof-the-box’<br />
recommended<br />
settings with no adjustments<br />
to the output - had we tried<br />
to find the best adjustment<br />
for each strobe we’d still<br />
be down there doing the<br />
test! Each unit was set up as<br />
follows:<br />
DS51 - TTL Sync Cord<br />
and hot-shoe connector, Mode<br />
Switch to TTL<br />
YS110 - Optical cable,<br />
Mode Switch to TTL, Slave<br />
switch to On, Light Level<br />
Control to Full<br />
Z240 - Optical cable,<br />
Mode Switch to S-TTS, EV<br />
Controller to B (ie: no power<br />
adjustment)<br />
Canon G9 - Flash On,<br />
Flash Control set to Auto, 1st<br />
Curtain Synch, Slow Synchro<br />
Off, no adjustment to flash<br />
output<br />
Running through the<br />
test shots was quite a simple<br />
exercise but we did have a<br />
bit of a struggle with all the<br />
settings of the G9 to get the<br />
results we wanted, though to<br />
be honest that was more down<br />
to us not reading the manual<br />
properly than any failing of<br />
the camera! Not including<br />
the cost of trays and arms,<br />
the most expensive strobe<br />
was the Inon Z240, followed<br />
by the YS110 and then the<br />
DS51. They are all fairly<br />
pricey units and some would<br />
question if many compact<br />
digital camera users would<br />
want to shell out more for<br />
their flash than the camera/<br />
housing cost them in the first<br />
place. That said, purchasing<br />
cheaper, manual strobes could<br />
instantly turn point-and-shoot<br />
simplicity into a manualcontrol-nightmare.<br />
What<br />
these strobes allow for is the<br />
continued use of point-andshoot<br />
methods while allowing<br />
the photographer to grow into<br />
the manually exposed shots<br />
we see the ‘pros’ taking.<br />
Looking at the test shots<br />
side by side (and judging<br />
on exposure alone, we’re<br />
www.uwpmag.com