

Bonneville/Thruxton A.R.K. Guide
Bonneville/Thruxton A.R.K. Guide
Bonneville/Thruxton A.R.K. Guide

You also want an ePaper? Increase the reach of your titles
YUMPU automatically turns print PDFs into web optimized ePapers that Google loves.
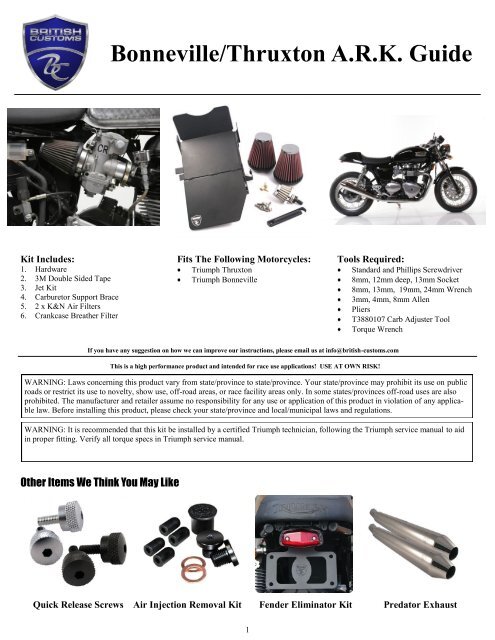
Kit Includes:<br />
1. Hardware<br />
2. 3M Double Sided Tape<br />
3. Jet Kit<br />
4. Carburetor Support Brace<br />
5. 2 x K&N Air Filters<br />
6. Crankcase Breather Filter<br />
<strong>Bonneville</strong>/<strong>Thruxton</strong> A.R.K. <strong>Guide</strong><br />
Fits The Following Motorcycles:<br />
Triumph <strong>Thruxton</strong><br />
Triumph <strong>Bonneville</strong><br />
If you have any suggestion on how we can improve our instructions, please email us at info@british-customs.com<br />
This is a high performance product and intended for race use applications! USE AT OWN RISK!<br />
1<br />
Tools Required:<br />
Standard and Phillips Screwdriver<br />
8mm, 12mm deep, 13mm Socket<br />
8mm, 13mm, 19mm, 24mm Wrench<br />
3mm, 4mm, 8mm Allen<br />
Pliers<br />
T3880107 Carb Adjuster Tool<br />
Torque Wrench<br />
WARNING: Laws concerning this product vary from state/province to state/province. Your state/province may prohibit its use on public<br />
roads or restrict its use to novelty, show use, off-road areas, or race facility areas only. In some states/provinces off-road uses are also<br />
prohibited. The manufacturer and retailer assume no responsibility for any use or application of this product in violation of any applicable<br />
law. Before installing this product, please check your state/province and local/municipal laws and regulations.<br />
WARNING: It is recommended that this kit be installed by a certified Triumph technician, following the Triumph service manual to aid<br />
in proper fitting. Verify all torque specs in Triumph service manual.<br />
Other Items We Think You May Like<br />
Quick Release Screws Air Injection Removal Kit Fender Eliminator Kit Predator Exhaust
<strong>Bonneville</strong>/<strong>Thruxton</strong> A.R.K. <strong>Guide</strong><br />
Step 1:<br />
Start by remove the side covers with a large flat head screwdriver<br />
or coin.<br />
*Note* British Customs machines BC409-001B/C Quick Release<br />
Side Cover Screws which is ideal for someone on the go. The<br />
screws are knurled for superior finger grip and come in either<br />
Black or Chrome Finishes.<br />
Step 2:<br />
Remove seat with a 5mm Allen<br />
*Note* British Customs machines BC407-001B/C Quick Release<br />
Seat Screws which is ideal for someone on the go. The screws are<br />
knurled for superior grip and come in either Black or Chrome Finishes.<br />
Step 3:<br />
Remove rubber battery support strap. Use a Phillips screwdriver<br />
to remove positive and negative battery cables. Remove Battery.<br />
Step 4:<br />
On the LH side, remove starter solenoid and relays by sliding them<br />
off the stock air box mounting pins.<br />
2
<strong>Bonneville</strong>/<strong>Thruxton</strong> A.R.K. <strong>Guide</strong><br />
Step 5:<br />
Use an 8mm socket to remove the 3 snorkel mounting bolts, then<br />
remove snorkel.<br />
Step 6:<br />
Remove rear brake reservoir bolt by using an 8mm socket.<br />
Step 7:<br />
Remove fuse box by using a 5mm Allen, there should be 2 mounting<br />
bolts.<br />
Step 8:<br />
Remove Carb. Heater Control, this is a press fit. If need be use a<br />
flat head screwdriver to pry on the mounting tab to remove unit.<br />
3
<strong>Bonneville</strong>/<strong>Thruxton</strong> A.R.K. <strong>Guide</strong><br />
Step 9:<br />
Remove the 4 battery box bolts with a 8mm wrench or socket.<br />
Step 10:<br />
Loosen air box to carburetor boots with a 3mm Allen.<br />
Step 11:<br />
With the clamps loose, you should be able to push the stock air<br />
box to towards the rear and off the carburetors.<br />
Step 12:<br />
Remove the crank case breather line off the air box by using pliers.<br />
You will be using this line again when we install the air box. You<br />
will be supplied with a breather filter.<br />
4
<strong>Bonneville</strong>/<strong>Thruxton</strong> A.R.K. <strong>Guide</strong><br />
Step 13:<br />
You are now ready to remove the air box. We just need to make<br />
room to remove it. Start by removing the bottom shock eyelet<br />
bolts with a 13mm, remove both shocks.<br />
*Note* Remember to support the bike!<br />
Step 14:<br />
We will now be removing the rear tire. Use a 19mm wrench on<br />
the axle nut on the brake side. Use a 24mm wrench on the<br />
sprocket side to loosen axle bolt. Use a 8mm socket to bring in<br />
both chain adjusters, this will loosen the chain. Remove the already<br />
loosened axle bolt, be sure to support the rear tire when pulling<br />
the axle out. Walk the chain off the sprocket and remove the<br />
rear tire. There should be enough room to pull the air box out.<br />
Step 15:<br />
Remove stock air box.<br />
Step 16:<br />
Install the British Customs Battery Box, tighten down supplied<br />
hardware with a 4mm Allen.<br />
5
<strong>Bonneville</strong>/<strong>Thruxton</strong> A.R.K. <strong>Guide</strong><br />
Step 17:<br />
With the battery box installed, you will need to re-install the rear<br />
wheel and shocks. Start by walking the chain on the sprocket and<br />
supporting the rear wheel to line up the axle holes. Install axle<br />
bolt, tighten down with a 19mm and 24mm wrench. Torque down<br />
to 85Nm.<br />
*Note* Make sure you adjust the chain to spec.<br />
Step 18:<br />
Re-install both shocks with a 13mm. Lower bike onto rear tire to<br />
allow load on the shocks. Then torque down to 28Nm.<br />
Step 19:<br />
On the LH side of the battery box, install the starter solenoid and<br />
relays on the new mounting pins.<br />
Step 20:<br />
On the RH side of the battery box, you will need to mount the rear<br />
brake reservoir and fuse block. Start by taking the fuse block<br />
bracket off. The bracket is secured by a black plastic clip, either<br />
cut or pry the clip from the fuse block. Using the supplied hardware,<br />
install the fuse block into the battery box. Tighten down<br />
with a 4mm Allen.<br />
6
<strong>Bonneville</strong>/<strong>Thruxton</strong> A.R.K. <strong>Guide</strong><br />
Step 21:<br />
Mount the rear brake reservoir with the supplied hardware into the<br />
top threaded bracket on the battery box. Tighten down with a<br />
4mm Allen<br />
Step 22:<br />
You will now need to secure the Carb. Heater Control to the battery<br />
box with double sided tape.<br />
Step 23:<br />
You will now need to re-jet the carburetors for the appropriate<br />
modifications on the bike.<br />
The supplied jet kit includes:<br />
(2) 135 main<br />
(2) 140 main<br />
(2) 42 pilot<br />
Note: Please specify during the time of ordering if you require different<br />
jet sizes.<br />
Step 24:<br />
Drain both Carburetor Bowls by using a 3mm Allen on the bowl<br />
screw. Use a rag to soak up the fuel. Once drained, tighten down<br />
the drain plug.<br />
7
<strong>Bonneville</strong>/<strong>Thruxton</strong> A.R.K. <strong>Guide</strong><br />
Step 25:<br />
Now you will be removing both bowl plates, start by using a small<br />
Phillips screwdriver and remove all 8 bowl screws.<br />
*Note* Be very careful not to strip these screws, they are a very<br />
soft metal. We recommend upgrading your screws to stainless<br />
steel. We have a kit available that includes all the hardware necessary<br />
to make the change. Part number: BC801-005<br />
Step 26:<br />
With the bowl plates removed, you can now access the main and<br />
pilot jets. You will need a few flat head screwdrivers to remove<br />
these jets. Install the proper jets for your application. We are using<br />
a 140 main and a 42 pilot.<br />
Pilot Jet<br />
Main Jet<br />
Step 27:<br />
After you have changed out the jets, install Carburetor Bowls.<br />
Step 28:<br />
Next you will need to adjust the idle mixture screw. T3880107 is<br />
the Carburetor Adjuster Tool which is shown in the picture. You<br />
will need to adjust each Carburetor. Start by tightening each side<br />
with the tool, back out 2-2.5 turns. Some people find it easy to<br />
mark the tool with a Sharpie to keep track of the turns.<br />
8
<strong>Bonneville</strong>/<strong>Thruxton</strong> A.R.K. <strong>Guide</strong><br />
Step 29:<br />
Now you will be install the Carburetor Support Brace, which is<br />
supplied in the ARK Kit. On the RH Side use a 12mm socket and<br />
13mm socket on the LH to remove the frame bolt. Mount the<br />
Brace hook side on the Carburetor rail and the Brace hole through<br />
the frame bolt. Secure factory nut and bolt.<br />
Step 30:<br />
Install both K&N Filters on the Carburetors. Secure with supplied<br />
clamps and tighten down with a flat head screwdriver.<br />
Step 31:<br />
Install Crankcase Breather Filter. Start by cutting down the Crankcase<br />
line (own preference). We like to keep it short, tucked in underneath<br />
the carburetors. Secure filter with supplied clamp.<br />
Step 32:<br />
Re-install both side covers.<br />
9
<strong>Bonneville</strong>/<strong>Thruxton</strong> A.R.K. <strong>Guide</strong><br />
Step 33:<br />
Re-install battery and positive/negative cables.<br />
Step 34:<br />
Install the stock rubber battery support strap on the British Customs<br />
Battery Box.<br />
Step 35:<br />
Install seat.<br />
Step 36:<br />
Verify all connections. Turn petcock to “On” position. To prevent<br />
a hard start issue, prime Carburetors by snapping the throttle a few<br />
times, be careful not to flood the bike. Pull choke out, start the<br />
bike. Check for leaks. Verify idle and road test. Enjoy.<br />
Note: It is best to sync the carburetors for the best running performance.<br />
10