Mini Coil Instructions - Daytona Twin Tec
Mini Coil Instructions - Daytona Twin Tec
Mini Coil Instructions - Daytona Twin Tec

Create successful ePaper yourself
Turn your PDF publications into a flip-book with our unique Google optimized e-Paper software.
<strong>Twin</strong> <strong>Tec</strong><br />
Installation <strong>Instructions</strong> for<br />
3 Ohm <strong>Mini</strong> <strong>Coil</strong>s P/N 2006<br />
CAUTION: CAREFULLY READ INSTRUCTIONS BEFORE PROCEEDING.<br />
OVERVIEW<br />
<strong>Twin</strong> <strong>Tec</strong> P/N 2006 3 ohm mini coils are 50<br />
states street legal (ARB E.O. No. D-641-2) for use with<br />
the following Harley-Davidson ® motorcycle models:<br />
• All 1984-1999 Evolution 1340cc Big <strong>Twin</strong><br />
• 1986-1993 XLH 883cc and 1986-1987 XLH<br />
1100cc Sportster ®<br />
Do not use the 3 ohm mini coils for any breaker<br />
points, Dyna-S series, Harley-Davidson ® <strong>Twin</strong> Cam<br />
88 ® applications or for any Japanese/European<br />
motorcycles with CDI type ignition requiring low<br />
resistance coils.<br />
The mini coil kit includes a universal spark plug<br />
wire set and crimp terminals for primary connections.<br />
INSTALLATION<br />
1. Turn off the ignition switch and disconnect the<br />
battery ground cable before proceeding.<br />
2. You will have to fabricate a custom bracket to<br />
mount the new coils.<br />
3. For <strong>Twin</strong> <strong>Tec</strong> ignitions, use the hookup shown in<br />
Figure 1 or 2. Use the supplied crimp terminals for<br />
the coil primary connections. You can use the<br />
same hookup for Crane and Dyna modules except<br />
that the wire color codes are different:<br />
Crane HI-4 Series<br />
Front Cylinder <strong>Coil</strong>- Black<br />
Rear Cylinder <strong>Coil</strong>- White<br />
<strong>Coil</strong>+ (Module Power) Red<br />
Dyna 2000 Series<br />
Front Cylinder <strong>Coil</strong>- Blue<br />
Rear Cylinder <strong>Coil</strong>- Pink<br />
<strong>Coil</strong>+ (Module Power) White<br />
4. The universal wire set supplied with the mini coil kit<br />
is pre-terminated with both 90° and 110° spark<br />
plug boots. Cut the new wires so that each section<br />
is 1” longer than the original wire and has the<br />
correct end for your application. The extra length<br />
allows for termination of the coil end. Check<br />
lengths carefully if the coil bracket is in a new<br />
location.<br />
5. You must use a proper ignition wire stripping and<br />
crimping tool. The tool should have a “W” crimping<br />
section. Such tools are available from most<br />
automotive parts stores. If you are unfamiliar with<br />
stripping and crimping spiral core wire, we<br />
recommend that you first practice on the unused<br />
section of wire left over. Extra terminals are<br />
supplied in the parts bag.<br />
6. Strip away 5/8” of the silicone insulation to expose<br />
the black spiral core conductor. Be careful so that<br />
you do not cut or knick the fine metal wire. Loosely<br />
fold the black conductor over the wire and crimp on<br />
the terminal. If you fold the conductor too tight, the<br />
crimping operation may stretch and break the fine<br />
wire.<br />
7. Insert the terminals into the straight coil boots.<br />
Spray WD-40 into the boots to ease the process.<br />
8. Install the new wire set on the engine. Apply<br />
silicone dielectric grease to the coil terminals to<br />
reduce corrosion and prevent arcing.<br />
WARNING: To avoid ignition system<br />
damage from coil arcing, never crank<br />
the engine while any spark plug wire<br />
is disconnected. Do not touch or<br />
connect any test equipment, including<br />
a timing light, to a coil while the<br />
engine is running.<br />
<strong>Daytona</strong> <strong>Twin</strong> <strong>Tec</strong> LLC, 933 Beville Road, Suite 101-H, S. <strong>Daytona</strong>, FL 32119 2006 <strong>Mini</strong> <strong>Coil</strong>s<br />
(386) 304-0700 www.daytona-twintec.com 1/2009<br />
Page 1
0<br />
9<br />
1 2<br />
8<br />
OPTIONAL VOES<br />
(VACUUM SWITCH)<br />
3<br />
6 7<br />
4<br />
5<br />
1<br />
ADJUST<br />
MODE ADVANCE RPM LIMIT<br />
SELECT SLOPE X1000 X100<br />
2<br />
8 9 0<br />
3<br />
7<br />
4<br />
5<br />
6<br />
1<br />
2<br />
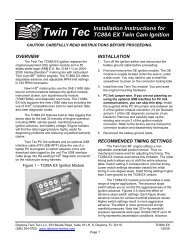
MODE SETTINGS FOR SINGLE FIRE<br />
2 STREET ADVANCE CURVES, MULTI-SPARK DISABLED<br />
3 STREET ADVANCE CURVES, MULTI-SPARK ENABLED<br />
6 RACE ADVANCE CURVES, MULTI-SPARK DISABLED<br />
7 RACE ADVANCE CURVES, MULTI-SPARK ENABLED<br />
8 9 0<br />
3<br />
7<br />
4<br />
5<br />
6<br />
STATUS<br />
VOES<br />
<strong>Twin</strong><strong>Tec</strong><br />
Internal Ignition<br />
Model 1005<br />
1<br />
Figure 1 – <strong>Twin</strong> <strong>Tec</strong> Model 1005 Wiring Diagram<br />
TO<br />
+12V<br />
2<br />
8 9 0<br />
3<br />
7<br />
4<br />
5<br />
6<br />
ENGINE<br />
STOP/RUN<br />
SWITCH<br />
WHITE/BLACK<br />
PURPLE/WHITE<br />
TAPE UP WIRE IF<br />
VOES NOT USED<br />
BROWN<br />
3 OHM MINI COILS<br />
<strong>Daytona</strong> <strong>Twin</strong> <strong>Tec</strong> LLC, 933 Beville Road, Suite 101-H, S. <strong>Daytona</strong>, FL 32119 2006 <strong>Mini</strong> <strong>Coil</strong>s<br />
(386) 304-0700 www.daytona-twintec.com 1/2009<br />
Page 2<br />
PINK<br />
BLUE<br />
WEATHER PACK CONNECTORS<br />
FEMALE TERMINAL MALE TERMINAL<br />
OPTIONAL TACH<br />
RPM<br />
OPTIONAL CABLE CONNECTED TO<br />
BROWN TACH WIRE DURING PC LINK<br />
TO PC<br />
SERIAL<br />
PORT<br />
TO FRONT<br />
SPARK<br />
PLUG<br />
TO REAR<br />
SPARK<br />
PLUG
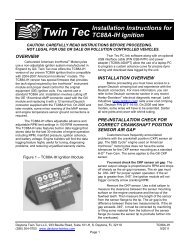
Figure 2 – <strong>Twin</strong> <strong>Tec</strong> Model 1006/1007 Wiring Diagram<br />
VOES<br />
(VACUUM<br />
SWITCH)<br />
TO<br />
+12V<br />
MODE SETTINGS FOR SINGLE FIRE<br />
2 STREET ADVANCE CURVES, MULTI-SPARK DISABLED<br />
3 STREET ADVANCE CURVES, MULTI-SPARK ENABLED<br />
6 RACE ADVANCE CURVES, MULTI-SPARK DISABLED<br />
7 RACE ADVANCE CURVES, MULTI-SPARK ENABLED<br />
MODE ADVANCE RPM LIMIT<br />
SELECT SLOPE X1000 X100<br />
3<br />
7 8 9 0 1 2<br />
4<br />
5<br />
6<br />
1<br />
0<br />
9<br />
2<br />
3 4<br />
7 8<br />
6<br />
1<br />
0<br />
9<br />
2<br />
ADJUST<br />
3<br />
4<br />
5<br />
6<br />
7 8 5<br />
1<br />
9 0<br />
2 3<br />
4<br />
7 8<br />
5<br />
6<br />
STATUS<br />
VOES<br />
<strong>Twin</strong><strong>Tec</strong><br />
External Ignition<br />
Model 1007<br />
BLUE<br />
BROWN<br />
ENGINE<br />
STOP/RUN<br />
SWITCH<br />
PURPLE/WHITE<br />
WHITE/BLACK<br />
TO PC<br />
SERIAL<br />
PORT<br />
OPTIONAL CABLE CONNECTED TO<br />
BROWN TACH WIRE DURING PC LINK<br />
OPTIONAL TACH<br />
<strong>Daytona</strong> <strong>Twin</strong> <strong>Tec</strong> LLC, 933 Beville Road, Suite 101-H, S. <strong>Daytona</strong>, FL 32119 2006 <strong>Mini</strong> <strong>Coil</strong>s<br />
(386) 304-0700 www.daytona-twintec.com 1/2009<br />
Page 3<br />
BLACK<br />
PINK<br />
BLUE<br />
3 OHM MINI COILS<br />
RPM<br />
CAMSHAFT<br />
POSITION<br />
SENSOR<br />
32400-80A<br />
TO FRONT<br />
SPARK<br />
PLUG<br />
TO REAR<br />
SPARK<br />
PLUG