3-Phase Padmount Transformer Concrete Foundation - Duke Energy
3-Phase Padmount Transformer Concrete Foundation - Duke Energy
3-Phase Padmount Transformer Concrete Foundation - Duke Energy

Create successful ePaper yourself
Turn your PDF publications into a flip-book with our unique Google optimized e-Paper software.
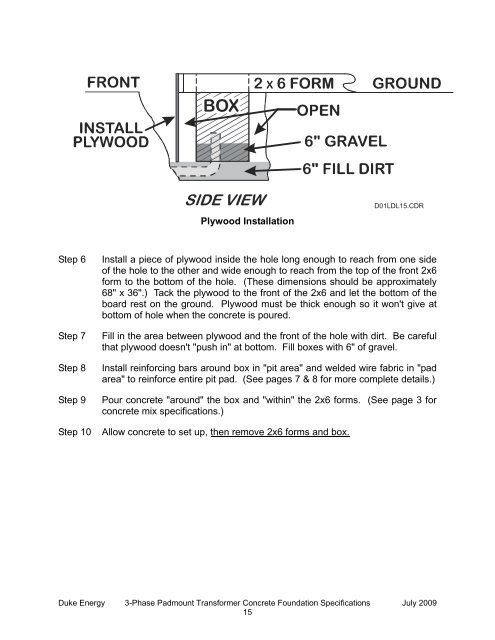
Plywood Installation<br />
Step 6 Install a piece of plywood inside the hole long enough to reach from one side<br />
of the hole to the other and wide enough to reach from the top of the front 2x6<br />
form to the bottom of the hole. (These dimensions should be approximately<br />
68" x 36".) Tack the plywood to the front of the 2x6 and let the bottom of the<br />
board rest on the ground. Plywood must be thick enough so it won't give at<br />
bottom of hole when the concrete is poured.<br />
Step 7 Fill in the area between plywood and the front of the hole with dirt. Be careful<br />
that plywood doesn't "push in" at bottom. Fill boxes with 6" of gravel.<br />
Step 8 Install reinforcing bars around box in "pit area" and welded wire fabric in "pad<br />
area" to reinforce entire pit pad. (See pages 7 & 8 for more complete details.)<br />
Step 9 Pour concrete "around" the box and "within" the 2x6 forms. (See page 3 for<br />
concrete mix specifications.)<br />
Step 10 Allow concrete to set up, then remove 2x6 forms and box.<br />
<strong>Duke</strong> <strong>Energy</strong> 3-<strong>Phase</strong> <strong>Padmount</strong> <strong>Transformer</strong> <strong>Concrete</strong> <strong>Foundation</strong> Specifications July 2009<br />
15