flooring installation, care and maintenance guide - Formica
flooring installation, care and maintenance guide - Formica
flooring installation, care and maintenance guide - Formica

You also want an ePaper? Increase the reach of your titles
YUMPU automatically turns print PDFs into web optimized ePapers that Google loves.
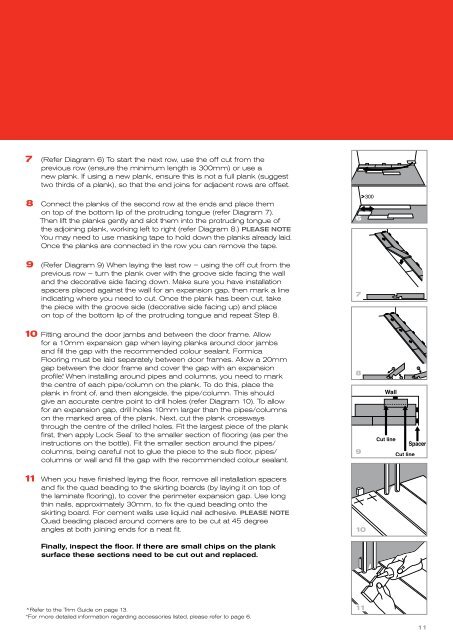
7 (Refer Diagram 6) To start the next row, use the off cut from the<br />
previous row (ensure the minimum length is 300mm) or use a<br />
new plank. If using a new plank, ensure this is not a full plank (suggest<br />
two thirds of a plank), so that the end joins for adjacent rows are offset.<br />
8 Connect the planks of the second row at the ends <strong>and</strong> place them<br />
on top of the bottom lip of the protruding tongue (refer Diagram 7).<br />
Then lift the planks gently <strong>and</strong> slot them into the protruding tongue of<br />
the adjoining plank, working left to right (refer Diagram 8.) PLeASe NOTe<br />
You may need to use masking tape to hold down the planks already laid.<br />
Once the planks are connected in the row you can remove the tape.<br />
9 (Refer Diagram 9) When laying the last row – using the off cut from the<br />
previous row – turn the plank over with the groove side facing the wall<br />
<strong>and</strong> the decorative side facing down. Make sure you have <strong>installation</strong><br />
spacers placed against the wall for an expansion gap, then mark a line<br />
indicating where you need to cut. Once the plank has been cut, take<br />
the piece with the groove side (decorative side facing up) <strong>and</strong> place<br />
on top of the bottom lip of the protruding tongue <strong>and</strong> repeat Step 8.<br />
10 Fitting around the door jambs <strong>and</strong> between the door frame. Allow<br />
for a 10mm expansion gap when laying planks around door jambs<br />
<strong>and</strong> fill the gap with the recommended colour sealant. <strong>Formica</strong><br />
Flooring must be laid separately between door frames. Allow a 20mm<br />
gap between the door frame <strong>and</strong> cover the gap with an expansion<br />
profile.^ When installing around pipes <strong>and</strong> columns, you need to mark<br />
the centre of each pipe/column on the plank. To do this, place the<br />
plank in front of, <strong>and</strong> then alongside, the pipe/column. This should<br />
give an accurate centre point to drill holes (refer Diagram 10). To allow<br />
for an expansion gap, drill holes 10mm larger than the pipes/columns<br />
on the marked area of the plank. Next, cut the plank crossways<br />
through the centre of the drilled holes. Fit the largest piece of the plank<br />
first, then apply Lock Seal * to the smaller section of <strong>flooring</strong> (as per the<br />
instructions on the bottle). Fit the smaller section around the pipes/<br />
columns, being <strong>care</strong>ful not to glue the piece to the sub floor, pipes/<br />
columns or wall <strong>and</strong> fill the gap with the recommended colour sealant.<br />
11 When you have finished laying the floor, remove all <strong>installation</strong> spacers<br />
<strong>and</strong> fix the quad beading to the skirting boards (by laying it on top of<br />
the laminate <strong>flooring</strong>), to cover the perimeter expansion gap. Use long<br />
thin nails, approximately 30mm, to fix the quad beading onto the<br />
skirting board. For cement walls use liquid nail adhesive. PLeASe NOTe<br />
Quad beading placed around corners are to be cut at 45 degree<br />
angles at both joining ends for a neat fit.<br />
Finally, inspect the floor. If there are small chips on the plank<br />
surface these sections need to be cut out <strong>and</strong> replaced.<br />
^Refer to the Trim Guide on page 13.<br />
*For more detailed information regarding accessories listed, please refer to page 6.<br />
6<br />
7<br />
8<br />
9<br />
10<br />
11<br />
Wall<br />
11