

Beads • Adornments • Travel - Whole Bead Show
Beads • Adornments • Travel - Whole Bead Show
Beads • Adornments • Travel - Whole Bead Show

You also want an ePaper? Increase the reach of your titles
YUMPU automatically turns print PDFs into web optimized ePapers that Google loves.
14<br />
old and Sweet Button Earrings<br />
by Renée Renoir<br />
Materials:<br />
(2) – 17mm button<br />
(2) – 3” length of 22 gauge dead soft gold filled wire<br />
(2) – 2” length of 22 gauge dead soft gold filled wire<br />
(2) – Gold German Metal head pins<br />
(4) – 5mm rose quartz facetted rondelle<br />
(2) – Gold German Metal small flower caps<br />
(2) – Gold German Metal diamond twists<br />
(2) – 28mm vintage Lucite pieces<br />
These directions are provided by a right hander<br />
A<br />
B<br />
D<br />
C<br />
Create the Dangle<br />
Convert The Button<br />
Tools:<br />
Round nose pliers<br />
Flat nose pliers<br />
Flush wire cutters<br />
Ear wire finishing tool<br />
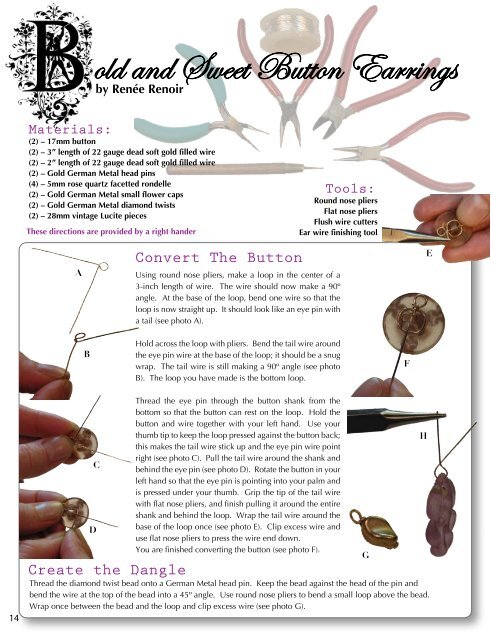
Using round nose pliers, make a loop in the center of a<br />
3-inch length of wire. The wire should now make a 90º<br />
angle. At the base of the loop, bend one wire so that the<br />
loop is now straight up. It should look like an eye pin with<br />
a tail (see photo A).<br />
Hold across the loop with pliers. Bend the tail wire around<br />
the eye pin wire at the base of the loop; it should be a snug<br />
wrap. The tail wire is still making a 90º angle (see photo<br />
B). The loop you have made is the bottom loop.<br />
Thread the eye pin through the button shank from the<br />
bottom so that the button can rest on the loop. Hold the<br />
button and wire together with your left hand. Use your<br />
thumb tip to keep the loop pressed against the button back;<br />
this makes the tail wire stick up and the eye pin wire point<br />
right (see photo C). Pull the tail wire around the shank and<br />
behind the eye pin (see photo D). Rotate the button in your<br />
left hand so that the eye pin is pointing into your palm and<br />
is pressed under your thumb. Grip the tip of the tail wire<br />
with flat nose pliers, and finish pulling it around the entire<br />
shank and behind the loop. Wrap the tail wire around the<br />
base of the loop once (see photo E). Clip excess wire and<br />
use flat nose pliers to press the wire end down.<br />
You are finished converting the button (see photo F).<br />
.<br />
Thread the diamond twist bead onto a German Metal head pin. Keep the bead against the head of the pin and<br />
bend the wire at the top of the bead into a 45º angle. Use round nose pliers to bend a small loop above the bead.<br />
Wrap once between the bead and the loop and clip excess wire (see photo G).<br />
G<br />
F<br />
H<br />
E