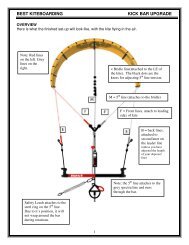
08 Yarga Manual - Best Kiteboarding
08 Yarga Manual - Best Kiteboarding
08 Yarga Manual - Best Kiteboarding

You also want an ePaper? Increase the reach of your titles
YUMPU automatically turns print PDFs into web optimized ePapers that Google loves.
Then pass the entire red line back through the loop so<br />
it forms a larks-head around the LE attachment point.<br />
Secure the line by firmly cinching up the loop to the<br />
white webbing insert.<br />
To complete rigging your kit select the correct knot on<br />
the bridle according to the size of the kite you are<br />
flying and cinch up the blue flying line above that knot.<br />
The center of the LE of the <strong>Yarga</strong> has two attachment<br />
points, one for the pump leash, shown above the<br />
seam, and another white webbing tab for attaching the<br />
5 th line kit.<br />
When attaching the bridle to the kite for the first time;<br />
take the red-knotted extension line, shown below the<br />
seam above and pass the closed loop end through the<br />
5 th line attachment point on the center of the LE.<br />
Depending on your riding style and bar set up<br />
preferences you may wish to try one knot either side of the recommended knot position for<br />
each size kite.<br />
Self launch:<br />
The <strong>08</strong> <strong>Yarga</strong> can be self launched on the beach in<br />
the same way as any other inflatable kite.<br />
With the kite fully inflated and all lines correctly<br />
attached position the kite with the wind passing from<br />
the lower wingtip towards the upper wingtip, as shown<br />
right.<br />
Sand the lower wingtip with sufficient sand to keep the<br />
secure against the wind.<br />
Holding the bar in your hand retire away from the kite<br />
so that the kite until the kite lines are loosely<br />
tensioned and positioned at ninety degrees to the<br />
wind.<br />
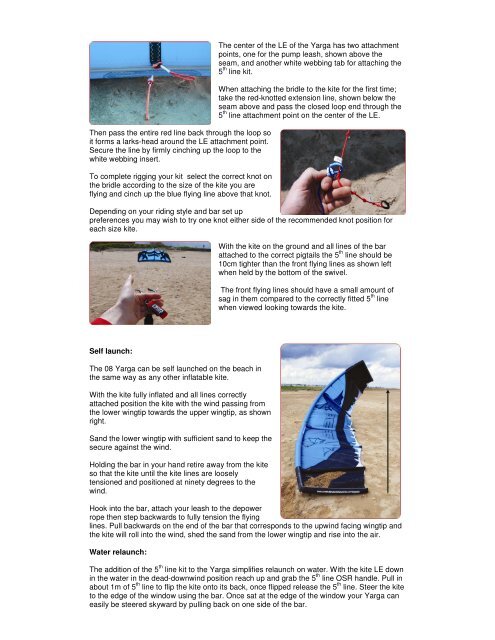
With the kite on the ground and all lines of the bar<br />
attached to the correct pigtails the 5 th line should be<br />
10cm tighter than the front flying lines as shown left<br />
when held by the bottom of the swivel.<br />
The front flying lines should have a small amount of<br />
sag in them compared to the correctly fitted 5 th line<br />
when viewed looking towards the kite.<br />
Hook into the bar, attach your leash to the depower<br />
rope then step backwards to fully tension the flying<br />
lines. Pull backwards on the end of the bar that corresponds to the upwind facing wingtip and<br />
the kite will roll into the wind, shed the sand from the lower wingtip and rise into the air.<br />
Water relaunch:<br />
The addition of the 5 th line kit to the <strong>Yarga</strong> simplifies relaunch on water. With the kite LE down<br />
in the water in the dead-downwind position reach up and grab the 5 th line OSR handle. Pull in<br />
about 1m of 5 th line to flip the kite onto its back, once flipped release the 5 th line. Steer the kite<br />
to the edge of the window using the bar. Once sat at the edge of the window your <strong>Yarga</strong> can<br />
easily be steered skyward by pulling back on one side of the bar.