


Create successful ePaper yourself
Turn your PDF publications into a flip-book with our unique Google optimized e-Paper software.
A l u m i n i A 1 ” C o l l e C t i o n<br />
Accurate measurements are essential, for both correct pricing and proper fit. use only a hard-edged ruler or<br />
steel tape, never a cloth tape. For inside mounts, width measurements should be rounded down to the nearest<br />
1/8” to prevent blind from binding against the window casing.<br />
inSiDe MOunTing (iB)<br />
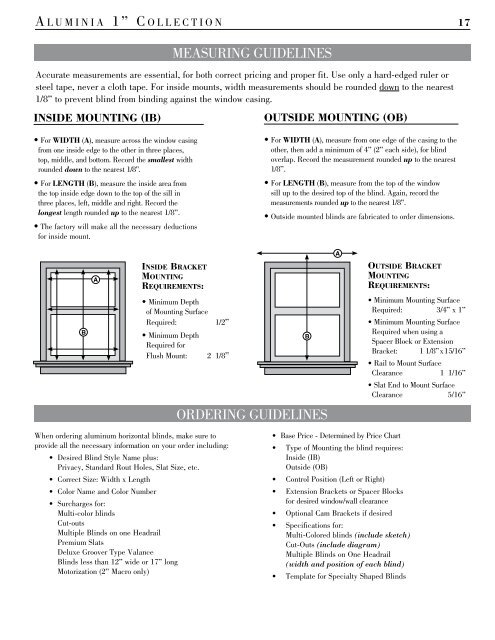
• For WiDTH (a), measure across the window casing<br />
from one inside edge to the other in three places,<br />
top, middle, and bottom. Record the smallest width<br />
rounded down to the nearest 1/8”.<br />
• For lengTH (B), measure the inside area from<br />
the top inside edge down to the top of the sill in<br />
three places, left, middle and right. Record the<br />
longest length rounded up to the nearest 1/8”.<br />
• The factory will make all the necessary deductions<br />
for inside mount.<br />
B<br />
A<br />
iNSidE BrACkET<br />
mOuNTiNg<br />
rEquirEmENTS:<br />
• Minimum Depth<br />
of Mounting Surface<br />
Required: 1/2”<br />
• Minimum Depth<br />
Required for<br />
Flush Mount: 2 1/8”<br />
When ordering aluminum horizontal blinds, make sure to<br />
provide all the necessary information on your order including:<br />
• Desired Blind Style name plus:<br />
Privacy, Standard Rout Holes, Slat Size, etc.<br />
• Correct Size: Width x Length<br />
• Color name and Color number<br />
• Surcharges for:<br />
Multi-color blinds<br />
Cut-outs<br />
Multiple <strong>Blinds</strong> on one Headrail<br />
Premium Slats<br />
Deluxe Groover Type Valance<br />
<strong>Blinds</strong> less than 12” wide or 17” long<br />
Motorization (2” Macro only)<br />
MeASuRInG GuIDeLIneS<br />
ORDeRInG GuIDeLIneS<br />
OuTSiDe MOunTing (OB)<br />
• For WiDTH (a), measure from one edge of the casing to the<br />
other, then add a minimum of 4” (2” each side), for blind<br />
overlap. Record the measurement rounded up to the nearest<br />
1/8”.<br />
• For lengTH (B), measure from the top of the window<br />
sill up to the desired top of the blind. Again, record the<br />
measurements rounded up to the nearest 1/8”.<br />
• Outside mounted blinds are fabricated to order dimensions.<br />
B<br />
A<br />
• Base Price - Determined by Price Chart<br />
OuTSidE BrACkET<br />
mOuNTiNg<br />
rEquirEmENTS:<br />
• Type of Mounting the blind requires:<br />
Inside (IB)<br />
Outside (OB)<br />
• Control Position (Left or Right)<br />
• extension Brackets or Spacer Blocks<br />
for desired window/wall clearance<br />
• Optional Cam Brackets if desired<br />
• Specifications for:<br />
Multi-Colored blinds (include sketch)<br />
Cut-Outs (include diagram)<br />
Multiple <strong>Blinds</strong> on One Headrail<br />
(width and position of each blind)<br />
• Template for Specialty Shaped <strong>Blinds</strong><br />
17<br />
• Minimum Mounting Surface<br />
Required: 3/4” x 1”<br />
• Minimum Mounting Surface<br />
Required when using a<br />
Spacer Block or extension<br />
Bracket: 1 1/8” x 15/16”<br />
• Rail to Mount Surface<br />
Clearance 1 1/16”<br />
• Slat end to Mount Surface<br />
Clearance 5/16”