Installation, Operation, & Maintenance Manual - Gorbel
Installation, Operation, & Maintenance Manual - Gorbel
Installation, Operation, & Maintenance Manual - Gorbel
Create successful ePaper yourself
Turn your PDF publications into a flip-book with our unique Google optimized e-Paper software.
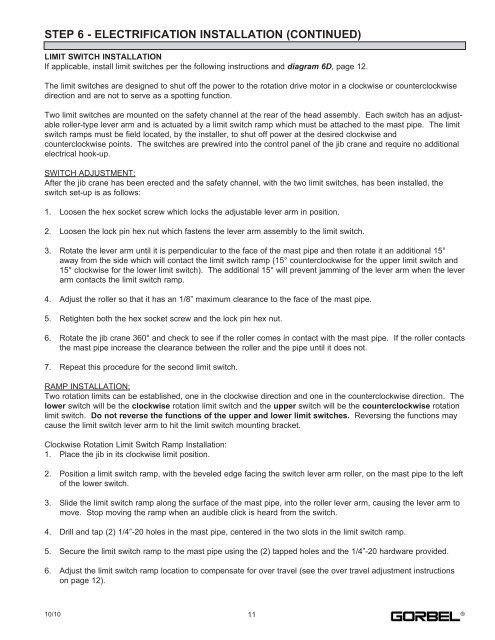
STEP 6 - ELECTRIFICATION INSTALLATION (CONTINUED)<br />
LIMIT SWITCH INSTALLATION<br />
If.applicable,.install.limit.switches.per.the.following.instructions.and.diagram 6D,.page.12.<br />
The.limit.switches.are.designed.to.shut.off.the.power.to.the.rotation.drive.motor.in.a.clockwise.or.counterclockwise.<br />
direction.and.are.not.to.serve.as.a.spotting.function.<br />
Two.limit.switches.are.mounted.on.the.safety.channel.at.the.rear.of.the.head.assembly...Each.switch.has.an.adjustable.roller-type.lever.arm.and.is.actuated.by.a.limit.switch.ramp.which.must.be.attached.to.the.mast.pipe...The.limit.<br />
switch.ramps.must.be.field.located,.by.the.installer,.to.shut.off.power.at.the.desired.clockwise.and<br />
counterclockwise.points...The.switches.are.prewired.into.the.control.panel.of.the.jib.crane.and.require.no.additional.<br />
electrical.hook-up.<br />
SWITCH.ADJUSTMENT:<br />
After.the.jib.crane.has.been.erected.and.the.safety.channel,.with.the.two.limit.switches,.has.been.installed,.the.<br />
switch.set-up.is.as.follows:<br />
1.. Loosen.the.hex.socket.screw.which.locks.the.adjustable.lever.arm.in.position.<br />
2.. Loosen.the.lock.pin.hex.nut.which.fastens.the.lever.arm.assembly.to.the.limit.switch.<br />
3.. Rotate.the.lever.arm.until.it.is.perpendicular.to.the.face.of.the.mast.pipe.and.then.rotate.it.an.additional.15°<br />
. away.from.the.side.which.will.contact.the.limit.switch.ramp.(15°.counterclockwise.for.the.upper.limit.switch.and<br />
. 15°.clockwise.for.the.lower.limit.switch)...The.additional.15°.will.prevent.jamming.of.the.lever.arm.when.the.lever<br />
. arm.contacts.the.limit.switch.ramp.<br />
4.. Adjust.the.roller.so.that.it.has.an.1/8”.maximum.clearance.to.the.face.of.the.mast.pipe.<br />
5.. Retighten.both.the.hex.socket.screw.and.the.lock.pin.hex.nut.<br />
6.. Rotate.the.jib.crane.360°.and.check.to.see.if.the.roller.comes.in.contact.with.the.mast.pipe...If.the.roller.contacts<br />
. the.mast.pipe.increase.the.clearance.between.the.roller.and.the.pipe.until.it.does.not.<br />
7.. Repeat.this.procedure.for.the.second.limit.switch.<br />
RAMP.INSTALLATION:<br />
Two.rotation.limits.can.be.established,.one.in.the.clockwise.direction.and.one.in.the.counterclockwise.direction...The.<br />
lower.switch.will.be.the.clockwise.rotation.limit.switch.and.the.upper.switch.will.be.the.counterclockwise.rotation.<br />
limit.switch...Do not reverse the functions of the upper and lower limit switches...Reversing.the.functions.may.<br />
cause.the.limit.switch.lever.arm.to.hit.the.limit.switch.mounting.bracket.<br />
Clockwise.Rotation.Limit.Switch.Ramp.<strong>Installation</strong>:<br />
1.. Place.the.jib.in.its.clockwise.limit.position.<br />
2.. Position.a.limit.switch.ramp,.with.the.beveled.edge.facing.the.switch.lever.arm.roller,.on.the.mast.pipe.to.the.left<br />
. of.the.lower.switch.<br />
3.. Slide.the.limit.switch.ramp.along.the.surface.of.the.mast.pipe,.into.the.roller.lever.arm,.causing.the.lever.arm.to<br />
. move...Stop.moving.the.ramp.when.an.audible.click.is.heard.from.the.switch.<br />
4.. Drill.and.tap.(2).1/4”-20.holes.in.the.mast.pipe,.centered.in.the.two.slots.in.the.limit.switch.ramp.<br />
5.. Secure.the.limit.switch.ramp.to.the.mast.pipe.using.the.(2).tapped.holes.and.the.1/4”-20.hardware.provided.<br />
6.. Adjust.the.limit.switch.ramp.location.to.compensate.for.over.travel.(see.the.over.travel.adjustment.instructions<br />
. on.page.12).<br />
10/10 11<br />
®


