

Tutorial: Jigsaw using ActionScript 3.0.
Tutorial: Jigsaw using ActionScript 3.0.
Tutorial: Jigsaw using ActionScript 3.0.

You also want an ePaper? Increase the reach of your titles
YUMPU automatically turns print PDFs into web optimized ePapers that Google loves.
<strong>Tutorial</strong>: <strong>Jigsaw</strong> <strong>using</strong> <strong>ActionScript</strong> <strong>3.0.</strong><br />
This tutorial describes how to build a computer implementation of a jigsaw puzzle. It will<br />
demonstrate the use of classes, packages, objects and separate .as files.<br />
Applications<br />
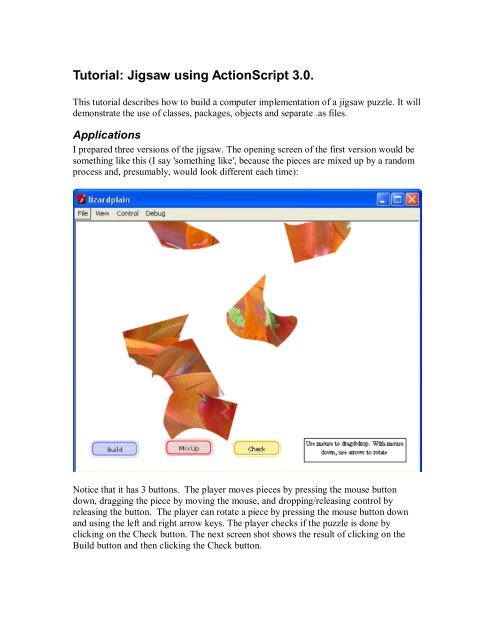
I prepared three versions of the jigsaw. The opening screen of the first version would be<br />
something like this (I say 'something like', because the pieces are mixed up by a random<br />
process and, presumably, would look different each time):<br />
Notice that it has 3 buttons. The player moves pieces by pressing the mouse button<br />
down, dragging the piece by moving the mouse, and dropping/releasing control by<br />
releasing the button. The player can rotate a piece by pressing the mouse button down<br />
and <strong>using</strong> the left and right arrow keys. The player checks if the puzzle is done by<br />
clicking on the Check button. The next screen shot shows the result of clicking on the<br />
Build button and then clicking the Check button.
The next shows the result of clicking on Check at a different time:
The next version of my jigsaw does away with the Check button and incorporates<br />
automatic checking whenever the player releases the mouse button. Here is the opening<br />
screen:
The next screen shot shows the puzzle after the program has determined that it is done:
Note that checking for completion in both programs is done with a tolerance factor: the<br />
player does not have to be perfect. If you want to make the puzzle more challenging, you<br />
can decrease this factor. If you require the player to position things exactly to the pixel, it<br />
will be very difficult to complete.<br />
The third version of the jigsaw has something called an attractor or idler. The game<br />
begins with the pieces periodically in new, mixed up positions. When the player starts to<br />
drag a piece or clicks on a button, the pieces stop moving. If the player does not do<br />
anything for a certain period of time, the pieces move again. The idea here is that this<br />
application could run on a kiosk and 'attract' people passing by. The term idler comes<br />
from the notion that the game is idling. People build idler/attractors that have no<br />
connection to the actual application. For jigsaw, mixing up the pieces is an obvious<br />
choice for the idling display.<br />
Overview<br />
The critical parts of building this application are<br />
creating the puzzle pieces, including determining the information that needs to be<br />
stored in order to re-create the puzzle
<strong>using</strong> the <strong>ActionScript</strong> 3.0 constructs of class and package to define a class,<br />
named Piece, that will specify Piece objects as well as class methods (build,<br />
mixup and checkit)<br />
creating the .fla file, with the piece movie clips and frame code, which will make<br />
reference to a package and a class, and also contain buttons and a text field.<br />
You will create the puzzle pieces by taking an image and effectively slicing it up. You<br />
move the pieces so that the individual registration point/transformation point is close to<br />
the middle of the piece and not where the registration point or transformation point was<br />
for the original whole image. Because we (the code) needs to be able to put the pieces<br />
together and also check if the pieces are close enough to consider the puzzle done, you<br />
need to record coordinate information. The exact procedure is described below.<br />
Note that the checking method does not require the pieces to go in the same position but<br />
just be correct (close to correct) relative to each other. Putting this another way, the<br />
puzzle can be put together with the top left corner NOT at the top of the screen. Check<br />
out the last screen shot to see this.<br />
The coordinate information, referred to here as offsetx and offsety, needs to be<br />
bundled together with the movie clip instance itself for each piece. This is a perfect<br />
application of class and objects. Classes are ways to define new types of values. They are<br />
a way to put together data (variables) and functions (called methods). You have seen<br />
these in action for built-in classes whenever you see the dot notation. I haven't used it in<br />
these tutorials, but perhaps you know from JavaScript about Date objects. In<br />
<strong>ActionScript</strong>, we have movie clip objects. Objects have properties, also called attributes,<br />
and also methods, functions that work with and on the object attributes. Recalling the<br />
target movie clip instance in cannonball, I used the code<br />
target.gotoAndPlay(2);<br />
This was making use of the gotoAndPlay method of the target object. The movie clip<br />
class also set up attributes for each object, for example, x, y, rotation, and<br />
visible. There also are classes that contain methods and variables for the whole class,<br />
not for individual objects of the class. The important example of this is the Math class<br />
and class methods such as random and floor and class variables such as PI.<br />
Programmers in <strong>ActionScript</strong> can define their own objects. The terminology/format is as<br />
follows: you define a class<br />
modifier class classname {<br />
For any class variables:<br />
modifier static var variable_name:datatype;<br />
For the object variables<br />
modifier var variable_name:datatype;<br />
For the class methods<br />
modifier static function method_name ( ) { }<br />
For the object methods
modifier function method_name( ) { }<br />
one of the methods, which would have the same name as the classname, is the<br />
constructor: the method called when a new object of the class is created.<br />
}<br />
[Note: you do not need to follow a strict order and you can mix these different categories<br />
up.]<br />
The modifiers signify how/where the function can be called or the variable referenced.<br />
This is done to do what is called information hiding. It isn't really to hide things but to<br />
make it easier to find errors and debug code. If the exact details of some implementation<br />
are confined to one place, it will be easier to make changes. For this example, certain<br />
things will have the modifier public indicating that they can be used outside of the<br />
class and others will have the modifier internal meaning that they will only be used<br />
inside the class. There are two other possibilities, but I won't get into that here.<br />
Here is some of the code (the whole thing is given below) for the class Piece:<br />
public class Piece {<br />
internal var offsetx: Number;<br />
internal var offsety: Number;<br />
internal var mclip:MovieClip;<br />
}<br />
public function Piece (xx, yy, clip) {<br />
this.offsetx = xx;<br />
this.offsety = yy;<br />
this.mclip = clip;<br />
}<br />
To create an object of class Piece, I use statements such as<br />
var p1:Piece = new Piece(41.6,48.1,piece1);<br />
This will set up an object of type Piece and invoke the function named Piece to set<br />
the object variables to hold the coordinates and a reference to the movie clip instance.<br />
There are 3 functions that I need to use that do not apply to individual Piece objects but<br />
to all the objects. These are for building a complete puzzle, mixing up the puzzle pieces<br />
randomly on the screen and checking if the pieces have been put together reasonably<br />
correctly. There probably are many ways to do this. What I did was to set up a class<br />
variable that was an array holding all the Piece objects and three class methods:<br />
buildit, mixup and checkit.<br />
internal static var pieces:Array = new Array();
The constructor function Piece includes a statement that adds the newly constructed<br />
Piece object to this array. The buildit, mixup and checkit functions make use<br />
of pieces.<br />
Class definitions are contained in packages. Specifically, each class definition is in its<br />
own file and the contents of the file are<br />
package jigsaw {<br />
class Piece {<br />
…<br />
}<br />
}<br />
The example here has just one class and, therefore, just one file: Piece.as. It MUST<br />
go in a folder named jigsaw and I placed it in a folder I named as3 directly in my C<br />
drive. See below concerning the specification of the classpath that indicates to the<br />
Flash environment where the packages are located.<br />
The code interprets the key stroke event <strong>using</strong> built-in variables.<br />
Implementation<br />
You need to prepare two files for this application: the .fla file and the .as file that<br />
holds the package that holds the Piece definition. The name of the .as file must be<br />
Piece.as. It needs to go in a folder with the same name as the package, namely<br />
jigsaw, and the jigsaw folder must be in a folder named in the classpath list. I<br />
will give instructions on this later.<br />
Start by opening up the Flash environment, under Create New, click on Flash File<br />
(<strong>ActionScript</strong> 3.0)
Using the Web or some other program, copy an image to the Clipboard. Back in Flash,<br />
click on Insert/New Symbol/ and, making sure that Movie clip is selected, give the<br />
symbol the name base. In the panel, click on Edit/Paste. If the image is too big, reduce<br />
the size <strong>using</strong> Transform/Scale or the width and height on the Property panel. The screen<br />
shot below shows an image I used Scale on (moving in from the corners) to make be<br />
under 550 by 450 in size. By <strong>using</strong> Scale and the arrows, I kept the proportions (aspect<br />
ratio). I also moved the image so that its origin is at the upper left corner.
Making sure the whole image is selected, click on Modify/Break apart. This turns the<br />
intact image into something you can slice up. You should see something like the screen<br />
shot below, with the pixels in the image selected.
Sometimes it is necessary to do Modify/Break Apart a second time. You now use the<br />
pencil tool or the straight line tool to slice up the picture. The screen shot below shows<br />
the result of <strong>using</strong> the pencil, with the smooth option (in between straighten and ink) to<br />
draw a curve and then <strong>using</strong> the arrow to select the cut-out part.<br />
Use this method to 'slice up' the picture.
Then, do the following for each piece. Select one piece<br />
and then click on Edit/Copy. Then Insert/New Symbol. Make sure the movie clip option<br />
is selected, and give the pieces the names piece1, piece2, etc. Click on Edit/Paste in<br />
Place. Go to Window/Info to make the info panel appear. Make sure that in the Info<br />
panel the graphic in the middle shows 3 squares and a circle in the lower right. This<br />
indicates the transformation point.
The print is small, but notice in my example the numbers for X and Y: 68.5 and 81.3. For<br />
each of your pieces, WRITE DOWN piece1 and the two numbers on paper or <strong>using</strong> a<br />
reliable on-line note pad. Then change the numbers to 0 and 0.<br />
You will see your piece jump so that the cross hairs are more towards the middle.<br />
Continue with all the pieces OR you can do one or two more and go on to do the rest of<br />
the application and then come back.<br />
Bring each piece to the Stage and give each piece an instance name: use piece1, piece2,<br />
etc.<br />
Rename the first layer board. Add a new layer and call it actions. Add a third layer<br />
and call it interactions. The interactions layer will be above the board layer,<br />
meaning that what you are about to put on it will be above any pieces. Add 3 buttons and<br />
one dynamic text field <strong>using</strong> the techniques you have learned from the other tutorials.<br />
Name the buttons: buildbtn, mixupbtn and checkbtn and name the text field<br />
result. The screen shot shows my lizardplain application after this has been done (and<br />
also after code has been put in the actions layer, which I have not shown you yet).
Click on the actions layer and Window/Actions to open up the Actions panel. Write as<br />
the first line:<br />
import jigsaw.*;<br />
These are instructions to the Flash environment to import everything in the jigsaw<br />
package. Since there is only one thing, one class, the Piece class, this statement has the<br />
same effect as writing<br />
Import jigsaw.Piece;<br />
You will see later how to let Flash know where to find this package.<br />
The next part of the code is setting up the objects that hold the offset information and a<br />
reference to the movie clip instance. I haven't told you the specifics of Piece yet, but it<br />
will be available (in the jigsaw package). Here is my code for the lizard puzzle. The<br />
numbers here are the numbers you wrote down from the Info panel for each piece.
var p1:Piece = new Piece(41.6,48.1,piece1);<br />
var p2:Piece = new Piece(101.5,48.5,piece2);<br />
var p3:Piece = new Piece(169.0,39.5,piece3);<br />
var p4:Piece = new Piece(42.0,110.5,piece4);<br />
var p5:Piece = new Piece(111.0,122.5,piece5);<br />
var p6:Piece = new Piece(179.6,111.5,piece6);<br />
Again, you can do just 2 or 3 and wait to do the rest or you can do them all now.<br />
The next 3 statements should be familiar to you from the other tutorials. You will set up<br />
the event handling for the 3 buttons. The functions invoked here are class methods (static<br />
methods) of the Piece class. I haven't shown you that code yet. That comes soon.<br />
mixupbtn.addEventListener(MouseEvent.CLICK,<br />
function(ev) {Piece.mixup();}<br />
);<br />
buildbtn.addEventListener(MouseEvent.CLICK,<br />
function(ev) {Piece.buildit();}<br />
);<br />
checkbtn.addEventListener(MouseEvent.CLICK,<br />
function(ev) {<br />
var res:Boolean;<br />
res = Piece.checkit();<br />
if (res) {<br />
result.text = "Good job!"; }<br />
else {result.text = "Keep working.";}}<br />
);<br />
I want the puzzle to start with the pieces mixed up, so I put in a call to the mixup<br />
method.<br />
Piece.mixup();<br />
Lastly, I put very brief instructions into the result text field.<br />
result.text="Use mouse to drag&drop. With mouse down, use<br />
arrows to rotate"<br />
Now let's go on to the .as file. Click on File/New and then select <strong>ActionScript</strong> File.
The code is a definition of the Piece class in the package jigsaw. There could be<br />
other files with other classes, but for this application, there is just this one file. The<br />
outline is<br />
package jigsaw {<br />
}<br />
import statements indicating what parts of Flash are needed.<br />
public class Piece {<br />
}<br />
definition of class variables, object variables, class methods and object variables<br />
There are 3 import statements needed:<br />
import flash.display.*;<br />
import flash.events.*;<br />
import flash.ui.Keyboard;<br />
You may ask: why do we need this? You might accept that it is necessary to indicate in<br />
the .fla <strong>ActionScript</strong> the need for the jigsaw package, but why is it necessary to indicate<br />
that I need specific stuff in Flash. The answer is that requiring the import statements
prevents certain errors such as referencing a built-in thing when you actually meant a<br />
programmer defined thing. It also may make compilation go quicker. If you imported<br />
class definitions that you actually did not use, this would not increase the size of the<br />
published files.<br />
In <strong>ActionScript</strong>, you can define something to be a constant by <strong>using</strong> const in place of<br />
var. This means that if the code assigns a value to it, this will be caught as an error. By<br />
custom, the names of constants are all caps. I use this for the numbers specifying how<br />
much to rotate the movie clip instance for each arrow key stroke.<br />
The coding in Piece.as includes addEventListener statements.<br />
Here are the entire contents of the file named Piece.as.<br />
package jigsaw{ Start package<br />
import flash.display.*; Import display<br />
import flash.events.*; Events<br />
import flash.ui.Keyboard; Keyboard<br />
public class Piece { Start class definition of Piece<br />
internal static var<br />
pieces:Array = new Array();<br />
This will hold all the pieces<br />
internal static const ROTUNIT=<br />
15;<br />
Defines amount of 1 rotation<br />
internal static const ROTNUM = How many rotations in a<br />
24;<br />
circle<br />
internal static var<br />
Indicates if a piece is being<br />
dragging:Boolean = false;<br />
dragged<br />
0;<br />
0;<br />
internal var offsetx:Number =<br />
internal var offsety:Number =<br />
Object variable<br />
Object variable<br />
internal var mclip:MovieClip; Object variable: points to the<br />
actual movie clip instance<br />
public function Piece(xx, Starts constructor for a piece<br />
yy,<br />
clip) {<br />
this.offsetx = xx; Sets object variables<br />
this.offsety = yy;<br />
this.mclip = clip;<br />
Piece.pieces.push(this); Adds to pieces array<br />
clip.addEventListener(MouseEvent.MOUS<br />
E_DOWN, startdragging);<br />
Sets up for mouse events
clip.addEventListener(MouseEvent.MOUS<br />
E_UP, stopdragging);<br />
Sets up for keyboard event<br />
clip.addEventListener(KeyboardEvent.K<br />
EY_DOWN,reportKeyDown);<br />
clip.buttonMode = true; Sets up so movie clip can get<br />
mouse events and key events<br />
}<br />
internal function<br />
Object method<br />
startdragging(ev) {<br />
this.mclip.startDrag();<br />
dragging = true;<br />
}<br />
internal function<br />
Object method<br />
reportKeyDown(ev) {<br />
if (dragging) {<br />
if<br />
(ev.keyCode==Keyboard.RIGHT) {<br />
this.mclip.rotation +=<br />
ROTUNIT;<br />
}<br />
if<br />
(ev.keyCode==Keyboard.LEFT) {<br />
this.mclip.rotation -=<br />
ROTUNIT;<br />
} Close if<br />
} Close if dragging<br />
} Close reportKeyDown method<br />
internal function<br />
Object method<br />
stopdragging(ev) {<br />
dragging = false;<br />
this.mclip.stopDrag();<br />
}<br />
public static function<br />
Class method<br />
buildit() {<br />
var i:int;<br />
var np:Piece;<br />
for (i=0;<br />
For each of the pieces<br />
i
public static function mixup() Class method<br />
{<br />
var i:int;<br />
var np:Piece;<br />
for (i=0;<br />
For each piece<br />
itolerance))<br />
{<br />
return false;<br />
} Close if<br />
if Compares rotations to 0
(Math.abs(np.mclip.rotation)>=<br />
ROTUNIT) {<br />
return false;<br />
} Close if<br />
} Close for loop<br />
return true;<br />
} Close checkit method<br />
} Close class definition<br />
} Close package<br />
CAUTION: The location of package folders appears to be a delicate<br />
matter. The following works on my home computer. See below for instructions for the<br />
computer classroom. The name of the package must match where it resides in the<br />
computer file structure. I constructed a new folder 'right below' c: called as3 and created<br />
a new folder in it called jigsaw. (I used as3 for all my <strong>ActionScript</strong> packages.) See the<br />
location of as3 and jigsaw in the following screen shot.<br />
Now that you have saved the Piece.as file in a folder named jigsaw, you need to go<br />
back to the .fla file to let Flash know where to find the package. This is called setting<br />
the classpath. Click on File/Publish Settings and then Flash, and then next to<br />
<strong>ActionScript</strong> 3.0, the Setting button. Then next to classpath, click on the cross-hairs in a
circle to get a browse window. Click on the folder holding the package folder (the parent<br />
folder of jigsaw).<br />
Spring 2008, Purchase College NS1013 computer lab of PCs: create a new folder called<br />
as3 on the D drive, create a new folder called jigsaw (the name of the package), and put<br />
the file Piece.as in this folder. In Flash, for the .fla file, under Publish Settings, browse to<br />
D:\as3 and click ok to make that the Classpath.<br />
You now can test the program. First save the .fla file. This can be saved anywhere. I<br />
saved it as lizardplain. Then, in the usual way, click Control/Test Movie.<br />
Changes for the automatic checking<br />
Now the question is how to implement automatic checking? One aspect of this was easy<br />
and another turned out to be more difficult than I initially expected. The first steps are<br />
easy: delete the button labeled check and remove the corresponding<br />
addEventListener statement. Change the first statement to be
import jigsawauto.*;<br />
I renamed the Text Field instructions. This was not necessary, but I thought it was<br />
a better name since that is how the field is used initially.<br />
Save the .fla file as lizardauto.fla. This can be saved in the same folder as<br />
lizardplain.fla.<br />
Next, open up the Piece.as file. I then saved this file by going to c:\as3 and creating a<br />
new folder called jigsawauto. Save Piece.as in this folder. Note that this means<br />
you do not need to change or add to the classpath for lizardauto. It is the same as<br />
lizardplain. [Of course, I am not forcing the name lizard on you. You can name the<br />
.fla file whatever you want. Since, hopefully, your initial one is working, I would save<br />
the new one with a different name.]<br />
This code refers to the TextField datatype, so you need to add the statement<br />
import flash.text.*;<br />
to the import statements at the start of the Piece file.<br />
In the Piece.as file, look at the stopdragging method. This is where I will put the code to<br />
call checkit. I change the header for checkit to have the internal modifier, since it is<br />
no longer called from outside the class.<br />
internal static function checkit():Boolean {<br />
The idea that did not work was to have the stopdragging method create a Text Field<br />
dynamically. This is possible, but it is necessary to do what is called add the Text Field to<br />
the display list and there is not a good candidate. This is chiefly for security reasons. So<br />
in order to provide a place to write the "Good Job", what I do is have the mixup method<br />
pass in the name of the text field already on the board:<br />
Piece.mixup(instructions);<br />
instructions.text=<br />
"Use mouse to drag&drop. With mouse down, use arrows to rotate"<br />
When you make this change, be sure and save the .fla file again.<br />
Now, back to Piece.as, add a new class variable:<br />
internal static var res:TextField;<br />
Change the header and the statement to mixup:
public static function mixup(t:TextField) {<br />
…<br />
Piece.res = t;<br />
The mixup function also is called during the program as a result of the event of the mix<br />
up button being pressed. This means that you must change the addEventListener call<br />
mixupbtn.addEventListener(MouseEvent.CLICK,<br />
function(ev) {Piece.mixup(instructions);}<br />
);<br />
The res class variable will be re-set to the same thing every time mixup is called, but<br />
that is okay. It happens at least once. The modified definition of the method<br />
stopdragging is the following:<br />
internal function stopdragging(ev) {<br />
dragging = false;<br />
this.mclip.stopDrag();<br />
if (checkit()) {<br />
Piece.res.text = "All Done!";<br />
}<br />
}<br />
This 'says' if checkit returns true, change the text in the text field pointed to by the<br />
class variable res to show "All Done!" If the method does not return true, do nothing.<br />
That is, don't tell the player to keep working.<br />
Note: the use of Piece is optional within the class, so I could omit it before the res and<br />
I could add it before checkit.<br />
Save the file as Piece.as in the jigsawauto folder. Test the program.<br />
When you publish the program for uploading to the web, you upload the .html and the<br />
.swf file. As before, you need to upload a file named AC_RunActiveContent.js to the file<br />
folder, if that is not already present. This file is created by the Flash environment and will<br />
be in the folder with the other files.<br />
Changes for idler/attractor<br />
This application has 2 stages: idling and not idling. During idling, there is a timing event<br />
with a short time interval. During not idling, the event is harder to describe. It is the<br />
event of nothing happening. This is how I think about it: do you even set an alarm clock<br />
and then decide, BEFORE it goes off, to push it further ahead. Say it is set for 8am. You
wake up at 7:30 and decide you need at least another hour of sleep, so set the alarm for<br />
8:30. You wake up at 8:15, decide you want at least one more hour, so set the alarm for<br />
9:15. This is how I handle the funny event of nothing happening. I will write code that<br />
stops a time and then starts it anew. If the timing event actually occurs, it does so<br />
because it has been allowed to get to the end of an interval.<br />
Start by creating a new folder in the parent director of the jigsaw and jigsawauto folders<br />
and name it jigsawidler. In Piece.as, change the name of the package to jigsawidler and<br />
save it in the jigsawidler folder. You will be making more changes. Go to the .fla file<br />
and change the name of the file to lizardidler and save it. You will be making more<br />
changes here as well. It is my practice to do this right away to avoid saving on top of a<br />
working program.<br />
Back to the Piece.as file (in the jigsawidler folder): here is my strategy. I will have two<br />
timers: shorttimer with an interval of 1 second and longtimer with an interval of<br />
20 seconds. I need to add to the import statements. They now are:<br />
import flash.display.*;<br />
import flash.events.*;<br />
import flash.ui.Keyboard;<br />
import flash.text.*;<br />
import flash.utils.Timer;<br />
The timer objects are class variables and not accessed outside of the Piece coding so the<br />
modifiers are static and internal:<br />
internal static var shorttimer:Timer = new Timer(1000);<br />
internal static var longtimer:Timer = new Timer(20000);<br />
I define 2 new class (static) functions. One, idler, calls mixup and does things with<br />
the timers. Both the timers set up (the term register is used) idler as the event handler.<br />
The other, setups, is used one-time-only to send the text field AND something I will<br />
describe soon. I could have used such a function in the jigsawauto game. I needed to do it<br />
now because of the requirements for event handlers to have one argument being an event.<br />
I changed mixup to NOT have any arguments and NOT have the line setting<br />
Piece.res.<br />
The idler function is:<br />
public static function idler (ev) {<br />
// only one timer actually will be going<br />
longtimer.stop();<br />
shorttimer.stop();<br />
Piece.mixup();<br />
shorttimer.start();<br />
}
Now the challenge is to find a place to set up (register) the timing events. I decided to do<br />
it in the same function used to get the text field address 'over' to where the Piece class<br />
instances could use id. The new function to accomplish the task for setting up the text<br />
field to be used to display All Done and register the timing events is:<br />
public static function setups(t:TextField) {<br />
Piece.res = t;<br />
shorttimer.addEventListener(TimerEvent.TIMER,Piece.idler);<br />
longtimer.addEventListener(TimerEvent.TIMER,Piece.idler);<br />
}<br />
I added the following two statements to each of the startdragging, buildit and<br />
mixup functions.<br />
shorttimer.stop();<br />
longtimer.stop();<br />
There apparently is no harm in stopping a timer that is not started. This greatly simplifies<br />
the coding. It is possible to access the status of a timer, but it is not necessary here.<br />
The stopdragging function is the one to start the longtimer. Add this one<br />
statement:<br />
longtimer.start();<br />
This one requires patience to test! Be sure both files are saved (and that the .fla file has<br />
import jigsawidler.*;<br />
and the Piece.js file starts with<br />
package jigsawidler {<br />
<strong>ActionScript</strong> 2.0 to <strong>ActionScript</strong> 3.0<br />
Only read this if you are familiar with previous versions of Flash and want to reflect on<br />
the differences.<br />
As I say in all these tutorials, consider that much is the same: you still need to work with<br />
the base image and write down coordinates to be used for the offsetx and offsety<br />
values. What is different is how this information is associated with the piece. You need to<br />
set up buttons, and you need to set up events and write code for event handling for mouse<br />
actions and for key presses. Second, please appreciate the fact that creating the separate<br />
Piece files in the jigsaw and jigsawauto folders means that you can produce new<br />
jigsaw puzzles quickly. You do not copy code but use the very same files.
Beforehand the offset data was associated with the pieces as part of the frame code of a<br />
movie clip symbol. When that proved difficult to do in <strong>ActionScript</strong> 3.0, I decided to use<br />
objects. I worked to make the interactions and the specifics of each jigsaw puzzle part of<br />
the .fla file and the general stuff concerning how jigsaw puzzles work part of the Piece.as<br />
files. The created a small challenge when I wanted to put the generation of the All Done<br />
message into the Piece code, but I solved it by passing a reference to the text field.<br />
This application demonstrates what is termed the composition relation between objects:<br />
the movie clip symbol instances that are the pieces are referenced as object variables in<br />
the Piece object. In other applications (for example, bouncing things), you will see<br />
another type of relationship of objects, specifically inheritance.<br />
The idler/attractor jigsaw made use of the Timer class. This implementation seems<br />
simpler to me, but I haven't really gone back to study the older versions. Setting up the<br />
two timers and thinking about having two alarm clocks that didn't 'mind' being turned off<br />
even if they were off, helped me. Note that creating a Timer does involve adding more<br />
to an application than <strong>using</strong> multiple frames or the Enter_Frame event. For this<br />
application, I did use 2 Timer objects. It is possible to change the timing interval. The<br />
attribute is named delay, so instead of defining two timers, I could have declared just<br />
one, call it mytimer, and had code<br />
and<br />
mytimer.delay = 1000;<br />
mytimer.delay = 20000;<br />
My not so economical approach appears to be acceptable.<br />
Please send comments and suggestions.