Rx2 N - Enika
Rx2 N - Enika
Rx2 N - Enika

Create successful ePaper yourself
Turn your PDF publications into a flip-book with our unique Google optimized e-Paper software.
SK<br />
POPIS<br />
Prijíma slúi k bezdrôtovému zapínaniu alebo vypínaniu<br />
dvoch elektrických spotrebiov pomocou vysielaov radu BO-<br />
Sys ® (tab.1) pouívajúcich prenosový protokol EXM 433 ® . Je<br />
prispôsobený pre intaláciu priamo do spotrebia.<br />
FUNKCIE PRIJÍMA A<br />
ON<br />
Po kadom stlaení tlaítka vysielaa relé prijímaa zopne a<br />
zostane zopnuté.<br />
OFF<br />
Po kadom stlaení tlaítka vysielaa relé prijímaa vypne a<br />
zostane vypnuté.<br />
ON/OFF JEDNOTLA ÍTKOVÝ MÓD<br />
Stlaením tlaítka vysielaa sa relé prijímaa striedavo zopne<br />
a rozopne.<br />
ON/OFF DVOJTLA ÍTKOVÝ MÓD<br />
Stlaením horného tlaítka vysielaa sa relé prijímaa zopne.<br />
Stlaením dolného tlaítka vysielaa sa relé prijímaa rozopne.<br />
TLA ÍTKO<br />
Relé prijímaa zostane zopnuté po dobu drania tlaítka vysielaa<br />
(na strane vysielaa obmedzenie na max. 25 s).<br />
TIMER<br />
Po stlaení tlaítka vysielaa relé prijímaa zopne poda dopredu<br />
nastaveného asu.<br />
SCÉNA - SC<br />
Pri stlaení tlaítka vysielaa naprogramovaného vo funkcii<br />
scéna kontakt relé zopne alebo rozopne poda dopredu ureného<br />
stavu uloeného v pamäti prijímaa. Dlhým stlaením<br />
rovnakého tlaítka sa do pamäti prepíe aktuálny stav výstupného<br />
relé.<br />
(Funkcia je vhodná hlavne pre doplnenie funkcie SCÉNA u<br />
prijímaov Rx1 N D.)<br />
Signalizácia LED:<br />
Prázdná pamä prijímaa je signalizovaná blikaním LED NO<br />
CODE.<br />
Pripojenie externého vysielaa signalizuje trvalý svit LED<br />
BAT/EXT.<br />
Blikanie LED BAT/EXT signalizuje, e vysiela, z ktorého sa<br />
naposledy vysielalo, má vybitú batériu.<br />
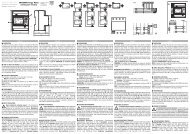
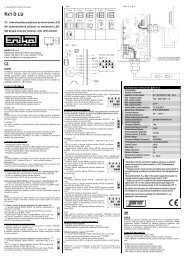
UVEDENIE DO PREVÁDZKY<br />
- Zatlate vhodným nástrojom do zámku krytu so súasným<br />
ahom hore (obr. 1).<br />
- Prijíma upevnite pomocou 2 skrutiek (3,9×12<br />
z prísluenstva) prípadne prilepte vhodnou samolepkou.<br />
- Pripojte káble (obr. 2).<br />
- Následne vráte kryt spä na miesto. K zaisteniu káblov proti<br />
vytrhnutiu pouite 2 skrutky 3,5×14, ktorými sa pritiahne pruná<br />
spodná as krytu proti krytu svoriek.<br />
(Pokia nie je vyadované zakrytie svoriek prijímaa, môe sa<br />
pruná spodná as odlomi.)<br />
Pozn:<br />
V prípade problémov s dosahom, je moné k prijímau pripoji<br />
externý prijíma Rx Ext alebo Rx GP + anténa GP (obr. 2 <br />
nie je súasou dodávky).<br />
Upozornenie:<br />
Pripojenie prístroja k elektrickej sieti môe vykonáva iba pracovník<br />
s odpovedajúcou elektrotechnickou kvalifikáciou.<br />
A) Rýchly zápis vysielaa do pamäti prijímaa (EASY<br />
PROG) vo funkcii ON/OFF<br />
- 1× krátko stlate tlaítko PROG - indikované svitom LED<br />
REC.<br />
- Do 30s 2× stlate vybrané tlaítko vysielaa spôsob ovládania<br />
poda tab. 1.<br />
- Súasné bliknutie LED A a B potvrdí správnos zápisu.<br />
Ak nedôjde behom 30s k nahraniu vysielaa, prijíma automaticky<br />
prejde do prevádzkového reimu.<br />
B) Zápis vysielaa do pamäti prijímaa vo funkcii ON,<br />
OFF, ON/OFF, SCÉNA<br />
- 1x dlho stlate tlaítko PROG. Na prijímai indikované svitom<br />
LED A a REC.<br />
- krátkymi stlaeniami tlaítka PROG vyberte kanál A, B alebo<br />
A+B.<br />
- Do 30s znovu 1x dlho stlate tlaítko PROG na prijímai.<br />
Svieti LED BAT., NO CODE, REC a A (alebo B alebo A+B<br />
poda výberu kanálu).<br />
- Opakovanými krátkymi stlaeniami<br />
tlaítka PROG zvote funkciu. Tá je<br />
urená kombináciou 3 vrchných LED.<br />
-2x dlho stlate vybrané tlaítko vysielaa.<br />
Súasné blikanie LED A a B potvrdí<br />
správnos zápisu<br />
Nastavenie stavu relé vo funkcii SCÉNA pomocou vysielaa.<br />
- stlaením u zapísaného tlaítka vysielaa vo funkcii ON,<br />
OFF, ON/OFF nastavte poadovaný stav relé.<br />
- Podrte dlho zvolené tlaítko vysielaa pre funkci /SCÉNA<br />
pokia sa relé nedostane do poadovaného stavu (asi 5s.).<br />
C) Zápis vysielaa do pamäti prijímaa vo funkcii TIMER<br />
- 1x dlho stlate tlaítko PROG. Na prijímai indikované svitom<br />
LED A a REC.<br />
- krátkymi stlaeniami tlaítka PROG vyberte kanál A, B alebo<br />
A,B.<br />
- Do 30s znovu 1x dlho stlate tlaítko PROG na prijímai.<br />
Svieti LED BAT., NO CODE, REC a A (alebo<br />
B alebo A+B poda výberu kanálov).<br />
- Opakovanými krátkymi stlaeniami tlaítka PROG<br />
zvote funkciu TIMER - tá je urená kombináciou 3<br />
vrchných LED.<br />
-2x dlho stlate vybrané tlaítko vysielaa. Prijíma sa<br />
automaticky prepne do stavu odmeriavania asu.<br />
Signalizované LED REC a blikaním LED A alebo LED<br />
B (LED A signalizuje nastavovanie sekúnd<br />
LED B nastavovanie minút).<br />
- krátkymi stlaeniami tlaítka PROG<br />
nastavte poda pomocnej tabuky poadovanú<br />
hodnotu asu.<br />
- Zvolený asový úsek potvr te dlhým<br />
stlaením tlaítka PROG.<br />
- Súasné blikanie LED A a B potvrdí<br />
správnos zápisu.<br />
D) Mazanie vetkých vysielaov z pamäti prijímaa<br />
- Stlate tlaítko PROG na dobu dlhiu ne 10s.<br />
- Prázdna pamä je signalizovaná blikaním LED NO CODE<br />
E) Mazanie jedného vysielaa<br />
- 1× dlho stlate tlaítko PROG. Signalizuje LED A a B.<br />
- Krátkym stlaením tlaítka PROG nastavte funkciu<br />
- 2× stlate tlaítko vysielaa, ktoré chcete vymaza.<br />
- Súasné bliknutie LED A a B potvrdí vymazanie tlaítka<br />
z pamäti prijímaa.<br />
ENIKA.CZ s.r.o. týmto prehlasuje, e tento <strong>Rx2</strong> N je v zhode<br />
so základnými poiadavkami a alími príslunými ustanoveniami<br />
smernice 1999/5/ES.<br />
GB<br />
DESCRIPTION<br />
The receiver is used for wireless turning on and off of two<br />
electric appliances using the BOSys ® series transmitters (table<br />
1) with the EXM 433 ® transmission protocol. It is ready to<br />
be installed directly into the appliance.<br />
FUNCTION OF THE RECE IVER<br />
ON<br />
Upon each pressing of the transmitter button, the relay of the<br />
receiver will close and remain closed.<br />
OFF<br />
Upon each pressing of the transmitter button, the relay of the<br />
receiver will open and remain open.<br />
ON/OFF - SINGLE BUTTON MODE<br />
Press the transmitter button to alternately close and open the<br />
relay of the receiver.<br />
ON/OFF - TWO-BUTTON MODE<br />
Press the transmitter upper button to close the relay of the receiver.<br />
Press the transmitter lower button to open the relay of the receiver.<br />
BUTTON<br />
The relay of the receiver will remain closed for the time of<br />
pressing the transmitter button (limited to 25s at the transmitter).<br />
TIMER<br />
Upon pressing of the transmitter button, the relay of the receiver<br />
will close for a preset time period.<br />
SCENE - SC<br />
When pressing the transmitter button programmed in the<br />
Scene function, the relay contact of the receiver will close or<br />
open according to the preset condition saved to the receiver<br />
memory. Press the same button longer to overwrite the memory<br />
with the current condition of the output relay.<br />
(This function is particularly suitable as an addition to the<br />
SCENE function of Rx1 N D receivers.)<br />
LED indication:<br />
Flashing NO CODE LED indicates empty memory of the receiver.<br />
Continuously lit BAT/EXT LED indicates connection of an external<br />
transmitter.<br />
Flashing BAT/EXT LED indicates the battery of the lasttransmitting<br />
transmitter is flat.<br />
COMMISSIONING<br />
- Using a suitable tool, push the cover lock while pulling upwards<br />
(fig. 1).<br />
- Mount the receiver using 2 screws (included, 3.9x12) or stick<br />
it using a suitable self-adhesive material.<br />
- Connect cables (fig. 2).<br />
- Mount the cover to its place. Secure cables against releasing<br />
using two screws 3.5x14, which tighten the flexible lower part<br />
of the cover against the cover of terminals.<br />
(In case covering of the receiver terminals is not required, you<br />
may break off the flexible lower part.)<br />
Note:<br />
In case of insufficient signal coverage, the external receiver<br />
Rx Ext or Rx GP + GP antenna (fig. 2 - not included) can be<br />
connected to the receiver.<br />
Note:<br />
Only qualified personnel can connect (disconnect) the receiver<br />
to (from) the mains and appliance.<br />
A) How to quickly program (EASY PROG) the transmitter<br />
with the ON/OFF function in the receiver memory<br />
- Press once (brief press) the PROG button (REC LED on).<br />
- Press the selected transmitter button twice within 30 s - see<br />
the table 1 for mode of control.<br />
- Correct programming will be confirmed by a simultaneous<br />
blink of A and B LEDs.<br />
In case the transmitter is not programmed within 30 s, the receiver<br />
will automatically switch to the operation mode.<br />
B) How to program the transmitter with the ON, OFF,<br />
ON/OFF and SCENE functions into the receiver memory<br />
- Press once (long press) the PROG button (A and REC<br />
LEDs on the receiver on).<br />
- Press repeatedly (brief press) the PROG button to select A,<br />
B or A+B channel.<br />
- Press once (long press) the PROG button on the receiver<br />
again within 30 s (BAT., NO CODE, REC and A (or B or A+B -<br />
acc. to channel selection) LEDs on).<br />
- Press repeatedly (brief press) the<br />
PROG button to select the function.<br />
(Defined by the combination of the 3<br />
top LEDs.)<br />
- Press twice (long press) the selected<br />
transmitter button.<br />
Correct programming will be confirmed<br />
by simultaneous blinking of A<br />
and B LEDs.<br />
How to use the transmitter to set up the relay condition in the<br />
SCENE function<br />
- Press longer the button of the transmitter previously programmed<br />
with the ON, OFF, ON/OFF function to set the required<br />
relay condition.<br />
- Hold the selected transmitter button of the SCENE function<br />
longer until the relay changes to the required condition<br />
(approx. 5 s).<br />
C) How to program the transmitter into the receiver memory<br />
with the TIMER function<br />
- Press once (long press) the PROG button (A and REC LEDs<br />
on the receiver on).<br />
- Press repeatedly (brief press) the PROG button to select A,<br />
B or A+B channel.<br />
- Press once (long press) the PROG button on the receiver<br />
again within 30 s (BAT., NO CODE, REC and A (or B or A+B -<br />
acc. to channel selection) LEDs on).<br />
- Press repeatedly (brief press) the PROG button to<br />
select the TIMER function (defined by the combination<br />
of the 3 top LEDs.<br />
- Press twice (long press) the selected transmitter button.<br />
The receiver will automatically switch to the timesetting<br />
mode (REC LED and one of the A or B LEDs<br />
flashing - the A LED indicates seconds, the B LED indicates<br />
minutes).<br />
- Press repeatedly (brief press) the<br />
PROG button to select the required time<br />
value according to the auxiliary table.<br />
- Press longer the PROG button to confirm<br />
the selected duration.<br />
- Correct programming will be confirmed<br />
by simultaneous blinking of A and B LEDs<br />
D) How to delete all transmitters from the receiver memory<br />
- Press the PROG button longer than 10 s.<br />
- Flashing NO CODE LED indicates empty memory of the receiver.<br />
E) How to delete a single transmitter<br />
- Press once (long press) the PROG button (A and B LEDs<br />
on).<br />
- Press briefly the PROG button to select the function.<br />
- Press twice the button of the transmitter you want to delete.<br />
- A simultaneous blink of the A and B LEDs will confirm deleting<br />
of the button from the receiver memory.<br />
Hereby, ENIKA.CZ s.r.o., declares that this <strong>Rx2</strong> N is in compliance<br />
with the essential requirements and other relevant<br />
provisions of Directive 1999/5/EC.<br />
Prohláení o shod<br />
Výrobce: ENIKA.CZ s.r.o.<br />
190 00 PRAHA, Pod Harfou 933/86<br />
I O: 15055761<br />
typové oznaení: <strong>Rx2</strong> N<br />
specifikace: ---<br />
tímto prohlauje, e výrobek<br />
druh výrobku: vestavný dvoukanálový pijíma<br />
dálkového ovládání<br />
frekvence: 433,92 MHz<br />
citlivost: -100 dBm<br />
- je ve shod se základními poadavky NV 426/2000 Sb. v platném znní<br />
- odpovídá základním poadavkm a dalím ustanovením evropské direktivy<br />
1999/5/ES (R&TTE) (Smrnice o radiových zaízeních a telekomunikaních<br />
koncových zaízeních a vzájemném uznávání jejich shody)<br />
- spluje poadavky tchto norem a pedpis:<br />
rádiové parametry: EN 300220-3:2000<br />
EMC: SN ETSI EN 301 489-1 V1.4.1:2003<br />
elektrická bezpenost: SN EN 60 669-2-1 ed.2:2001<br />
SN EN 60 669-1 ed.2:2003<br />
+A1:03+1:05+2:05 l.8, 10, 12,13,15,<br />
16, 20, 21, 23, 24<br />
SN EN 60 730-1:01 ed.2<br />
+A11:02+A12:04+A1:05+A13:05+A14:05 l.20<br />
Toto prohláení je vydáno na výhradní odpovdnost výrobce.<br />
V Nové Pace dne 03.01.2008 ing. Vladimír Militký,<br />
ízení sytému jakosti