


You also want an ePaper? Increase the reach of your titles
YUMPU automatically turns print PDFs into web optimized ePapers that Google loves.
or bow knot. Once complete, this arrangement will<br />
let you tension the tarp by sliding the Prusik knot<br />
along the ridgeline. As soon as the Prusik is put<br />
under strain, it will lock. To adjust the tarp, simply<br />
take the strain off the Prusik knot. As soon as it<br />
relaxes, it can be slid along the ridgeline.<br />
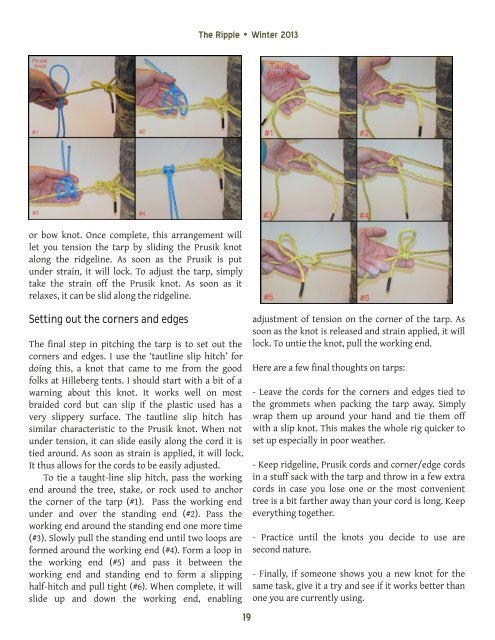
Setting out the corners and edges<br />
The final step in pitching the tarp is to set out the<br />
corners and edges. I use the ‘tautline slip hitch’ for<br />
doing this, a knot that came to me from the good<br />
folks at Hilleberg tents. I should start with a bit of a<br />
warning about this knot. It works well on most<br />
braided cord but can slip if the plastic used has a<br />
very slippery surface. The tautline slip hitch has<br />
similar characteristic to the Prusik knot. When not<br />
under tension, it can slide easily along the cord it is<br />
tied around. As soon as strain is applied, it will lock.<br />
It thus allows for the cords to be easily adjusted.<br />
To tie a taught-line slip hitch, pass the working<br />
end around the tree, stake, or rock used to anchor<br />
the corner of the tarp (#1). Pass the working end<br />
under and over the standing end (#2). Pass the<br />
working end around the standing end one more time<br />
(#3). Slowly pull the standing end until two loops are<br />
formed around the working end (#4). Form a loop in<br />
the working end (#5) and pass it between the<br />
working end and standing end to form a slipping<br />
half-hitch and pull tight (#6). When complete, it will<br />
slide up and down the working end, enabling<br />
The <strong>Ripple</strong> • <strong>Winter</strong> <strong>2013</strong><br />
19<br />
adjustment of tension on the corner of the tarp. As<br />
soon as the knot is released and strain applied, it will<br />
lock. To untie the knot, pull the working end.<br />
Here are a few final thoughts on tarps:<br />
- Leave the cords for the corners and edges tied to<br />
the grommets when packing the tarp away. Simply<br />
wrap them up around your hand and tie them off<br />
with a slip knot. This makes the whole rig quicker to<br />
set up especially in poor weather.<br />
- Keep ridgeline, Prusik cords and corner/edge cords<br />
in a stuff sack with the tarp and throw in a few extra<br />
cords in case you lose one or the most convenient<br />
tree is a bit farther away than your cord is long. Keep<br />
everything together.<br />
- Practice until the knots you decide to use are<br />
second nature.<br />
- Finally, if someone shows you a new knot for the<br />
same task, give it a try and see if it works better than<br />
one you are currently using.