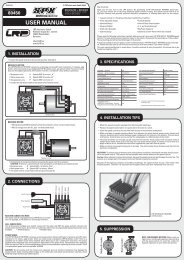
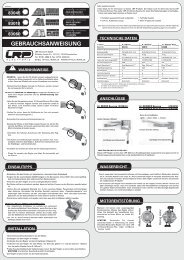
USER MANUAL - LRP
USER MANUAL - LRP
USER MANUAL - LRP

You also want an ePaper? Increase the reach of your titles
YUMPU automatically turns print PDFs into web optimized ePapers that Google loves.
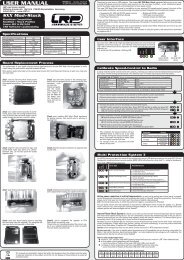
Mode Programming<br />
The iX8 features 4 modes which enable you to adjust it 100% to YOUR requirements.<br />
• How to get into „programming the modes“ Press MODE button for 3 or more seconds.<br />
• How to check the stored values Count the number of flashes of the blue SET-LED<br />
(* = value 1 | ** = value 2 | etc.).<br />
• How to change the value Press SET button to increase value by one step.<br />
• How to get to the next Mode Press MODE button once.<br />
• How to leave the programming mode If you are in MODE.4, press the MODE button one more time,<br />
which will also store the settings!<br />
Important: do not turn the switch off before leaving Mode 4 (by one more press of MODE button) as otherwise your recent<br />
changes won‘t be stored in the memory of the iX8!<br />
Table of settings, values and modes: see below (grey-shaded values show „works default settings“)<br />
Mode.1 (ACS2): allows you to adjust the cut-off voltage precisely depending on the battery type you use:<br />
LED flashes Remark #0 #2 #3 #4 #5 #6<br />
Yellow<br />
Cut-Off Voltage<br />
use for LiPo<br />
disabled<br />
6.4V<br />
2S<br />
9.6V<br />
3S<br />
12.8V<br />
4S<br />
16.0V<br />
5S<br />
19.2V<br />
6S<br />
Caution: WorksDefault setting has cut-off disabled, make sure you adjust this setting before first use!<br />
Important: Using value #0 in this mode will also disable the motor temperature cut-off function!<br />
Mode.2 (Drive Selection): the iX8 can be adjusted for all applications, no matter which motor rotation<br />
direction you need, if you want reverse, electronic brakes or neither you can set it up accordingly!<br />
LED flashes Remark #1 #2 #3 #4 #5 #6<br />
Reverse no yes no no yes no<br />
Red Brake yes yes no yes yes no<br />
Motor Direction CCW (normal) CW (reversed)<br />
Mode.3 (Powerprofiles): allows you to adjust the iX8 to your likes. Either you run on slippery or hightraction<br />
surfaces, we have incorporated a profile for you!<br />
Higher value means more overall power and more aggressive throttle response.<br />
LED flashes #1 #2 #3 #4 #5<br />
Yellow/Red<br />
(alternate)<br />
Special Features<br />
lowest to highest power setting<br />
(value 1 = minimum / value 5 = maximum<br />
Mode.4 (Automatic Brake): allows you to set a slight braking action when your trigger is in neutral range.<br />
LED flashes #0 #1 #2 #3 #4 #5<br />
Yellow/Red<br />
(same time)<br />
disabled<br />
Changing Mode Settings without the Transmitter: simply disconnect the receiver lead from the receiver<br />
and change the MODE settings on the speed-control as described under „Mode Programming“.<br />
Works-Default-Settings: All <strong>LRP</strong> speed-controls come factory-adjusted (defaults are grey-shaded). If you<br />
loose track of the modes, you can restore the works default settings easily. With your radio switched on, hold the<br />
SET button pressed while you switch on the speed-control. This returns the unit to our works default settings.<br />
Sensored Brushless Technology: Advanced Digital allows the perfect knowledge of the brushless motor’s<br />
magnet position. This results in perfect motor control at high and low RPM‘s, as well as perfect brake control.<br />
Troubleshooting Guide<br />
lowest to highest automatic brake setting<br />
(value 1 = minimum / value 5 = maximum)<br />
To eliminate all other possibilities or improper handling, first check all other components in your model and the<br />
trouble shooting guide before you send in this product for repair. If products are sent in for repair, which do operate<br />
perfectly, we have to charge a service fee according to our pricelist.<br />
Always check error by checking LED error code first, this gives you a good indication were to search!<br />
SyMPtoM URSACHE MASSNAHME<br />
Motor overheats Wrong number of cells for your motor Decrease number of cells<br />
Wrong Gear ratio Adjust gear ratio<br />
Too little motor cooling Add cooling fan and/or heatsink<br />
Insufficient performance.<br />
E.g. poor power, topspeed<br />
or brake<br />
Servo is working, no motor<br />
function<br />
No servo and no motor<br />
function<br />
Motor stutters while<br />
accelerating<br />
Motor runs in reverse when<br />
accelerating forward on radio<br />
Speed-control switches off<br />
frequently<br />
Motor never stops, runs at<br />
constant slow speed<br />
Wrong Gear ratio Adjust gear ratio<br />
Wrong number of cells for your motor Adjust number of cells<br />
Transmitter settings changed after set-up Repeat set-up procedure<br />
Motor or sensor-board in motor defective Replace sensor-board or motor<br />
Speed-control defective Send in product for repair<br />
Speedo plugged in incorrectly Plug speedo to receiver as Ch.2<br />
Multiprotection System activated Check settings for your application<br />
Wiring problem Check wires and connectors<br />
Sensor wire missing/defective Install/replace sensor wire<br />
Motor defective Replace motor<br />
Speedo defective Send in product for repair<br />
Speedo connected to receiver with wrong polarity Connect speedo with correct polarity<br />
Wiring problem Check wires and connectors<br />
Battery defective Replace with different battery pack<br />
Crystal, receiver or transmitter defective Replace components one by one<br />
Speedo defective Send in product for repair<br />
Sensor wire defective Replace sensor wire<br />
Motor or sensor board in motor defective Replace sensor board or motor<br />
Radio interference Change location of components<br />
Speedo defective Send in product for repair<br />
Model with reversed gearbox! Change settings in Mode.2 (CCW + CCW<br />
motor rotation direction)<br />
Wrong setting in ACS2 (Mode.1)! Change value of ACS2 (Mode.1) accordingly<br />
Speed-Control overheats Add cooling fan to speed-control<br />
Model used too often without cool-down periods Let cool down after every run<br />
Motor too strong for input voltage Use lower kV motor or lower number of cells<br />
Stuck drivetrain or ball-bearing Maintain model<br />
Motor defective Replace motor<br />
Transmitter settings changed after set-up Repeat set-up procedure<br />
Humidity/water in speedo Immediately unplug and dry speedo<br />
Motor or sensor board in motor defective Replace sensor board or motor<br />
Radio interference Receiver or antenna too close to power wires,<br />
motor, battery or speedo. Receiver aerial too short<br />
or coiled up<br />
Receiver defective, too sensitive;<br />
Transmitter defective, transmitter output power<br />
too low, servo problem<br />
See „Installation Tips“ and „Installation“<br />
Replace components one by one<br />
Only use original manufacturers crystals<br />
Poor battery connection Check plugs and connecting wires<br />
Transmitter batteries empty Replace / recharge transmitter batteries<br />
Mode.1 - AutoCell System 2 & SwitchingBEC<br />
AutoCell System 2: ensures that all batteries can be used safely for all applications, please select the correct<br />
value according to our table under „Mode Programming“. When the battery voltage reaches the selected cut-off<br />
voltage, the motor function will be disabled and the LED‘s will indicate that the shutdown has occured due to<br />
undervoltage of your batteries (see chapter „Multi Protection System 3“ for further details).<br />
Switching BEC: strongest in it‘s class, 6.0V/6A highly efficient output which powers even the strongest digital<br />
servo‘s in the heaviest vehicles!<br />
Mode.2 - Drive Selection<br />
Drive Selection (Brake-, Reverse-Function and Motor Rotation Direction): the iX8 includes fully<br />
adjustable drive selection. The requirements and preferences for 1:8 buggy and truggy-brushless setups can be<br />
rather different and therefore we allow maximum flexibility!<br />
You can disable reverse, if you plan on using forward/brake only as you‘re used to from your nitro vehicle. But<br />
addtionaly you can also disable the speed-controls brake function in case you prefer using your standard nitro cars<br />
brake system with a brake servo, for that operation you need a separete „Y-wire“ which allows you to connect both<br />
the speed-control and the brake servo to the receivers channel 2.<br />
Also there is reversed/CW motor rotation mode available for models with reversed gearbox which normally can<br />
not use a sensored brushless system.<br />
Mode.3 - Feel / Powerprofiles<br />
Allows you to adjust the iX8‘s feeling & characteristics to different motor types, classes, number of cells, racetracks<br />
and of course personal preferences!<br />
Our worlds-winning profiles have been altered for the special requirements of 1:8 cars, buggy‘s and truggy‘s now!<br />
Depending on the status of the car (start, acceleration, full speed) the software calculates the perfect motor<br />
management by adjusting current limiter, throttle curve and more! Higher value means more overall power and<br />
aggressive response.<br />
We integrated an active current limiter to achieve best car control without sacrifising topspeed, so you have very<br />
good control during acceleration but always reach the maximum speed your motor is capable of. The higher profile<br />
you select the more bottom end power & torque you will achieve.<br />
Recommendations<br />
Caution: correct gearing is crucial for good performance and a healthy temperature of motor, speed-control and<br />
batteries. When making changes to gearing, battery voltage, motor or mode3 settings you need to monitor motor<br />
temperatures during the first minutes of running carefully.<br />
A brushless motor should never exceed a temperature of 100°C (210°F).<br />
X-Brake: A good starting point for the brake setting on your radio is 80% for all classes. Make sure you do the<br />
radio-setup with all settings on the radio on 100% and decrease them to 80% after you have compleded the setup.!<br />
Spare- & Optional-Parts<br />
<strong>LRP</strong> offers a comprehensive line of accessories, as well as particular spare- and optional items. Here you find an<br />
overview, for a full picture please visit our website at www.lrp.cc:<br />
Optional parts:<br />
#819307 Sensor-Wire „HighFlex“ 70mm<br />
#819310 Sensor-Wire „HighFlex“ 100mm<br />
#819315 Sensor-Wire „HighFlex“ 150mm<br />
#819320 Sensor-Wire „HighFlex“ 200mm<br />
#81907 3.3mm² Powerwire black (1.0m)<br />
#81908 3.3mm² Powerwire blue (1.0m)<br />
#82506 Power-Wire Set Brushless 3.3mm² (red, black, blue, orange, yellow)<br />
1/8th Brushless Motors:<br />
#53230 Dynamic8 Brushless Motor 1800kV<br />
#53235 Dynamic8 Brushless Motor 2000kV<br />
#53240 Dynamic8 Brushless Motor 2200kV<br />
Repair Procedures / Limited Warranty<br />
All products from <strong>LRP</strong> electronic GmbH (hereinafter called “<strong>LRP</strong>”) are manufactured according to the highest quality<br />
standards. <strong>LRP</strong> guarantees this product to be free from defects in materials or workmanship for 90 days (noneuropean<br />
countris only) from the original date of purchase verified by sales receipt. This limited warranty doesn’t<br />
cover defects, which are a result of misuse, improper maintenance, outside interference or mechanical damage.<br />
„This applies among other things on:<br />
• Cut off original power plug or not using reverse polarity protected plugs<br />
• Receiver wire and/or switch wire damaged<br />
• Mechanical damage of the case<br />
• Humidity/Water inside the speed control<br />
• Mechanical damage of electronical components/PCB<br />
• Soldered on the PCB (except on solderpads)<br />
• Connected speed-control with reversed polarity“<br />
To eliminate all other possibilities or improper handling, first check all other components in your model and the<br />
trouble shooting guide, if available, before you send in this product for repair. If products are sent in for repair, which<br />
do operate perfectly, we have to charge a service fee according to our pricelist.<br />
With sending in this product, the customer has to advise <strong>LRP</strong> if the product should be repaired in either case. If<br />
there is neither a warranty nor guarantee claim, the inspection of the product and the repairs, if necessary, in either<br />
case will be charged with a fee at the customers expense according to our price list. A proof of purchase including<br />
date of purchase needs to be included. Otherwise, no warranty can be granted. For quick repair- and return service,<br />
add your address and detailed description of the malfunction.<br />
If <strong>LRP</strong> no longer manufactures a returned defective product and we are unable to service it, we shall provide you<br />
with a product that has at least the same value from one of the successor series.<br />
The specifications like weight, size and others should be seen as guide values. Due to ongoing technical improvements,<br />
which are done in the interest of the product, <strong>LRP</strong> does not take any responsibility for the accuracy of<br />
these specs.<br />
<strong>LRP</strong>-Distributor-Service:<br />
• Package your product carefully and include sales receipt and detailed description of malfunction.<br />
• Send parcel to your national <strong>LRP</strong> distributor.<br />
• Distributor repairs or exchanges the product.<br />
• Shipment back to you usually by COD (cash on delivery), but this is subject to your national <strong>LRP</strong> distributor‘s<br />
general policy.