
You also want an ePaper? Increase the reach of your titles
YUMPU automatically turns print PDFs into web optimized ePapers that Google loves.
72 HUNTEB — TRADEIl — THAPPEIt.<br />
The Indian? always make their mills sev<br />
eral sizes too big and have to keep their<br />
hands bent to keep the mitts from falling off.<br />
Then they have Ihe two connected with a<br />
cord Ihat passes over the shoulders and<br />
around the neck, or have them attached to<br />
the coat sleeves with a short cord, so that<br />
when they want to shoot quickly they just<br />
ftralgfeten their hands and let the mittens<br />
fall off, and the cord keeps them from falling<br />
into the snow. No, they don't all do so, but<br />
many of them do.<br />
THE WAY THEY AKE BEWN UP.<br />
My way is to have two pairs and carry<br />
the spare ones in a roomy inside coat pocket<br />
(they will get wet from the snow if carried<br />
in an outside pocket), and if I have to drop<br />
my milts into the snow anil they get snowinside,<br />
I wear the other pair for the remain<br />
der of the day.<br />
Don't make these mitts so big at the top<br />
that they <strong>com</strong>e outside of your coat sleeves;<br />
have the wrists small enough to go inside.<br />
Mackinaw coats (the only kind for the woods<br />
in cold weather) always have big sleeves,<br />
and so there is not likely to be any trouble<br />
from this source. A gauntlet glove is an<br />
abomination, and will lead you to say things<br />
Inconsistent with religion. They gather in<br />
all the snow from the surrounding brush,<br />
also liltle twigs, etc<br />
For spring and early fall you can make<br />
these mittens from old grain bags. They<br />
wear well and arc warm enough at that time<br />
of year. The pattern shown is the easiest to<br />
make, and the best fitting that I know. I<br />
have tried making mittens with the thumb<br />
set in but i: is a mighty hard job to make<br />
it fit<br />
Say you old timers, I am one of the "know<br />
all" kind. I just know 1 have the best way<br />
to do everything. I defy you to show me<br />
better ways, or others just as good. Simply<br />
saying that you know better doesn't go—you<br />
will have to show me. Here's hoping that<br />
you will. Clias. J. Dexter.<br />
—o—<br />
AN EASILY MADE BOAT.<br />
Seeing in ihc H-T-T that a reader wants<br />
to know how to build n duck boat, and if a<br />
fifteen foot boat would be too large for a<br />
small stream, I think the boat you mention<br />
is too large as one could not pu!l it. A 15<br />
ft. boat will require 7 fl. oars, and as the<br />
stream is only 7 ft wide I would advise<br />
you to build a 12 ft. double end boat, as<br />
you will have to use a paddle. One could<br />
not turn a 12 ft. boat in a 7 ft. stream<br />
without a great deal of difficulty. You can<br />
paddle any way with Ihis boat—backwards<br />
or forwards—as you choose.<br />
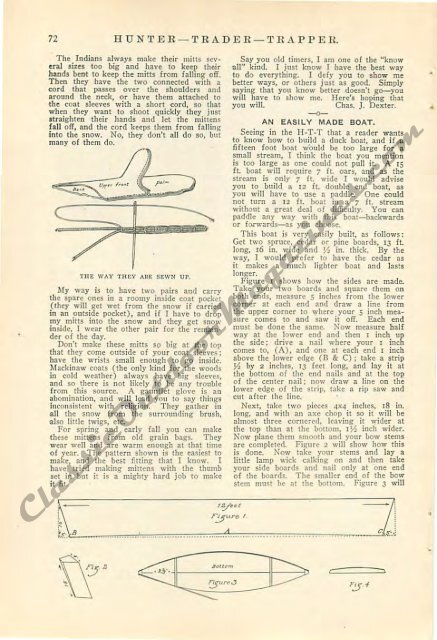
This boat is very easily built, as follows:<br />
Get two spruce, cedar or pine boards, 13 ft.<br />
long, 16 in. wide and Yi in. thick. By the<br />
way, I would prefer to have the cedar as<br />
it makes a much lighter boat and lasts<br />
longer.<br />
Figure 1 shows bow Ihe sides are made.<br />
Take your two boards and square them on<br />
both ends, measure 5 inches from the lower<br />
<strong>com</strong>er at each end and draw a jine from<br />
the upper corner to where your 3 inch mea<br />
sure <strong>com</strong>es to and saw it off. Each end<br />
must be done the same. Now measure half<br />
way at the lower end and then 1 inch up<br />
the side; drive a nail where your 1 inch<br />
<strong>com</strong>es to, (A), and one at each end I inch<br />
above the lower edge (H & C); take a strip<br />
^ by 2 inches, 13 feet long, and lay it at<br />
the bottom of ihe end nails and at the top<br />
□ f the center nail: now draw a line on the<br />
lower edge of the strip, take a rip saw and<br />
cut after the line.<br />
Next, take two pieces 4x4 inches, 18 in.<br />
long, and with an axe chop it so it will lie<br />
almost three cornered, leaving it wider at<br />
the top than at the bottom, V/i inch wider.<br />
Now plane them smooth and your bow stems<br />
arc <strong>com</strong>pleted. Figure 2 will show how this<br />
is done. Now take your stems and lay a<br />
little lamp wick calking on and then take<br />
your side boards and nail only at one end<br />
of the boards. The smaller end of the bow<br />
stem must he at the Imtinm. Figure 3 will<br />
<strong>ClassicOutdoorMagazines</strong>.<strong>com</strong>