

USER MANUAL - Appliances Online
USER MANUAL - Appliances Online
USER MANUAL - Appliances Online

Create successful ePaper yourself
Turn your PDF publications into a flip-book with our unique Google optimized e-Paper software.
TROUBLESHOOTING<br />
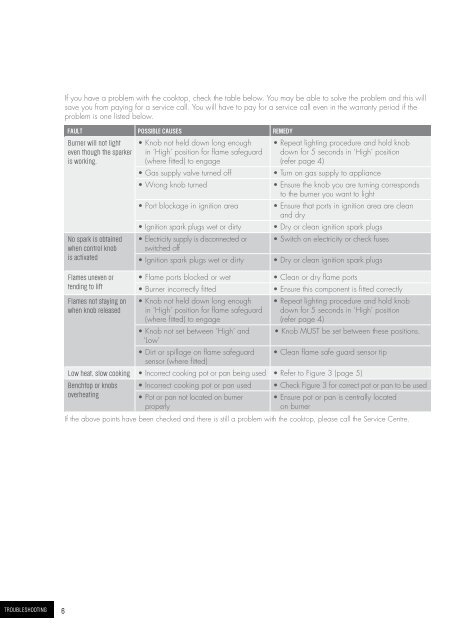
If you have a problem with the cooktop, check the table below. You may be able to solve the problem and this will<br />
save you from paying for a service call. You will have to pay for a service call even in the warranty period if the<br />
problem is one listed below.<br />
FAULT POSSIBLE CAUSES REMEDY<br />
Burner will not light<br />
even though the sparker<br />
is working .<br />
No spark is obtained<br />
when control knob<br />
is activated<br />
• Knob not held down long enough<br />
in ‘High’ position for flame safeguard<br />
(where fitted) to engage<br />
• Repeat lighting procedure and hold knob<br />
down for 5 seconds in ‘High’ position<br />
(refer page 4)<br />
• Gas supply valve turned off • Turn on gas supply to appliance<br />
• Wrong knob turned • Ensure the knob you are turning corresponds<br />
to the burner you want to light<br />
• Port blockage in ignition area • Ensure that ports in ignition area are clean<br />
and dry<br />
• Ignition spark plugs wet or dirty • Dry or clean ignition spark plugs<br />
• Electricity supply is disconnected or<br />
switched off<br />
• Switch on electricity or check fuses<br />
• Ignition spark plugs wet or dirty • Dry or clean ignition spark plugs<br />
Flames uneven or • Flame ports blocked or wet • Clean or dry flame ports<br />
tending to lift • Burner incorrectly fitted • Ensure this component is fitted correctly<br />
Flames not staying on • Knob not held down long enough • Repeat lighting procedure and hold knob<br />
when knob released in ‘High’ position for flame safeguard down for 5 seconds in ‘High’ position<br />
(where fitted) to engage<br />
(refer page 4)<br />
• Knob not set between ‘High’ and<br />
‘Low’<br />
• Knob MUST be set between these positions.<br />
• Dirt or spillage on flame safeguard<br />
sensor (where fitted)<br />
• Clean flame safe guard sensor tip<br />
Low heat, slow cooking • Incorrect cooking pot or pan being used • Refer to Figure 3 (page 5)<br />
Benchtop or knobs • Incorrect cooking pot or pan used • Check Figure 3 for correct pot or pan to be used<br />
overheating<br />
• Pot or pan not located on burner • Ensure pot or pan is centrally located<br />
properly<br />
on burner<br />
If the above points have been checked and there is still a problem with the cooktop, please call the Service Centre.<br />
INSTALLATION INSTRUCTIONS<br />
This appliance must be installed by an authorised person<br />
and in compliance with :<br />
1. AS/NZS 5601.1 Gas Installations Part 1: General<br />
Installations, and AS/NZS 5601.2 Gas Installations<br />
Part 2: LP Gas installations in caravans and<br />
boats for non-propulsive purposes, or the relevant<br />
installation code for gas appliances in your country.<br />
2. The local gas fitting regulations, municipal building<br />
codes, electrical wiring regulations and any other<br />
relevant statutory regulations.<br />
3. The particular instructions as given below.<br />
Figure 4–60cm and 75cm models cut-out<br />
Gas supply connection location<br />
Figure 4–90cm models cut-out<br />
Gas supply connection location<br />
6 7 INSTALLATION<br />
560mm<br />
830mm<br />
CAUTION<br />
Cooktops are supplied for use with natural gas (NG).<br />
To use on LPG the injectors MUST be changed using<br />
the conversion kit supplied. Refer LP Conversion on<br />
page 12.<br />
4. A certificate of compliance MUST be given to the<br />
customer after the appliance is successfully installed.<br />
5. This appliance must be earthed.<br />
*<br />
*<br />
480mm<br />
480mm


