

Refrigeration - Appliances Online
Refrigeration - Appliances Online
Refrigeration - Appliances Online

You also want an ePaper? Increase the reach of your titles
YUMPU automatically turns print PDFs into web optimized ePapers that Google loves.
Installing your new refrigerator<br />
Clearance around your Side by Side refrigerator<br />
Your Side by Side Refrigerator can be installed between<br />
cupboards or fixtures but you must allow for the following<br />
spaces around the cabinet.<br />
1. allow a minimum of 5mm clearance on both sides.<br />
2. allow 10mm clearance at the back of the refrigerator.<br />
3. allow a minimum of 10mm clearance above hinge covers.<br />
4. allow a 250 or 350mm DOORS clearance on the hinge side of<br />
the doors, if you place the refrigerator next to the wall.<br />
This will make cleaning easier.<br />
5. make sure that cupboards or fixtures do not stick out<br />
further than the refrigerator cabinet.<br />
Clearance around your Top and Bottom Mount refrigerator<br />
1. allow a minimum of 5mm clearance on both sides.<br />
2. allow 10mm clearance at the back of the refrigerator.<br />
3. allow a minimum of 10mm clearance above hinge covers.<br />
4. If you do not have a cupboard with a rear gap, the<br />
recommended clearance area on top increases from<br />
50mm to 90mm.<br />
5. When positioned in a corner area, spacing of at least<br />
350mm on the hinge side will allow the doors to open<br />
enough to enable the removal of bins and shelves.<br />
30mm<br />
50mm<br />
Recommended<br />
airspace<br />
CABINET<br />
DOOR<br />
5mm<br />
5mm<br />
250mm<br />
250mm<br />
30mm<br />
10mm<br />
Recommended<br />
airspace 10mm<br />
CABINET<br />
Recommended<br />
DOORS<br />
airspace<br />
CABINET<br />
Freezer<br />
Door<br />
Freezer<br />
Door<br />
5mm<br />
5mm<br />
90mm<br />
10mm 35mm<br />
10mm 35mm<br />
Fridge<br />
Door<br />
Fridge<br />
Door<br />
Note: Doors on all models are designed to sit proud of<br />
cabinetry (not flush). The refrigerator should be placed<br />
against a wall and the gap between the rear of the<br />
refrigerator and the wall should be no greater than 75mm.<br />
4 Installing your new refrigerator Kelvinator <strong>Refrigeration</strong><br />
350mm<br />
350mm<br />
350mm<br />
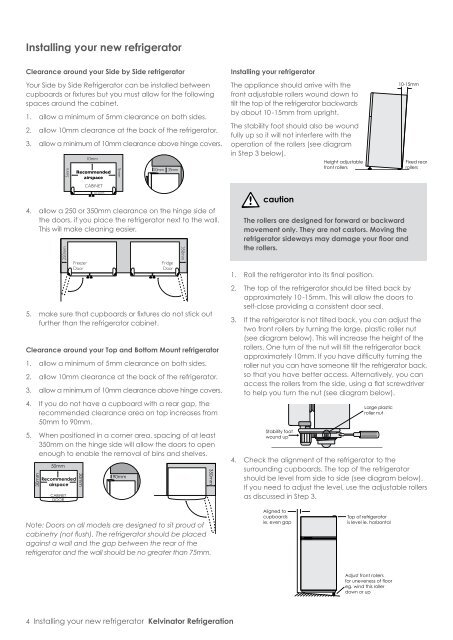
Installing your refrigerator<br />
The appliance should arrive with the<br />
front adjustable rollers wound down to<br />
tilt the top of the refrigerator backwards<br />
by about 10 -15mm from upright.<br />
The stability foot should also be wound<br />
fully up so it will not interfere with the<br />
operation of the rollers (see diagram<br />
in Step 3 below).<br />
caution<br />
Height adjustable<br />
front rollers<br />
The rollers are designed for forward or backward<br />
movement only. They are not castors. Moving the<br />
refrigerator sideways may damage your floor and<br />
the rollers.<br />
1. Roll the refrigerator into its final position.<br />
10-15mm<br />
2. The top of the refrigerator should be tilted back by<br />
approximately 10 -15mm. This will allow the doors to<br />
self-close providing a consistent door seal.<br />
Fixed rear<br />
rollers<br />
3. If the refrigerator is not tilted back, you can adjust the<br />
two front rollers by turning the large, plastic roller nut<br />
(see diagram below). This will increase the height of the<br />
rollers. One turn of the nut will tilt the refrigerator back<br />
approximately 10mm. If you have difficulty turning the<br />
roller nut you can have someone tilt the refrigerator back,<br />
so that you have better access. Alternatively, you can<br />
access the rollers from the side, using a flat screwdriver<br />
to help you turn the nut (see diagram below).<br />
Stability foot<br />
wound up<br />
4. Check the alignment of the refrigerator to the<br />
surrounding cupboards. The top of the refrigerator<br />
should be level from side to side (see diagram below).<br />
If you need to adjust the level, use the adjustable rollers<br />
as discussed in Step 3.<br />
Aligned to<br />
cupboards<br />
ie. even gap<br />
Large plastic<br />
roller nut<br />
Top of refrigerator<br />
is level ie. horizontal<br />
Adjust front rollers<br />
for uneveness of floor<br />
eg. wind this roller<br />
down or up


