

MULTIFUNCTION BUILT-IN OVENS - Appliances Online
MULTIFUNCTION BUILT-IN OVENS - Appliances Online
MULTIFUNCTION BUILT-IN OVENS - Appliances Online

Create successful ePaper yourself
Turn your PDF publications into a flip-book with our unique Google optimized e-Paper software.
E<br />
Figure 46<br />
Figure 43<br />
D<br />
Figure 44<br />
Figure 45<br />
G<br />
F<br />
H<br />
Figure 47<br />
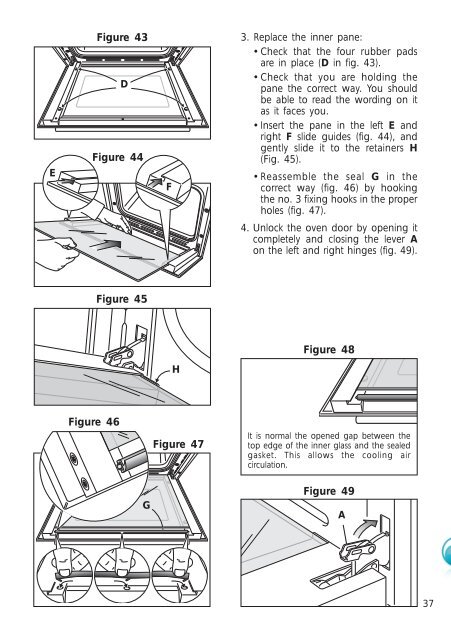
3. Replace the inner pane:<br />
• Check that the four rubber pads<br />
are in place (D in fig. 43).<br />
• Check that you are holding the<br />
pane the correct way. You should<br />
be able to read the wording on it<br />
as it faces you.<br />
• Insert the pane in the left E and<br />
right F slide guides (fig. 44), and<br />
gently slide it to the retainers H<br />
(Fig. 45).<br />
•Reassemble the seal G in the<br />
correct way (fig. 46) by hooking<br />
the no. 3 fixing hooks in the proper<br />
holes (fig. 47).<br />
4. Unlock the oven door by opening it<br />
completely and closing the lever A<br />
on the left and right hinges (fig. 49).<br />
Figure 48<br />
It is normal the opened gap between the<br />
top edge of the inner glass and the sealed<br />
gasket. This allows the cooling air<br />
circulation.<br />
Figure 49<br />
A<br />
37


