

Washing Machine - Appliances Online
Washing Machine - Appliances Online
Washing Machine - Appliances Online

Create successful ePaper yourself
Turn your PDF publications into a flip-book with our unique Google optimized e-Paper software.
installation & maintenance<br />
The User’s Manual is for common use.<br />
Make use of the User’s Manual depending upon your washing machine model.<br />
ENVIRONMENT<br />
Leave some space<br />
Maintain at least 10cm between the washer and the wall.<br />
Place the washer on a sturdy flat surface.<br />
If the washer is placed on an uneven or weak surface, noise or vibration occurs. (Allowable is 1˚)<br />
Adjust the legs for even placement.<br />
Never install the washer near water.<br />
Do not place the washer in steamy rooms or where the washer is directly exposed to rain. Moisture may<br />
destroy the electrical insulation causing an electrical shock hazard.<br />
Avoid direct sunlight or heaters.<br />
As plastic an electrical components are affected by direct heat, never place the washer near furnaces,<br />
boilers, etc. Do not place under direct sunlight.<br />
All packing materials should be disposed of in an environmentally suitable manner.<br />
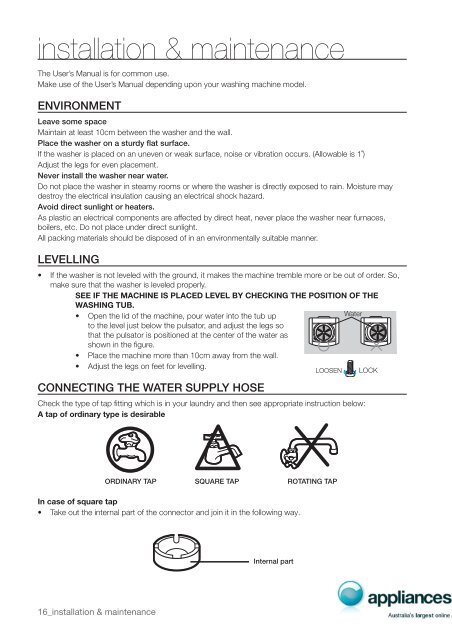
LEVELLING<br />
• If the washer is not leveled with the ground, it makes the machine tremble more or be out of order. So,<br />
make sure that the washer is leveled properly.<br />
SEE IF THE MACHINE IS PLACED LEVEL BY CHECKING THE POSITION OF THE<br />
WASHING TUB.<br />
• Open the lid of the machine, pour water into the tub up<br />
to the level just below the pulsator, and adjust the legs so<br />
that the pulsator is positioned at the center of the water as<br />
shown in the figure.<br />
Water<br />
• Place the machine more than 10cm away from the wall.<br />
• Adjust the legs on feet for levelling.<br />
LOOSEN LOCK<br />
CONNECTING THE WATER SUPPLY HOSE<br />
Check the type of tap fitting which is in your laundry and then see appropriate instruction below:<br />
A tap of ordinary type is desirable<br />
In case of square tap<br />
• Take out the internal part of the connector and join it in the following way.<br />
16_installation & maintenance<br />
ORDINARY TAP SQUARE TAP ROTATING TAP<br />
Internal part


