ML-4512ND Manual - OlsonBros
ML-4512ND Manual - OlsonBros
ML-4512ND Manual - OlsonBros

You also want an ePaper? Increase the reach of your titles
YUMPU automatically turns print PDFs into web optimized ePapers that Google loves.
User’s Guide<br />
Basic<br />
imagine the possibilities<br />
This guide provides information concerning installation, basic operation and troubleshooting on<br />
windows.<br />
<strong>ML</strong>-451x Series<br />
<strong>ML</strong>-501x Series
Contents<br />
1. Introduction<br />
5 Key benefits<br />
7 Features by models<br />
8 Useful to know<br />
9 About this user’s guide<br />
10 Safety information<br />
16 Machine overview<br />
19 Control panel overview<br />
21 Turning on the machine<br />
22 Installing the driver locally<br />
23 Reinstalling the driver<br />
2. Menu overview and basic setup<br />
25 Menu overview<br />
31 Printing a demo page<br />
32 Changing the display language<br />
33 Media and tray<br />
44 Basic printing<br />
50 Using USB memory device<br />
3. Maintenance<br />
54 Ordering supplies and accessories<br />
55 Available supplies<br />
56 Available accessories<br />
58 Available maintenance parts<br />
59 Redistributing toner<br />
61 Replacing the toner cartridge<br />
63 Replacing the imaging unit<br />
65 Upgrading a memory module<br />
66 Installing a mass storage device<br />
67 Replacing the stapler cartridge<br />
68 Monitoring the supplies life<br />
69 Setting the toner low alert<br />
70 Cleaning the machine<br />
4. Troubleshooting<br />
74 Tips for avoiding paper jams<br />
75 Clearing paper jams<br />
91 Understanding the status LED<br />
93 Understanding display messages<br />
2
Contents<br />
5. Appendix<br />
106 Specifications<br />
116<br />
117 Regulatory information<br />
125 Copyright<br />
3
1. Introduction<br />
This chapter provides information you need to know before using the<br />
machine.<br />
• Key benefits 5<br />
• Features by models 7<br />
• Useful to know 8<br />
• About this user’s guide 9<br />
• Safety information 10<br />
• Machine overview 16<br />
• Control panel overview 19<br />
• Turning on the machine 21<br />
• Installing the driver locally 22<br />
• Reinstalling the driver 23
Key benefits<br />
Environmentally friendly<br />
• To save toner and paper, this machine supports Eco feature.<br />
• To save paper, you can print multiple pages on one single sheet of<br />
paper (see Advanced Guide).<br />
• To save paper, you can print on both sides of the paper (doublesided<br />
printing) (see Advanced Guide).<br />
• To save electricity, this machine automatically conserves electricity<br />
by substantially reducing power consumption when not in use.<br />
Print with excellent quality and speed<br />
<br />
• You can print with a resolution of up to 1,200 x 1,200 dpi effective<br />
output.<br />
• Fast, on-demand printing.<br />
For <strong>ML</strong>-451x Series:<br />
- For single-side printing, 43 ppm (A4) or 45 ppm (Letter).<br />
- For duplex printing, 27 ipm (A4) or 28 ipm (Letter).<br />
For <strong>ML</strong>-501x Series:<br />
- For single-side printing, 48 ppm (A4) or 50 ppm (Letter).<br />
- For duplex printing, 31 ipm (A4) or 32 ipm (Letter).<br />
Convenience<br />
• Samsung Easy Printer Manager and Samsung Printer Status (or Smart<br />
Panel) are programs that monitors and informs you of the machine’s<br />
status and allows you to customize the machine’s settings (see<br />
Advanced Guide).<br />
• AnyWeb Print helps you<br />
screen-capture, preview, scrap, and print<br />
the screen of Windows Internet Explorer more easily, than when you<br />
use the ordinary program (see Advanced Guide).
Key benefits<br />
Wide range of functionality and application support<br />
• Supports various paper sizes (see "Print media specifications" on page 108).<br />
• Print watermark: You can customize your documents with words, such as “Confidential” (see Advanced Guide).<br />
• Print posters: The text and pictures of each page of your document are magnified and printed across the multiple sheets of paper and can then<br />
be taped together to form a poster (see Advanced Guide).<br />
• You can print in various operating systems (see "System requirements" on page 111).<br />
• Your machine is equipped with a USB interface and/or a network interface.<br />
Expand your machine’s capacity<br />
• This machine has an extra memory slot for adding more memory (see "Available accessories" on page 56).
Features by models<br />
Some features and optional accessories may not be available depending on model or country, see chart below.<br />
Mass Storage Device <br />
Multbin Mailbox <br />
<br />
Finisher (Stacker & Stapler) <br />
( : Included, : Optional, Blank: Not available)<br />
Features <strong>ML</strong>-451x Series <strong>ML</strong>-501x Series<br />
Hi-Speed USB 2.0 <br />
IEEE 1284 parallel connector a<br />
a. If you use the parallel port, you cannot use the USB cable.<br />
<br />
Network Interface Ethernet 10/100/1000 Base TX wired LAN <br />
Eco printing <br />
Duplex (2-sided) printing <br />
USB memory interface <br />
Memory module (512 MB) <br />
Optional tray <br />
Short Stand
Useful to know<br />
The machine does not print.<br />
• Open the print queue list and remove the document from<br />
the list (see "Canceling a print job" on page 45).<br />
• Remove the driver and install it again (see "Installing the<br />
driver locally" on page 22).<br />
• Select your machine as your default machine in your OS.<br />
Where can I purchase accessories or supplies?<br />
• Inquire at a Samsung distributor or retailer.<br />
• Visit www.samsung.com/supplies. Select your country/<br />
region to view product service information.<br />
The status LED flashes or remains constantly on.<br />
• Turn the product off and on again.<br />
• Check the meanings of LED indications in this manual<br />
and troubleshoot accordingly (see "Understanding the<br />
status LED" on page 91).<br />
A paper jam has occurred.<br />
• Open and close the front door.<br />
• Check the instructions on removing jammed paper in this<br />
manual and troubleshoot accordingly (see "Clearing<br />
paper jams" on page 75).<br />
Printouts are blurry.<br />
• The toner level might be low or uneven. Shake the toner<br />
cartridge to redistribute the toner that remains in the<br />
cartridge.<br />
• Try a different print resolution setting.<br />
• Replace the toner cartridge.<br />
Where can I download the machine’s driver?<br />
• Visit www.samsung.com/printer to download the latest<br />
machine’s driver, and install it on your system.
About this user’s guide<br />
This user's guide provides information for your basic understanding<br />
of the machine as well as detailed steps to explain machine usage.<br />
• Read the safety information before using the machine.<br />
• If you have a problem using the machine, refer to the<br />
troubleshooting chapter.<br />
• Terms used in this user’s guide are explained in the glossary<br />
chapter.<br />
• All illustrations in this user’s guide may differ from your machine<br />
depending on its options or model you purchased.<br />
• The screenshots in this user's guide may differ from your machine<br />
depending on the machine’s firmware/driver version.<br />
• The procedures in this user’s guide are mainly based on Windows 7.<br />
1<br />
<br />
Conventions<br />
Some terms in this guide are used interchangeably, as below:<br />
• Document is synonymous with original.<br />
• Paper is synonymous with media, or print media.<br />
• Machine refers to printer or MFP.<br />
2<br />
<br />
General icons<br />
Icon Text Description<br />
Caution<br />
Note<br />
1. Introduction<br />
Gives users information to protect the<br />
machine from possible mechanical damage<br />
or malfunction.<br />
Provides additional information or detailed<br />
specification of the machine function and<br />
feature.<br />
9
Safety information<br />
These warnings and precautions are included to prevent injury to<br />
you and others, and to prevent any potential damage to your<br />
machine. Be sure to read and understand all of these instructions<br />
before using the machine. After reading this section, keep it in a safe<br />
place for future reference.<br />
3<br />
<br />
Important safety symbols<br />
Explanation of all icons and signs used in this chapter<br />
Warning<br />
Caution<br />
Do not attempt.<br />
Hazards or unsafe practices that may result in<br />
severe personal injury or death.<br />
Hazards or unsafe practices that may result in<br />
minor personal injury or property damage.<br />
4<br />
<br />
Operating environment<br />
Warning<br />
1. Introduction<br />
Do not use if the power cord is damaged or if the<br />
electrical outlet is not grounded.<br />
This could result in electric shock or fire.<br />
Do not place anything on top of the machine (water,<br />
small metal or heavy objects, candles, lit cigarettes, etc.).<br />
This could result in electric shock or fire.<br />
• If the machine gets overheated, it releases smoke,<br />
makes strange noises, or generates an odd odor,<br />
immediately turn off the power switch and unplug the<br />
machine.<br />
• The user should be able to access the power outlet in<br />
case of emergencies that might require the user to pull<br />
the plug out.<br />
This could result in electric shock or fire.<br />
Do not bend, or place heavy objects on the power cord.<br />
Stepping on or allowing the power cord to be crushed by<br />
a heavy object could result in electric shock or fire.<br />
10
Safety information<br />
Caution<br />
Do not remove the plug by pulling on the cord; do not<br />
handle the plug with wet hands.<br />
This could result in electric shock or fire.<br />
During an electrical storm or for a period of nonoperation,<br />
remove the power plug from the electrical<br />
outlet.<br />
This could result in electric shock or fire.<br />
Be careful, the paper output area is hot.<br />
Burns could occur.<br />
If the machine has been dropped, or if the cabinet<br />
appears damaged, unplug the machine from all<br />
interface connections and request assistance from<br />
qualified service personnel.<br />
Otherwise, this could result in electric shock or fire.<br />
If the plug does not easily enter the electrical outlet, do<br />
not attempt to force it in.<br />
Call an electrician to change the electrical outlet, or this<br />
could result in electric shock.<br />
5<br />
<br />
Operating method<br />
Caution<br />
1. Introduction<br />
Do not allow pets to chew on the AC power, telephone<br />
or PC interface cords.<br />
This could result in electric shock or fire and/or injury to<br />
your pet.<br />
If the machine does not operate properly after these<br />
instructions have been followed, unplug the machine<br />
from all interface connections and request assistance<br />
from qualified service personnel.<br />
Otherwise, this could result in electric shock or fire.<br />
Do not forcefully pull the paper out during printing.<br />
It can cause damage to the machine.<br />
Be careful not to put your hand between the machine<br />
and paper tray.<br />
You may get injured.<br />
11
Safety information<br />
Do not block or push objects into the ventilation<br />
opening.<br />
This could result in elevated component temperatures<br />
which can cause damage or fire.<br />
Be care when replacing paper or removing jammed<br />
paper.<br />
New paper has sharp edges and can cause painful cuts.<br />
When printing large quantities, the bottom part of the<br />
paper output area may get hot. Do not allow children to<br />
touch.<br />
Burns can occur.<br />
When removing jammed paper, do not use tweezers or<br />
sharp metal objects.<br />
It can damage the machine.<br />
Do not allow too many papers to stack up in the paper<br />
output tray.<br />
It can damage the machine.<br />
This machine's power reception device is the power cord.<br />
To switch off the power supply, remove the power cord<br />
from the electrical outlet.<br />
6<br />
<br />
Installation / Moving<br />
Warning<br />
Caution<br />
1. Introduction<br />
Do not place the machine in an area with dust, humidity,<br />
or water leaks.<br />
This could result in electric shock or fire.<br />
Before moving the machine, turn the power off and<br />
disconnect all cords.<br />
Then lift the machine:<br />
• If the machine weighs under 20 kg (44.09 lbs), lift with<br />
1 person.<br />
• If the machine weighs 20 kg (44.09 lbs) - 40kg (88.18<br />
lbs), lift with 2 people.<br />
• If the machine weighs more than 40 kg (88.18 lbs), lift<br />
with 4 or more people.<br />
The machine could fall, causing injury or machine<br />
damage.<br />
12
Safety information<br />
Do not place the machine on an unstable surface.<br />
The machine could fall, causing injury or machine<br />
damage.<br />
The machine should be connected to<br />
the power level which is specified on the label.<br />
If you are unsure and want to check the power level you<br />
are using, contact the electrical utility company.<br />
Use only No.26 AWG a or larger, telephone line cord, if<br />
necessary.<br />
Otherwise, it can cause damage to the machine.<br />
Do not put a cover over the machine or place it in an<br />
airtight location, such as a closet.<br />
If the machine is not well-ventilated, this could result in<br />
fire.<br />
Make sure you plug the power cord into a grounded<br />
electrical outlet.<br />
Otherwise, this could result in electric shock or fire.<br />
Do not overload wall outlets and extension cords.<br />
This can diminish performance, and could result in<br />
electric shock or fire.<br />
7<br />
<br />
Maintenance / Checking<br />
Caution<br />
1. Introduction<br />
Use the power cord supplied with your machine for safe<br />
operation. If you are using a cord which is longer than 2<br />
meters (6 feet) with a 110 V machine, then the gauge<br />
should be 16 AWG or larger.<br />
Otherwise, it can cause damage to the machine, and<br />
could result in electric shock or fire.<br />
a. AWG: American Wire Gauge<br />
Unplug this product from the wall outlet before<br />
cleaning the inside of the machine. Do not clean the<br />
machine with benzene, paint thinner or alcohol; do not<br />
spray water directly into the machine.<br />
This could result in electric shock or fire.<br />
When you are working inside the machine replacing<br />
supplies or cleaning the inside, do not operate the<br />
machine.<br />
You could get injured.<br />
13
Safety information<br />
Keep the power cable and the contact surface of the<br />
plug clean from dust or water.<br />
Otherwise, this could result in electric shock or fire.<br />
• Do not remove any covers or guards that are<br />
fastened with screws.<br />
• Fuser units should only be repaired by a certified<br />
service technician. Repair by non-certified<br />
technicians could result in fire or electric shock.<br />
The machine should only be repaired by a Samsung<br />
service technician.<br />
Keep cleaning supplies away from children.<br />
Children could get hurt.<br />
Do not disassemble, repair or rebuild the machine by<br />
yourself.<br />
It can damage the machine. Call a certified technician<br />
when the machine needs repairing.<br />
To clean and operate the machine, strictly follow the<br />
user's guide provided with the machine.<br />
Otherwise, you could damage the machine.<br />
8<br />
<br />
Supply usage<br />
Caution<br />
Do not disassemble the toner cartridge.<br />
1. Introduction<br />
Toner dust can be dangerous if inhaled or ingested.<br />
Do not burn any of the supplies such as toner cartridge<br />
or fuser unit.<br />
This could cause an explosion or uncontrollable fire.<br />
When changing the toner cartridge or removing<br />
jammed paper, be careful not to let toner dust touch<br />
your body or clothes.<br />
Toner dust can be dangerous if inhaled or ingested.<br />
When storing supplies such as toner cartridges, keep<br />
them away from children.<br />
Toner dust can be dangerous if inhaled or ingested.<br />
Using recycled supplies, such as toner, can cause<br />
damage to the machine.<br />
In case of damage due to the use of recycled supplies, a<br />
service fee will be charged.<br />
14
Safety information<br />
When toner gets on your clothing, do not use hot water<br />
to wash it.<br />
Hot water sets toner into fabric. Use cold water.<br />
1. Introduction<br />
15
Machine overview<br />
9<br />
<br />
Accessories<br />
Power cord Toner cartridge Imaging unit<br />
Software CD a<br />
a. The software CD contains the printer driver and applications.<br />
Quick installation guide Misc. accessories b<br />
b. Miscellaneous accessories included with your machine may vary by country of purchase and specific model.<br />
1. Introduction<br />
16
Machine overview<br />
10<br />
<br />
14<br />
13<br />
12<br />
11<br />
10<br />
9<br />
8<br />
7<br />
6<br />
Front view<br />
• This illustration may differ from your machine depending<br />
on its model.<br />
• Some features and optional goods may not be available<br />
depending on model or country.<br />
1<br />
3<br />
4<br />
5<br />
15<br />
16<br />
2<br />
17<br />
18<br />
1 Finisher (Stacker &<br />
Stapler)<br />
1. Introduction<br />
10 Multi-purpose tray cover<br />
2 Mailbox 11 USB memory port<br />
3 Stapler cover 12 Front cover<br />
4 Optional wireless cover 13 Control panel<br />
5 Control board cover 14 Output tray<br />
6 Short stand 15 Toner cartridge<br />
7 Paper level indicator 16 Imaging unit<br />
8 Optional tray<br />
9 Tray1<br />
17 Multi-purpose tray paper width<br />
guides<br />
18 Multi-purpose tray paper<br />
extension<br />
17
Machine overview<br />
11<br />
<br />
9<br />
8<br />
7<br />
6<br />
5<br />
4<br />
Rear view<br />
• This illustration may differ from your machine depending<br />
on its model.<br />
• Some features and optional goods may not be available<br />
depending on model or country.<br />
1<br />
2<br />
3<br />
1 Finisher cover (Stacker &<br />
Stapler)<br />
2 Rear cover 7 USB port<br />
1. Introduction<br />
6 IEEE 1284 parallel connector<br />
3 Mail cover 8 USB memory port<br />
4 Power receptacle 9 Network port<br />
5 Power-switch<br />
18
Control panel overview<br />
12<br />
<br />
This control panel may differ from your machine depending<br />
on its model. There are various types of control panels.<br />
Type A<br />
1 Display<br />
2<br />
10<br />
9<br />
8<br />
7<br />
6<br />
(Back)<br />
Shows the current status and<br />
prompts during an operation.<br />
Sends you back to the upper menu<br />
level.<br />
1<br />
2<br />
3<br />
4<br />
5<br />
3 OK<br />
4<br />
5<br />
6<br />
LED)<br />
(Cancel)<br />
(Power)<br />
(Status<br />
7 Numeric keypad<br />
8<br />
9<br />
Eco<br />
Arrows<br />
1. Introduction<br />
Confirms the selection on the<br />
display.<br />
Stops current operation.<br />
You can turn the power on and off<br />
with this button. Or wake up from<br />
the power save mode.<br />
Shows the status of your machine<br />
(see "Understanding the status LED"<br />
on page 91).<br />
Use the keypad to enter numbers<br />
and characters.<br />
Enters eco mode to reduce toner<br />
consumption and paper usage (see<br />
"Eco options" on page 49).<br />
Navigates available values by<br />
moving to the next or previous<br />
options.<br />
10 (Menu) Enters menu mode and scrolls<br />
through the available menus.<br />
19
Control panel overview<br />
13<br />
<br />
Type B<br />
1 Display<br />
2<br />
3<br />
(Cancel)<br />
(Power)<br />
Shows the current status and prompts<br />
during an operation.<br />
Stops current operation. The pop-up<br />
window appears on the screen that the<br />
user can stop or resume.<br />
You can turn the power on and off with<br />
this button. Or wake up from the<br />
power save mode.<br />
4<br />
(Status LED)<br />
1. Introduction<br />
Shows the status of your machine (see<br />
"Understanding the status LED" on<br />
page 91).<br />
20
Turning on the machine<br />
1<br />
2<br />
Connect the machine to the electricity supply first.<br />
Turn the power switch on.<br />
1. Introduction<br />
21
Installing the driver locally<br />
A locally connected machine is a machine directly attached to your<br />
computer using the cable. If your machine is attached to a network,<br />
skip the following steps below and go on to installing a network<br />
connected machine’s driver (see Advanced Guide).<br />
14<br />
1<br />
2<br />
<br />
• If you are a Macintosh, Linux, or Unix OS user, refer to the<br />
Advanced guide.<br />
• The installation window in this User’s Guide may differ<br />
depending on the machine and interface in use.<br />
• Selecting Advanced Installation > Custom Installation<br />
allows you to choose which programs to install.<br />
• Only use a USB cable no longer than 3 meters (118 inches).<br />
Windows<br />
Make sure that the machine is connected to your computer<br />
and powered on.<br />
If the “Found New Hardware Wizard” appears during the<br />
installation procedure, click Cancel to close the window.<br />
Insert the supplied software CD into your CD-ROM drive.<br />
3<br />
4<br />
5<br />
1. Introduction<br />
The software CD should automatically run and an installation<br />
window will appear.<br />
Select Install Now.<br />
Read License Agreement, and select I accept the terms of<br />
the License Agreement. Then, click Next.<br />
Follow the instructions in the installation window.<br />
22
Reinstalling the driver<br />
If the printer driver does not work properly, follow the steps below to<br />
reinstall the driver.<br />
15<br />
1<br />
2<br />
3<br />
4<br />
<br />
Windows<br />
Make sure that the machine is connected to your computer<br />
and powered on.<br />
From the Start menu, select Programs or All Programs ><br />
Samsung Printers > your printer driver name > Uninstall.<br />
Follow the instructions in the installation window.<br />
Insert the software CD into your CD-ROM drive and try<br />
installing the driver again (see "Installing the driver locally" on<br />
page 22).<br />
1. Introduction<br />
23
2. Menu overview and basic<br />
setup<br />
After installation is complete, you may want to set the machine’s default<br />
settings. Refer to the next section if you would like to set or change values.<br />
This chapter provides information about the overall menu structure and<br />
the basic setup options.<br />
• Menu overview 25<br />
• Printing a demo page 31<br />
• Changing the display language 32<br />
• Media and tray 33<br />
• Basic printing 44<br />
• Using USB memory device 50
Menu overview<br />
The control panel provides access to various menus to set up the<br />
machine or use the machine’s functions.<br />
1<br />
<br />
<strong>ML</strong>-451x Series/ <strong>ML</strong>-501x Series<br />
• These menus can be accessed by pressing (Menu)<br />
button. Press the arrows until the needed menu item<br />
appears and then press OK.<br />
• An asterisk (*) appears next to the currently selected<br />
menu.<br />
• Some menus may not appear on the display depending on<br />
options or models. If so, it is not applicable to your<br />
machine.<br />
• Some menu names may differ from your machine<br />
depending on its options or the models.<br />
2. Menu overview and basic setup<br />
Items Options<br />
Information<br />
Layout<br />
Menu Map<br />
Configuration<br />
Supplies Info.<br />
Demo Page<br />
PCL Font<br />
PS Font<br />
EPSON Font<br />
Stored Jobs<br />
Completed Jobs<br />
Usage Counter<br />
Account<br />
Orientation<br />
Common Margin<br />
MP Tray<br />
<br />
Emulation Margin<br />
Duplex<br />
Landscape Stapling Position<br />
25
Menu overview<br />
Paper<br />
Graphic<br />
Items Options<br />
Copies<br />
MP Tray/ [Tray ]<br />
Paper Source<br />
Auto Tray Switch<br />
Tray Confirm<br />
Resolution<br />
Clear Text<br />
Darkness<br />
2. Menu overview and basic setup<br />
Items Options<br />
System Setup<br />
Emulation<br />
Date & Time<br />
Clock Mode<br />
Form Menu<br />
Select Form<br />
Spooling<br />
Language<br />
Default Paper Size<br />
Power Save<br />
Wakeup Event<br />
Auto Continue<br />
Altitude Adjustment<br />
Auto CR<br />
Job Timeout<br />
Multi-Bin<br />
Import Setting<br />
Export Setting<br />
Eco Settings<br />
Clear Settings<br />
Emulation Type<br />
Setup<br />
26
Menu overview<br />
Network<br />
Items Options<br />
Direct USB<br />
Job<br />
Management<br />
Admin Setup<br />
Ethernet Speed<br />
802.1x<br />
TCP/IP (IPv4)<br />
TCP/IP (IPv6)<br />
Clear Settings<br />
Network Configuration<br />
Net. Activate<br />
Http Activate<br />
Active Job<br />
Stored Job<br />
File Policy<br />
Held Job Timeout<br />
Image Overwrite<br />
Password Protect<br />
Change Password<br />
Maintenance<br />
2<br />
<br />
2. Menu overview and basic setup<br />
<strong>ML</strong>-5015 Series/ <strong>ML</strong>-5017 Series<br />
You can set menus easily using the touch screen.<br />
• The Main screen is shown on the touch screen on the<br />
control panel.<br />
• Some menus are grayed out depending on your options or<br />
models.<br />
• Some menu names may differ from your machine<br />
depending on its options or the models.<br />
Items Options<br />
Information<br />
Eco<br />
Help List<br />
Configuration<br />
Supplies Info.<br />
Demo Page<br />
Font List<br />
Job Reports<br />
Eco-On<br />
Settings<br />
Preview Simulator<br />
27
Menu overview<br />
Items Options<br />
Direct USB<br />
Print From<br />
File Manage<br />
Show Space<br />
Setup<br />
2. Menu overview and basic setup<br />
Items Options<br />
System Date & Time<br />
Clock Mode<br />
Form Menu<br />
Spooling<br />
Language<br />
Maintenance<br />
Default Paper Size<br />
Power Save<br />
Auto Continue<br />
Altitude Adjustment<br />
Auto CR<br />
Job Timeout<br />
File Policy<br />
Held Job Timeout<br />
ImageOverwrite<br />
Multi-Bin<br />
Import Setting<br />
Export Setting<br />
Wakeup Event<br />
Clear Settings<br />
28
Menu overview<br />
Items Options<br />
Setup<br />
(continue)<br />
Network Ethernet Speed<br />
TCP/IP (IPv4)<br />
TCP/IP (IPv6)<br />
802.1x<br />
Network Configuration<br />
Ethernet Activate<br />
Http Activate<br />
Clear Settings<br />
Layout Orientation<br />
Common Margin<br />
MP Tray<br />
Tray 1<br />
Tray 2-5<br />
Emulation Margin<br />
Duplex<br />
Landscape Stapling<br />
Position<br />
Setup<br />
(continue)<br />
Job Status<br />
Counter<br />
2. Menu overview and basic setup<br />
Items Options<br />
Paper Copies<br />
Tray 1<br />
Tray 2-5<br />
MP Tray<br />
Paper Source<br />
Auto Tray Switch<br />
Tray Confirm<br />
Graphic Resolution<br />
Clear Text<br />
Darkness<br />
Emulation Emulation Type<br />
Current Job<br />
Secure Job<br />
Stored Job<br />
Completed Job<br />
Setup<br />
29
Menu overview<br />
Help<br />
Items Options<br />
Introducing the Home Screen<br />
Touch screen<br />
Basic Taskflow<br />
Maintenance<br />
Trouble Shooting<br />
• (Information): Gives detailed information about machine’s<br />
information.<br />
• (Eco): You can view the eco settings.<br />
• (Direct USB): Enters the USB menu when USB memory is<br />
inserted into the USB memory port on your machine.<br />
2. Menu overview and basic setup<br />
• (Setup): You can browse current machine settings or change<br />
machine values.<br />
• (Job Status): Job status shows the jobs currently running and<br />
in queue.<br />
• (Counter): Allows you to check how many pages are printed.<br />
• (Help): Gives detailed information about machine’s info.,<br />
reports, troubleshooting guide.<br />
• : Shows the toner status<br />
• : Selects the LCD brightness, language, and diagnostic.<br />
• : Scroll through available options.<br />
30
Printing a demo page<br />
Print a demo page to make sure that the machine is operating<br />
correctly.<br />
3<br />
4<br />
1<br />
2<br />
3<br />
1<br />
2<br />
<br />
<br />
<strong>ML</strong>-451x Series/ <strong>ML</strong>-501x Series<br />
Press (Menu) button on the control panel.<br />
Press Information > OK > Demo Page > OK.<br />
Press Print? > Yes > OK.<br />
A demo page prints out.<br />
<strong>ML</strong>-5015 Series/ <strong>ML</strong>-5017 Series<br />
Press Information from the Main screen.<br />
Press Demo Page > Print.<br />
A demo page prints out.<br />
2. Menu overview and basic setup<br />
31
Changing the display language<br />
To change the language that is displayed on the control panel,<br />
follow these steps:<br />
5<br />
1<br />
2<br />
3<br />
<br />
<strong>ML</strong>-451x Series/ <strong>ML</strong>-501x Series<br />
Press (Menu) button on the control panel.<br />
Press System Setup > OK > Language > OK.<br />
Select the option you want, then press OK.<br />
6<br />
1<br />
2<br />
3<br />
4<br />
<br />
2. Menu overview and basic setup<br />
<strong>ML</strong>-5015 Series/ <strong>ML</strong>-5017 Series<br />
Press Setup from the Main screen.<br />
Press System > Next > Language.<br />
Select the language you want.<br />
Press the home icon ( ) to return to the Standby mode.<br />
32
Media and tray<br />
This chapter provides information on how to load print media into<br />
your machine.<br />
7<br />
<br />
• Using print media that does not meet these specifications<br />
may cause problems or require repairs. Such repairs are<br />
not covered by Samsung’s warranty or service<br />
agreements.<br />
• Use only xerographic paper in this machine; do not use the<br />
inkjet photo paper as it could cause damage to the<br />
machine.<br />
• Using inflammable print media can cause a fire.<br />
• Use only the type, size, and weight of the print media for<br />
your machine are described in print media specifications<br />
(see "Print media specifications" on page 108).<br />
The use of inflammable media or foreign materials left in the<br />
printer may lead to overheating of the unit and in rare cases<br />
may cause a fire.<br />
Tray overview<br />
To change the size, you need to adjust the paper guides.<br />
2. Menu overview and basic setup<br />
Paper quantity indicator shows the amount of paper in the<br />
tray.<br />
1 Full<br />
2 Empty<br />
1 Paper length guide<br />
2 Paper width guide<br />
33
Media and tray<br />
8<br />
1<br />
2<br />
3<br />
<br />
Loading paper in the tray/ optional tray<br />
Pull out the paper tray (see "Tray overview" on page 33).<br />
Flex or fan the edge of the paper stack to separate the pages<br />
before loading papers.<br />
Squeeze and the paper width guide and paper length lever to<br />
locate them in the correct paper size slot marked at the<br />
bottom of the tray to adjust to the size.<br />
4<br />
5<br />
2. Menu overview and basic setup<br />
Place paper with the side you want to print on facing down.<br />
Slide the paper length guide until it lightly touches the end of<br />
the paper stack.<br />
34
Media and tray<br />
6<br />
Squeeze the paper width guide and slide it to the edge of the<br />
paper stack without causing it to bend.<br />
7<br />
8<br />
2. Menu overview and basic setup<br />
• Do not push the paper width guide too far causing the<br />
media to warp.<br />
• If you do not adjust the paper width guide, it may cause<br />
paper jams.<br />
• Do not use a paper with a leading-edge curl, it may cause<br />
a paper jam or the paper can be wrinkled.<br />
Insert the tray back into the machine.<br />
Set the paper type and size for tray 1 (see "Setting the paper<br />
size and type" on page 42).<br />
35
Media and tray<br />
9<br />
<br />
The settings set from the machine driver override the<br />
settings on the control panel.<br />
a To print from an application, open an application and start<br />
the print menu.<br />
b Open Printing Preferences (see "Opening printing<br />
preferences" on page 46).<br />
c Press the Paper tab in Printing Preferences, and select an<br />
appropriate paper type.<br />
Loading in multi-purpose tray<br />
The multi-purpose tray can hold special sizes and types of print<br />
material, such as postcards, note cards, and envelopes.<br />
Tips on using the multi-purpose tray<br />
• To prevent paper jams, do not add paper while printing<br />
when there is still paper in the multi-purpose tray.<br />
• Print media should be loaded face up with the top edge<br />
going into the multi-purpose tray first and be placed in the<br />
center of the tray.<br />
• To ensure printing quality and to prevent paper jams, only<br />
load the available paper (see "Print media specifications"<br />
on page 108).<br />
1<br />
2. Menu overview and basic setup<br />
• Flatten any curl on postcards, envelopes, and labels before<br />
loading them into the multi-purpose tray.<br />
• When printing on special media, you must follow the<br />
loading guidelines (see "Printing on special media" on<br />
page 38).<br />
• When papers overlap when printing using the multipurpose<br />
tray, open tray 1 and remove the overlapping<br />
papers then try printing again.<br />
• When paper does not feed well while printing, push the<br />
paper in manually until it starts feeding automatically.<br />
Open the multi-purpose tray and unfold the multi-purpose<br />
tray extension, as shown.<br />
36
Media and tray<br />
2<br />
3<br />
Adjust the multi-purpose tray paper width guides to the width<br />
of the paper.<br />
Flex or fan the edge of the paper stack to separate the pages<br />
before loading paper.<br />
4<br />
5<br />
2. Menu overview and basic setup<br />
Load the paper. Squeeze the multi-purpose tray paper width<br />
guides and adjust them to the width of the paper.<br />
Set the paper type and size from the control panel (see<br />
"Setting the paper size and type" on page 42).<br />
The settings set from the machine’s driver override the<br />
settings on the control panel.<br />
a To print from an application, open an application and start<br />
the print menu.<br />
b Open Printing Preferences (see "Opening printing<br />
preferences" on page 46).<br />
c Press the Paper tab in Printing Preferences and select an<br />
appropriate paper type.<br />
For example, if you want to use a label, set the paper type<br />
to Label.<br />
37
Media and tray<br />
10<br />
<br />
d Select MP Tray in paper source, then press OK.<br />
e Start printing in application.<br />
Printing on special media<br />
The table below shows the special media usable in each tray.<br />
The media types are shown in the Printing Preferences. Select the<br />
proper media type to get the highest printing quality.<br />
When using special media, we recommend you feed one<br />
sheet at a time (see "Print media specifications" on page 108).<br />
To see for paper weights for each sheet, refer to "Print media<br />
specifications" on page 108.<br />
Types Tray 1<br />
Optional<br />
tray<br />
Multi-purpose tray<br />
Plain <br />
Thick <br />
Thicker <br />
Thin <br />
Bond <br />
Types Tray 1<br />
( : Included, Blank: Not available)<br />
Envelope<br />
2. Menu overview and basic setup<br />
Color <br />
CardStock <br />
Labels <br />
Transparency <br />
Envelope a <br />
Preprinted <br />
Cotton <br />
Recycled b <br />
Archive <br />
Letterhead <br />
Punched <br />
a. Only for optional tray2.<br />
Optional<br />
tray<br />
b. When you use recycled paper as a used paper, printout might be wrinkled<br />
and/or jamming may occure due to excessive curl.<br />
Printing successfully on envelopes depends upon the quality of the<br />
envelopes.<br />
38<br />
Multi-purpose tray
Media and tray<br />
To print an envelope, place it as shown in the following figure.<br />
• When selecting envelopes, consider the following factors:<br />
- Weight: should not exceed 90 g/m 2 otherwise; jams may<br />
occur.<br />
- Construction: should lie flat with less than 6 mm curl and<br />
should not contain air.<br />
- Condition: should not be wrinkled, nicked, nor damaged.<br />
- Temperature: should resist the heat and pressure of the<br />
machine during operation.<br />
• Use only well-constructed envelopes with sharp and wellcreased<br />
folds.<br />
• Do not use stamped envelopes.<br />
• Do not use envelopes with clasps, snaps, windows, coated lining,<br />
self-adhesive seals, or other synthetic materials.<br />
• Do not use damaged or poorly made envelopes.<br />
2. Menu overview and basic setup<br />
• Be sure the seam at both ends of the envelope extends all the<br />
way to the corner of the envelope.<br />
1 2<br />
1 Acceptable<br />
2 Unacceptable<br />
• Envelopes with a peel-off adhesive strip or with more than one<br />
flap that folds over to seal must use adhesives compatible with<br />
the machine’s fusing temperature for 0.1 second (about 170°C<br />
(338 °F)). The extra flaps and strips might cause wrinkling,<br />
creasing, or jams, and may even damage the fuser.<br />
• For the best print quality, position margins no closer than 15 mm<br />
from the edges of the envelope.<br />
• Avoid printing over the area where the envelope’s seams meet.<br />
Transparency<br />
In case of color printing using transparencies, the picture<br />
quality would be lower than mono printing when the<br />
printouts are used on the overhead projector.<br />
39
Media and tray<br />
To avoid damaging the machine, use only transparencies designed<br />
for use in laser printers.<br />
• Must withstand the machine’s fusing temperature.<br />
• Place them on a flat surface after removing them from the<br />
machine.<br />
• Do not leave unused transparencies in the paper tray for long.<br />
Dust and dirt may accumulate on them, resulting in spotty<br />
printing.<br />
• To avoid smudging caused by fingerprints, handle them<br />
carefully.<br />
• To avoid fading, do not expose printed transparencies to<br />
prolonged sunlight.<br />
• Ensure that transparencies are not wrinkled, curled, or have any<br />
torn edges.<br />
• Do not use transparencies that separate from the backing sheet.<br />
2. Menu overview and basic setup<br />
• To prevent transparencies from sticking to each other, do not let<br />
the printed sheets stack up as they are being printed out.<br />
• Recommended media: Transparency for a color laser printer by<br />
Xerox, such as 3R 91331(A4), 3R 2780 (Letter).<br />
Labels<br />
To avoid damaging the machine, use only labels designed for use in<br />
laser printers.<br />
• When selecting labels, consider the following factors:<br />
- Adhesives: Should be stable at your machine’s fusing<br />
temperature. Check your machine’s specifications to view the<br />
fusing temperature (about 170°C (338°F)).<br />
- Arrangement: Only use labels with no exposed backing<br />
between them. Labels can peel off sheets that have spaces<br />
between the labels, causing serious jams.<br />
40
Media and tray<br />
- Curl: Must lie flat with no more than 13 mm of curl in any<br />
direction.<br />
- Condition: Do not use labels with wrinkles, bubbles, or other<br />
indications of separation.<br />
• Make sure that there is no exposed adhesive material between<br />
labels. Exposed areas can cause labels to peel off during printing,<br />
which can cause paper jams. Exposed adhesive can also cause<br />
damage to machine components.<br />
• Do not run a sheet of labels through the machine more than<br />
once. The adhesive backing is designed for only a single pass<br />
through the machine.<br />
• Do not use labels that are separating from the backing sheet or<br />
are wrinkled, bubbled, or otherwise damaged.<br />
Card stock/ Custom-sized paper<br />
2. Menu overview and basic setup<br />
• In the software application, set margins at least 6.4 mm (0.25<br />
inches) away from the edges of the material.<br />
41
Media and tray<br />
Letterhead/Preprinted paper<br />
When loading preprinted paper, the printed side should be facing up<br />
with an uncurled edge at the front. If you experience problems with<br />
paper feeding, turn the paper around. Note that print quality is not<br />
guaranteed.<br />
• Must be printed with heat-resistant ink that will not melt,<br />
vaporize, or release hazardous emissions when subjected to the<br />
machine’s fusing temperature for 0.1 second (about 170°C<br />
(338°F)).<br />
• Must be non-flammable and should not adversely affect machine<br />
rollers.<br />
• Before you load preprinted paper, verify that the ink on the paper<br />
is dry. During the fusing process, wet ink can come off preprinted<br />
paper, reducing print quality.<br />
11<br />
<br />
2. Menu overview and basic setup<br />
Setting the paper size and type<br />
After loading paper in the paper tray, set the paper size and type<br />
using the control panel buttons.<br />
• The settings set from the machine’s driver override the<br />
settings on the control panel.<br />
• If you want to use special-sized paper such as billing<br />
paper, select Custom in the Paper tab in the Printing<br />
Preferences (see "Opening printing preferences" on page<br />
46).<br />
<strong>ML</strong>-451x Series/ <strong>ML</strong>-501x Series<br />
1<br />
2<br />
3<br />
4<br />
5<br />
Press (Menu) button on the control panel.<br />
Press Paper > OK > Select the tray you want > OK.<br />
Press Paper Size > OK > Select the option you want > OK.<br />
Press Paper Type > OK > Select the option you want > OK.<br />
Press (Cancel) to return to ready mode.<br />
42
Media and tray<br />
<strong>ML</strong>-5015 Series/ <strong>ML</strong>-5017 Series<br />
1<br />
2<br />
3<br />
4<br />
5<br />
6<br />
7<br />
Press Setup from the Main screen.<br />
Press System > Paper > Next.<br />
Press the tray you want.<br />
Press Paper Size > Select the option you want.<br />
Press the button.<br />
Press Paper Type > Select the option you want.<br />
Press the home icon ( ) to return to the Standby mode.<br />
2. Menu overview and basic setup<br />
43
Basic printing<br />
12<br />
<br />
Printing<br />
If you are a Macintosh, Linux, or Unix OS user, refer to the<br />
Advanced Guide.<br />
The following Printing Preferences window is for Notepad in<br />
Windows 7.<br />
1<br />
2<br />
3<br />
Open the document you want to print.<br />
Select Print from the File menu.<br />
Select your machine from the Select Printer list.<br />
4<br />
5<br />
2. Menu overview and basic setup<br />
The basic print settings including the number of copies and<br />
print range are selected within the Print window.<br />
To take advantage of the advanced printing features, click<br />
Properties or Preferences from the Print window (see<br />
"Opening printing preferences" on page 46).<br />
To start the print job, click OK or Print in the Print window.<br />
44
Basic printing<br />
13<br />
<br />
Canceling a print job<br />
If the print job is waiting in the print queue or print spooler, cancel<br />
the job as follows:<br />
• You can access this window by simply double-clicking the<br />
machine icon ( ) in the Windows task bar.<br />
• You can also cancel the current job by pressing (Cancel) on<br />
the control panel.<br />
2. Menu overview and basic setup<br />
45
Basic printing<br />
14<br />
1<br />
2<br />
3<br />
<br />
Opening printing preferences<br />
• The Printing Preferences window that appears in this<br />
user’s guide may differ depending on the machine in use.<br />
• When you select an option in Printing Preferences, you<br />
may see a warning mark or . An mark means you<br />
can select that certain option but it is not recommended,<br />
and an mark means you cannot select that option due<br />
to the machine’s setting or environment.<br />
Open the document you want to print.<br />
Select Print from the file menu.<br />
Select your machine from the Select Printer.<br />
4<br />
Click Properties or Preferences.<br />
2. Menu overview and basic setup<br />
You can check the machine's current status using the Printer<br />
Status button (see Advanced Guide).<br />
46
Basic printing<br />
Using a favorite setting<br />
The Presets option, which is visible on each preferences tab except<br />
for the Samsung tab, allows you to save the current preferences for<br />
future use.<br />
To save a Presets item, follow these steps:<br />
1<br />
2<br />
3<br />
Change the settings as needed on each tab.<br />
Enter a name for the item in the Presets input box.<br />
Click (Add). When you save Presets, all current driver<br />
settings are saved.<br />
15<br />
<br />
2. Menu overview and basic setup<br />
Select more options and click (Update), settings will be<br />
added to the Presets you made. To use a saved setting, select<br />
it from the Presets drop-down list. The machine is now set to<br />
print according to the settings you have selected. To delete<br />
saved settings, select it from the Presets drop-down list and<br />
click (Delete).<br />
You can also restore the printer driver’s default settings by<br />
selecting Default Preset from the Presets drop-down list.<br />
Using help<br />
Click the option you want to know on the Printing Preferences<br />
window and press F1 on your keyboard.<br />
16<br />
<br />
Eco printing<br />
The Eco function cuts toner consumption and paper usage. The Eco<br />
function allows you to save print resources and lead you to ecofriendly<br />
printing.<br />
If you press the Eco button from the control panel, eco mode is<br />
enabled. The default setting of eco mode is duplex (long edge), 2-up,<br />
skip blank pages, and toner save.<br />
47
Basic printing<br />
Setting eco mode on the control panel<br />
• The settings set from the machine’s driver override the<br />
settings on the control panel.<br />
• For models that do not have the display screen on the<br />
control panel, this feature is not applicable.<br />
<strong>ML</strong>-451x Series/ <strong>ML</strong>-501x Series<br />
1<br />
2<br />
3<br />
Press (Menu) button on the control panel.<br />
Press System Setup > OK > Eco Settings > OK.<br />
Press OK select the mode you want.<br />
• Default Mode: Select this to turn on or off the eco mode.<br />
(Duplex (long edge)/Toner save/2-up/Skip blank pages)<br />
- Off: Set the eco mode off.<br />
- On: Set the eco mode on.<br />
If you set the eco mode on with a password from the SyncThru<br />
Web Service ( Settings tab > Machine Settings > System > Eco<br />
> Settings), the Onforce message appears. You have to enter<br />
the password to turn off the eco mode status.<br />
2. Menu overview and basic setup<br />
• Change Temp.: Select the eco template.<br />
- Default Eco: The default setting of eco mode is duplex,<br />
2-up, skip blank pages, and toner save.<br />
- Custom Eco: Follow the settings from Syncthru Web<br />
Service. Before you select this item, you must set the<br />
eco function in SyncThru Web Service> Settings tab<br />
> Machine Settings > System > Eco > Settings.<br />
<strong>ML</strong>-5015 Series/ <strong>ML</strong>-5017 Series<br />
1<br />
2<br />
3<br />
Press Eco from the Main screen.<br />
Press the option you want.<br />
You can view current option description.<br />
Press the home icon ( ) to return to the Standby mode.<br />
Setting eco mode on the driver<br />
Open the Eco tab to set eco mode. When you see the eco image<br />
( ), that means the eco mode is currently enabled.<br />
48
Basic printing<br />
Eco options<br />
• Printer Default: Follows the settings from the machine's control<br />
panel.<br />
• None: Disables eco mode.<br />
• Eco Printing: Enables eco mode. Activate the various eco items<br />
you want to use.<br />
• Password: If the administrator fixed to enable the eco mode, you<br />
have to enter the password to turn off the mode.<br />
Result simulator<br />
Result Simulator shows the results of reduced emission of carbon<br />
dioxide, used electricity, and the amount of saved paper in<br />
accordance with the settings you selected.<br />
• The results are calculated on the basis that the total number of<br />
printed paper is one hundred without a blank page when the eco<br />
mode is disabled.<br />
• Refer to the calculation coefficient about CO2, energy, and paper<br />
from IEA, the index of Ministry of Internal Affairs and<br />
Communication of Japan and www.remanufacturing.org.uk.<br />
Each model has a different index.<br />
• The power consumption in printing mode refers to the average<br />
printing power consumption of this machine.<br />
2. Menu overview and basic setup<br />
• The actual saved or reduced amount may differ depending on<br />
the operating system used, computing performance, application<br />
software, connection method, media type, media size, job<br />
complexity, etc.<br />
49
Using USB memory device<br />
17<br />
<br />
About USB memory device<br />
USB memory devices are available with a variety of memory<br />
capacities to give you more room for storing documents,<br />
presentations, music and videos, high resolution photographs, or<br />
whatever other files you want to store or move.<br />
Your machine supports USB memory devices with FAT16/FAT32 and<br />
sector size of 512 bytes.<br />
Check your USB memory device’s file system from your dealer.<br />
You must use only an authorized USB memory device with an A plug<br />
type connector.<br />
A B<br />
Use only a USB memory device with metal-shielded connector.<br />
Only use a USB memory device that has obtained compatibility<br />
certification; otherwise, the machine might not recognize it.<br />
2. Menu overview and basic setup<br />
50<br />
• Do not remove the USB memory device while it is in use.<br />
The machine warranty does not cover damage caused by<br />
user’s misuse.<br />
• If your USB memory device has certain features such as<br />
security settings and password settings, your machine<br />
may not automatically detect it. For details about these<br />
features, see the user’s guide of the USB memory device.
Using USB memory device<br />
18<br />
<br />
Printing from a USB memory device<br />
You can directly print files stored on a USB memory device.<br />
Direct Print option supported file types:<br />
• PRN: Only files created by provided driver with your machine are<br />
compatible.<br />
If you print PRN files created from other machine, the<br />
printout would be different.<br />
• BMP: BMP Uncompressed<br />
• TIFF: TIFF 6.0 Baseline<br />
• JPEG: JPEG Baseline<br />
• PDF: PDF 1.4 and below<br />
• XPS<br />
To print a document from a USB memory device, you can use these<br />
features from the Direct USB > USB Print or Print From menu (see<br />
"Menu overview" on page 25).<br />
If you see [+] or [D] in the front of a folder name, there are one<br />
or more files or folders in the selected folder.<br />
19<br />
<br />
2. Menu overview and basic setup<br />
Viewing the USB Memory Status<br />
You can check the amount of memory space available for saving<br />
documents.<br />
You can use these features from the Direct USB > Show Space or<br />
Check Space menu (see "Menu overview" on page 25).<br />
20<br />
<br />
Backing up data<br />
Data in the machine’s memory can be accidentally erased due to<br />
power failure or storage failure.<br />
You can use these features from the System Setup (or Setup ><br />
System) > Export Setting and Import Setting menu (see "Menu<br />
overview" on page 25).<br />
21<br />
<br />
Managing USB memory<br />
You can delete image files stored on a USB memory device one by<br />
one or all at once by reformatting the device.<br />
You can use these features from the Direct USB > File Manage<br />
menu (see "Menu overview" on page 25).<br />
51
Using USB memory device<br />
If you see + in the front of a folder name, there are one or<br />
more files or folders in the selected folder.<br />
After deleting files or reformatting a USB memory device,<br />
files cannot be restored. Therefore, confirm that you no<br />
longer need the data before deleting it.<br />
2. Menu overview and basic setup<br />
52
3. Maintenance<br />
This chapter provides information about purchasing supplies, accessories<br />
and maintenance parts available for your machine.<br />
• Ordering supplies and accessories 54<br />
• Available supplies 55<br />
• Available accessories 56<br />
• Available maintenance parts 58<br />
• Redistributing toner 59<br />
• Replacing the toner cartridge 61<br />
• Replacing the imaging unit 63<br />
• Upgrading a memory module 65<br />
• Installing a mass storage device 66<br />
• Replacing the stapler cartridge 67<br />
• Monitoring the supplies life 68<br />
• Setting the toner low alert 69<br />
• Cleaning the machine 70
Ordering supplies and accessories<br />
3. Maintenance<br />
Available accessories may differ from country to country. Contact your sales representatives to obtain the list of available supplies, and<br />
maintenance parts.<br />
To order Samsung-authorized supplies, accessories, and maintenance parts, contact your local Samsung dealer or the retailer where you<br />
purchased your machine. You can also visit www.samsung.com/supplies, and then select your country/region to obtain the contact<br />
information for service.<br />
54
Available supplies<br />
When supplies reach the end of their life spans, you can order the<br />
following types of supplies for your machine:<br />
Type Average yield a<br />
Standard yield<br />
toner cartridge<br />
High yield toner<br />
cartridge<br />
Extra high yield<br />
toner cartridge b<br />
Part name<br />
Approx. 7,000 pages <strong>ML</strong>T-D307S<br />
Approx. 15,000 pages <strong>ML</strong>T-D307L<br />
Approx. 20,000 pages <strong>ML</strong>T-D307E<br />
Imaging unit Approx. 60,000 pages <strong>ML</strong>T-R307<br />
a. Declared yield value in accordance with ISO/IEC 19752. The number of pages<br />
may be affected by operating environment, printing interval, graphics, media<br />
type and media size.<br />
b. The extra toner cartridge is available only for <strong>ML</strong>-501x Series.<br />
Depending on the model or country, the toner cartridge’s<br />
lifespan may differ.<br />
3. Maintenance<br />
55<br />
When purchasing new toner cartridges or other supplies,<br />
these must be purchased in the same country as the machine<br />
you are using. Otherwise, new toner cartridges or other<br />
supplies will be incompatible with your machine due to<br />
different configurations of toner cartridges and other<br />
supplies according to the specific country conditions.<br />
Samsung does not recommend using non-genuine Samsung<br />
toner cartridge such as refilled or remanufactured toner.<br />
Samsung cannot guarantee non-genuine Samsung toner<br />
cartridge's quality. Service or repair required as a result of<br />
using non-genuine Samsung toner cartridges will not be<br />
covered under the machine’s warranty.
Available accessories<br />
You can purchase and install accessories to enhance your machine’s performance and capacity.<br />
3. Maintenance<br />
Some features and optional goods may not be available depending on models or countries (see "Features by models" on page 7).<br />
Accessory Function Part name<br />
Memory module Extends your machine’s memory capacity. <strong>ML</strong>-MEM170: 512 MB<br />
Optional tray<br />
IEEE 1284 parallel<br />
connector<br />
If you are experiencing frequent paper supply problems, you can attach<br />
an additional tray.<br />
Allows you to use various interface.<br />
• When installing the printer driver with an IEEE1284 parallel<br />
connector, the machine might not be found and after<br />
installing the printer driver, only basic printing features are<br />
available.<br />
• If you want to check the machine's status or set the settings,<br />
connect the machine to a computer with a USB cable or a<br />
network.<br />
• If you use the IEEE 1284 parallel connector, you can not use<br />
the USB cable.<br />
• <strong>ML</strong>-451x Series/<strong>ML</strong>-501x Series: <strong>ML</strong>-<br />
S5010A<br />
56<br />
• <strong>ML</strong>-4512 Series/<strong>ML</strong>-5012 Series: <strong>ML</strong>-<br />
S5012A<br />
<strong>ML</strong>-PAR100<br />
Mass Storage Device Allows you to enhance the machine’s capability and print in various ways. <strong>ML</strong>-HDK470
Available accessories<br />
Accessory Function Part name<br />
Finisher (Stacker &<br />
Stapler)<br />
You can sort and staple printouts.<br />
Mass storage device needs be installed to use some of the<br />
finisher related options in the printer driver.<br />
<strong>ML</strong>-OCT65<br />
Short stand You can easily move the machine using the stand with its wheels. <strong>ML</strong>-DSK65S<br />
Multbin mailbox You can stack printouts in 4 different stacker. <strong>ML</strong>-MBT65<br />
Staple Cartridge Allows you to staple the printouts. SCX-STP000<br />
3. Maintenance<br />
57
Available maintenance parts<br />
3. Maintenance<br />
To purchase maintenance parts, contact the source where you bought the machine. Replacing maintenance parts can be performed only by<br />
an authorized service provider, dealer, or the retailer where you bought the machine. The warranty does not cover the replacement of any<br />
maintenance parts once it has reached its “Average yield”.<br />
Maintenance parts are replaced at specific intervals to avoid print quality and paper feed problems resulting from worn parts, see table below.<br />
The purpose of which is to maintain your machine in top working condition. The maintenance parts below should be replaced when the life<br />
span of each item has been met.<br />
Parts Average yield a<br />
Transfer roller Approx. 100,000 pages<br />
Fuser unit Approx. 100,000 pages<br />
Pickup roller/ Forward roller Approx. 100,000 pages<br />
Retard roller Approx. 100,000 pages<br />
a. It will be affected by the operating system used, computing performance, application software, connecting method, media type, media<br />
size and job complexity.<br />
58
Redistributing toner<br />
When the toner cartridge is near the end of its life:<br />
• White streaks or light printing occurs and/or density variation<br />
side to side.<br />
• The Status LED blinks red.<br />
If this happens, you can temporarily improve print quality by<br />
redistributing the remaining toner in the cartridge. In some cases,<br />
white streaks or light printing will still occur even after you have<br />
redistributed the toner.<br />
1<br />
Open the front cover and pull the toner cartridge out.<br />
2<br />
3. Maintenance<br />
Thoroughly roll the cartridge five or six times to distribute the<br />
toner evenly inside the cartridge.<br />
59<br />
If toner gets on your clothing, wipe it off with a dry cloth and<br />
wash clothing in cold water: hot water sets toner into fabric.
Redistributing toner<br />
3<br />
4<br />
Hold the toner cartridge by the handle and slowly insert the<br />
cartridge into the opening in the machine.<br />
Close the front cover. Ensure that the cover is securely closed.<br />
3. Maintenance<br />
60
Replacing the toner cartridge<br />
Click this link to open an animation about replacing a toner<br />
cartridge.<br />
When a toner cartridge has reached the end of life, the machine will<br />
stop printing (see "Available supplies" on page 55).<br />
1<br />
2<br />
Open the front cover and pull the toner cartridge out.<br />
Remove the new toner cartridge from its bag.<br />
3<br />
3. Maintenance<br />
Thoroughly shake side to side the cartridge five or six times to<br />
distribute the toner evenly inside the cartridge.<br />
61<br />
If toner gets on your clothing, wipe it off with a dry cloth and<br />
wash clothing in cold water: hot water sets toner into fabric.
Replacing the toner cartridge<br />
4<br />
5<br />
Hold the toner cartridge by the handle and slowly insert the<br />
cartridge into the opening in the machine.<br />
Close the front cover. Ensure that the cover is securely closed.<br />
3. Maintenance<br />
62
Replacing the imaging unit<br />
Click this link to open an animation about replacing the<br />
imaging unit.<br />
When a imaging unit has reached the end of life, the machine will<br />
stop printing (see "Available supplies" on page 55).<br />
1<br />
Open the front cover and pull the toner cartridge out.<br />
2<br />
3<br />
Pull the imaging unit out.<br />
Remove the new imaging unit from its bag.<br />
3. Maintenance<br />
63<br />
• Do not use sharp objects, such as a knife or scissors, to<br />
open the toner cartridge package. They might scratch the<br />
drum of the cartridge.<br />
• To prevent damage to the imaging unit, do not expose it<br />
to light for more than a few minutes. Cover it with a piece<br />
of paper, if necessary.
Replacing the imaging unit<br />
4<br />
5<br />
6<br />
Thoroughly shake the imaging unit 5 or 6 times to distribute<br />
the toner evenly inside the imaging unit.<br />
Remove the protection cover and seal.<br />
Hold the imaging unit by the handle and slowly insert the new<br />
imaging unit into the opening in the machine.<br />
7<br />
8<br />
3. Maintenance<br />
Tabs on the sides of the imaging unit and corresponding<br />
grooves within the machine will guide the imaging unit into<br />
the correct position until it locks into place completely.<br />
• Do not touch the green surface of the imaging unit.<br />
• To prevent damage to the imaging unit, do not expose it<br />
to light for more than a few minutes. Cover it with a piece<br />
of paper, if necessary.<br />
Reinsert the toner cartridge.<br />
Close the front cover. Ensure that the cover is securely closed.<br />
64
Upgrading a memory module<br />
The order information is provided for optional accessories (see "Available accessories" on page 56.)<br />
3. Maintenance<br />
65
Installing a mass storage device<br />
A-type screws are not needed for this machine.<br />
The order information is provided for optional accessories (see "Available accessories" on page 56.)<br />
3. Maintenance<br />
66
Replacing the stapler cartridge<br />
The order information is provided for optional accessories (see "Available accessories" on page 56.)<br />
3. Maintenance<br />
67
Monitoring the supplies life<br />
1<br />
1<br />
2<br />
3<br />
4<br />
<strong>ML</strong>-451x Series/ <strong>ML</strong>-501x Series<br />
Press (Menu) on the control panel.<br />
Press Admin Setup > OK > Maintenance > OK.<br />
Press Supplies Info. > OK.<br />
Press OK to select the option you want.<br />
2<br />
1<br />
2<br />
3<br />
4<br />
<strong>ML</strong>-5015 Series/ <strong>ML</strong>-5017 Series<br />
Press Setup from the Main screen.<br />
3. Maintenance<br />
Press System > Next > Maintenance > Supplies<br />
Information.<br />
Press the option you want.<br />
Press the home icon ( ) to return to the Standby mode.<br />
68
Setting the toner low alert<br />
If the amount of toner in the cartridge is low, a message or LED<br />
informing the user to change the toner cartridge appears. You can<br />
set the option for whether or not this message or LED appears.<br />
3<br />
1<br />
2<br />
3<br />
4<br />
<strong>ML</strong>-451x Series/ <strong>ML</strong>-501x Series<br />
Press (Menu) on the control panel.<br />
Press Admin Setup > OK > Maintenance > OK.<br />
Press Toner Low Alert > OK.<br />
Select the option you want, then press OK.<br />
4<br />
1<br />
2<br />
3<br />
4<br />
5<br />
<strong>ML</strong>-5015 Series/ <strong>ML</strong>-5017 Series<br />
Press Setup from the Main screen.<br />
Press System > Next > Maintenance.<br />
Press Toner Low Alert.<br />
Press the option you want.<br />
3. Maintenance<br />
Press the home icon ( ) to return to the Standby mode.<br />
69
Cleaning the machine<br />
3. Maintenance<br />
If printing quality problems occur or if you use your machine in a dusty enviroment, you need to clean your machine regularly to keep it in<br />
the best printing condition and use your machine longer.<br />
5<br />
• Cleaning the cabinet of the machine with cleaning materials containing large amounts of alcohol, solvents, or other strong substances<br />
can discolor or distort the cabinet.<br />
• If your machine or the surrounding area is contaminated with toner, we recommend you use a cloth or tissue dampened with water<br />
to clean it. If you use a vacuum cleaner, toner blows in the air and might be harmful to you.<br />
Cleaning the outside<br />
Clean the machine cabinet with a soft, lint-free cloth. Dampen the cloth slightly with water, but be careful not to let any water drip onto or<br />
into the machine.<br />
6<br />
Cleaning the inside<br />
During the printing process, paper, toner, and dust particles can accumulate inside the machine. This buildup can cause print quality<br />
problems, such as toner specks or smearing. Cleaning the inside of the machine clears and reduces these problems.<br />
Use a dry lint free cloth when cleaning the inside of the machine, be careful not to damage the transfer roller or any other inside parts.<br />
Do not use solvents such as benzene or thinner. Printing quality problems can occur and cause damage to the machine.<br />
70
Cleaning the machine<br />
3. Maintenance<br />
71
Cleaning the machine<br />
7<br />
Cleaning the pickup roller<br />
3. Maintenance<br />
72
4. Troubleshooting<br />
This chapter gives helpful information for what to do if you encounter an<br />
error.<br />
• Tips for avoiding paper jams 74<br />
• Clearing paper jams 75<br />
• Understanding the status LED 91<br />
• Understanding display messages 93<br />
<br />
This chapter gives helpful information for what to do if you<br />
encounter an error.<br />
If your machine has a display screen, check the message on the<br />
display screen first to solve the error. If you cannot find a solution<br />
to your problem in this chapter, refer to the Troubleshooting<br />
chapter in the Advanced User's Guide.<br />
If you cannot find a solution in the User's Guide or the problem<br />
persists, call for service.
Tips for avoiding paper jams<br />
By selecting the correct media types, most paper jams can be avoided. To avoid paper jams, refer to the following guidelines:<br />
• Ensure that the adjustable guides are positioned correctly (see "Tray overview" on page 33).<br />
• Do not overload the tray. Ensure that the paper level is below the paper capacity mark on the inside of the tray.<br />
• Do not remove paper from the tray while your machine is printing.<br />
• Flex, fan, and straighten paper before loading.<br />
• Do not use creased, damp, or highly curled paper.<br />
• Do not mix paper types in a tray.<br />
• Use only recommended print media (see "Print media specifications" on page 108).<br />
4. Troubleshooting<br />
74
Clearing paper jams<br />
1<br />
<br />
To avoid tearing the paper, pull the jammed paper out slowly and gently.<br />
In tray 1<br />
4. Troubleshooting<br />
75
Clearing paper jams<br />
2<br />
<br />
In optional tray<br />
Click this link to open an animation about clearing a jam.<br />
4. Troubleshooting<br />
76
Clearing paper jams<br />
3<br />
<br />
In the multi-purpose tray<br />
4. Troubleshooting<br />
77
Clearing paper jams<br />
4<br />
<br />
Inside the machine<br />
The fuser area is hot. Take care when removing paper from the machine.<br />
• Do not touch the green surface of the imaging unit.<br />
4. Troubleshooting<br />
• To prevent damage to the imaging unit, do not expose it to light for more than a few minutes. Cover it with a piece of paper, if<br />
necessary.<br />
78
Clearing paper jams<br />
4. Troubleshooting<br />
79
Clearing paper jams<br />
If you do not see the paper in this area, stop and go to next step:<br />
2<br />
4. Troubleshooting<br />
80
Clearing paper jams<br />
5<br />
<br />
In the exit area<br />
The fuser area is extremely hot. Take care when removing paper from the machine to avoid getting burned.<br />
4. Troubleshooting<br />
81
Clearing paper jams<br />
6<br />
<br />
In the duplex unit area<br />
The fuser area is extremely hot. Take care when removing paper from the machine to avoid getting burned.<br />
4. Troubleshooting<br />
82
Clearing paper jams<br />
4. Troubleshooting<br />
83
Clearing paper jams<br />
If you do not see the paper in this area, stop and go to next step:<br />
4. Troubleshooting<br />
84
Clearing paper jams<br />
7<br />
<br />
In the optional finisher (stacker & stapler)<br />
Paper jam in front of the finisher<br />
4. Troubleshooting<br />
85
Clearing paper jams<br />
Paper jam inside the finisher<br />
4. Troubleshooting<br />
86
Clearing paper jams<br />
Paper jam at the exit of the finisher<br />
4. Troubleshooting<br />
87
Clearing paper jams<br />
8<br />
<br />
In the optional multi-bin mailbox<br />
Paper jam in front of the multi-bin mailbox<br />
4. Troubleshooting<br />
88
Clearing paper jams<br />
Paper jam inside the multi-bin mailbox<br />
4. Troubleshooting<br />
89
Clearing paper jams<br />
Paper jam at the exit of the multi-bin mailbox<br />
4. Troubleshooting<br />
90
Understanding the status LED<br />
The color of the LED indicates the machine's current status.<br />
• Some LEDs may not be available depending on model or country.<br />
• To resolve the error, look at the error message and its instructions from the troubleshooting part.<br />
4. Troubleshooting<br />
• You also can resolve the error with the guideline from the computers’s Samsung Printer Status or Smart Panel program window.<br />
• If the problem persists, call a service representative.<br />
91
Understanding the status LED<br />
LED Status Description<br />
Off The machine is off-line.<br />
Green<br />
Red<br />
Blinking • When the backlight slowly blinks, the machine is receiving data from the computer.<br />
• When the backlight blinks rapidly, the machine is printing data.<br />
On • The machine is on-line and can be used.<br />
Blinking<br />
On<br />
4. Troubleshooting<br />
• A minor error has occurred and the machine is waiting for the error to be cleared. Check the display message.<br />
When the problem is cleared, the machine resumes. For some models that does not support the display screen<br />
on the control panel, this feature is not applicable.<br />
• Small amount of toner is left in the cartridge. The estimated cartridge life a of toner is close. Prepare a new<br />
cartridge for replacement. You may temporarily increase the printing quality by redistributing the toner (see<br />
"Redistributing toner" on page 59).<br />
• A toner cartridge has almost reached its estimated cartridge life a . It is recommended to replace the toner<br />
cartridge (see "Replacing the toner cartridge" on page 61).<br />
• The cover is opened. Close the cover.<br />
• There is no paper in the tray. Load paper in the tray.<br />
• The machine has stopped due to a major error. Check the display message (see "Understanding display<br />
messages" on page 93).<br />
• A paper jam has occurred (see "Clearing paper jams" on page 75).<br />
a. Estimated cartridge life means the expected or estimated toner cartridge life, which indicates the average capacity of print-outs and is designed pursuant to ISO/<br />
IEC 19752. The number of pages may be affected by operating environment, printing interval, graphics, media type and media size. Some amount of toner may<br />
remain in the cartridge even when red LED is on and the printer stops printing.<br />
92
Understanding display messages<br />
Messages appear on the control panel display to indicate the<br />
machine’s status or errors. Refer to the tables below to understand<br />
the messages’ and their meaning, and correct the problem, if<br />
necessary.<br />
9<br />
Checking display messages<br />
• If a message is not in the table, reboot the power and try<br />
the printing job again.<br />
• When you call for service, provide the service<br />
representative with the contents of display message.<br />
• Some messages may not appear on the display depending<br />
on the options or models.<br />
• [error number] indicates the error number.<br />
Paper Jam-related messages<br />
Message Meaning<br />
• Jam at mailbox bin<br />
[number]<br />
• Jam at mailbox bin<br />
[number]. Remove<br />
Jam<br />
Jam bottom of duplex<br />
• Jam exit of Finisher<br />
• Paper jam at exit of<br />
finisher<br />
Paper has jammed in<br />
the mailbox area.<br />
Paper has jammed in<br />
the duplex area.<br />
Paper has jammed in<br />
the finisher area.<br />
4. Troubleshooting<br />
Suggested<br />
solutions<br />
93<br />
Clear the jam (see<br />
"In the optional<br />
multi-bin<br />
mailbox" on page<br />
88).<br />
Clear the jam (see<br />
"In the duplex unit<br />
area" on page 82).<br />
Clear the jam (see<br />
"Paper jam at the<br />
exit of the finisher"<br />
on page 87).
Understanding display messages<br />
Message Meaning<br />
• Jam front of<br />
mailbox<br />
• Paper jam in front<br />
of mailbox.<br />
Remove Jam<br />
• Jam front of bin<br />
number]<br />
• Jam in front of bin<br />
[number]. Remove<br />
Jam<br />
• Jam front of<br />
Finisher<br />
• Paper jam in front<br />
of finisher<br />
Jam in exit area<br />
• Jam inside Finisher<br />
• Paper jam inside of<br />
finisher<br />
Paper has jammed in<br />
the mailbox area.<br />
Paper has jammed in<br />
the finisher area.<br />
Paper has jammed in<br />
the exit area.<br />
Paper has jammed in<br />
the finisher area.<br />
Suggested<br />
solutions<br />
Clear the jam (see<br />
"Paper jam in front<br />
of the multi-bin<br />
mailbox" on page<br />
88).<br />
Clear the jam (see<br />
"Paper jam in front<br />
of the finisher" on<br />
page 85).<br />
Clear the jam (see<br />
"In the exit area"<br />
on page 81).<br />
Clear the jam (see<br />
"Paper jam inside<br />
the finisher" on<br />
page 86).<br />
Message Meaning<br />
Jam inside machine<br />
• Jam inside mailbox<br />
• Paper jam inside of<br />
mailbox.Remove<br />
Jam<br />
Paper Jam in [tray<br />
type]<br />
Paper Jam in MP tray<br />
Paper has jammed<br />
inside the machine.<br />
Paper has jammed in<br />
the mailbox area.<br />
Paper has jammed in<br />
the tray area.<br />
Paper has jammed in<br />
the multi-purpose tray<br />
area.<br />
4. Troubleshooting<br />
Suggested<br />
solutions<br />
94<br />
Clear the jam (see<br />
"Inside the<br />
machine" on page<br />
78).<br />
Clear the jam (see<br />
"Paper jam inside<br />
the multi-bin<br />
mailbox" on page<br />
89).<br />
Clear the jam.<br />
• See "In tray 1"<br />
on page 75.<br />
• See "In optional<br />
tray" on page<br />
76.<br />
Clear the jam (see<br />
"In the multipurpose<br />
tray" on<br />
page 77).
Understanding display messages<br />
Toner-related messages<br />
• IMG. Not Compatible<br />
Message Meaning Suggested solutions<br />
• Imaging unit is not compatible.<br />
Check guide.<br />
• IMG. Not Installed<br />
• Imaging unit is not installed. Install<br />
the unit.<br />
• Not Supply Toner<br />
• Did not supply enough toner.<br />
Reinstall Toner.<br />
• Prepare IMG. unit<br />
• Prepare new imaging unit.<br />
The imaging unit you have installed is not for<br />
your machine.<br />
The imaging unit is not installed or the<br />
CRUM in the imaging unit is not properly<br />
connected.<br />
4. Troubleshooting<br />
Install a Samsung-genuine imaging unit, designed for<br />
your machine.<br />
Reinstall the imaging unit two or three times. If the<br />
problem persists, call for service.<br />
The machine cannot supply toner. Thoroughly roll the cartridge five or six times to<br />
distribute the toner evenly inside the cartridge.<br />
The estimated imaging unit life is close. Prepare a new imaging unit for replacement.<br />
95
Understanding display messages<br />
• Replace IMG. unit<br />
Message Meaning Suggested solutions<br />
• Replace with new imaging unit<br />
The indicated imaging unit has almost<br />
reached its estimated imaging unit life.<br />
Estimated imaging unit life means<br />
the expected or estimated<br />
imaging unit, which indicates the<br />
average capacity of print-outs and<br />
is designed pursuant to ISO/<br />
IEC 19752. The number of pages<br />
may be affected by the<br />
percentage of image area,<br />
operating environment, printing<br />
interval, media type and media<br />
size. Some amount of toner may<br />
remain in the cartridge even when<br />
red LED is turns on and the printer<br />
stops printing.<br />
4. Troubleshooting<br />
• You can choose Stop or Continue as shown on the<br />
control panel. If you select Stop, the printer stops<br />
printing and you cannot print any more without<br />
changing the imaging unit. If you select Continue,<br />
the printer keeps printing but the printing quality<br />
cannot be guaranteed.<br />
Replace the imaging unit for the best print quality<br />
when this message appears. Using a imaging unit<br />
beyond this stage can result in printing quality<br />
issues (see "Replacing the imaging unit" on page 63).<br />
Samsung does not recommend using nongenuine<br />
Samsung imaging unit such as<br />
refilled or remanufactured. Samsung cannot<br />
guarantee non-genuine Samsung toner<br />
cartridge's quality. Service or repair required<br />
as a result of using non-genuine Samsung<br />
imaging unit will not be covered under the<br />
machine warranty.<br />
• If the machine stops printing, replace the imaging<br />
unit (see "Replacing the imaging unit" on page 63).<br />
96
Understanding display messages<br />
• Replace new IMG.unit<br />
• End of life. Replace with new<br />
imaging unit<br />
• Prepare new toner<br />
Message Meaning Suggested solutions<br />
• Prepare new toner cartridge<br />
The indicated imaging unit has reached its<br />
estimated imaging unit life. The machine<br />
might stop printing.<br />
Estimated imaging unit life means<br />
the expected or estimated<br />
imaging unit life, which indicates<br />
the average capacity of print-outs<br />
and is designed pursuant to ISO/<br />
IEC 19752. The number of pages<br />
may be affected by the<br />
percentage of image area,<br />
operating environment, printing<br />
interval, media type and media<br />
size. Some amount of toner may<br />
remain in the cartridge even when<br />
red LED is turns on and the printer<br />
stops printing.<br />
Small amount of toner is left in the cartridge.<br />
The estimated cartridge life of toner is close.<br />
4. Troubleshooting<br />
Replace the imaging unit (see "Replacing the imaging<br />
unit" on page 63).<br />
Prepare a new cartridge for replacement. You may<br />
temporarily increase the printing quality by<br />
redistributing the toner (see "Redistributing toner" on<br />
page 59).<br />
97
Understanding display messages<br />
• Replace new toner<br />
Message Meaning Suggested solutions<br />
• Replace with new toner cartridge<br />
The indicated toner cartridge has almost<br />
reached its estimated cartridge life.<br />
Estimated cartridge life means the<br />
expected or estimated toner<br />
cartridge life, which indicates the<br />
average capacity of print-outs and<br />
is designed pursuant to ISO/<br />
IEC 19752. The number of pages<br />
may be affected by the<br />
percentage of image area,<br />
operating environment, printing<br />
interval, media type and media<br />
size. Some amount of toner may<br />
remain in the cartridge even when<br />
red LED is turns on and the printer<br />
stops printing.<br />
4. Troubleshooting<br />
• You can choose Stop or Continue as shown on the<br />
control panel. If you select Stop, the printer stops<br />
printing and you cannot print any more without<br />
changing the cartridge. If you select Continue, the<br />
printer keeps printing but the printing quality<br />
cannot be guaranteed.<br />
Replace the toner cartridge for the best print quality<br />
when this message appears. Using a cartridge<br />
beyond this stage can result in printing quality<br />
issues (see "Replacing the toner cartridge" on page<br />
61).<br />
Samsung does not recommend using nongenuine<br />
Samsung toner cartridge such as<br />
refilled or remanufactured. Samsung cannot<br />
guarantee non-genuine Samsung toner<br />
cartridge's quality. Service or repair required<br />
as a result of using non-genuine Samsung<br />
toner cartridges will not be covered under<br />
the machine warranty.<br />
• If the machine stops printing, replace the toner<br />
cartridge (see "Replacing the toner cartridge" on<br />
page 61).<br />
98
Understanding display messages<br />
• Replace new toner<br />
• End of life. Replace with new toner<br />
cartridge<br />
• Shake toner cart.<br />
• Shake toner cartridge and then<br />
install.<br />
• Toner Not Compatible<br />
Message Meaning Suggested solutions<br />
• Toner cartridge is not compatible.<br />
Check guide.<br />
The indicated toner cartridge has reached its<br />
estimated cartridge life. The machine might<br />
stop printing.<br />
Estimated cartridge life means the<br />
expected or estimated toner<br />
cartridge life, which indicates the<br />
average capacity of print-outs and<br />
is designed pursuant to ISO/<br />
IEC 19752. The number of pages<br />
may be affected by the<br />
percentage of image area,<br />
operating environment, printing<br />
interval, media type and media<br />
size. Some amount of toner may<br />
remain in the cartridge even when<br />
red LED is turns on and the printer<br />
stops printing.<br />
4. Troubleshooting<br />
Replace the toner cartridge (see "Replacing the toner<br />
cartridge" on page 61)<br />
Toner is not evenly distributed. Redistribute the toner (see "Redistributing toner" on<br />
page 59).<br />
The toner cartridge you have installed is not<br />
for your machine.<br />
Install a Samsung-genuine toner cartridge, designed<br />
for your machine.<br />
99
Understanding display messages<br />
• Toner not installed<br />
Message Meaning Suggested solutions<br />
• Toner cartridge is not installed.<br />
Install it.<br />
The toner cartridge is not installed or the<br />
CRUM (Consumer Replaceable Unit Monitor)<br />
in the cartridge is not properly connected.<br />
4. Troubleshooting<br />
Reinstall the toner cartridge two or three times. If the<br />
problem persists, call for service.<br />
100
Understanding display messages<br />
Tray-related messages<br />
Message Meaning Suggested solutions<br />
• Output bin full<br />
• Too much paper<br />
in output bin<br />
[number].<br />
Remove printed<br />
paper<br />
• Paper Empty in<br />
[Tray type]<br />
• Paper is empty<br />
in [Tray type].<br />
Load paper.<br />
• [Tray type] Not<br />
installed<br />
• [Tray type] is<br />
not installed.<br />
Install the tray.<br />
Too much paper in the<br />
output tray.<br />
There is no paper in<br />
the tray.<br />
The tray is not<br />
installed.<br />
Remove the printed<br />
paper.<br />
Load paper in the tray<br />
(see "Loading paper in<br />
the tray/ optional tray"<br />
on page 34).<br />
Install the tray (see<br />
"Loading paper in the<br />
tray/ optional tray" on<br />
page 34).<br />
Network-related messages<br />
4. Troubleshooting<br />
Message Meaning Suggested solutions<br />
• [Tray type]<br />
cassette Out<br />
• [Tray type]<br />
cassette is<br />
pulled out.<br />
Insert it<br />
properly.<br />
The tray is not<br />
properly inserted.<br />
Close the tray.<br />
Message Meaning Suggested solutions<br />
• IP Conflict<br />
• This IP addrress<br />
conflicts with that<br />
of other system.<br />
Check it.<br />
• 802.1x Network<br />
Error<br />
• 802.1x Network<br />
Error. Contact the<br />
Admin.<br />
The network IP<br />
address you have set<br />
is being used by<br />
someone else.<br />
Check the IP address<br />
and reset it if<br />
necessary (see<br />
Advanced Guide).<br />
101<br />
Fail to authenticate. Check the network<br />
authentication<br />
protocol. If the<br />
problem persists,<br />
contact your network<br />
administrator.
Understanding display messages<br />
Error-related messages<br />
Error:<br />
Message Meaning Suggested solutions<br />
• #H1-1230<br />
• #H1-1253<br />
• #H1-1330<br />
• #H1-1353<br />
• #H1-1430<br />
• #H1-1453<br />
• #H1-1530<br />
• #H1-1553<br />
Error:<br />
• #C1-1311<br />
• #C1-1330<br />
Error:<br />
• #C3-1312<br />
• #C3-1315<br />
• #C3-1320<br />
• #C3-1330<br />
The machine cannot<br />
communicate with<br />
the optional tray.<br />
Toner is not evenly<br />
distributed.<br />
Imaging unit is not<br />
installed.<br />
Reinstall the optional<br />
tray(s). If the problem<br />
persists, call for service.<br />
Redistribute the toner<br />
and install toner cartridge<br />
again (see "Redistributing<br />
toner" on page 59).<br />
Install imaging unit again.<br />
Error:<br />
• #A1-1110<br />
• #A1-2110 (T)<br />
Error:<br />
• #A2-1210<br />
• #A2-2110<br />
• #A2-2410<br />
Error:<br />
There is a problem<br />
with a motor.<br />
4. Troubleshooting<br />
Message Meaning Suggested solutions<br />
• #A3-3211<br />
• #A3-3212<br />
• #A3-3311<br />
• #A3-3312<br />
• #A3-3411<br />
• #A3-3412<br />
There is a problem<br />
with a fan.<br />
There is a problem<br />
with a sensor.<br />
102<br />
Turn off then on. If the<br />
problem persists, call for<br />
service.<br />
Turn off then on. If the<br />
problem persists, call for<br />
service.
Understanding display messages<br />
Error:<br />
Message Meaning Suggested solutions<br />
• #H2-1710<br />
• #H2-1711<br />
• #H2-1720<br />
• #H2-1721<br />
• #H2-1730<br />
• #H2-1731<br />
• #H2-1750<br />
• #H2-1751<br />
• #H2-1752<br />
• #H2-1753<br />
• #H2-1760<br />
• #H2-1761<br />
• #H2-1800<br />
• #H2-1A50<br />
• #H2-1A52<br />
• #H2-1A70<br />
• #H2-1A80<br />
There is a problem in<br />
the finisher.<br />
Turn off then on. If the<br />
problem persists, call for<br />
service.<br />
Error:<br />
• #H2-4700<br />
• #H2-4701<br />
• #H2-4710<br />
• #H2-4711<br />
• #H2-4A50<br />
Error:<br />
• #U1-2115<br />
• #U1-2116<br />
• #U1-2117<br />
• #U1-2320<br />
• #U1-2327<br />
• #U1-2330<br />
• #U1-2340<br />
Error:<br />
• #U2-1111<br />
• #U2-1113<br />
Error:<br />
• #S2-1320<br />
Error:<br />
There is a problem in<br />
the mailbox.<br />
There is a problem in<br />
the fuser unit.<br />
There is a problem in<br />
the LSU.<br />
4. Troubleshooting<br />
Message Meaning Suggested solutions<br />
• #M1-1411<br />
There is a problem in<br />
the engine.<br />
There is a problem in<br />
the main system.<br />
103<br />
Turn off then on. If the<br />
problem persists, call for<br />
service.
Understanding display messages<br />
Unit-related messages<br />
Message Meaning Suggested solutions<br />
• Finisher Door<br />
Open<br />
• Finisher door is<br />
open. Close it<br />
• Finisher stacker<br />
Full<br />
• Too much paper in<br />
finisher stacker<br />
• Install fuser unit<br />
• Fuser unit is not<br />
installed. Install<br />
the unit.<br />
• Mailbox bin<br />
[number] full<br />
• Too much paper in<br />
bin [number].<br />
Remove printed<br />
paper<br />
The finisher door is<br />
open.<br />
Too much paper in<br />
finisher stacker.<br />
The fuser unit is not<br />
installed.<br />
Too much paper in<br />
mailbox stacker.<br />
Close the finisher<br />
door.<br />
Remove the printed<br />
paper.<br />
Installed the fuser<br />
unit.<br />
Remove the printed<br />
paper.<br />
Misc. messages<br />
4. Troubleshooting<br />
Message Meaning Suggested solutions<br />
• Mailbox door<br />
Open<br />
• Mailbox door is<br />
open. Close it.<br />
• Staple Empty<br />
• Staple cartridge is<br />
empty. Replace it.<br />
• Staple Low<br />
• Staple cartridge is<br />
low. Replace it.<br />
The mailbox door is<br />
open.<br />
The staple cartridge<br />
is empty.<br />
The staple cartridge<br />
is low.<br />
Close the mailbox<br />
door.<br />
104<br />
Replace the staple<br />
cartridge (see<br />
"Replacing the stapler<br />
cartridge" on page<br />
67).<br />
Prepare a new staple<br />
cartridge.<br />
Message Meaning Suggested solutions<br />
• Front Door is open.<br />
Close it<br />
• Front door is open.<br />
Close the door.<br />
• Rear Door Open<br />
• Rear door is open.<br />
Close the door.<br />
The front door is<br />
open.<br />
The rear door is<br />
open.<br />
Close the front door.<br />
Close the rear door.
5. Appendix<br />
This chapter provides product specifications and information concerning<br />
applicable regulations.<br />
• Specifications 106<br />
• Regulatory information 117<br />
• Copyright 125
Specifications<br />
1<br />
General specifications<br />
5. Appendix<br />
The specification values listed below are subject to change without notice. See www.samsung.com/printer for possible changes in<br />
information.<br />
Items Description<br />
Dimension Width x Length x Height 418 x 435 x 358 mm (16.46 x 17.13 x 14.09 inches) without optional tray<br />
Weight Machine with consumables 22.96 kg (50.62 lbs)<br />
Noise Level a<br />
Temperature<br />
Humidity<br />
Power rating b<br />
Ready mode 30 dB (A)<br />
Print mode 54 dB (A)<br />
Operation 10 to 30°C (50 to 86°F)<br />
Storage (packed) -20 to 40°C (-4 to 104°F)<br />
Operation 10 to 85% RH<br />
Storage (packed) 10 to 90% RH<br />
110 volt models AC 110 - 127 V<br />
220 volt models AC 220 - 240 V<br />
106
Specifications<br />
Power consumption<br />
Items Description<br />
Average operating mode<br />
Ready mode<br />
Power save mode Less than 4.5 W<br />
Power off mode Less than 0.5 W<br />
• <strong>ML</strong>-451x Series: Less than 850 W<br />
• <strong>ML</strong>-501x Series: Less than 900 W<br />
• <strong>ML</strong>-451x Series: Less than 12 W<br />
• <strong>ML</strong>-501x Series: Less than 15 W<br />
a. Sound Pressure Level, ISO 7779. Configuration tested: basic machine installation, A4 paper, simplex printing.<br />
b. See the rating label on the machine for the correct voltage (V), frequency (hertz) and type of current (A) for your machine.<br />
5. Appendix<br />
107
Specifications<br />
2<br />
Print media specifications<br />
Type Size Dimensions<br />
Plain paper<br />
Print media weight ab /Capacity c<br />
Letter 216 x 279 mm (8.5 x 11 inches) 70 to 90 g/m 2 (19 to 24 lbs bond)<br />
Legal 216 x 356 mm (8.5 x 14 inches)<br />
US Folio 216 x 330 mm (8.5 x 13 inches)<br />
A4 210 x 297 mm (8.27 x 11.69 inches)<br />
Oficio 216 x 343 mm (8.5 x 13.5 inches)<br />
JIS B5 182 x 257 mm (7.17 x 10.12 inches)<br />
ISO B5 176 x 250 mm (6.93 x 9.84 inches)<br />
Executive 184 x 267 mm (7.25 x 10.5 inches)<br />
Statement 140 x 216 mm (5.5 x 8.5 inches)<br />
A5 148 x 210 mm (5.83 x 8.27 inches)<br />
A6<br />
5. Appendix<br />
Tray1 / Optional tray Multi-purpose tray<br />
• 520 sheets (80g/m 2 )<br />
105 x 148 mm (4.13 x 5.83 inches) 70 to 90 g/m 2 (19 to 24 lbs bond)<br />
• 250 sheets for tray1.<br />
• Not available in optional trays.<br />
70 to 90 g/m 2 (19 to<br />
24 lbs bond)<br />
• 100 sheets<br />
108
Specifications<br />
Envelope<br />
Type Size Dimensions<br />
Thick paper<br />
Thicker paper<br />
Thin paper<br />
Transparency<br />
Envelope No. 9 98 x 225 mm (3.87 x 8.87 inches) 75 to 90 g/m 2 (20 to 24 lbs bond)<br />
Envelope No. 10 105 x 241 mm (4.12 x 9.5 inches)<br />
Envelope DL 110 x 220 mm (4.33 x 8.66 inches)<br />
Envelope C5 162 x 229 mm (6.38 x 9.02 inches)<br />
Envelope C6 114 x 162 mm (4.49 x 6.38 inches)<br />
Envelope Monarch 98 x 191 mm (3.87 x 7.5 inches)<br />
Refer to the Plain<br />
paper section<br />
Refer to the Plain<br />
paper section<br />
Refer to the Plain<br />
paper section<br />
Refer to the Plain<br />
paper section<br />
• 50 sheets for tray1 and optional<br />
tray2 only.<br />
Refer to the Plain paper section 90 to 120 g/m 2 (24 to 32 lbs bond)<br />
• 250 sheets<br />
5. Appendix<br />
75 to 90 g/m 2 (20 to<br />
24 lbs bond)<br />
• 10 sheets<br />
109<br />
90 to 120 g/m 2 (24 to 32<br />
lbs bond)<br />
• 40 sheets<br />
Refer to the Plain paper section Not available in tray1/optional tray. 163 to 216 g/m 2 (43 to<br />
58 lbs bond)<br />
Refer to the Plain paper section 60 to 70 g/m 2 (16 to 19 lbs bond)<br />
• 520 sheets<br />
Refer to the Plain paper section Not available in optional tray.<br />
• 50 sheets<br />
Print media weight ab /Capacity c<br />
Tray1 / Optional tray Multi-purpose tray<br />
• 10 sheets<br />
60 to 70 g/m 2 (16 to 19<br />
lbs bond)<br />
• 100 sheets<br />
138 to 146 g/m 2 (35 to<br />
39 lbs bond)<br />
• 10 sheets
Specifications<br />
Labels d<br />
CardStock<br />
Bond<br />
Preprinted,<br />
Colored,<br />
Cotton,<br />
Recycled,<br />
Letterhead,<br />
Punched<br />
PostCard<br />
Type Size Dimensions<br />
Refer to the Plain<br />
paper section<br />
Refer to the Plain<br />
paper section<br />
Refer to the Plain<br />
paper section<br />
Refer to the Plain<br />
paper section<br />
Refer to the Plain<br />
paper section<br />
Refer to the Plain paper section 120 to 150 g/m 2 (32 to 40 lbs bond)<br />
• 50 sheets<br />
Refer to the Plain paper section 120 to 163 g/m 2 (32 to 43 lbs bond)<br />
• 50 sheets<br />
Refer to the Plain paper section 106 to 120 g/m 2 (28 to 32 lbs bond)<br />
Refer to the Plain paper section<br />
• PostCard 4 x 6 mm<br />
• PostCard 100 x 148 mm<br />
• IndexCard<br />
• 50 sheets<br />
Print media weight ab /Capacity c<br />
5. Appendix<br />
Tray1 / Optional tray Multi-purpose tray<br />
110<br />
120 to 150 g/m 2 (32 to<br />
40 lbs bond)<br />
• 10 sheets<br />
120 to 163 g/m 2 (32 to<br />
43 lbs bond)<br />
• 10 sheets<br />
106 to 120 g/m 2 (28 to<br />
32 lbs bond)<br />
• 10 sheets
Specifications<br />
3<br />
Type Size Dimensions<br />
Minimum size (custom) e<br />
System requirements<br />
Microsoft® Windows®<br />
• 76 x 127mm (3 x 5 inches): Multi-purpose tray<br />
Maximum size (custom) 216 x 356 mm (8.5 x 14 inches)<br />
• 98.6 x 148.5mm (3.88 x 5.85 inches): Multi-purpose tray, Tray1<br />
• 98.6 x 210 mm (3.88 x 8.27 inches): Multi-purpose tray, Tray1, Optional tray.<br />
a. If media weight is over 105 g/m 2 (28 lbs bond), load a paper into the multi-purpose tray one by one.<br />
b. The finisher does not support 60 g/m 2 (16 lbs bond)paper.<br />
c. Maximum capacity may differ depending on media weight, thickness, and environmental conditions.<br />
d. The smoothness of the labels used in this machine is 100 to 250 (sheffield). This means the numeric level of smoothness.<br />
e. The minimum size’s minimum weight is 105 g/m 2 (28 lbs bond).<br />
Operating system<br />
Requirement (recommended)<br />
Print media weight ab /Capacity c<br />
5. Appendix<br />
Tray1 / Optional tray Multi-purpose tray<br />
CPU RAM free HDD space<br />
Windows® 2000 Intel® Pentium® II 400 MHz (Pentium III 933 MHz) 64 MB (128 MB) 600 MB<br />
Windows® XP Intel® Pentium® III 933 MHz (Pentium IV 1 GHz) 128 MB (256 MB) 1.5 GB<br />
111
Specifications<br />
Operating system<br />
Macintosh<br />
• Internet Explorer 6.0 or higher is the minimum requirement for all Windows operating systems.<br />
• Users who have administrator rights can install the software.<br />
• Windows Terminal Services is compatible with your machine.<br />
• For Windows 2000, Services Pack 4 or higher is required.<br />
5. Appendix<br />
Windows Server® 2003 Intel® Pentium® III 933 MHz (Pentium IV 1 GHz) 128 MB (512 MB) 1.25 GB to 2 GB<br />
Windows Server® 2008 Intel® Pentium® IV 1 GHz (Pentium IV 2 GHz) 512 MB (2 GB) 10 GB<br />
Windows Vista® Intel® Pentium® IV 3 GHz 512 MB (1 GB) 15 GB<br />
Windows® 7<br />
Intel® Pentium® IV 1 GHz 32-bit or 64-bit processor or higher 1 GB (2 GB) 16 GB<br />
• Support for DirectX® 9 graphics with 128 MB memory (to enable the Aero theme).<br />
• DVD-R/W Drive<br />
Windows Server® 2008 R2 Intel® Pentium® IV 1 GHz (x86) or 1.4 GHz (x64) processors (2 GHz or faster) 512 MB (2 GB) 10 GB<br />
Operating system<br />
Mac OS X 10.3 ~ 10.4<br />
• Intel® processors<br />
• PowerPC G4/ G5<br />
Requirement (recommended)<br />
CPU RAM free HDD space<br />
Requirements (Recommended)<br />
CPU RAM Free HDD space<br />
• 128 MB for a powerPC based Mac (512 MB)<br />
• 512 MB for an Intel-based Mac (1 GB)<br />
1 GB<br />
112
Specifications<br />
Linux<br />
Operating system<br />
Mac OS X 10.5<br />
• Intel® processors<br />
• 867 MHz or faster Power PC G4/ G5<br />
512 MB (1 GB) 1 GB<br />
Mac OS X 10.6 • Intel® processors 1 GB (2 GB) 1 GB<br />
Operating system<br />
Items Requirements<br />
RedHat® Enterprise Linux WS 4, 5 (32/64 bit)<br />
Fedora 5, 6, 7, 8, 9, 10, 11, 12, 13 (32/ 64 bit)<br />
SuSE Linux 10.1 (32 bit)<br />
OpenSuSE® 10.2, 10.3, 11.0, 11.1, 11.2 (32/64 bit)<br />
Mandriva 2007, 2008, 2009, 2009.1, 2010 (32/64 bit)<br />
Ubuntu 6.06, 6.10, 7.04, 7.10, 8.04, 8.10, 9.04, 9.10, 10.04 (32/64 bit)<br />
SuSE Linux Enterprise Desktop 10, 11 (32/64 bit)<br />
Debian 4.0, 5.0 (32/64 bit)<br />
CPU Pentium IV 2.4GHz (Intel Core2)<br />
RAM 512 MB (1 GB)<br />
Free HDD space 1 GB (2 GB)<br />
Requirements (Recommended)<br />
5. Appendix<br />
CPU RAM Free HDD space<br />
113
Specifications<br />
Unix<br />
4<br />
Operating system<br />
Items Requirements<br />
Network environment<br />
Sun Solaris 9, 10 (x86, SPARC)<br />
HP-UX 11.0, 11i v1, 11i v2, 11i v3 (PA-RISC, Itanium)<br />
IBM AIX 5.1, 5.2, 5.3, 5.4<br />
Free HDD space Up to 100 MB<br />
Network model only (see "Features by models" on page 7).<br />
5. Appendix<br />
You need to set up the network protocols on the machine to use it as your network machine. The following table shows the network<br />
environments supported by the machine.<br />
Items Specifications<br />
Network interface • Ethernet 10/100/1000 Base-TX<br />
114
Specifications<br />
Network operating system<br />
Network protocols<br />
Items Specifications<br />
• Windows 2000/Server 2003/Server 2008/XP/Vista/7/Server 2008 R2<br />
• Various Linux OS<br />
• Mac OS X 10.3 ~ 10.6<br />
• Unix<br />
• TCP/IPv4<br />
• DHCP, BOOTP<br />
• DNS, WINS, Bonjour, SLP, UPnP<br />
• Standard TCP/IP Printing (RAW), LPR, IPP, WSD<br />
• SNMPv 1/2/3, HTTP (S), IPSec<br />
• TCP/IPv6 (DHCP, DNS, RAW, LPR, SNMPv 1/2/3, HTTP (S), IPSec)<br />
5. Appendix<br />
115
Regulatory information<br />
This machine is designed for a normal work environment and<br />
certified with several regulatory statements.<br />
5<br />
Laser safety statement<br />
The printer is certified in the U.S. to conform to the requirements of<br />
DHHS 21 CFR, chapter 1 Subchapter J for Class I(1) laser products,<br />
and elsewhere is certified as a Class I laser product conforming to the<br />
requirements of IEC 60825-1 : 2007.<br />
Class I laser products are not considered to be hazardous. The laser<br />
system and printer are designed so there is never any human access<br />
to laser radiation above a Class I level during normal operation, user<br />
maintenance or prescribed service condition.<br />
Warning<br />
Never operate or service the printer with the protective cover<br />
removed from laser/scanner assembly. The reflected beam,<br />
although invisible, can damage your eyes.<br />
5. Appendix<br />
117<br />
When using this product, these basic safety precautions should<br />
always be followed to reduce risk of fire, electric shock, and injury to<br />
persons:<br />
6<br />
Taiwan only
Regulatory information<br />
7<br />
8<br />
Ozone safety<br />
This product's ozone emission rate is under 0.1 ppm.<br />
Because ozone is heavier than air, keep the product in<br />
a place with good ventilation.<br />
Power saver<br />
This printer contains advanced energy conservation<br />
technology that reduces power consumption when it is<br />
not in active use.<br />
When the printer does not receive data for an extended<br />
period of time, power consumption is automatically<br />
lowered.<br />
ENERGY STAR and the ENERGY STAR mark are<br />
registered U.S. marks.<br />
For more information on the ENERGY STAR program<br />
see http://www.energystar.gov<br />
9<br />
10<br />
Recycling<br />
China only<br />
5. Appendix<br />
Recycle or dispose of the packaging material for this<br />
product in an environmentally responsible manner.<br />
118
Regulatory information<br />
11<br />
Correct disposal of this product (Waste<br />
electrical & electronic equipment)<br />
(Applicable in the european union and other european<br />
countries with separate collection systems)<br />
This marking on the product, accessories or literature<br />
indicates that the product and its electronic accessories (e.g.<br />
charger, headset, USB cable) should not be disposed of with<br />
other household waste at the end of their working life. To<br />
prevent possible harm to the environment or human health<br />
from uncontrolled waste disposal, please separate these<br />
items from other types of waste and recycle them responsibly<br />
to promote the sustainable reuse of material resources.<br />
Household users should contact either the retailer where they<br />
purchased this product, or their local government office, for<br />
details of where and how they can take these items for<br />
environmentally safe recycling.<br />
Business users should contact their supplier and check the<br />
terms and conditions of the purchase contract. This product<br />
and its electronic accessories should not be mixed with other<br />
commercial wastes for disposal.<br />
The United States of America only<br />
5. Appendix<br />
119<br />
Dispose unwanted electronics through an approved recycler. To find<br />
the nearest recycling location, go to our<br />
website:www.samsung.com/recyclingdirect Or call, (877) 278 - 0799<br />
12<br />
Correct disposal of batteries in this product<br />
(Applicable in the European Union and other<br />
European countries with separate battery return<br />
systems.)<br />
This marking on the battery, manual or packaging<br />
indicates that the batteries in this product should not<br />
be disposed with other household waste at the end of<br />
their working life. Where marked, the chemical symbols<br />
Hg, Cd or Pb indicate that the battery contains mercury,<br />
cadmium or lead above the reference levels in EC<br />
Directive 2006/66. If batteries are not properly disposed<br />
of, these substances can cause harm to human health<br />
or the environment.<br />
To protect natural resources and to promote material<br />
reuse, please separate batteries from other types of<br />
waste and recycle them through your local, free battery<br />
return system.
Regulatory information<br />
13<br />
Radio frequency emissions<br />
FCC information to the user<br />
This device complies with Part 15 of the FCC Rules. Operation is<br />
subject to the following two conditions:<br />
• This device may not cause harmful interference, and<br />
• This device must accept any interference received, including<br />
interference that may cause undesired operation.<br />
This equipment has been tested and found to comply with the limits<br />
for a Class A digital device, pursuant to Part 15 of the FCC Rules.<br />
These limits are designed to provide reasonable protection against<br />
harmful interference in a residential installation. This equipment<br />
generates, uses and can radiate radio frequency energy and, if not<br />
installed and used in accordance with the instructions, may cause<br />
harmful interference to radio communications. However, there is no<br />
guarantee that interference will not occur in a particular installation.<br />
If this equipment does cause harmful interference to radio or<br />
television reception, which can be determined by turning the<br />
equipment off and on, the user is encouraged to try to correct the<br />
interference by one or more of the following measures:<br />
• Reorient or relocate the receiving antenna.<br />
• Increase the separation between the equipment and receiver.<br />
5. Appendix<br />
• Connect the equipment into an outlet on a circuit different from<br />
that to which the receiver is connected.<br />
• Consult the dealer or experienced radio TV technician for help.<br />
Change or modifications not expressly approved by the<br />
manufacturer responsible for compliance could void the<br />
user's authority to operate the equipment.<br />
Canadian radio interference regulations<br />
120<br />
This digital apparatus does not exceed the Class A limits for radio<br />
noise emissions from digital apparatus as set out in the interferencecausing<br />
equipment standard entitled “Digital Apparatus”, ICES-003<br />
of the Industry and Science Canada.<br />
Cet appareil numérique respecte les limites de bruits<br />
radioélectriques applicables aux appareils numériques de Classe A<br />
prescrites dans la norme sur le matériel brouilleur: “Appareils<br />
Numériques”, ICES-003 édictée par l’Industrie et Sciences Canada.
Regulatory information<br />
14<br />
15<br />
16<br />
Taiwan only<br />
Russia only<br />
Germany only<br />
17<br />
18<br />
Important<br />
Turkey only<br />
Replacing the fitted plug (for UK only)<br />
5. Appendix<br />
The mains lead for this machine is fitted with a standard (BS 1363) 13<br />
amp plug and has a 13 amp fuse. When you change or examine the<br />
fuse, you must re-fit the correct 13 amp fuse. You then need to<br />
replace the fuse cover. If you have lost the fuse cover, do not use the<br />
plug until you have another fuse cover.<br />
Contact the people from you purchased the machine.<br />
The 13 amp plug is the most widely used type in the UK and should<br />
be suitable. However, some buildings (mainly old ones) do not have<br />
normal 13 amp plug sockets. You need to buy a suitable plug<br />
adaptor. Do not remove the moulded plug.<br />
121
Regulatory information<br />
If you cut off the moulded plug, get rid of it straight away.<br />
You cannot rewire the plug and you may receive an electric<br />
shock if you plug it into a socket.<br />
Important warning:<br />
You must earth this machine.<br />
The wires in the mains lead have the following color code:<br />
• Green and Yellow: Earth<br />
• Blue: Neutral<br />
• Brown: Live<br />
If the wires in the mains lead do not match the colors marked in your<br />
plug, do the following:<br />
You must connect the green and yellow wire to the pin marked by<br />
the letter “E” or by the safety ‘Earth symbol’ or colored green and<br />
yellow or green.<br />
You must connect the blue wire to the pin which is marked with the<br />
letter “N” or colored black.<br />
You must connect the brown wire to the pin which is marked with<br />
the letter “L” or colored red.<br />
5. Appendix<br />
You must have a 13 amp fuse in the plug, adaptor, or at the<br />
distribution board.<br />
19<br />
Declaration of conformity (European<br />
countries)<br />
Approvals and Certifications<br />
January 1, 1995: Council Directive 2006/95/EC Approximation of<br />
the laws of the member states related to low voltage equipment.<br />
January 1, 1996: Council Directive 2004/108/EC, approximation of<br />
the laws of the Member States related to electromagnetic<br />
compatibility.<br />
122<br />
Hereby, Samsung Electronics, declares that this [<strong>ML</strong>-<br />
451x Series/ <strong>ML</strong>-501x Series] is in compliance with the<br />
essential requirements and other relevant provisions of<br />
Low Voltage Directive (2006/95/EC), EMC Directive (2004/<br />
108/EC)<br />
The declaration of conformity may be consulted at<br />
www.samsung.com/printer, go to Support > Download<br />
center and enter your printer (MFP) name to browse the<br />
EuDoC.
Regulatory information<br />
March 9, 1999: Council Directive 1999/5/EC on radio equipment<br />
and telecommunications terminal equipment and the mutual<br />
recognition of their conformity. A full declaration, defining the<br />
relevant Directives and referenced standards can be obtained from<br />
your Samsung Electronics Co., Ltd. representative.<br />
EC Certification<br />
Certification to 1999/5/EC Radio Equipment & Telecommunications<br />
Terminal Equipment Directive (FAX)<br />
This Samsung product has been self-certified by Samsung for pan-<br />
European single terminal connection to the analogue public<br />
switched telephone network (PSTN) in accordance with Directive<br />
1999/5/EC. The product has been designed to work with the national<br />
PSTNs and compatible PBXs of the European countries:<br />
In the event of problems, you should contact the Euro QA Lab of<br />
Samsung Electronics Co., Ltd. in the first instance.<br />
The product has been tested against TBR21. To assist in the use and<br />
application of terminal equipment which complies with this<br />
standard, the European Telecommunication Standards Institute<br />
(ETSI) has issued an advisory document (EG 201 121) which contains<br />
notes and additional requirements to ensure network compatibility<br />
of TBR21 terminals. The product has been designed against, and is<br />
fully compliant with, all of the relevant advisory notes contained in<br />
this document.<br />
5. Appendix<br />
123
Regulatory information<br />
20<br />
China only<br />
5. Appendix<br />
124
Copyright<br />
© 2011 Samsung Electronics Co., Ltd. All rights reserved.<br />
This user’s guide is provided for information purposes only. All information included herein is subject to change without notice.<br />
Samsung Electronics is not responsible for any direct or indirect damages, arising from or related to use of this user’s guide.<br />
• Samsung and the Samsung logo are trademarks of Samsung Electronics Co., Ltd.<br />
5. Appendix<br />
• Microsoft, Windows, Windows Vista, Windows 7, and Windows Server 2008 R2 are either registered trademarks or trademarks of Microsoft<br />
Corporation.<br />
• TrueType, LaserWriter, and Macintosh are trademarks of Apple Computer, Inc.<br />
• All other brand or product names are trademarks of their respective companies or organizations.<br />
Refer to the 'LICENSE.txt' file in the provided CD-ROM for the open source license information.<br />
REV. 1.01<br />
125
Index<br />
<br />
<br />
<br />
<br />
<br />
<br />
<br />
<br />
<br />
<br />
<br />
<br />
<br />
<br />
<br />
<br />
<br />
<br />
<br />
<br />
<br />
<br />
<br />
<br />
<br />
<br />
<br />
<br />
<br />
<br />
<br />
<br />
<br />
<br />
<br />
<br />
<br />
<br />
<br />
<br />
<br />
<br />
<br />
<br />
<br />
<br />
<br />
<br />
<br />
<br />
<br />
<br />
<br />
<br />
<br />
<br />
<br />
<br />
<br />
<br />
<br />
<br />
<br />
<br />
<br />
<br />
<br />
<br />
<br />
<br />
<br />
<br />
<br />
<br />
126
Index<br />
<br />
<br />
<br />
<br />
<br />
<br />
<br />
<br />
<br />
<br />
<br />
<br />
<br />
<br />
<br />
<br />
<br />
<br />
<br />
<br />
<br />
<br />
<br />
<br />
<br />
<br />
<br />
<br />
<br />
<br />
<br />
<br />
<br />
<br />
<br />
<br />
<br />
<br />
<br />
<br />
<br />
<br />
<br />
<br />
<br />
<br />
<br />
<br />
<br />
<br />
<br />
<br />
<br />
<br />
<br />
<br />
<br />
127
User’s Guide<br />
Advanced<br />
imagine the possibilities<br />
This guide provides information about installation, advanced configuration, operation and<br />
troubleshooting on various OS environments.<br />
Some features may not be available depending on model or country.<br />
<strong>ML</strong>-451x Series<br />
<strong>ML</strong>-501x Series
Contents<br />
1. Software installation<br />
5 Installation for Macintosh<br />
7 Reinstallation for Macintosh<br />
8 Installation for Linux<br />
10 Reinstallation for Linux<br />
2. Using a network-connected<br />
machine<br />
12 Useful network programs<br />
13 Wired network setup<br />
17 Installing driver over the network<br />
29 IPv6configuration<br />
32 Wireless network setup<br />
3. Useful setting menus<br />
59 Information<br />
60 Layout<br />
61 Paper<br />
62 Graphic<br />
63 System setup<br />
66 Emulation<br />
67 Network<br />
68 Admin setup<br />
69 Eco<br />
70 Job Status<br />
4. Special features<br />
72 Altitude adjustment<br />
73 Changing the font setting<br />
74 Changing the default print settings<br />
75 Setting your machine as a default machine<br />
76 Using advanced print features<br />
84 Using Direct Printing Utility (Windows only)<br />
86 Using memory/mass storage device features<br />
87 Macintosh printing<br />
89 Linux printing<br />
92 Unix printing<br />
5. Maintenance<br />
95 Storing the toner cartridge (or imaging unit)<br />
97 Tips for moving & storing your machine<br />
98 Useful management tools<br />
2
Contents<br />
6. Troubleshooting<br />
110 Paper feeding problems<br />
111 Power and cable connecting problems<br />
112 Printing problems<br />
116 Printing quality problems<br />
124 Operating system problems<br />
Contact SAMSUNG worldwide<br />
Glossary<br />
3
1. Software installation<br />
This chapter provides instructions for installing essential and helpful software<br />
for use in an environment where the machine is connected via a cable. A locally<br />
connected machine is a machine directly attached to your computer using the<br />
cable. If your machine is attached to a network, skip the following steps below<br />
and go on to installing a network connected machine’s driver (see Installing<br />
driver over the network17).<br />
• Installation for Macintosh 5<br />
• Reinstallation for Macintosh 7<br />
• Installation for Linux 8<br />
• Reinstallation for Linux 10<br />
<br />
• If you are a Windows OS user, refer to the Basic Guide for installing the<br />
machine’s driver.<br />
• Only use a USB cable no longer then 3 meter (118 inches).
Installation for Macintosh<br />
1<br />
2<br />
3<br />
4<br />
5<br />
6<br />
7<br />
8<br />
9<br />
10<br />
Make sure that the machine is connected to your computer<br />
and powered on.<br />
Insert the supplied software CD into your CD-ROM drive.<br />
Double-click the CD-ROM icon that appears on your<br />
Macintosh desktop.<br />
Double-click the MAC_Installer folder > Installer OS X icon.<br />
Enter the password and click OK.<br />
Click Continue.<br />
Read the license agreement and click Continue.<br />
Click Agree to agree to the license agreement.<br />
Select Easy Install and click Install. Easy Install is<br />
recommended for most users. All components necessary for<br />
machine operations will be installed.<br />
If you select Custom Install, you can choose individual<br />
components to install.<br />
When the message that warns that all applications will close<br />
on your computer appears, click Continue.<br />
11<br />
12<br />
13<br />
14<br />
15<br />
16<br />
1. Software installation<br />
Select Typical installation for a local printer and then click<br />
OK.<br />
Click Continue on the Read Me window.<br />
After the installation is finished, click Quit.<br />
Open the Applications folder > Utilities > Print Setup<br />
Utility.<br />
• For Mac OS X 10.5-10.6, open the Applications folder ><br />
System Preferences and click Print & Fax.<br />
Click Add on the Printer List.<br />
• For Mac OS X 10.5-10.6, click the “+” icon; a display window<br />
will pop up.<br />
For Mac OS X 10.3, select the USB tab.<br />
• For Mac OS X10.4, click Default Browser and find the USB<br />
connection.<br />
• For Mac OS X 10.5-10.6, click Default and find the USB<br />
connection.<br />
5
Installation for Macintosh<br />
17<br />
18<br />
For Mac OS X 10.3, if Auto Select does not work properly, select<br />
Samsung in Printer Model and your machine name in Model<br />
Name.<br />
• For Mac OS X 10.4, if Auto Select does not work properly,<br />
select Samsung in Print Using and your machine name in<br />
Model.<br />
• For Mac OS X 10.5-10.6, if Auto Select does not work<br />
properly, select Select a driver to use... and your machine<br />
name in Print Using.<br />
Your machine appears on the Printer List, and is set as the<br />
default machine.<br />
Click Add.<br />
1. Software installation<br />
6
Reinstallation for Macintosh<br />
If the printer driver does not work properly, uninstall the driver and<br />
reinstall it.<br />
1<br />
2<br />
3<br />
4<br />
5<br />
6<br />
7<br />
8<br />
9<br />
10<br />
11<br />
Make sure that the machine is connected to your computer<br />
and powered on.<br />
Insert the supplied software CD into your CD-ROM drive.<br />
Double-click the CD-ROM icon that appears on your<br />
Macintosh desktop.<br />
Double-click the MAC_Installer folder > Installer OS X icon.<br />
Enter the password and click OK.<br />
Click Continue.<br />
Read the license agreement and click Continue.<br />
Click Agree to agree to the license agreement.<br />
Select Uninstall and click Uninstall.<br />
When the message which warns that all applications will close<br />
on your computer appears, click Continue.<br />
When the uninstall is done, click Quit.<br />
1. Software installation<br />
If a machine has already been added, delete it from the Print<br />
Setup Utility or Print & Fax.<br />
7
Installation for Linux<br />
You need to download Linux software packages from the Samsung<br />
website to install the printer software (http://www.samsung.com/<br />
printer).<br />
1<br />
1<br />
2<br />
3<br />
4<br />
5<br />
Installing the Unified Linux Driver<br />
Make sure that the machine is connected to your computer<br />
and powered on.<br />
When the Administrator Login window appears, type “root”<br />
in the Login field and enter the system password.<br />
You must log in as a super user (root) to install the machine<br />
software. If you are not a super user, ask your system<br />
administrator.<br />
From the Samsung website, download the Unified Linux<br />
Driver package to your computer.<br />
Right-click the Unified Linux Driver package and extract the<br />
package.<br />
Double click cdroot > autorun.<br />
6<br />
7<br />
1. Software installation<br />
When the welcome screen appears, click Next.<br />
When the installation is complete, click Finish.<br />
The installation program added the Unified Driver Configurator<br />
desktop icon and the Unified Driver group to the system menu for<br />
your convenience. If you have any difficulties, consult the on-screen<br />
help that is available through your system menu or from the driver<br />
package applications, such as Unified Driver Configurator or<br />
Image Manager.<br />
2<br />
1<br />
2<br />
3<br />
Installing the Smart Panel<br />
Make sure that the machine is connected to your computer<br />
and powered on.<br />
When the Administrator Login window appears, type in root<br />
in the Login field and enter the system password.<br />
You must log in as a super user (root) to install the machine<br />
software. If you are not a super user, ask your system<br />
administrator.<br />
From the Samsung website, download the Smart Panel<br />
package to your computer.<br />
8
Installation for Linux<br />
3<br />
4<br />
5<br />
1<br />
2<br />
3<br />
4<br />
5<br />
Right-click the Smart Panel package and extract the package.<br />
Double click cdroot > Linux > smartpanel > install.sh.<br />
Installing the Printer Settings Utility<br />
Make sure that the machine is connected to your computer<br />
and powered on.<br />
When the Administrator Login window appears, type “root”<br />
in the Login field and enter the system password.<br />
You must log in as a super user (root) to install the machine<br />
software. If you are not a super user, ask your system<br />
administrator.<br />
From the Samsung website, download the Printer Settings<br />
Utility package to your computer.<br />
Right-click the Printer Settings Utility package and extract<br />
the package.<br />
Double click cdroot > Linux > psu > install.sh.<br />
1. Software installation<br />
9
Reinstallation for Linux<br />
If the printer driver does not work properly, uninstall the driver and<br />
reinstall it.<br />
1<br />
2<br />
3<br />
4<br />
5<br />
6<br />
Make sure that the machine is connected to your computer<br />
and powered on.<br />
When the Administrator Login window appears, type “root”<br />
in the Login field and enter the system password.<br />
You must log in as a super user (root) to uninstall the printer<br />
driver. If you are not a super user, ask your system<br />
administrator.<br />
Click the icon at the bottom of the desktop. When the<br />
Terminal screen appears, type in the following.<br />
[root@localhost root]#cd /opt/Samsung/mfp/uninstall/<br />
[root@localhost uninstall]#./uninstall.sh<br />
Click Uninstall.<br />
Click Next.<br />
Click Finish.<br />
1. Software installation<br />
10
2. Using a network-connected<br />
machine<br />
This chapter gives you step-by-step instructions for setting up a network<br />
connected machine and software.<br />
• Useful network programs 12<br />
• Wired network setup 13<br />
• Installing driver over the network 17<br />
• IPv6 configuration 29<br />
• Wireless network setup 32<br />
<br />
Supported optional devices and features may differ according to your<br />
model.
Useful network programs<br />
There are several programs available to setup the network settings<br />
easily in a network environment. For the network administrator<br />
especially, managing several machines on the network is possible.<br />
1<br />
<br />
Before using the programs below, set the IP address first.<br />
SyncThru Web Service<br />
The web server embedded on your network machine allows you to<br />
do the following tasks (see "Using SyncThru Web Service" on page<br />
31):<br />
• Check the supplies information and status.<br />
• Customize machine settings.<br />
• Set the email notification option. When you set this option, the<br />
machine status (toner cartridge shortage or machine error) will<br />
be sent to a certain person's email automatically.<br />
• Configure the network parameters necessary for the machine to<br />
connect to various network environments.<br />
2<br />
<br />
2. Using a network-connected machine<br />
SyncThru Web Admin Service<br />
Web-based machine management solution for network<br />
administrators. SyncThru Web Admin Service provides you with an<br />
efficient way of managing network devices and lets you remotely<br />
monitor and troubleshoot network machines from any site with<br />
corporate internet access. Download this program from http://<br />
solution.samsungprinter.com.<br />
3<br />
<br />
SetIP<br />
This utility program allows you to select a network interface and<br />
manually configure the IP addresses for use with the TCP/IP protocol.<br />
• See "IPv4 configuration using SetIP (Windows)" on page 13.<br />
• See "IPv4 configuration using SetIP (Macintosh)" on page 15.<br />
• See "IPv4 configuation using SetIP (Linux)" on page 15.<br />
TCP/IPv6 is not supported by this program.<br />
12
Wired network setup<br />
You must set up the network protocols on your machine to use it on<br />
your network.<br />
You can use network after connecting network cable to a<br />
corresponding port on your machine.<br />
• For models that do not have the display screen on the control<br />
panel, use the SyncThru Web Service or SetIP program.<br />
- See "Using SyncThru Web Service" on page 98.<br />
- See "Setting IP address" on page 13.<br />
• For models that have the display screen on the control panel,<br />
configure the network setting by pressing Network menu (see<br />
"Network" on page 67).<br />
4<br />
<br />
Printing a network configuration report<br />
You can print Network Configuration Report from the machine’s<br />
control panel that will show the current machine’s network settings.<br />
This will help you to set up a network.<br />
• The machine has the display screen: Press the (Menu)<br />
button on the control panel and select Network > Network<br />
Config. (Network Configuration).<br />
• The machine has the touch screen: Press Setup from the Main<br />
screen > Network > Next > Network Configuration.<br />
2. Using a network-connected machine<br />
• The machine does not have the display screen: Press the<br />
(Cancel or Stop/Clear) button for more than five seconds on the<br />
control panel.<br />
Using this Network Configuration Report, you can find your<br />
machine’s MAC address and IP address.<br />
For example:<br />
• MAC Address: 00:15:99:41:A2:78<br />
• IP Address: 192.0.0.192<br />
5<br />
<br />
Setting IP address<br />
First, you have to set up an IP address for network printing and<br />
managements. In most cases a new IP address will be automatically<br />
assigned by a DHCP (Dynamic Host Configuration Protocol) server<br />
located on the network.<br />
IPv4 configuration using SetIP (Windows)<br />
Before using the SetIP program, disable the computer firewall from<br />
Control Panel > Security Center > Windows Firewall.<br />
13
Wired network setup 2. Using a network-connected machine 14<br />
1<br />
2<br />
3<br />
4<br />
5<br />
6<br />
Install this program from the supplied CD-ROM by doubleclick<br />
Application > SetIP > Setup.exe.<br />
Follow the instructions in the installation window.<br />
Connect your machine to the network with a network cable.<br />
Turn on the machine.<br />
From the Windows Start menu, select All Programs ><br />
Samsung Printers > SetIP > SetIP.<br />
Click the icon (third from left) in the SetIP window to open<br />
the TCP/IP configuration window.<br />
7<br />
8<br />
Enter the machine’s new information into the configuration<br />
window as follows. In a corporate intranet, you may need to<br />
have this information assigned by a network manager before<br />
proceeding.<br />
Find the machine’s MAC address from the Network<br />
Configuration Report (see "Printing a network<br />
configuration report" on page 13) and enter it without the<br />
colons. For example, 00:15:99:29:51:A8 becomes<br />
0015992951A8.<br />
Click Apply, and then click OK. The machine will automatically<br />
print the Network Configuration Report. Confirm that all the<br />
settings are correct.
Wired network setup 2. Using a network-connected machine 15<br />
IPv4 configuration using SetIP (Macintosh)<br />
Before using the SetIP program, disable the computer firewall from<br />
System Preferences > Security > Firewall.<br />
1<br />
2<br />
3<br />
4<br />
5<br />
The following instructions may vary from your model.<br />
Connect your machine to the network with a network cable.<br />
Insert the Installation CD-ROM, and open the disk window,<br />
select MAC_Installer > MAC_Printer > SetIP ><br />
SetIPapplet.html.<br />
Double-click the file and Safari will automatically open, then<br />
select Trust. The browser will open the SetIPapplet.html<br />
page that shows the printer’s name and IP address<br />
information.<br />
Click the icon (third from left) in the SetIP window to open<br />
the TCP/IP configuration window.<br />
Enter the machine’s new information into the configuration<br />
window. In a corporate intranet, you may need to have this<br />
information assigned by a network manager before<br />
proceeding.<br />
6<br />
7<br />
Find the machine’s MAC address from the Network<br />
Configuration Report (see "Printing a network<br />
configuration report" on page 13) and enter it without the<br />
colons. For example, 00:15:99:29:51:A8 becomes<br />
0015992951A8.<br />
Select Apply, then OK, and OK again.<br />
Quit Safari.<br />
IPv4 configuation using SetIP (Linux)<br />
Before using the SetIP program, disable the computer firewall from<br />
System Preferences or Administrator.<br />
1<br />
2<br />
3<br />
The following instructions may vary from your model or<br />
operating systems.<br />
Open /opt/Samsung/mfp/share/utils/.<br />
Double-click the SetIPApplet.html file.<br />
Click to open the TCP/IP configuration window.
Wired network setup 2. Using a network-connected machine 16<br />
4<br />
5<br />
Enter the machine’s new information into the configuration<br />
window. In a corporate intranet, you may need to have this<br />
information assigned by a network manager before<br />
proceeding.<br />
Find the machine’s MAC address from the Network<br />
Configuration Report (see "Printing a network<br />
configuration report" on page 13) and enter it without the<br />
colons. For example, 00:15:99:29:51:A8 becomes<br />
0015992951A8.<br />
The machine will automatically print the Network<br />
Configuration Report.
Installing driver over the network<br />
6<br />
1<br />
2<br />
3<br />
<br />
Windows<br />
Make sure that the machine is connected to the network and<br />
powered on. Also, your machine’s IP address should have<br />
been set (see "Setting IP address" on page 13).<br />
If the “Found New Hardware Wizard” appears during the<br />
installation procedure, click Cancel to close the window.<br />
Insert the supplied software CD into your CD-ROM drive.<br />
The software CD should automatically run and an installation<br />
window will appear.<br />
Select Install Now.<br />
When you click the Advanced Installation, you can use the<br />
Custom Installation option. The Custom Installation<br />
allows you to select the machine’s connection and choose<br />
individual components to install. Follow the instructions on<br />
the window.<br />
4<br />
2. Using a network-connected machine<br />
Read License Agreement, and select I accept the terms of<br />
the License Agreement. Then, click Next.<br />
The program searches for the machine.<br />
If your machine is not found on the network or locally, an<br />
error message appears.<br />
• Check if you want to install the software without<br />
connection of the printer.<br />
17<br />
- Check this option to install this program without a<br />
machine connected. In this case, the print a test page<br />
window will be skipped, and completes the installation.<br />
• Search again<br />
When you press this button, the firewall notice window<br />
appears.<br />
- Turn off the firewall and Search again. For Windows<br />
operating system, click Start > Control Panel ><br />
Windows Firewall, and inactivate this option.<br />
- Turn off the firewall from the third party's program<br />
beside the operating system. Refer to the manual<br />
provided by individual programs.
Installing driver over the network 2. Using a network-connected machine 18<br />
5<br />
• Direct Input<br />
The Direct Input allows you to search for a specific<br />
machine on the network.<br />
- Search by IP address: Enter the IP address or the host<br />
name. Then click Next.<br />
To verify your machine’s IP address, print a network<br />
configuration report (see "Printing a network<br />
configuration report" on page 13).<br />
- Search by network path: To find a shared machine<br />
(UNC Path), enter the shared name manually or find a<br />
shared printer by clicking the Browse button. Then click<br />
Next.<br />
• Help<br />
If your machine is not connected to the computer or<br />
network, this help button gives detailed information<br />
about how to connect the machine.<br />
• SNMP Community Name<br />
If your system administrator set the new SNMP<br />
Community Name on the machine, you can find the<br />
machine in the network. Contact your system<br />
administrator for new SNMP Community Name.<br />
The searched machines will be shown on the screen. Select<br />
the one you wish to use and click OK.<br />
6<br />
If the driver searched only one machine, the confirmation<br />
window appears.<br />
Follow the instructions in the installation window.<br />
Silent installation Mode<br />
Silent installation mode is an installation method that does not<br />
require any user intervention. Once you start the installation, the<br />
machine driver and software are automatically installed on you<br />
computer. You can start the silent installation by typing /s or /S in the<br />
command window.<br />
Command-line Parameters<br />
Following table shows commands that can be used in the command<br />
window.<br />
Following command-line are effective and operated when<br />
command is used with /s or /S. But /h, /H or /? are exceptional<br />
commands that can be operated solely.
Installing driver over the network 2. Using a network-connected machine 19<br />
Command- line Definition Description<br />
/s or<br />
/S<br />
/p””<br />
or<br />
/P””<br />
Starts silent installation. Installs machine drivers<br />
without prompting any<br />
UIs or user intervention.<br />
Specifies printer port.<br />
Network Port<br />
will be<br />
created by<br />
use of<br />
Standard<br />
TCP/IP Port<br />
monitor. For<br />
local port,<br />
this port<br />
must exist on<br />
system<br />
before being<br />
specified by<br />
command.<br />
Printer port name can<br />
be specified as IP<br />
address, hostname, USB<br />
local port name or<br />
IEEE1284 port name.<br />
For example:<br />
• /p”xxx.xxx.xxx.xxx”<br />
in where,<br />
“xxx.xxx.xxx.xxx”<br />
means IP address for<br />
network printer. /<br />
p”USB001”, /<br />
P”LPT1:”, /<br />
p”hostname”<br />
• When installing the<br />
driver silently in<br />
Korean, type in-<br />
Setup.exe /s /<br />
L"0x0012” or<br />
Setup.exe /s /L"18” .<br />
Command- line Definition Description<br />
/a””<br />
or<br />
/A””<br />
Specifies destination<br />
path for installation.<br />
The<br />
destination<br />
path should<br />
be a fully<br />
qualified<br />
path.<br />
Since machine drivers<br />
should be installed on<br />
the OS specific location,<br />
this command applies<br />
to only application<br />
software.
Installing driver over the network 2. Using a network-connected machine 20<br />
Command- line Definition Description<br />
/i”” or<br />
/I””<br />
Specifies customized<br />
install script file for<br />
custom operation.<br />
The script<br />
filename<br />
should be a<br />
fully qualified<br />
filename.<br />
Customized script file<br />
can be assigned for<br />
customized silent<br />
installation. This script<br />
file can be created or<br />
modified through<br />
provided installer<br />
customizing utility or<br />
by text editor.<br />
This<br />
customized<br />
script file is<br />
prior than<br />
default<br />
installer<br />
setting in<br />
setup<br />
package but<br />
not prior<br />
than<br />
commandline<br />
parameters.<br />
Command- line Definition Description<br />
/n”” or<br />
/N””<br />
/nd or<br />
/ND<br />
Specifies printer name.<br />
Printer instance shall be<br />
created as specified<br />
printer name.<br />
Commands not to set<br />
the installed driver as a<br />
default machine driver.<br />
With this parameter,<br />
you can add printer<br />
instances as your<br />
wishes.<br />
It indicates installed<br />
machine driver will not<br />
be the default machine<br />
driver on your system if<br />
there are one or more<br />
printer drivers installed.<br />
If there is no installed<br />
machine driver on your<br />
system, then this<br />
option won’t be<br />
applied because<br />
Windows OS will set<br />
installed printer driver<br />
as a default machine<br />
driver.
Installing driver over the network 2. Using a network-connected machine 21<br />
Command- line Definition Description<br />
/x or<br />
/X<br />
/up”” or<br />
/UP””<br />
/d or<br />
/D<br />
Uses existing machine<br />
driver files to create<br />
printer instance if it is<br />
already installed.<br />
Removes only specified<br />
printer instance and<br />
not the driver files.<br />
Uninstalls all device<br />
drivers and applications<br />
from your system.<br />
This command<br />
provides a way to install<br />
a printer instance that<br />
uses installed printer<br />
driver files without<br />
installing an additional<br />
driver.<br />
This command<br />
provides a way to<br />
remove only specified<br />
printer instance from<br />
your system without<br />
effecting other printer<br />
drivers. It will not<br />
remove printer driver<br />
files from your system.<br />
This command will<br />
remove all installed<br />
device drivers and<br />
application software<br />
from your system.<br />
Command- line Definition Description<br />
/v”” or<br />
/V””<br />
/o or<br />
/O<br />
/f”” or<br />
/F””<br />
Language code<br />
Shares installed<br />
machine and add other<br />
available platform<br />
drivers for Point & Print.<br />
Opens Printers and<br />
Faxes folder after<br />
installation.<br />
Specifies log filename.<br />
The default log file is<br />
created in the system<br />
temp folder if not<br />
specified.<br />
/h, /H or /? Shows Command-line<br />
Usage.<br />
Code Language<br />
0X0009 English<br />
It will install all<br />
supported Windows OS<br />
platform’s machine<br />
drivers to system and<br />
share it with specified<br />
for point<br />
and print.<br />
This command will<br />
open Printers and<br />
Faxes folder after the<br />
silent installation.<br />
It will create a log file to<br />
a specified folder.
Installing driver over the network 2. Using a network-connected machine 22<br />
Code Language<br />
0X0012 Korean<br />
0X0804 Simplified Chinese<br />
0X0404 Traditional Chinese<br />
0x040c French<br />
0X0007 German<br />
0X0010 Italian<br />
0X000a Spanish<br />
0X0013 Dutch<br />
0X001D Swedish<br />
0X0006 Danish<br />
0X000b Finnish<br />
0X0014 Norwegian<br />
0X0019 Russian<br />
0X0005 Czech<br />
0X000e Hungarian<br />
0X0008 Greek<br />
0X0816 Standard Portuguese<br />
0X0416 Brazilian Portuguese<br />
Code Language<br />
0X0015 Polish<br />
0X001F Turkish<br />
0X0001 Arabic<br />
0X000D Hebrew<br />
0x0424 Slovenian<br />
0X0418 Romanian<br />
0X0402 Bulgarian<br />
0X041A Croatian<br />
0X081A Serbian<br />
0X0422 Ukraine<br />
0X041B Slovakia<br />
0X0421 Indonesian<br />
0x041E Thai<br />
0X0429 Farsi
Installing driver over the network 2. Using a network-connected machine 23<br />
7<br />
1<br />
2<br />
3<br />
4<br />
5<br />
6<br />
7<br />
8<br />
<br />
Macintosh<br />
Make sure that the machine is connected to your network and<br />
powered on. Also, your machine’s IP address should have<br />
been set (see "Setting IP address" on page 13).<br />
Insert the supplied software CD into your CD-ROM drive.<br />
Double-click the CD-ROM icon that appears on your<br />
Macintosh desktop.<br />
Double-click the MAC_Installer folder > Installer OS X icon.<br />
Enter the password and click OK.<br />
Click Continue.<br />
Read the license agreement and click Continue.<br />
Click Agree to agree to the license agreement.<br />
9<br />
10<br />
11<br />
12<br />
13<br />
14<br />
15<br />
Select Easy Install and click Install. Easy Install is<br />
recommended for most users. All components necessary for<br />
machine operations will be installed.<br />
If you select Custom Install, you can choose individual<br />
components to install.<br />
When the message which warns that all applications will close<br />
on your computer appears, click Continue.<br />
Select Typical installation for a network printer and then<br />
click OK.<br />
The SetIP program automatically runs.<br />
Click OK to continue the installation.<br />
Click Continue on the Read me window.<br />
After the installation is finished, click OK.
Installing driver over the network 2. Using a network-connected machine 24<br />
16<br />
17<br />
18<br />
19<br />
20<br />
21<br />
Open the Applications folder > Utilities > Print Setup<br />
Utility.<br />
• For Mac OS X 10.5-10.6, open the Applications folder ><br />
System Preferences and click Print & Fax.<br />
Click Add on the Printer List.<br />
• For Mac OS X 10.5-10.6, click the “+” icon. A display window<br />
will pop up.<br />
For Mac OS X 10.3, select the IP Printing tab.<br />
• For Mac OS X 10.4, click IP Printer.<br />
• For Mac OS X 10.5-10.6, click IP.<br />
Select HP Jetdirect /Socket in Protocol.<br />
When printing a document containing many pages, printing<br />
performance may be enhanced by choosing Socket for<br />
Printer Type option.<br />
Enter the machine’s IP address in the Address input field.<br />
Enter the queue name in the Queue input field. If you cannot<br />
determine the queue name for your machine server, try using<br />
the default queue first.<br />
22<br />
23<br />
8<br />
<br />
For Mac OS X 10.3, if Auto Select does not work properly, select<br />
Samsung in Printer Model and your machine name in Model<br />
Name.<br />
• For Mac OS X 10.4, if Auto Select does not work properly,<br />
select Samsung in Print Using and your machine name in<br />
Model.<br />
• For Mac OS X 10.5-10.6, if Auto Select does not work<br />
properly, choose Select Printer Software and your<br />
machine name in Print Using.<br />
Click Add.<br />
Your machine appears in the Printer List, and is set as the<br />
default machine.<br />
Linux<br />
You need to download Linux software packages from the Samsung<br />
website to install the printer software (http://www.samsung.com/<br />
printer).<br />
To install other software:<br />
• See "Installing the Smart Panel" on page 8.<br />
• See "Installing the Printer Settings Utility" on page 9.
Installing driver over the network 2. Using a network-connected machine 25<br />
Install the Linux driver and add network printer<br />
1<br />
2<br />
3<br />
4<br />
5<br />
6<br />
7<br />
8<br />
9<br />
10<br />
Make sure that the machine is connected to your network and<br />
powered on. Also, your machine’s IP address should have<br />
been set.<br />
Download the Unified Linux Driver package from the<br />
Samsung website.<br />
Extract the UnifiedLinuxDriver.tar.gz file and open the new<br />
directory.<br />
Double-click the Linux folder > install.sh icon.<br />
The Samsung installer window opens. Click Continue.<br />
The add printer wizard window opens. Click Next.<br />
Select network printer and click Search button.<br />
The machine’s IP address and model name appears on list<br />
field.<br />
Select your machine and click Next.<br />
Input the printer description and Next.<br />
11<br />
12<br />
After the machine is added, click Finish.<br />
When installation is done, click Finish.<br />
Add a network printer<br />
1<br />
2<br />
3<br />
4<br />
5<br />
6<br />
7<br />
8<br />
Double-click the Unified Driver Configurator.<br />
Click Add Printer.<br />
The Add printer wizard window opens. Click Next.<br />
Select Network printer and click the Search button.<br />
The printer’s IP address and model name appears on list field.<br />
Select your machine and click Next.<br />
Enter the printer description and click Next.<br />
After the machine is added, click Finish.
Installing driver over the network 2. Using a network-connected machine 26<br />
9<br />
<br />
UNIX<br />
Make sure your machine supports the UNIX operating<br />
system before installing the UNIX printer driver (see basic<br />
guide)<br />
To use the UNIX printer driver, you have to install the UNIX printer<br />
driver package first, then setup the printer. You can download the<br />
UNIX printer driver package from the Samsung website.<br />
Installing the UNIX printer driver package<br />
The installation procedure is common for all variants of UNIX OS<br />
mentioned.<br />
1<br />
2<br />
3<br />
From the Samsung website, download and unpack the UNIX<br />
Printer Driver package to your computer.<br />
Acquire root privileges.<br />
su -<br />
Copy the appropriate driver archive to the target UNIX<br />
computer.<br />
4<br />
5<br />
6<br />
7<br />
See administration guide of your UNIX OS for details.<br />
Unpack the UNIX printer driver package.<br />
For example, on IBM AIX, use the following command (without<br />
“).<br />
gzip -d < "package name" | tar xf -<br />
The “binaries” folder consists of binz, install, share files and<br />
folders.<br />
Change to the driver’s “binaries” directory.<br />
For example, on IBM AIX,<br />
cd aix_power/binaries<br />
Run the install script.<br />
./install<br />
install is the installer script file which is used to install or<br />
uninstall the UNIX Printer Driver package.<br />
Use “chmod 755 install” command to give the permission to<br />
the installer script.<br />
Execute the “. /install –c” command to verify installation<br />
results.
Installing driver over the network 2. Using a network-connected machine 27<br />
8<br />
Run ‘installprinter’ from the command line. This will bring up<br />
the Add Printer Wizard window. Setup the printer in this<br />
window referring to the following procedures.<br />
On some UNIX OS, for example on Solaris 10, just added<br />
printers may not be enabled and/or may not accept jobs. In<br />
this case run the following two commands on the root<br />
terminal:<br />
accept <br />
enable <br />
Uninstalling the printer driver package<br />
The utility should be used to delete the printer installed in<br />
the system.<br />
a Run “uninstallprinter” command from the terminal.<br />
It will open the Uninstall Printer Wizard.<br />
The installed printers are listed in the drop-down list.<br />
b Select the printer to be deleted.<br />
c Click Delete to delete the printer from the system.<br />
d Execute the “. /install –d” command to uninstall the whole<br />
package.<br />
e To verify removal results, execute the “. /install –c”<br />
command.<br />
To re-install it, use the command “. /install” to reinstall the binaries.<br />
Setting up the printer<br />
To add the printer to your UNIX system, run ‘installprinter’ from the<br />
command line. This will bring up the Add Printer Wizard window.<br />
Setup the printer in this window according to the following steps:<br />
1<br />
2<br />
3<br />
4<br />
5<br />
6<br />
Type the name of the printer.<br />
Select the appropriate printer model from the model list.<br />
Enter any description corresponding to the type of the printer<br />
in the Type field. This is optional.<br />
Specify any printer description in the Description field. This is<br />
optional.<br />
Specify the printer location in the Location field.<br />
Type the IP address or DNS name of the printer in the Device<br />
textbox for network-connected printers. On IBM AIX with<br />
jetdirect Queue type, only the DNS name is possible-numeric<br />
IP address is not allowed.
Installing driver over the network 2. Using a network-connected machine 28<br />
7<br />
8<br />
9<br />
10<br />
11<br />
12<br />
Queue type shows the connection as lpd or jetdirect in the<br />
corresponding list box. Additionally, usb type is available on<br />
Sun Solaris OS.<br />
Select Copies to set the number of copies.<br />
Check the Collate option to receive copies already sorted.<br />
Check the Reverse Order option to receive copies in the<br />
reverse order.<br />
Check the Make Default option to set this printer as default.<br />
Click OK to add the printer.
IPv6configuration<br />
10<br />
1<br />
2<br />
3<br />
4<br />
5<br />
<br />
IPv6 is supported properly only in Windows Vista or higher.<br />
Activating IPv6<br />
Press the (Menu) button on the control panel.<br />
Press Network > TCP/IP (IPv6) > IPv6 Activate.<br />
Select On and press OK.<br />
Turn the machine off and turn it on again.<br />
Reinstall your printer driver.<br />
For models that have the touch screen on the control panel,<br />
follow the next procedure:<br />
a Press Setup from the Main screen.<br />
b Press Network > Next > TCP/IP (IPv6).<br />
c Select On.<br />
d Press the home icon ( ) to return to the Standby mode.<br />
11<br />
<br />
Using IPv6<br />
2. Using a network-connected machine<br />
In the IPv6 network environment, follow the next procedure to use<br />
the IPv6 address.<br />
1<br />
2<br />
3<br />
4<br />
5<br />
6<br />
7<br />
Connect your machine to the network with a network cable.<br />
Turn on the machine.<br />
Print a Network Configuration Report that will check IPv6<br />
addresses (see "Printing a network configuration report" on<br />
page 13).<br />
Select Start > Control Panel > Printers and Faxes.<br />
Click Add a printer in the left pane of the Printers and Faxes<br />
windows.<br />
Click Add a network, wireless or Bluetooth printer in the<br />
Add Printer windows.<br />
Follow the instructions in the window.<br />
29
IPv6configuration<br />
12<br />
<br />
If the machine does not work in the network environment,<br />
activate IPv6.<br />
Setting IPv6 addresses<br />
The machine supports the following IPv6 addresses for network<br />
printing and managements.<br />
• Link-local Address: Self-configured local IPv6 address (Address<br />
starts with FE80).<br />
• Stateless Address: Automatically configured IPv6 address by a<br />
network router.<br />
• Stateful Address: IPv6 address configured by a DHCPv6 server.<br />
• <strong>Manual</strong> Address: <strong>Manual</strong>ly configured IPv6 address by a user.<br />
DHCPv6 address configuration (Stateful)<br />
If you have a DHCPv6 server on your network, you can set one of the<br />
following options for default dynamic host configuration.<br />
1<br />
2<br />
Press the (Menu) button on the control panel.<br />
Press Network > TCP/IP (IPv6) > DHCPv6 Config.<br />
3<br />
2. Using a network-connected machine<br />
Press OK to select the required value you want.<br />
• DHCPv6 Addr.: Always use DHCPv6 regardless of router<br />
request.<br />
• DHCPv6 Off: Never use DHCPv6 regardless of router<br />
request.<br />
• Router: Use DHCPv6 only when requested by a router.<br />
For models that have the touch screen on the control panel,<br />
follow the next procedure:<br />
a Press Setup from the Main screen.<br />
b Press Network > Next > TCP/IP (IPv6)> DHCPv6 Config.<br />
c Select the required value you want.<br />
d Press the home icon ( ) to return to the Standby mode.<br />
<strong>Manual</strong> address configuration<br />
1<br />
2<br />
3<br />
Start a web browser, such as Internet Explorer, that supports<br />
IPv6 addressing as a URL.<br />
When the SyncThru Web Service window opens, move the<br />
mouse cursor over the Settings of the top menu bar and then<br />
click Network Settings.<br />
Click TCP/IPv6 on the left pane of the website.<br />
30
IPv6configuration<br />
13<br />
4<br />
5<br />
6<br />
1<br />
2<br />
3<br />
<br />
Select the <strong>Manual</strong> Address check box. Then, the Address/<br />
Prefix text box is activated.<br />
Enter IPv6 address and a prefix length (e.g.,:<br />
3FFE:10:88:194::AAAA/64).<br />
Click the Apply button.<br />
Using SyncThru Web Service<br />
Start a web browser, such as Internet Explorer, that supports<br />
IPv6 addressing as a URL.<br />
Select one of the IPv6 addresses (Link-local Address,<br />
Stateless Address, Stateful Address, <strong>Manual</strong> Address) from<br />
Network Configuration Report (see "Printing a network<br />
configuration report" on page 13).<br />
Enter the IPv6 addresses (e.g.,: http://<br />
[FE80::215:99FF:FE66:7701]).<br />
Address must be enclosed in '[ ]' brackets.<br />
2. Using a network-connected machine<br />
31
Wireless network setup<br />
14<br />
<br />
Make sure your machine supports a wireless network.<br />
Wireless network may not be available depending on the<br />
model.<br />
Getting started<br />
Understanding your network type<br />
Typically, you can only have one connection between your<br />
computer and the machine at a time.<br />
Infrastructure mode<br />
This is an environment generally used for homes and<br />
SOHOs (Small Office/ Home Office). This mode uses<br />
an access point to communicate with the wireless<br />
machine.<br />
Ad hoc mode<br />
This mode does not use an access point. The wireless<br />
computer and wireless machine communicates<br />
directly.<br />
2. Using a network-connected machine<br />
Wireless network name and network key<br />
Wireless networks require higher security, so when an access point is<br />
first set up, a network name (SSID), the type of security used, and a<br />
Network Key are created for the network. Locate this information<br />
before proceeding with the machine installation.<br />
15<br />
<br />
Choosing the installation type<br />
You can install a wireless network from the machine’s control panel<br />
or the computer.<br />
From the control panel<br />
You can configure wireless parameters with the control panel.<br />
• See "Using the WPS" on page 33.<br />
• See "Using the WLAN" on page 37.<br />
From the computer<br />
From the computer, we recommend using a USB cable with the<br />
program provided in the supplied software CD.<br />
32
Wireless network setup 2. Using a network-connected machine 33<br />
See "Setup using Windows" on page 38.<br />
• With a USB cable: You can simply set up a wireless network<br />
using the program on the supplied software CD. Only Windows<br />
and Macintosh operating systems are supported (see "Setup<br />
using Windows" on page 38 or "Setup using Macintosh" on page<br />
45).<br />
You can also install a wireless network in Samsung Easy<br />
Printer Manager (Device Settings) or Printer Settings Utility<br />
with a USB cable after installing the driver (Windows and<br />
Macintosh operating systems are supported).<br />
• With a network cable: You can set up a wireless network using<br />
the SyncThru Web Service program (see "Using a network<br />
cable" on page 51).<br />
16<br />
<br />
Using the WPS<br />
Some models may not support this feature.<br />
If your machine and an access point (or wireless router) support Wi-<br />
Fi Protected Setup (WPS), you can easily configure the wireless<br />
network settings on the control panel without a computer.<br />
If you want to use the wireless network using the<br />
infrastructure mode, make sure that the network cable is<br />
disconnected from the machine. Using the WPS (PBC)<br />
button or entering the PIN from the computer to connect to<br />
the access point (or wireless router) varies depending on the<br />
access point (or wireless router) you are using. Refer to the<br />
user's guide of the access point (or wireless router) you are<br />
using.<br />
Items to prepare<br />
• Check if the access point (or wireless router) supports Wi-Fi<br />
Protected Setup (WPS).<br />
• Check if your machine supports Wi-Fi Protected Setup (WPS).<br />
• Networked computer (PIN mode only)<br />
Choosing your type<br />
The Push Button Configuration (PBC) method allows you to<br />
connect your machine to a wireless network by pressing both the<br />
WPS menu on the control panel of your machine and the WPS (PBC)<br />
button on a Wi-Fi Protected Setup (WPS)-enabled access point (or<br />
wireless router) respectively.
Wireless network setup 2. Using a network-connected machine 34<br />
The Personal Identification Number (PIN) method helps you<br />
connect your machine to a wireless network by entering the<br />
supplied PIN information on a Wi-Fi Protected Setup (WPS)enabled<br />
access point (or wireless router).<br />
To changethe WPS mode , press (Menu) > Network><br />
Wireless >WPS Setting.<br />
For models that have the touch screen on the control panel,<br />
follow the next procedure:<br />
a Press Setup from the Main screen.<br />
b Press Network > Next > Wireless > WPS Setting.<br />
c Select the setup method you want.<br />
Machines with an display (or touch) screen<br />
Connecting in PBC mode (recommended)<br />
1<br />
2<br />
Press (Menu) > Network>Wireless >WPS Setting.<br />
For models that have the touch screen on the control panel,<br />
press Setup > Network > Next > Wireless > WPS Setting.<br />
Press PBC (or Connect via PBC).<br />
3<br />
4<br />
Press OK when the confirmation window appears.<br />
Information window appears showing 2 minutes connection<br />
processing time.<br />
Press the WPS (PBC) button on the access point (or wireless<br />
router).<br />
The messages are displayed on the display screen in the order<br />
below:<br />
a Connecting: The machine is connecting to the access<br />
point (or wireless router).<br />
b Connected: When the machine is successfully connected<br />
to the wireless network, the WPS LED light stays on.<br />
c AP SSID: After completing the wireless network<br />
connection process, the AP’s SSID information appears on<br />
the display.<br />
Connecting in PIN mode<br />
1<br />
2<br />
3<br />
Press (Menu) > Network>Wireless >WPS Setting.<br />
For models that have the touch screen on the control panel,<br />
press Setup > Network > Next > Wireless > WPS Setting.<br />
Press PIN (or Connect via PIN).<br />
Press OK when the confirmation window appears.
Wireless network setup 2. Using a network-connected machine 35<br />
4<br />
The eight-digit PIN appears on the display.<br />
You need to enter the eight-digit PIN within two minutesin<br />
order to link the computer which is connected to the access<br />
point (or wireless router).<br />
The messages are displayed on the display screen in the order<br />
below:<br />
a Connecting: The machine is connecting to the wireless<br />
network.<br />
b Connected: When the machine is successfully connected<br />
to the wireless network, the WPS LED light stays on.<br />
c AP SSID: After completing the wireless network<br />
connection process, the AP’s SSID information is diplayed<br />
on the LCD display.<br />
Machines without an display screen<br />
Connecting in PBC mode (recommended)<br />
1<br />
2<br />
Press and hold the (WPS) button on the control panel for<br />
about 2 - 4 seconds until the status LED blinks quickly.<br />
The machine starts connecting to the wireless network. The<br />
LED blinks slowly for up to two minutes until you press the PBC<br />
button on the access point (or wireless router).<br />
Press the WPS (PBC) button on the access point (or wireless<br />
router).<br />
a The light blinks fast on the WPS LED. The machine is<br />
connecting to the access point (or wireless router).<br />
b When the machine is successfully connected to the<br />
wireless network, the WPS LED light stays on.
Wireless network setup 2. Using a network-connected machine 36<br />
Connecting in PIN mode<br />
1<br />
2<br />
3<br />
The network configuration report, including PIN, must be<br />
printed.<br />
In ready mode, press and hold the (Cancel or Stop/Clear)<br />
button on the control panel for about 5 seconds. You can find<br />
your machine’s PIN number.<br />
Press and hold the (WPS) button on the control panel for<br />
more than 4 seconds until the status LED stays on.<br />
The machine starts connecting to the access point (or wireless<br />
router).<br />
You need to enter the eight-digit PIN within two minutes in<br />
order to link the computer that is connected to the access<br />
point (or wireless router).<br />
The LED blinks slowly for up to two minutes until you enter the<br />
eight-digit PIN.<br />
The WPS LED blinks in the order below:<br />
a The light blinks fast on the WPS LED. The machine is<br />
connecting to the access point (or wireless router).<br />
b When the machine is successfully connected to the<br />
wireless network, the WPS LED light stays on.<br />
Re-connecting to a network<br />
When the wireless function is off, the machine automatically tries to<br />
re-connect to the access point (or wireless router) with the<br />
previously used wireless connection settings and address.<br />
In the following cases, the machine automatically reconnects<br />
to the wireless network:<br />
• The machine is turned off and on again.<br />
• The access point (or wireless router) is turned off and on<br />
again.<br />
Canceling the connection process<br />
To cancel the wireless network connection when the machine is<br />
connecting to the wireless network, press and release the (Cancel<br />
or Stop/Clear) button on the control panel. You need to wait 2<br />
minuites to re-connect to the wireless network.
Wireless network setup 2. Using a network-connected machine 37<br />
Disconnecting from a network<br />
To disconnect the wireless network connection, press the (WPS)<br />
buttonor (Cancel or Stop/Clear) button on the control panel for<br />
more than two seconds.<br />
• When the Wi-Fi network is in idle mode: The machine is<br />
immediately disconnected from the wireless network<br />
• When the Wi-Fi network is being used: While the machine<br />
waits until the current job is finished, the light blinks fast on the<br />
WPS LED. Then, the wireless network connection is automatically<br />
disconnected.<br />
17<br />
<br />
Using the WLAN<br />
Some models may not support this feature.<br />
Before starting, you will need to know the network name (SSID) of<br />
your wireless network and the network key if it is encrypted. This<br />
information was set when the access point (or wireless router) was<br />
installed. If you do not know about your wireless environment,<br />
please ask the person who set up your network.<br />
1<br />
2<br />
3<br />
After completing the wireless network connection, you need<br />
to install a machine driver to print from an application (see<br />
"Installing driver over the network" on page 17).<br />
Press the (Menu) button on the control panel.<br />
Press Network > Wireless > WLAN Settings.<br />
Press the OK to select the setup method you want.<br />
• Wizard (recommended): In this mode the setup is<br />
automatic. Machine will display a list of available network<br />
to choose. After a network is chosen then printer will<br />
prompt for the corresponding security Key.<br />
• Custom: In this mode users can give their own SSID or edit<br />
SSID, choose the security manually and apply the settings.<br />
• For models that have the touch screen on the control<br />
panel, follow the next procedure:<br />
a Press Setup from the Main screen.<br />
b Press Network > Next > Wireless > WLAN Setting.<br />
c Select the setup method you want.<br />
• If your machine is connected to the network, you can set<br />
the WLAN via SyncThru Web Service.
Wireless network setup 2. Using a network-connected machine 38<br />
18<br />
<br />
Setup using Windows<br />
Shortcut to Wireless Setting program without CD: If you<br />
have installed the printer driver once, you can access the<br />
Wireless Setting program without CD. From the Start menu,<br />
select Programs or All Programs > Samsung Printers ><br />
your printer driver name > Wireless Setting Program.<br />
Access point via USB cable<br />
Items to prepare<br />
• Access point<br />
• Network-connected computer<br />
• Software CD that was provided with your machine<br />
• The machine installed with a wireless network interface<br />
• USB cable<br />
Creating the infrastructure network<br />
1<br />
2<br />
Check whether the USB cable is connected to the machine.<br />
Turn on your computer, access point, and machine.<br />
3<br />
4<br />
5<br />
6<br />
Insert the supplied software CD into your CD-ROM drive.<br />
Select the Wireless Setting and Installation option.<br />
• Install Now: If you have already set up the wireless<br />
network, click this button to install the machine’s driver to<br />
use the wireless network machine. If you have not set up<br />
the wireless network, click the Wireless Setting and<br />
Installation button to set up the wireless network before<br />
you click this button.<br />
• Wireless Setting and Installation: Configure the wireless<br />
network settings of your machine with a USB cable then<br />
install the machine driver. This is only for users who have<br />
not set up the wireless connection before.<br />
Read the License Agreement, and select I accept the terms<br />
of the License Agreement. Then, click Next.<br />
The software searches the wireless network.
Wireless network setup 2. Using a network-connected machine 39<br />
7<br />
If the search has failed, you may check if the USB cable is<br />
properly connected between the computer and machine,<br />
and follow the instructions on the window.<br />
After searching, the window shows the wireless network<br />
devices. Select the name (SSID) of the access point you are<br />
using and click Next.<br />
If you cannot find the network name you want to choose, or<br />
if you want to set the wireless configuration manually, click<br />
Advanced Setting.<br />
• Enter the wireless Network Name: Enter the SSID of<br />
access point you want (SSID is case-sensitive).<br />
• Operation Mode: Select Infrastructure.<br />
• Authentication: Select an authentication type.<br />
Open System: Authentication is not used, and encryption<br />
may or may not be used, depending on the need for data<br />
security.<br />
Shared Key: Authentication is used. A device that has a<br />
proper WEP key can access the network.<br />
WPA Personal or WPA2 Personal: Select this option to<br />
authenticate the print server based on WPA Pre-Shared<br />
Key. This uses a shared secret key (generally called Pre-<br />
Shared Key pass phrase) which is manually configured on<br />
the access point and each of its clients.<br />
• Encryption: Select the encryption (None, WEP64,<br />
WEP128, TKIP, AES, TKIP AES).<br />
• Network Key: Enter the encryption network key value.<br />
• Confirm Network Key: Confirm the encryption network<br />
key value.<br />
• WEP Key Index: If you are using WEP Encryption, select<br />
the appropriate WEP Key Index.
Wireless network setup 2. Using a network-connected machine 40<br />
The wireless network security window appears when the<br />
access point has security settings.<br />
The wireless network security window appears. The window<br />
may differ according to its security mode: WEP, or WPA.<br />
• WEP<br />
Select Open System or Shared Key for the authentication<br />
and enter the WEP security key. Click Next.<br />
WEP (Wired Equivalent Privacy) is a security protocol<br />
preventing unauthorized access to your wireless network.<br />
WEP encrypts the data portion of each packet exchanged<br />
on a wireless network using a 64-bit or 128-bit WEP<br />
encryption key.<br />
• WPA<br />
Enter the WPA shared key and click Next.<br />
WPA authorizes and identifies users based on a secret key<br />
that changes automatically at regular intervals. WPA also<br />
uses TKIP (Temporal Key Integrity Protocol) and AES<br />
(Advanced Encryption Standard) for data encryption.<br />
8<br />
The window shows the wireless network settings and checks<br />
if the settings are correct. Click Next.<br />
• For the DHCP method<br />
If the IP address assignment method is DHCP, check if<br />
DHCP is shown in the window. If it shows Static, click<br />
Change TCP/IP to change the assignment method to<br />
DHCP.<br />
• For the Static method<br />
If the IP address assignment method is Static, check if<br />
Static is shown in the window. If it shows DHCP, click<br />
Change TCP/IP to enter the IP address and other network<br />
configuration values for the machine. Before entering the<br />
IP address for the machine, you must know the computer’s<br />
network configuration information. If the computer is set<br />
to DHCP, you must contact the network administrator to<br />
get the static IP address.<br />
For example:<br />
If the computer’s network information is as shown below:<br />
- IP address: 169.254.133.42<br />
- Subnet Mask: 255.255.0.0<br />
Then, the machine’s network information should be as<br />
follows:<br />
- IP address: 169.254.133.43
Wireless network setup 2. Using a network-connected machine 41<br />
9<br />
10<br />
11<br />
12<br />
13<br />
- Subnet Mask: 255.255.0.0 (Use the computer’s subnet<br />
mask.)<br />
- Gateway: 169.254.133.1<br />
When the wireless network setting is completed, disconnect<br />
the USB cable between the computer and machine. Click<br />
Next.<br />
The Wireless Network Setting Complete window appears.<br />
Select Yes if you accept the current settings and continue the<br />
setup procedure.<br />
Select No if you want to return to the beginning screen.<br />
Then, click Next.<br />
Click Next when the Confirm Printer Connection window<br />
appears.<br />
Select the components to be installed. Click Next.<br />
After selecting the components, you can also change the<br />
machine name, set the machine to be shared on the network,<br />
set the machine as the default machine, and change the port<br />
name of each machine. Click Next.<br />
14<br />
15<br />
16<br />
17<br />
After the installation is finished, a window asking you to print<br />
a test page appears. If you want to print a test page, click Print<br />
a test page.<br />
Otherwise, just click Next and go to step 16.<br />
If the test page prints out correctly, click Yes.<br />
If not, click No to reprint it.<br />
To register as a user of the machine in order to receive<br />
information from Samsung, click On-line Registration.<br />
Click Finish.<br />
Ad hoc via USB cable<br />
If you do not have an access point (AP), you may still connect the<br />
machine wirelessly to your computer by setting up an ad-hoc<br />
wireless network by following the simple steps below.<br />
Items to prepare<br />
• Network-connected computer<br />
• Software CD that was provided with your machine<br />
• The machine installed with a wireless network interface<br />
• USB cable
Wireless network setup 2. Using a network-connected machine 42<br />
Creating the ad hoc network in Windows<br />
1<br />
2<br />
3<br />
4<br />
Check whether the USB cable is connected to the machine.<br />
Turn on your computer and the wireless network machine.<br />
Insert the supplied software CD into your CD-ROM drive.<br />
Select the Wireless Setting and Installation option.<br />
• Install Now: If you have set the wireless network, click this<br />
button to install the machine’s driver to use the wireless<br />
network machine. If you have not set the wireless network,<br />
click Wireless Setting and Installation button to set the<br />
wireless network before you click this button.<br />
• Wireless Setting and Installation: Configure the wireless<br />
network settings of your machine’s with a USB cable then<br />
install the machine driver. This only for users who have not<br />
set up the wireless connection before.<br />
5<br />
6<br />
7<br />
Read the License Agreement, and select I accept the terms<br />
of the License Agreement. Then, click Next.<br />
The software searches the wireless network.<br />
If the software has failed to search the network, check if the<br />
USB cable is connected properly between the computer and<br />
machine, and follow the instruction in the window.<br />
After searching the wireless networks, a list of wireless<br />
networks your machine has searched appears.<br />
If you want to use the Samsung default ad hoc setting, select<br />
the last wireless network on the list, Network Name(SSID) is<br />
portthru and Signal is Printer Self Network.<br />
Then, click Next.<br />
If you want to use other ad hoc settings, select another<br />
wireless network from the list.<br />
If you want to change ad hoc settings click the Advanced<br />
Setting button.<br />
• Enter the wireless Network Name: Enter the SSID name<br />
you want (SSID is case-sensitive).<br />
• Operation Mode: Select ad hoc.
Wireless network setup 2. Using a network-connected machine 43<br />
• Channel: Select the channel. (Auto Setting or 2412 MHz<br />
to 2467 MHz).<br />
• Authentication: Select an authentication type.<br />
Open System: Authentication is not used, and encryption<br />
may or may not be used, depending on the need for data<br />
security.<br />
Shared Key: Authentication is used. A device that has a<br />
proper WEP key can access the network.<br />
• Encryption: Select the encryption (None, WEP64,<br />
WEP128).<br />
• Network Key: Enter the encryption network key value.<br />
• Confirm Network Key: Confirm the encryption network<br />
key value.<br />
• WEP Key Index: If you are using WEP Encryption, select<br />
the appropriate WEP Key Index.<br />
The wireless network security window appears when the ad<br />
hoc network has security setting.<br />
The wireless network security window appears. Select Open<br />
System or Shared Key for the authentication and click Next.<br />
• WEP (Wired Equivalent Privacy) is a security protocol<br />
preventing unauthorized access to your wireless network.<br />
WEP encrypts the data portion of each packet exchanged<br />
on a wireless network using a 64-bit or 128-bit WEP<br />
encryption key.<br />
8<br />
The window showing the wireless network setting appears.<br />
Check the settings and click Next.
Wireless network setup 2. Using a network-connected machine 44<br />
Before entering the IP address for the machine, you must<br />
know the computer’s network configuration information. If<br />
the computer’s network configuration is set to DHCP, the<br />
wireless network setting should also be DHCP. Likewise, if<br />
the computer’s network configuration is set to Static, the<br />
wireless network setting should also be Static.<br />
If your computer is set to DHCP and you want to use the<br />
Static wireless network setting, you must contact the<br />
network administrator to get the static IP address.<br />
• For the DHCP method<br />
If the IP address assignment method is DHCP, check if<br />
DHCP is shown in the Wireless Network Setting Confirm<br />
window. If it shows Static, click Change TCP/IP to change<br />
the assignment method to Receive IP address<br />
automatically (DHCP).<br />
• For the Static method<br />
If the IP address assignment method is Static, check if<br />
Static is shown in the Wireless Network Setting Confirm<br />
window. If it shows DHCP, click Change TCP/IP to enter<br />
the IP address and other network configuration values for<br />
the machine.<br />
For example:<br />
If the computer’s network information is as shown follows:<br />
- IP address: 169.254.133.42<br />
- Subnet Mask: 255.255.0.0<br />
Then, the machine’s network information should be as<br />
below:<br />
9<br />
10<br />
11<br />
- IP address: 169.254.133.43<br />
- Subnet Mask: 255.255.0.0 (Use the computer’s subnet<br />
mask.)<br />
- Gateway: 169.254.133.1<br />
When the wireless network settings are completed,<br />
disconnect the USB cable between the computer and<br />
machine. Click Next.<br />
If the Change PC Network Setting window appears, follow<br />
the steps in the window.<br />
Click Next if you are finished with the computer’s wireless<br />
network settings.<br />
If you set the computer’s wireless network on DHCP, it will<br />
take several minutes to receive the IP address.<br />
The Wireless Network Setting Complete window appears.<br />
Select Yes if you accept the current settings and continue the<br />
setup procedure.<br />
Select No if you want to return to the beginning screen.<br />
Then, click Next.<br />
Click Next when the Confirm Printer Connection window<br />
appears.
Wireless network setup 2. Using a network-connected machine 45<br />
12<br />
13<br />
14<br />
15<br />
16<br />
17<br />
Select the components to be installed. Click Next.<br />
After selecting the components, you can also change the<br />
machine name, set the machine to be shared on the network,<br />
set the machine as the default machine, and change the port<br />
name of each machine. Click Next.<br />
After the installation is finished, a window asking you to print<br />
a test page appears. If you want to print a test page, click Print<br />
a test page.<br />
Otherwise, just click Next and go to step 16.<br />
If the test page prints out correctly, click Yes.<br />
If not, click No to reprint it.<br />
To register as a user of the machine in order to receive<br />
information from Samsung, click On-line Registration.<br />
Click Finish.<br />
19<br />
<br />
Setup using Macintosh<br />
Items to prepare<br />
• Access point<br />
• Network-connected computer<br />
• Software CD that was provided with your machine<br />
• The machine installed with a wireless network interface<br />
• USB cable<br />
Access point via USB cable<br />
1<br />
2<br />
3<br />
4<br />
5<br />
6<br />
Check whether the USB cable is connected to the machine.<br />
Turn on your computer, access point, and machine.<br />
Insert the supplied software CD into your CD-ROM drive.<br />
Double-click the CD-ROM icon that appears on your<br />
Macintosh desktop.<br />
Double-click the MAC_Installer folder.<br />
Double-click the Installer OS X icon.
Wireless network setup 2. Using a network-connected machine 46<br />
7<br />
8<br />
9<br />
10<br />
11<br />
12<br />
13<br />
14<br />
Enter the password and click OK.<br />
Click Continue.<br />
Read the license agreement and click Continue.<br />
Click Agree to agree to the license agreement.<br />
Click Continue.<br />
Select Easy Install and click Install. Easy Install is<br />
recommended for most users. All components necessary for<br />
machine operations will be installed.<br />
If you select Custom Install, you can choose which individual<br />
operations will be installed.<br />
Select the Wireless Setting and Installation option.<br />
The software searches the wireless network.<br />
If the search has failed, you may check if the USB cable is<br />
connected between the computer and machine properly,<br />
and follow the instructions in the window.<br />
15<br />
After searching, the window shows the wireless network<br />
devices. Select the name (SSID) of the access point you are<br />
using and click Next.<br />
When you set the wireless configuration manually, click<br />
Advanced Setting.<br />
• Enter the wireless Network Name: Enter the SSID of the<br />
access point you want with (SSID is case-sensitive).<br />
• Operation Mode: Select Infrastructure.<br />
• Authentication: Select an authentication type.<br />
Open System: Authentication is not used, and encryption<br />
may or may not be used, depending on the need for data<br />
security.<br />
Shared Key: Authentication is used. A device that has a<br />
proper WEP key can access the network.<br />
WPA Personal or WPA2 Personal: Select this option to<br />
authenticate the print server based on WPA Pre-Shared<br />
Key. This uses a shared secret key (generally called Pre-<br />
Shared Key pass phrase) that is manually configured on<br />
the access point and each of its clients.<br />
• Encryption: Select the encryption. (None, WEP64,<br />
WEP128, TKIP, AES, TKIP, AES)<br />
• Network Key: Enter the encryption network key value.<br />
• Confirm Network Key: Confirm the encryption network<br />
key value.<br />
• WEP Key Index: If you are using WEP Encryption, select<br />
the appropriate WEP Key Index.
Wireless network setup 2. Using a network-connected machine 47<br />
The wireless network security window appears when the<br />
access point has security setting.<br />
The wireless network security window appears. The window<br />
may differ according to its security mode: WEP or WPA.<br />
• WEP<br />
Select Open System or Shared Key for the authentication<br />
and enter the WEP security key. Click Next.<br />
WEP (Wired Equivalent Privacy) is a security protocol<br />
preventing unauthorized access to your wireless network.<br />
WEP encrypts the data portion of each packet exchanged<br />
on a wireless network using a 64-bit or 128-bit WEP<br />
encryption key.<br />
• WPA<br />
Enter the WPA shared key and click Next.<br />
WPA authorizes and identifies users based on a secret key<br />
that changes automatically at regular intervals. WPA also<br />
uses TKIP (Temporal Key Integrity Protocol) and AES<br />
(Advanced Encryption Standard) for data encryption.<br />
16<br />
The window shows the wireless network settings and check if<br />
settings are right. Click Next.<br />
• For the DHCP method<br />
If the IP address assignment method is DHCP, check if<br />
DHCP is shown in the window. If it shows Static, click<br />
Change TCP/IP to change the assignment method to<br />
DHCP.<br />
• For the Static method<br />
If the IP address assignment method is Static, check if<br />
Static is shown in the window. If it shows DHCP, click<br />
Change TCP/IP to enter the IP address and other network<br />
configuration values for the machine. Before entering the<br />
IP address for the machine, you must know the computer’s<br />
network configuration information. If the computer is set<br />
to DHCP, you must contact the network administrator to<br />
get the static IP address.<br />
For example:<br />
If the computer’s network information is as shown follows:<br />
- IP address: 169.254.133.42<br />
- Subnet Mask: 255.255.0.0<br />
Then, the machine’s network information should be as<br />
follows:<br />
- IP address: 169.254.133.43
Wireless network setup 2. Using a network-connected machine 48<br />
17<br />
18<br />
19<br />
- Subnet Mask: 255.255.0.0 (Use the computer’s subnet<br />
mask.)<br />
- Gateway: 169.254.133.1<br />
The wireless network connects according to the network<br />
configuration.<br />
When the wireless network settings are completed,<br />
disconnect the USB cable between the computer and<br />
machine.<br />
Follow the instructions on the screen to complete the<br />
installation. After the installation is finished, click Quit or<br />
Restart.<br />
Ad hoc via USB cable<br />
If you do not have an access point (AP), you may still connect the<br />
machine wirelessly to your computer by setting up an ad hoc<br />
wireless network by following these simple directions.<br />
Items to prepare<br />
• Network-connected computer<br />
• Software CD that provided with your machine<br />
• The machine installed with a wireless network interface<br />
• USB cable<br />
Creating the ad hoc network in Macintosh<br />
1<br />
2<br />
3<br />
4<br />
5<br />
6<br />
7<br />
8<br />
9<br />
10<br />
Check whether the USB cable is connected to the machine.<br />
Turn on your computer and machine.<br />
Insert the supplied software CD into your CD-ROM drive.<br />
Double-click the CD-ROM icon that appears on your<br />
Macintosh desktop.<br />
Double-click the MAC_Installer folder.<br />
Double-click the Installer OS X icon.<br />
Enter the password and click OK.<br />
Click Continue.<br />
Read the license agreement and click Continue.<br />
Click Agree to agree to the license agreement.
Wireless network setup 2. Using a network-connected machine 49<br />
11<br />
12<br />
13<br />
14<br />
Select Easy Install and click Install. Easy Install is<br />
recommended for most users. All components necessary for<br />
machine operations will be installed.<br />
If you select Custom Install, you can choose individual<br />
operations will be installed.<br />
Click Wireless Setting and Installation.<br />
The software searches the wireless network devices.<br />
If the search has failed, check if the USB cable is connected<br />
between the computer and machine properly, and follow<br />
the instructions in the window.<br />
After searching the wireless networks, a list of wireless<br />
networks your machine has searched appears.<br />
If you want to use the Samsung default ad hoc setting, select<br />
the last wireless network on the list, which Network<br />
Name(SSID) is portthru and Signal is Printer Self Network.<br />
Then, click Next.<br />
If you want to use other ad hoc settings, select another<br />
wireless network from the list.<br />
If you want to change ad hoc settings click the Advanced<br />
Setting button.<br />
• Enter the wireless Network Name: Enter the SSID name<br />
you want (SSID is case-sensitive).<br />
• Operation Mode: Select ad hoc.<br />
• Channel: Select the channel (Auto Setting or 2412 MHz<br />
to 2467 MHz).<br />
• Authentication: Select an authentication type.<br />
Open System: Authentication is not used, and encryption<br />
may or may not be used, depending on the need for data<br />
security.<br />
Shared Key: Authentication is used. A device that has a<br />
proper WEP key can access the network.<br />
• Encryption: Select the encryption (None, WEP64,<br />
WEP128).<br />
• Network Key: Enter the encryption network key value.<br />
• Confirm Network Key: Confirm the encryption network<br />
key value.<br />
• WEP Key Index: If you are using WEP Encryption, select<br />
the appropriate WEP Key Index.
Wireless network setup 2. Using a network-connected machine 50<br />
15<br />
The wireless network security window appears when the ad<br />
hoc network has security setting.<br />
The wireless network security window appears. Select Open<br />
System or Shared Key for the authentication and click Next.<br />
• WEP (Wired Equivalent Privacy) is a security protocol<br />
preventing unauthorized access to your wireless network.<br />
WEP encrypts the data portion of each packet exchanged<br />
on a wireless network using a 64-bit or 128-bit WEP<br />
encryption key.<br />
The window showing the wireless network settings appears.<br />
Check the settings and click Next.
Wireless network setup 2. Using a network-connected machine 51<br />
Before entering the IP address for the machine, you must<br />
know the computer’s network configuration information. If<br />
the computer’s network configuration is set to DHCP, the<br />
wireless network setting should also be DHCP. Likewise, if<br />
the computer’s network configuration is set to Static, the<br />
wireless network setting should also be Static.<br />
If your computer is set to DHCP and you want to use Static<br />
wireless network setting, you must contact the network<br />
administrator to get the static IP address.<br />
• For the DHCP method<br />
If the IP address assignment method is DHCP, check if<br />
DHCP is shown in the Wireless Network Setting Confirm<br />
window. If it shows Static, click Change TCP/IP to change<br />
the assignment method to Receive IP address<br />
automatically (DHCP).<br />
• For the Static method<br />
If the IP address assignment method is Static, check if<br />
Static is shown in the Wireless Network Setting Confirm<br />
window. If it shows DHCP, click Change TCP/IP to enter<br />
the IP address and other network configuration values for<br />
the machine.<br />
For example:<br />
If the computer’s network information is as shown follows:<br />
- IP address: 169.254.133.42<br />
- Subnet Mask: 255.255.0.0<br />
Then, the machine’s network information should be as<br />
below:<br />
16<br />
17<br />
18<br />
20<br />
<br />
- IP address: 169.254.133.43<br />
- Subnet Mask: 255.255.0.0 (Use the computer’s subnet<br />
mask.)<br />
- Gateway: 169.254.133.1<br />
The wireless network connects according to the network<br />
configuration.<br />
When the wireless network setting is completed, disconnect<br />
the USB cable between the computer and machine.<br />
Follow the instructions on the screen to complete the<br />
installation. After the installation is finished, click Quit or<br />
Restart.<br />
Using a network cable<br />
Your machine is a network compatible machine. To enable your<br />
machine to work with your network, you will need to perform some<br />
configuration procedures.
Wireless network setup 2. Using a network-connected machine 52<br />
• After completing the wireless network connection, you<br />
need to install a machine driver to print from an<br />
application (See "Installing driver over the network" on<br />
page 17).<br />
• See your network administrator, or the person that set up<br />
your wireless network, for information about your<br />
network configuration.<br />
Items to prepare<br />
• Access point<br />
• Network-connected computer<br />
• Software CD that was provided with your machine<br />
• The machine installed with a wireless network interface<br />
• Network cable<br />
Printing a network configuration report<br />
You can identify the network settings of your machine by printing a<br />
network configuration report.<br />
See "Printing a network configuration report" on page 13.<br />
IP setting using SetIP Program (Windows)<br />
This program is used to manually set the network IP address of your<br />
machine using its MAC address to communicate with the machine.<br />
The MAC address is the hardware serial number of the network<br />
interface and can be found in the Network Configuration Report.<br />
See "Setting IP address" on page 13.<br />
Configuring the machine’s wireless network<br />
Before starting you will need to know the network name (SSID) of<br />
your wireless network and the network key if it is encrypted. This<br />
information was set when the access point (or wireless router) was<br />
installed. If you do not know about your wireless environment,<br />
please ask the person who set up your network.<br />
To configure wireless parameters, you can use SyncThru Web<br />
Service.<br />
Using SyncThru Web Service<br />
Before starting wireless parameter configuration, check the cable<br />
connection status.
Wireless network setup 2. Using a network-connected machine 53<br />
1<br />
2<br />
3<br />
4<br />
5<br />
6<br />
Check whether or not the network cable is connected to the<br />
machine. If not, connect the machine with a standard network<br />
cable.<br />
Start a web browser such as Internet Explorer, Safari or Firefox<br />
and enter your machine’s new IP address in the browser<br />
window.<br />
For example,<br />
Click Login on the upper right of the SyncThru Web Service<br />
website.<br />
Type in the ID and Password then click Login.<br />
• ID: admin<br />
• Password: sec00000<br />
When the SyncThru Web Service window opens, click<br />
Network Settings.<br />
Click Wireless > Wizard.<br />
7<br />
Wizard will help you setup the wireless network<br />
configuration. However, if you want to set the wireless<br />
network directly, select Custom.<br />
Select the one Network Name(SSID) in the list.<br />
• SSID: SSID (Service Set Identifier) is a name that identifies a<br />
wireless network, access points, and wireless devices<br />
attempting to connect to a specific wireless network must<br />
use the same SSID. The SSID is case-sensitive.<br />
• Operation Mode: Operation Mode refers to the type of<br />
wireless connections (See "Wireless network name and<br />
network key" on page 32).<br />
- Ad-hoc: Allows wireless devices to communicate<br />
directly with each other in a peer-to-peer environment.<br />
- Infrastructure: Allows wireless devices to<br />
communicate with each other through an access point.<br />
If your network’s Operation Mode is Infrastructure, select<br />
the SSID of the access point. If the Operation Mode is Adhoc,<br />
select the machine’s SSID. Note that “portthru” is the<br />
default SSID of your machine.
Wireless network setup 2. Using a network-connected machine 54<br />
21<br />
8<br />
9<br />
1<br />
2<br />
<br />
Click Next.<br />
If the wireless security setting window appears, enter the<br />
registered password (network key) and click Next.<br />
The confirmation window appears, please check your wireless<br />
setup. If the setup is right, click Apply.<br />
Disconnect the network cable (standard or network). Your<br />
machine should then start communicating wirelessly with<br />
the network. In case of Ad-hoc mode, you can use a wireless<br />
LAN and wired LAN simultaneously.<br />
Turning the Wi-Fi network on/off<br />
Check whether the network cable is connected to the<br />
machine. If not, connect the machine with a standard network<br />
cable.<br />
Start a web browser such as Internet Explorer, Safari or Firefox<br />
and enter your machine’s new IP address in the browser<br />
window.<br />
For example,<br />
22<br />
3<br />
4<br />
5<br />
6<br />
<br />
Click Login on the upper right of the SyncThru Web Service<br />
website.<br />
Type in the ID and Password then click Login.<br />
• ID: admin<br />
• Password: sec00000<br />
When the SyncThru Web Service window opens, click<br />
Network Settings.<br />
Click Wireless > Custom.<br />
You can also turn the Wi-Fi network on/off.<br />
Troubleshooting<br />
Problems during setup or driver installation<br />
Printers Not Found<br />
• Your machine may not be turned on. Turn on your computer and<br />
the machine.<br />
• USB cable is not connected between your computer and<br />
machine. Connect machine to your computer using the USB<br />
cable.
Wireless network setup 2. Using a network-connected machine 55<br />
• The machine does not support a wireless network. Check the<br />
machine's user's guide included on the software CD supplied<br />
with your machine and prepare a wireless network machine.<br />
Connecting Failure - Not Found SSID<br />
• The machine is unable to search the network name (SSID) you<br />
have selected or entered. Check the network name (SSID) on your<br />
access point and try connecting again.<br />
• Your access point is not turned on. Turn on your access point.<br />
Connecting Failure - Invalid Security<br />
• You configured security incorrectly. Check the configured<br />
security on your access point and machine.<br />
Connecting Failure - General Connection Error<br />
• Your computer is not receiving a signal from your machine.<br />
Check the USB cable and your machine’s power.<br />
Connecting Failure - Connected Wired Network<br />
• Your machine is connected with a wired network cable. Remove<br />
the wired network cable from your machine.<br />
PC Connection Error<br />
• The configured network address is unable to connect between<br />
your computer and machine.<br />
- For a DHCP network environment<br />
The receives the IP address automatically (DHCP) when<br />
computer is configured to DHCP.<br />
- For a Static network environment<br />
The machine uses the static address when the computer is<br />
configured to static address.<br />
For example:<br />
If the computer’s network information is as shown below:<br />
IP address: 169.254.133.42
Wireless network setup 2. Using a network-connected machine 56<br />
Subnet Mask: 255.255.0.0<br />
Then, the machine’s network information should be as below:<br />
IP address: 169.254.133.43<br />
Subnet Mask: 255.255.0.0 (Use the computer’s subnet<br />
mask.)<br />
Gateway: 169.254.133.1<br />
Other problems<br />
If problems occur while using the machine on a network, check the<br />
following:<br />
For information on the access point (or wireless router), refer<br />
to its own user's guide.<br />
• Your computer, access point (or wireless router), or machine may<br />
not be turned on.<br />
• Check the wireless reception around the machine. If the router is<br />
far from the machine or there are obstacles such as walls in its<br />
path, you might have difficulty receiving the signal.<br />
• Cycle the power for the access point (or wireless router), machine,<br />
and computer. Sometimes cycling the power can recover<br />
network communication.<br />
• Check whether firewall software (V3 or Norton and/or other virus<br />
software) is blocking the communication.<br />
If the computer and the machine are connected on the same<br />
network and it cannot be found when searching, firewall<br />
software might be blocking the communication. Refer to the<br />
user's guide for the software to turn it off and try searching for the<br />
machine again.<br />
• Check whether the machine's IP address is allocated correctly.<br />
You can check the IP address by printing the network<br />
configuration report.<br />
• Check whether the access point (or wireless router) has a<br />
configured security (password). If it has a password, refer to the<br />
access point (or wireless router) administrator.<br />
• Check the machine's IP address. Reinstall the machine driver and<br />
change the settings to connect to the machine on the network.<br />
Due to the characteristics of DHCP, the allocated IP address could<br />
change if the machine is not used for a long time or if the access<br />
point has been reset.<br />
• Check the wireless environment. You might not be able to<br />
connect to the network in the infrastructure environment where<br />
you need to type in a user's information before connecting to<br />
access point (or wireless router).<br />
• This machine only supports IEEE 802.11 b/g/n and Wi-Fi. Other<br />
wireless communication types (e.g., Bluetooth) are not<br />
supported.
Wireless network setup 2. Using a network-connected machine 57<br />
• When using the ad hoc mode, in operating systems such as<br />
Windows Vista, you might need to set the wireless connection<br />
setting every time you use the wireless machine.<br />
• You cannot use Infrastructure mode and Ad hoc mode at the<br />
same time for Samsung wireless network machines.<br />
• The machine is within the range of the wireless network.<br />
• The machine is located away from obstacles that could block the<br />
wireless signal.<br />
Remove any large metal objects between the access point (or<br />
wireless router) and the machine.<br />
Make sure the machine and wireless access point (or wireless<br />
router) are not separated by poles, walls, or support columns<br />
containing metal or concrete.<br />
• The machine is located away from other electronic devices that<br />
may interfere with the wireless signal.<br />
Many devices can interfere with the wireless signal, including a<br />
microwave oven and some Bluetooth devices.
3. Useful setting menus<br />
This chapter explains how to browse the current status of your machine, and the<br />
method of setting for advanced machine setup.<br />
• Information 59<br />
• Layout 60<br />
• Paper 61<br />
• Graphic 62<br />
• System setup 63<br />
• Emulation 66<br />
• Network 67<br />
• Admin setup 68<br />
• Eco 69<br />
• Job Status 70<br />
<br />
The control panel provides access to various menus to set up the<br />
machine or use the machine’s functions.<br />
• Some menus may not appear on the display depending on options or<br />
models. If so, it is not applicable to your machine.<br />
• For models that do not have the display screen on the control panel,<br />
this feature is not applicable.<br />
• Some menu names may differ from your machine depending on its<br />
options or the models.
Information<br />
Item Description<br />
Menu Map(Help<br />
List)<br />
Configuration<br />
Prints the menu map which shows the layout<br />
and current settings of this machine.<br />
Prints a report on the machine's overall<br />
configuration.<br />
Supplies Info. Prints supplies’ information page.<br />
Demo Page<br />
Prints the demo page to check whether your<br />
machine is printing properly or not.<br />
PCL Font Prints the PCL font list.<br />
PS Font Prints the PS font list.<br />
EPSON Font Prints the EPSON font list.<br />
KSC5843 Font Prints the KS font list.<br />
KSC5895 Prints the KS5895 font list.<br />
KSSM Font Prints the KSSM font list.<br />
Stored Job<br />
Usage Counter<br />
Prints jobs currently stored in the optional<br />
memory or on a mass storage device.<br />
Prints a usage page. The usage page contains<br />
the total number of pages printed.<br />
Completed Job Prints list of completed jobs.<br />
Item Description<br />
Accounting Report<br />
Font List Prints the font lists.<br />
3. Useful setting menus<br />
This is used only available when Job<br />
Accounting is enabled from the SyncThru<br />
Web Admin Service. You can print a report of<br />
printout counts for each user.<br />
Job Reports Prints the job reports.<br />
59
Layout<br />
Orientation<br />
Item Description<br />
Common Margin<br />
MP Tray<br />
Tray X<br />
Selects the direction in which information is<br />
printed on a page.<br />
• Simplex: Sets the margin for one-sided<br />
printing.<br />
• Duplex: Sets the margin for double-sided<br />
printing.<br />
• Binding: When printing on both sides of the<br />
paper, side A's margin closest to the binding<br />
will be the same as side B's margin closest to<br />
the binding. Likewise, the sides' margins<br />
farthest from the binding will be the same.<br />
Sets the paper margins in multi-purpose tray.<br />
• Simplex: Sets the margin for one-sided<br />
printing.<br />
• Duplex: Sets the margins for double-sided<br />
printing.<br />
Sets the paper margins for the paper trays.<br />
• Simplex: Sets the margin for one-sided<br />
printing.<br />
• Duplex: Sets the margins for double-sided<br />
printing.<br />
Emulation<br />
Margin<br />
Duplex<br />
Item Description<br />
Landscape<br />
Stapling Position<br />
3. Useful setting menus<br />
60<br />
Sets the paper margins for emulation print page.<br />
• Top Margin: Sets the top margin, from 0.0 to<br />
250 mm.<br />
• Left Margin: Sets the left margin, from 0.0 to<br />
164 mm.<br />
To print on both sides of the paper, choose the<br />
binding edge.<br />
• Off: Disables this option.<br />
• Long Edge: This binding is the conventional<br />
layout used in bookbinding.<br />
• Short Edge: This binding is the conventional<br />
layout used in calendars.<br />
Selects the location of the staple.
Paper<br />
Item Description<br />
Copies Selects the number of copies.<br />
MP Tray /<br />
[Tray]<br />
• Paper Size: Selects the default paper size.<br />
• Paper Type: Selects the paper type currently<br />
loaded in the tray.<br />
Paper Source Sets the default paper tray to use.<br />
Auto Tray Switch<br />
Tray Confirm<br />
When you select any other value except Auto<br />
from Paper Source and the selected tray is<br />
empty, you can set the machine to automatically<br />
print from other trays, only when like paper is<br />
asked for.<br />
If you select Auto from Paper Source,<br />
this message does not appear.<br />
Activates the tray confirmation message. If you<br />
open and close a tray, a window asking you<br />
whether to set the paper size and type for the<br />
tray just opened appears.<br />
3. Useful setting menus<br />
61
Graphic<br />
Resolution<br />
Item Description<br />
Specifies the number of dots printed per inch<br />
(dpi). The higher the setting, the sharper printed<br />
characters and graphics.<br />
Clear Text Prints text darker than on a normal document.<br />
Darkness<br />
Lightens or darkens the print on the page. The<br />
Normal setting usually produces the best result.<br />
Use the Light toner density setting to save toner.<br />
3. Useful setting menus<br />
62
System setup<br />
Item Description<br />
Date & Time Sets the date and time.<br />
Clock Mode<br />
Form Menu<br />
Select Form<br />
Spooling<br />
Language<br />
Default Paper<br />
Size<br />
Selects the format for displaying time between<br />
12 hr and 24 hr.<br />
• Off: Prints in normal mode.<br />
• Single Form: Prints all page using the first<br />
form.<br />
• Double Form: Prints the front page using the<br />
first form and the back page using the second<br />
form.<br />
Form overlay is images stored on the printer’s<br />
mass storage device as a special file format that<br />
can be printed in layers on any document.<br />
When On, a partition on the drive is used to assist<br />
in spooling print jobs from the mass storage<br />
device queue.<br />
Sets the language of the text that appears on the<br />
control panel display.<br />
You can set the default paper size to use.<br />
Power Save<br />
Wakeup Event<br />
Auto Continue<br />
Altitude<br />
Adjustment<br />
Item Description<br />
3. Useful setting menus<br />
Sets how long the machine waits before going to<br />
power save mode.<br />
When the machine does not receive data for an<br />
extended period of time, power consumption is<br />
automatically lowered.<br />
You can set the condition to wake up from<br />
power-save mode. Set the item on.<br />
• ButtonPress: When you press any button<br />
except power button, the machine wake up<br />
from the power save mode.<br />
• Printer: When you open or close the paper<br />
tray, the machine wake up from the power<br />
save mode.<br />
Determine whether or not the machine<br />
continues printing when it detects the paper<br />
does not match the paper settings.<br />
• Off: If a paper mismatch occurs, the machine<br />
waits until you insert the correct paper.<br />
• On: If a paper mismatch occurs, an error<br />
message will display. The machine waits for<br />
about 30 second, then automatically clear the<br />
message and continue printing.<br />
Optimize print quality according to the<br />
machine’s altitude.<br />
63
System setup<br />
Auto CR<br />
Job Timeout<br />
Multi-Bin<br />
Item Description<br />
Allows you to append the required carriage<br />
return to each line feed, which is useful for Unix<br />
or DOS users.<br />
When there is no input for a certain period of<br />
time, the machine cancels the current job. You<br />
can set the amount of time the machine will wait<br />
before canceling the job.<br />
• Mode: Selects the mult-bin mode you want to<br />
use.<br />
• Default Bin: Selects the bin to use as a default.<br />
Item Description<br />
Maintenance<br />
Import Setting<br />
3. Useful setting menus<br />
• Clean Drum: Cleans the OPC drum of the<br />
cartridge by printing a sheet.<br />
• Clean Fuser: Cleans the fuser by printing a<br />
sheet.<br />
• CLR Empty Msg.: This option appears only<br />
when toner cartridge is empty.<br />
• Supplies Info. (Supplies Information):<br />
Allows you to check how many pages are<br />
printed and how much toner is left in the<br />
cartridge.<br />
• TonerLow Alert: If toner in the cartridge has<br />
run out, a message informing the user to<br />
change the toner cartridge appears. You can<br />
set the option for this message to appear or<br />
not.<br />
• Paper Stacking: If you use a machine in a<br />
humid area, or you are using the damp print<br />
media caused by a high humidity, the printouts<br />
on the output tray may be curled and<br />
may not be stacked properly. In this case, you<br />
can set the machine to use this function to let<br />
print-outs stacked firmly. But, using this<br />
function will make the print speed slow.<br />
Imports data stored on a USB memory stick to<br />
the machine.<br />
64
System setup<br />
Export Setting<br />
Toner Save<br />
Quiet Mode<br />
Item Description<br />
Eco Settings<br />
Exports data stored on a USB memory stick to the<br />
machine.<br />
Activating this mode extends the life of your<br />
toner cartridge and reduces your cost per page<br />
beyond what one would experience in the<br />
normal mode, but it reduces print quality.<br />
You can reduce the printing noise by turning this<br />
menu on. However, the printing speed and<br />
quality may be declined.<br />
Allows you to save print resources and enables<br />
eco-friendly printing.<br />
• Default Mode: Select whether to turn the Eco<br />
mode on or off.<br />
Onforce: Sets the Eco mode on. If a<br />
user wants to turn the Eco mode off,<br />
the user needs to enter the password.<br />
• Change Template: Selects the eco template<br />
set from the SyncThru Web Service.<br />
Clear Setting Restores the machine’s factory default settings.<br />
3. Useful setting menus<br />
65
Emulation<br />
Item Description<br />
Emulation Type<br />
Setup<br />
The machine language defines how the<br />
computer communicates with the machine.<br />
Sets the detailed settings for the selected<br />
emulation type.<br />
3. Useful setting menus<br />
66
Network<br />
Option Description<br />
TCP/IP (IPv4)<br />
TCP/IP (IPv6)<br />
Selects the appropriate protocol and configure<br />
parameters to use the network environment.<br />
There are lots of parameters to be set.<br />
If you are not sure, leave as is, or<br />
consult the network administrator.<br />
Selects this option to use the network<br />
environment through IPv6 (see "IPv6<br />
configuration" on page 29).<br />
Ethernet Speed Configure the network transmission speed.<br />
802.1x<br />
You can selects the user authentication for<br />
network communication. For detailed<br />
information consult the network administrator.<br />
Wireless Selects this option to use the wireless network.<br />
Clear Setting<br />
Network<br />
Configuration<br />
Reverts the network settings to the default<br />
values.<br />
This list shows information on your machine’s<br />
network connection and configuration.<br />
Net. Activate You can sets whether to use Ethernet on or off.<br />
Option Description<br />
Http Activate<br />
3. Useful setting menus<br />
You can sets whether to use SyncThru Web<br />
Service or not.<br />
67
Admin setup<br />
Item Description<br />
Password Sets the password to access the AdminSetup menu.<br />
Protect Select On to use this option and enter the password<br />
Change Changes the machine’s password for accessing the<br />
Password Admin Setup.<br />
Maintenance<br />
3. Useful setting menus<br />
Item Description<br />
• Clean Fuser: Cleans the fuser by printing a sheet.<br />
The printed sheet has toner debris on it.<br />
• CLR Empty Msg.: Prevents the TonerLow Alert<br />
message from appearing on the display.<br />
68<br />
• Supplies Info.: Allows you to check how many<br />
pages are printed and how much toner is left in the<br />
cartridge.<br />
• TonerLow Alert: If toner in the cartridge has run<br />
out, a message informing the user to change the<br />
toner cartridge appears. You can set the option for<br />
this message to appear or not.<br />
• Ram Disk: Enables/disables RAM disk to manage<br />
jobs. Depending on the installed optional memory<br />
size, you can set the RAM disk size to between 32<br />
and 64 MB. This option does not appear if you have<br />
installed mass storage device.<br />
• Density Calibration: You can manually calibrate<br />
the toner density of machine for the best possible<br />
print quality.<br />
• Density Sensing: Automatically calculates the<br />
reduced or worn out supplies like toner or machine<br />
parts and uses this information to adjust the<br />
density.<br />
• Density Control: The machine automatically<br />
calibrates the toner density of machine for the best<br />
possible print quality. If you select Off, the machine<br />
is calibrated by the factory default toner density.
Eco<br />
Item Description<br />
Eco-On You can change on/off option.<br />
Settings<br />
Preview Simulator<br />
View current eco-related settings and change<br />
default settings.<br />
View estimated summary if you use current<br />
eco settings.<br />
3. Useful setting menus<br />
69
Job Status<br />
Item Description<br />
Current Job Shows the list of jobs in progress and pending.<br />
Secure Job Shows the job list of secure.<br />
Stored Job Shows the job list of stored.<br />
Completed Job Shows the list of completed jobs.<br />
3. Useful setting menus<br />
70
4. Special features<br />
This chapter explains special printing features.<br />
• Altitude adjustment 72<br />
• Changing the font setting 73<br />
• Changing the default print settings 74<br />
• Setting your machine as a default machine 75<br />
• Using advanced print features 76<br />
• Using Direct Printing Utility (Windows only) 84<br />
• Using memory/mass storage device features 86<br />
• Macintosh printing 87<br />
• Linux printing 89<br />
• Unix printing 92<br />
The procedures in this chapter are mainly based on Windows 7.
Altitude adjustment<br />
Print quality is affected by atmospheric pressure, which is<br />
determined by the height of the machine above sea level. The<br />
following information will guide you on how to set your machine for<br />
the best print quality.<br />
Before you set the altitude value, determine the altitude where you<br />
are.<br />
4,000 m<br />
(13,123 ft)<br />
3,000 m<br />
(9,842 ft)<br />
2,000 m<br />
(6,561 ft)<br />
1,000 m<br />
(3,280 ft)<br />
0<br />
1 High 3<br />
2 High 2<br />
3 High 1<br />
4 Normal<br />
• For Windows user, see "Device Settings" on page 102.<br />
• For Macintosh, Linux, or Unix OS user, see "Using Smart Panel<br />
(Macintosh and Linux only)" on page 104.<br />
• If your machine is connected to the network, you can set<br />
the altitude via SyncThru Web Service.<br />
• You can also set the altitude in System Setup (or System)<br />
option on the machine’s display.<br />
1<br />
2<br />
3<br />
4<br />
4. Special features<br />
72
Changing the font setting<br />
Your machine has preset the font for your region or country.<br />
If you want to change the font or set the font for special condition,<br />
such as the DOS environment, you can change the font setting from<br />
Device Settingsor Emulation section.<br />
• For Windows user, see "Device Settings" on page 102.<br />
• For Macintosh, Linux, or Unix OS user, see "Using Smart Panel<br />
(Macintosh and Linux only)" on page 104.<br />
• If your machine is connected to the network, you can set<br />
the font setting via SyncThru Web Service.<br />
• You can also change the font setting in Emulation option<br />
on the machine’s display.<br />
• The following information shows the proper font list for<br />
corresponding languages.<br />
- Russian: CP866, ISO 8859/5 Latin Cyrillic<br />
- Hebrew: Hebrew 15Q, Hebrew-8, Hebrew-7 (Israel only)<br />
- Greek: ISO 8859/7 Latin Greek, PC-8 Latin/Greek<br />
- Arabic & Farsi: HP Arabic-8, Windows Arabic, Code<br />
Page 864, Farsi, ISO 8859/6 Latin Arabic<br />
- OCR: OCR-A, OCR-B<br />
4. Special features<br />
73
Changing the default print settings<br />
1<br />
2<br />
3<br />
4<br />
5<br />
6<br />
Click the Windows Start menu.<br />
For Windows Server 2000, select Settings > Printers.<br />
• For Windows XP/Server 2003, select Printer and Faxes.<br />
• For Windows Server 2008/Vista, select Control Panel ><br />
Hardware and Sound > Printers.<br />
• For Windows 7, select Control Panel > Devices and<br />
Printers.<br />
• For Windows Server 2008 R2, select Control Panel ><br />
Hardware > Devices and Printers.<br />
Right-click on your machine.<br />
For Windows XP/Server 2003/Server 2008/Vista, select<br />
Printing Preferences.<br />
For Windows 7 or Windows Server 2008 R2, from context<br />
menus, select Printing preferences.<br />
If Printing preferences has a , you can select other printer<br />
drivers connected to the selected printer.<br />
Change the settings on each tab.<br />
Click OK.<br />
4. Special features<br />
If you want to change the settings for each print job, change<br />
it in Printing Preferences.<br />
74
Setting your machine as a default machine<br />
1<br />
2<br />
3<br />
4<br />
Click the Windows Start menu.<br />
For Windows Server 2000, select Settings > Printers.<br />
• For Windows XP/Server 2003, select Printer and Faxes.<br />
• For Windows Server 2008/Vista, select Control Panel ><br />
Hardware and Sound > Printers.<br />
• For Windows 7, select Control Panel > Devices and<br />
Printers.<br />
• For Windows Server 2008 R2, select Control Panel ><br />
Hardware > Devices and Printers.<br />
Select your machine.<br />
Right-click your machine and select Set as Default Printer.<br />
For Windows 7 or Windows Server 2008 R2, if Set as default<br />
printer has a , you can select other printer drivers<br />
connected to the selected printer.<br />
4. Special features<br />
75
Using advanced print features<br />
1<br />
XPS printer driver: used to print XPS file format.<br />
• The XPS printer driver can be installed only on Windows<br />
Vista OS or higher.<br />
• You can install the XPS printer driver when you insert the<br />
software CD into your CD-ROM drive. When the<br />
installation window appears, select Advanced<br />
Installation > Custom Installation. You can select the<br />
XPS printer driver in the Select Software and Utilities to<br />
Install window.<br />
• Install optional memory when an XPS job does not print<br />
because the printer is out of memory.<br />
Printing to a file (PRN)<br />
You will sometimes need to save the print data as a file.<br />
1<br />
2<br />
3<br />
4. Special features<br />
Check the Print to file box in the Print window.<br />
Click Print.<br />
Type in the destination path and the file name, and then click<br />
OK.<br />
For example, c:\Temp\file name.<br />
If you type in only the file name, the file is automatically<br />
saved in My Documents, Documents and Settings, or<br />
Users. The saved folder may differ, depending on your<br />
operating system or the application you are using.<br />
76
Using advanced print features<br />
2<br />
Understanding special printer features<br />
You can use advanced printing features when using your machine.<br />
4. Special features<br />
To take advantage of the printer features provided by your printer driver, click Properties or Preferences in the application’s Print window<br />
to change the print settings. The machine name, that appears in the printer properties window may differ depending on the machine in use.<br />
Some menus may not appear on the display depending on options or models. If so, it is not applicable to your machine.<br />
Item Description<br />
Multiple Pages per Side Selects the number of pages to print on a single sheet of paper. To print more than one page per sheet, the pages will<br />
be reduced in size and arranged in the order you specify. You can print up to 16 pages on one sheet.<br />
Poster Printing<br />
Prints a single-page document onto 4 (Poster 2x2), 9 (Poster 3x3), or 16 (Poster 4x4) sheets of paper, for the purpose<br />
of pasting the sheets together to form one poster-size document.<br />
Select the Poster Overlap value. Specify Poster Overlap in millimeters or inches by selecting the radio button on the<br />
upper right of Basic tab to make it easier to paste the sheets together.<br />
77
Using advanced print features<br />
Booklet Printing<br />
8<br />
9<br />
Item Description<br />
Double-sided Printing<br />
4. Special features<br />
Prints your document on both sides of a sheet of paper and arranges the pages so that the paper can be folded in half<br />
after printing to produce a booklet.<br />
If you want to make a booklet, you need to print on Letter, Legal, A4, US Folio, or Oficio sized print media.<br />
The Booklet Printing option is not available for all paper sizes. Select the available paper Size option under<br />
the Paper tab to see what paper sizes are available.<br />
If you select an unavailable paper size, this option can be automatically canceled. Select only available<br />
paper (paper without or mark).<br />
Print on both sides of a sheet of paper (duplex). Before printing, decide how you want your document oriented.<br />
• You can use this feature with Letter, Legal, A4, US Folio or Oficio sized paper<br />
• If your machine does not have a duplex unit, you should complete the printing job manually. The<br />
machine prints every other page of the document first. After that, a message appears on your computer.<br />
• Skip Blank Pages feature does not work when you select the duplex option.<br />
78
Using advanced print features<br />
Double-sided Printing<br />
(Option)<br />
Item Description<br />
4. Special features<br />
• Printer Default: If you select this option, this feature is determined by the settings you have selected on the<br />
control panel of the machine. This option is available only when you use the PCL/XPS printer driver.<br />
• None: Disables this feature.<br />
• Long Edge: This option is the conventional layout used in bookbinding.<br />
• Short Edge: This option is the conventional layout used in calendars.<br />
• Reverse Double-Sided Printing: Check this option to reverse the print order when duplex printing.<br />
Paper Options Changes the size of a document to appear larger or smaller on the printed page by entering in a percentage by which<br />
to enlarge or decrease the document.<br />
Watermark The watermark option allows you to print text over an existing document. For example, you use it when you want to<br />
have large gray letters reading “DRAFT” or “CONFIDENTIAL” printed diagonally across the first page or all pages of<br />
a document.<br />
79
Using advanced print features<br />
Watermark<br />
(Creating a watermark)<br />
Watermark<br />
(Editing a watermark)<br />
Watermark<br />
Item Description<br />
(Deleting a watermark)<br />
4. Special features<br />
a To change the print settings from your software application, access Printing Preferences.<br />
b Click the Advanced tab, select Edit from the Watermark drop-down list. The Edit Watermarks window appears.<br />
c Enter a text message in the Watermark Message box.<br />
You can enter up to 256 characters. The message displays in the preview window.<br />
a To change the print settings from your software application, access Printing Preferences.<br />
b Click the Advanced tab, select Edit from the Watermark drop-down list. The Edit Watermarks window appears.<br />
c Select the watermark you want to edit from the Current Watermarks list and change the watermark message and<br />
options.<br />
d Click Update to save the changes.<br />
e Click OK or Print until you exit the Print window.<br />
a To change the print settings from your software application, access Printing Preferences.<br />
b Click the Advanced tab, select Edit from the Watermark drop-down list. The Edit Watermarks window appears.<br />
c Select the watermark you want to delete from the Current Watermarks list and click Delete.<br />
d Click OK or Print until you exit the Print window.<br />
80
Using advanced print features<br />
Overlay<br />
Overlay<br />
Item Description<br />
(Creating a new page<br />
overlay)<br />
This option is available only when you use the PCL printer driver.<br />
4. Special features<br />
An overlay is text and/or images stored in the computer hard disk as a special file format that can be printed on any<br />
document. Overlays are often used to take the place of letterhead paper. Rather than using preprinted letterhead,<br />
you can create an overlay containing exactly the same information that is currently on your letterhead. To print a<br />
letter with your company’s letterhead, you do not need to load preprinted letterhead paper in the machine: just print<br />
the letterhead overlay on your document.<br />
To use a page overlay, you must create a new page overlay containing your logo or image.<br />
• The overlay document size must be the same as the document you print with the overlay. Do not create<br />
an overlay with a watermark.<br />
• The resolution of the overlay document must be the same as that of the document you will print with<br />
the overlay.<br />
a To save the document as an overlay, access Printing Preferences.<br />
b Click the Advanced tab, and select Edit from the Text drop-down list. Edit Overlay window appears.<br />
c In the Edit Overlay window, click Create.<br />
d In the Save As window, type a name up to eight characters in the File name box. Select the destination path, if<br />
necessary (The default is C:\Formover).<br />
e Click Save. The name appears on the Overlay List.<br />
f Click OK or Print until you exit the Print window.<br />
The file is not printed. Instead, it is stored on your computer hard disk.<br />
81
Using advanced print features<br />
Overlay<br />
(Using a page overlay)<br />
Overlay<br />
Item Description<br />
(Deleting a page overlay)<br />
4. Special features<br />
a Click the Advanced tab.<br />
b Select the desired overlay from the Text drop-down list.<br />
c If the overlay file you want does not appear in the Text drop-down list, select Edit... from the list and click Load.<br />
Select the overlay file you want to use.<br />
If you have stored the overlay file you want to use in an external source, you can also load the file when you access<br />
the Open window.<br />
After you select the file, click Open. The file appears in the Overlay List box and is available for printing. Select the<br />
overlay from the Overlay List box.<br />
d If necessary, check Confirm Page Overlay When Printing box. If this box is checked, a message window appears<br />
each time you submit a document for printing, asking you to confirm printing an overlay on your document.<br />
If this box is not checked and an overlay has been selected, the overlay automatically prints with your document.<br />
e Click OK or Print until you exit the Print window.<br />
a In the Printing Preferences window, click the Advanced tab.<br />
b Select Edit in the Text drop down list.<br />
c Select the overlay you want to delete from the Overlay List box.<br />
d Click Delete.<br />
e When a confirming message window appears, click Yes.<br />
f Click OK or Print until you exit the Print window. You can delete page overlays that you no longer use.<br />
82
Using advanced print features<br />
Print Mode<br />
Item Description<br />
4. Special features<br />
• This feature is available only if you have installed the optional mass storage device or set the Ram Disk.<br />
To set the Ram Disk, you must enable it from SyncThru Web ServiceSettings Machine Settings ><br />
Ram Disk.<br />
• Some menus may not appear on the display depending on options or models. If so, it is not applicable<br />
to your machine.<br />
• You can see the print job list you set in the printer driver's Print Mode in the Job Management menu<br />
(see "From the control panel" on page 86).<br />
• Print Mode: The default Print Mode is Normal, which is for printing without saving the printing file in the<br />
memory.<br />
- Normal: This mode prints without storing your document in the optional memory.<br />
- Proof: This mode is useful when you print more than one copy. You can print one copy first to check, then print<br />
the rest of the copies later.<br />
- Confidential: This mode is used for printing confidential documents. You need to enter a password to print.<br />
- Store: Select this setting to save a document in the mass storage device without printing.<br />
- Store and Print: This mode is used when printing and storing document at the same time.<br />
- Spool: This option can be useful when handling large amounts of data. If you select this setting, the printer<br />
spools the document into the mass storage device and then prints it from the mass storage device queue,<br />
decreasing the computer’s work load.<br />
- Print Schedule: Select this setting to print the document at a specified time.<br />
• User ID: This option is used when you need to find a saved file using the control panel.<br />
• Job Name: This option is used when you need to find a saved file using the control panel.<br />
83
Using Direct Printing Utility (Windows only)<br />
3<br />
What is Direct Printing Utility?<br />
Direct Printing Utility is a program that sends PDF files directly to<br />
your machine to print without having to opening the file.<br />
To install this program, select Advanced Installation > Custom<br />
Installation and put a check mark in this program when you install<br />
the printer driver.<br />
• For some models, a mass storage device should be<br />
installed or memory inserted to properly run utilities.<br />
Otherwise, they should be installed.<br />
• You cannot print PDF files that are restricted. Deactivate<br />
the printing restriction feature and retry printing.<br />
• You cannot print PDF files that are restricted by a<br />
password. Deactivate the password feature, and retry<br />
printing.<br />
• Whether or not a PDF file can be printed using the Direct<br />
Printing Utility program depends on how the PDF file was<br />
created.<br />
• The Direct Printing Utility program supports PDF version<br />
1.7 and below. For higher versions, you must open the file<br />
to print it.<br />
4<br />
Printing<br />
4. Special features<br />
There are several ways you can print using the Direct Printing Utility.<br />
1<br />
2<br />
3<br />
4<br />
5<br />
84<br />
From the Start menu select Programs or All Programs ><br />
Samsung Printers > Direct Printing Utility > Direct Printing<br />
Utility.<br />
The Direct Printing Utility window appears.<br />
Select your machine from the Select Printer drop-down list<br />
and click Browse.<br />
Select the file you wish to print and click Open.<br />
The file is added in the Select Files section.<br />
Customize the machine settings for your needs.<br />
Click Print. The selected PDF file is sent to the machine.
Using Direct Printing Utility (Windows only)<br />
5<br />
1<br />
2<br />
3<br />
4<br />
Using the right-click menu<br />
Right-click on the PDF file to print and select Direct Printing.<br />
The Direct Printing Utility window appears with the PDF file is<br />
added.<br />
Select the machine to use.<br />
Customize the machine settings.<br />
Click Print. The selected PDF file is sent to the machine.<br />
4. Special features<br />
85
Using memory/mass storage device features<br />
6<br />
Some menus may not appear on the display depending on<br />
options or models. If so, it is not applicable to your machine.<br />
From the printer driver<br />
After installing the optional memory, you can use advanced printing<br />
features, such as proofing a job and specifying of printing a private<br />
job in the Print window. Select PropertiesorPreference, and<br />
configure the printing mode.<br />
7<br />
From the control panel<br />
4. Special features<br />
If your machine has optional memory or an optional mass storage<br />
device, you can use these features from the Job Management menu.<br />
• Active Job All of the print jobs waiting to be printed are listed in<br />
the active job queue in the order you sent them to the printer.<br />
You can delete a job from the queue before printing, or promote<br />
a job to print sooner.<br />
• File Policy You can choose the file policy for generating file name<br />
before you proceed with the job through optional memory. If the<br />
optional memory already has the same name when you entered a<br />
new file name, you can rename or overwrite it.<br />
• Stored Job: You can print or delete a stored job.<br />
• Held Job Timeout: The machine can automatically delete a<br />
stored job after a certain period of time. You can set the time the<br />
machine will wait before deleting the stored job.<br />
• ImageOverwrite: Image Overwrite is a security measure for<br />
customers who are concerned about unauthorized access and<br />
duplication of classified or private document.<br />
After installing the mass storage device, you can also print<br />
the predefined document templates from Form Menu.<br />
86
Macintosh printing<br />
8<br />
Some features may not be available depending on models or<br />
options. It means that the features are not supported.<br />
Printing a document<br />
When you print with a Macintosh, you need to check the printer<br />
driver settings in each application you use. Follow the steps below to<br />
print from a Macintosh:<br />
1<br />
2<br />
3<br />
4<br />
5<br />
6<br />
Open the document to print.<br />
Open the File menu and click Page Setup (Document Setup<br />
in some applications).<br />
Choose your paper size, orientation, scaling, other options,<br />
and make sure that your machine is selected. Click OK.<br />
Open the File menu and click Print.<br />
Choose the number of copies and indicate which pages to<br />
print.<br />
Click Print.<br />
9<br />
Changing printer settings<br />
4. Special features<br />
You can use advanced printing features when using your machine.<br />
Open an application and select Print from the File menu. The<br />
machine name, which appears in the printer properties window,<br />
may differ depending on the machine in use. Except for the name,<br />
the composition of the printer properties window is similar to the<br />
following.<br />
10<br />
Printing multiple pages on one sheet<br />
You can print more than one page on a single sheet of paper. This<br />
feature provides a cost-effective way to print draft copies.<br />
1<br />
2<br />
3<br />
Open an application, and select Print from the File menu.<br />
Select Layout from the drop-down list under Orientation. In<br />
the Pages per Sheet drop-down list, select the number of<br />
pages you want to print on one sheet of paper.<br />
Select the other options to use.<br />
87
Macintosh printing<br />
11<br />
4<br />
Click Print.<br />
The machine prints the selected number of pages to print on<br />
one sheet of paper.<br />
Printing on both sides of the paper<br />
Some features may not be available depending on models or<br />
options. It means that the features are not supported.<br />
Before printing in the duplex mode, decide on which edge you will<br />
be binding your finished document. The binding options are, as<br />
follows:<br />
• Long-Edge Binding: This option is the conventional layout used<br />
in book binding.<br />
• Short-Edge Binding: This option is the type often used with<br />
calendars.<br />
1<br />
2<br />
3<br />
From your Macintosh application, select Print from the File<br />
menu.<br />
Select Layout from the drop-down list under Orientation.<br />
Select a binding orientation from the Two-Sided option.<br />
12<br />
4<br />
5<br />
Select the other options to use.<br />
4. Special features<br />
Click Print and the machine prints on both sides of the paper.<br />
If you print more than 2 copies, the first copy and the second<br />
copy might print on the same sheet of paper. Avoid printing<br />
on both sides of paper when you are printing more than 1<br />
copy.<br />
Using help<br />
Click the question mark on the bottom-left corner of the window and<br />
click on the topic you want to know about. A pop-up window<br />
appears with information about that option's feature, which is<br />
provided from the driver.<br />
88
Linux printing<br />
13<br />
Some features may not be available depending on models or<br />
options. It means that the features are not supported.<br />
Printing from applications<br />
There are a lot of Linux applications that allow you to print using<br />
Common UNIX Printing System (CUPS). You can print on your<br />
machine from any such application.<br />
1<br />
2<br />
3<br />
Open an application, and select Print from the File menu<br />
Select Print directly using lpr.<br />
In the LPR GUI window, select the model name of your<br />
machine from the printer list and click Properties.<br />
4<br />
5<br />
6<br />
4. Special features<br />
Change the print job properties using the following four tabs<br />
displayed at the top of the window.<br />
• General: Changes the paper size, the paper type, and the<br />
orientation of the documents. It enables the duplex<br />
feature, adds start and end banners, and changes the<br />
number of pages per sheet.<br />
89<br />
Automatic/manual duplex printing may not be available<br />
depending on models. You can alternatively use the lpr<br />
printing system or other applications for odd-even printing.<br />
• Text: Specifies the page margins and set the text options,<br />
such as spacing or columns.<br />
• Graphics: Sets image options that are used when printing<br />
image files, such as color options, image size, or image<br />
position.<br />
• Advanced: Sets the print resolution, paper source, and<br />
destination.<br />
Click Apply to apply the changes and close the Properties<br />
window.<br />
Click OK in the LPR GUI window to start printing.
Linux printing<br />
14<br />
7<br />
The Printing window appears, allowing you to monitor the<br />
status of your print job.<br />
To abort the current job, click Cancel.<br />
Printing files<br />
You can print many different types of files on your machine using the<br />
standard CUPS, directly from the command line interface. The CUPS<br />
lpr utility allows you to do that, but the driver’s package replaces the<br />
standard lpr tool by a much more user-friendly LPR GUI program.<br />
To print any document file:<br />
1<br />
2<br />
3<br />
Enter lpr from the Linux shell command line and<br />
press Enter. The LPR GUI window appears.<br />
When you type only lpr and press Enter, the Select file(s) to<br />
print window appears first. Just select any files you want to<br />
print and click Open.<br />
In the LPR GUI window, select your machine from the list, and<br />
change the print job properties.<br />
Click OK to start printing.<br />
15<br />
Configuring Printer Properties<br />
4. Special features<br />
Using the Printer Properties window provided by the Printers<br />
configuration, you can change the various properties for your<br />
machine as a printer.<br />
1<br />
2<br />
3<br />
Open the Unified Driver Configurator.<br />
If necessary, switch to Printers configuration.<br />
Select your machine on the available printers list and click<br />
Properties.<br />
The Printer Properties window appears.<br />
The following five tabs display at the top of the window:<br />
• General: Allows you to change the printer location and<br />
name. The name entered in this tab displays on the printer<br />
list in Printers configuration.<br />
• Connection: Allows you to view or select another port. If<br />
you change the machine port from USB to parallel or vice<br />
versa while in use, you must re-configure the machine port<br />
in this tab.<br />
• Driver: Allows you to view or select another machine<br />
driver. By clicking Options, you can set the default device<br />
options.<br />
90
Linux printing<br />
4<br />
• Jobs: Shows the list of print jobs. Click Cancel job to cancel<br />
the selected job and select the Show completed jobs<br />
check box to see previous jobs on the job list.<br />
• Classes: Shows the class that your machine is in. Click Add<br />
to Class to add your machine to a specific class or click<br />
Remove from Class to remove the machine from the<br />
selected class.<br />
Click OK to apply the changes and close the Printer<br />
Properties window.<br />
4. Special features<br />
91
Unix printing<br />
16<br />
Some features may not be available depending on models or<br />
options. It means that the features are not supported.<br />
Proceeding the print job<br />
After installing the printer, choose any of the image, text, PS or HPGL<br />
files to print.<br />
1<br />
2<br />
3<br />
4<br />
Execute “printui ” command.<br />
For example, if you are printing “document1”<br />
printui document1<br />
This will open the UNIX Printer Driver Print Job Manager in<br />
which the user can select various print options.<br />
Select a printer that has been already added.<br />
Select the printing options from the window such as Page<br />
Selection.<br />
Select how many copies are needed in Number of Copies.<br />
17<br />
5<br />
4. Special features<br />
To take advantage of the printer features provided by your<br />
printer driver, press Properties (see "Changing printer<br />
settings" on page 87).<br />
Press OK to start the print job.<br />
Changing the machine settings<br />
The UNIX printer driver Print Job Manager in which the user can<br />
select various print options in printer Properties.<br />
The following hot keys may also be used: “H” for Help, “O” for OK, “A”<br />
for Apply, and “C” for Cancel.<br />
General tab<br />
• Paper Size: Set the paper size as A4, Letter, or other paper sizes,<br />
according to your requirements.<br />
• Paper Type: Choose the type of the paper. Options available in<br />
the list box are Printer Default, Plain, and Thick.<br />
• Paper Source: Select from which tray the paper is used. By<br />
default, it is Auto Selection.<br />
92
Unix printing<br />
• Orientation: Select the direction in which information is printed<br />
on a page.<br />
• Duplex: Print on both sides of paper to save paper.<br />
Automatic/manual duplex printing may not be available<br />
depending on models. You can alternatively use the lpr<br />
printing system or other applications for odd-even printing.<br />
• Multiple pages: Print several pages on one side of the paper.<br />
• Page Border: Choose any of the border styles (e.g., Single-line<br />
hairline, Double-line hairline)<br />
Image tab<br />
In this tab, you can change the brightness, resolution, or image<br />
position of your document.<br />
Text tab<br />
Set the character margin, line space, or the columns of the actual<br />
print output.<br />
HPGL/2 tab<br />
• Use only black pen: To print all graphics in black.<br />
4. Special features<br />
• Fit plot to page: Fit the entire graphic into a single page.<br />
• Pen Width: Change value to increase the thickness of pen lines.<br />
By default, it is 1000.<br />
Margins tab<br />
• Use Margins: Set the margins for the document. By default,<br />
margins are not enabled. The user can change the margin<br />
settings by changing the values in the respective fields. Set by<br />
default, these values depend on the page size selected.<br />
• Unit: Change the units to points, inches, or centimeters.<br />
Printer-Specific Settings tab<br />
Select various options in the JCL and General frames to customize<br />
various settings. These options are specific to the printer and depend<br />
on the PPD file.<br />
93
5. Maintenance<br />
This chapter introduces management tools provided to help you make full use<br />
of your machine. It also provides information for maintaining the toner<br />
cartridge.<br />
• Storing the toner cartridge (or imaging unit) 95<br />
• Tips for moving & storing your machine 97<br />
• Useful management tools 98
Storing the toner cartridge (or imaging unit)<br />
Toner cartridge (or imaging unit) contain components that are<br />
sensitive to light, temperature and humidity. Samsung suggests<br />
users follow these recommendations to ensure optmal performance,<br />
highest quality, and longest life from your new Samsung toner<br />
cartridge.<br />
Store this cartridge in the same environment in which the printer will<br />
be used. This should be in controlled temperature and humidity<br />
conditions. The toner cartridge (or imaging unit) should remain in its<br />
original and unopened package until installation – if original<br />
packaging is not available, cover the top opening of the cartridge<br />
with paper and store in a dark cabinet.<br />
Opening the cartridge package prior to use dramatically shortens its<br />
useful shelf and operating life. Do not store on the floor. If the Toner<br />
cartridge (or imaging unit) is removed from the printer, follow the<br />
instructions below to store the toner cartridge (or imaging unit)<br />
properly.<br />
• Store the cartridge inside the protective bag from the original<br />
package.<br />
• Store lying flat (not standing on end) with the same side facing<br />
up as if it were installed in the machine.<br />
• Do not store consumables in any of the following conditions:<br />
- Temperature greater than 40°C (104°F).<br />
- Humidity range not less than 20% and not greater than 80%.<br />
- An environment with extreme changes in humidity or<br />
temperature.<br />
1<br />
- Direct sunlight or room light.<br />
- Dusty places.<br />
- A car for a long period of time.<br />
5. Maintenance<br />
- An environment where corrosive gases are present.<br />
- An environment with salty air.<br />
Handling instructions<br />
• Do not touch the surface of the photoconductive drum in the<br />
cartridge.<br />
• Do not expose the cartridge to unnecessary vibrations or shock.<br />
• Never manually rotate the drum, especially in the reverse<br />
direction; this can cause internal damage and toner spillage.<br />
2<br />
Toner cartridge (or imaging unit) usage<br />
Samsung Electronics does not recommend or approve the use of<br />
non-Samsung brand toner cartridge (or imaging unit) in your printer<br />
including generic, store brand, refilled, or remanufactured toner<br />
cartridge (or imaging unit).<br />
95
Storing the toner cartridge (or imaging unit)<br />
3<br />
Samsung’s printer warranty does not cover damage to the<br />
machine caused by the use of a refilled, remanufactured, or<br />
non-Samsung brand toner cartridges.<br />
Estimated cartridge life<br />
Estimated cartridge life the life of the toner cartridge (or imaging unit<br />
yield) depends on the amount of toner that print jobs require. The<br />
actual print yield may vary depending on the print density of the<br />
pages you print on, operating environment, printing interval, media<br />
type and/or media size. For example, if you print a lot of graphics, the<br />
consumption of the toner is higher and you may need to change the<br />
cartridge more often.<br />
5. Maintenance<br />
96
Tips for moving & storing your machine<br />
• When moving the machine, do not tilt or turn it upside down.<br />
Otherwise, the inside of the machine may be contaminated by<br />
toner, which can cause damage to the machine or reduce print<br />
quality.<br />
• When moving the machine, make sure to use at least two people<br />
and holding the machine securely.<br />
5. Maintenance<br />
97
Useful management tools<br />
4<br />
Samsung AnyWeb Print<br />
This tool helps you screen-capture, preview, scrap, and print<br />
Windows Internet Explorer pages more easily, than when you use an<br />
ordinary program. Click Start > All programs > Samsung Printers<br />
> Samsung AnyWeb Print > Download the latest version to link to<br />
the website where the tool is available for download.<br />
5<br />
Using SyncThru Web Service<br />
• Internet Explorer 6.0 or higher is the minimum<br />
requirement for SyncThru Web Service.<br />
• SyncThru Web Service explanation in this user’s guide<br />
may differ from your machine depending on its options or<br />
models.<br />
• Network model only.<br />
Accessing SyncThru Web Service<br />
1<br />
2<br />
5. Maintenance<br />
Access a web browser, such as Internet Explorer, from<br />
Windows.<br />
Enter the machine IP address of your printer (http://<br />
xxx.xxx.xxx.xxx) in the address field and press the Enter key or<br />
click Go.<br />
Your machine’s embedded website opens.<br />
Logging into SyncThru Web Service<br />
Before configuring options in SyncThru Web Service, you need to<br />
log-in as an administrator. You can still use SyncThru Web Service<br />
without logging in but you won’t have access to Settings tab and<br />
Security tab.<br />
1<br />
2<br />
Click Login on the upper right of the SyncThru Web Service<br />
website.<br />
Type in the ID and Password then click Login.<br />
• ID: admin<br />
• Password: sec00000<br />
98
Useful management tools<br />
SyncThru Web Service overview<br />
Some tabs may not appear depending on your model.<br />
Information tab<br />
This tab gives you general information about your machine. You can<br />
check things, such as remaining amount of toner. You can also print<br />
reports, such as an error report.<br />
• Active Alerts: Shows the alerts that have occurred in the<br />
machine and their severity.<br />
• Supplies: Shows how many pages are printed and amount of<br />
toner left in the cartridge.<br />
• Usage Counters: Shows the usage count by print types: simplex<br />
and duplex.<br />
• Current Settings: Shows the machine’s and network’s<br />
information.<br />
• Print information: Prints reports such as system related reports<br />
and font reports.<br />
Settings tab<br />
5. Maintenance<br />
This tab allows you to set configurations provided by your machine<br />
and network. You need to log-in as an administrator to view this tab.<br />
• Machine Settings tab: Sets options provided by your machine.<br />
• Network Settings tab: Shows options for the network<br />
environment. Sets options such as TCP/IP and network protocols.<br />
Security tab<br />
This tab allows you to set system and network security information.<br />
You need to log-in as an administrator to view this tab.<br />
• System Security: Sets the system administrator’s information<br />
and also enables or disables machine features.<br />
• Network Security: Sets settings for HTTPs, IPSec, IPv4/IPv6<br />
filtering, and 802.1x.<br />
Maintenance tab<br />
This tab allows you to maintain your machine by upgrading firmware<br />
and setting contact information for sending emails. You can also<br />
connect to Samsung website or download drivers by selecting the<br />
Link menu.<br />
• Firmware Upgrade: Upgrade your machine’s firmware.<br />
• Contact Information: Shows the contact information.<br />
99
Useful management tools<br />
• Link: Shows links to useful sites where you can download or<br />
check information.<br />
• License Management: You can add or delete license. If you add<br />
an application, you need to activate the license of the installed<br />
application. This feature is also available from the machine<br />
E-mail notification setup<br />
You can receive emails about your machine’s status by setting this<br />
option. By setting information such as IP address, host name, e-mail<br />
address and SMTP server information, the machine status (toner<br />
cartridge shortage or machine error) will be sent to a certain person's<br />
e-mail automatically. This option may be used more frequently by a<br />
machine administrator.<br />
1<br />
2<br />
3<br />
Start a web browser, such as Internet Explorer, from Windows.<br />
Enter the machine IP address (http://xxx.xxx.xxx.xxx) in the<br />
address field and press the Enter key or click Go.<br />
Your machine’s embedded website opens.<br />
From the Settings tab, select Machine Settings > E-mail<br />
Notification.<br />
4<br />
5<br />
6<br />
5. Maintenance<br />
100<br />
If you have not configured outgoing server environment, go<br />
to Settings > Network Settings > Outgoing Mail<br />
Server(SMTP) to configure network environment before<br />
setting e-mail notification.<br />
Select Enable check box to use the E-mail Notification.<br />
Click Add button to add e-mail notification user.<br />
Set the recipient name and e-mail address(es) with<br />
notification items you want to receive an alert for.<br />
Click Apply.<br />
If the firewall is activated, the e-mail may not be sent<br />
successfully. In that case, contact the a network<br />
administrator.<br />
Setting the system administrator’s information<br />
This setting is necessary for using the e-mail notification option.
Useful management tools<br />
6<br />
1<br />
2<br />
3<br />
4<br />
5<br />
Start a web browser, such as Internet Explorer, from Windows.<br />
Enter the machine IP address (http://xxx.xxx.xxx.xxx) in the<br />
address field and press the Enter key or click Go.<br />
Your machine’s embedded website opens.<br />
From the Security tab, select System Security > System<br />
Administrator<br />
Enter the name of the administrator, phone number, location,<br />
and email address.<br />
Click Apply.<br />
Using Samsung Easy Printer Manager<br />
(Windows only)<br />
Samsung Easy Printer Manager is a Windows-based application that<br />
combines Samsung machine settings into one location. Samsung<br />
Easy Printer Manager combines device settings as well as printing<br />
environments, settings/actions and launching. All of these features<br />
provide a gateway to conveniently use your Samsung machine.<br />
Samsung Easy Printer Manager provides two different user<br />
interfaces for the user to choose from: the basic user interface and<br />
the advanced user interface. Switching between the two interfaces is<br />
easy: just click a button.<br />
5. Maintenance<br />
Internet Explorer 6.0 or higher is the minimum requirement<br />
for Samsung Easy Printer Manager.<br />
Understanding Samsung Easy Printer Manager<br />
To open the program:<br />
Select Start > Programs or All Programs > Samsung Printers ><br />
Samsung Easy Printer Manager > Samsung Easy Printer<br />
Manager.<br />
The Samsung Easy Printer Manager interface is comprised of various<br />
basic sections as described in the table that follows:<br />
101
Useful management tools<br />
1<br />
2<br />
3<br />
4<br />
Printer List The printer list displays the installed printer icons<br />
on your computer.<br />
Printer<br />
Information<br />
Application<br />
information<br />
This area gives you general information about<br />
your machine. You can check information, such as<br />
the machine’s model name, IP address (or Port<br />
name), and machine status.<br />
User’s Guide button: This button<br />
opens Troubleshooting Guide when<br />
an error occurs. You can directly open<br />
the necessary section in the user’s<br />
guide.<br />
Includes links for changing to the advanced<br />
settings, preference, help, and about.<br />
The button is used to change the<br />
user interface to the advanced settings<br />
user interface.<br />
Quick links Displays Quick links to machine specific<br />
functions. This section also includes links to<br />
applications in the advanced settings.<br />
5<br />
6<br />
Contents<br />
Area<br />
Order<br />
Supplies<br />
5. Maintenance<br />
102<br />
Click the Help ( ) button from the upper-right corner of the<br />
window and click on any option you want to know about.<br />
Advanced settings user interface overview<br />
The advanced user interface is intended to be used by the person<br />
responsible for managing the network and machines.<br />
Device Settings<br />
Displays information about the selected machine,<br />
remaining toner level, and paper. The information<br />
will vary based on the machine selected. Some<br />
machines do not have this feature.<br />
Click on the Order button from the supply<br />
ordering window. You can order replacement<br />
toner cartridge(s) from online.<br />
You can configure various machine settings such as machine setup,<br />
paper, layout, emulation, network, and print information.
Useful management tools<br />
Alert Settings<br />
This is menu includes settings related to error alerting.<br />
• Printer Alert: Provides settings related to when alerts will be<br />
received.<br />
• Email Alert: Povides options relating to receiving alerts via email.<br />
• Alert History : Provides a history of device and toner related<br />
alerts.<br />
Job Accounting<br />
Provides querying of quota information of the specified job<br />
accounting user. This quota information can be created and applied<br />
to devices by job accounting software such as SyncThru or<br />
CounThru admin software.<br />
7<br />
Using Samsung Printer Status (Windows only)<br />
The Samsung Printer Status is a program that monitors and informs<br />
you of the machine status.<br />
5. Maintenance<br />
• The Samsung Printer Status window and its contents<br />
shown in this user’s guide may differ depending on the<br />
machine or operating system in use.<br />
• Check the operating system(s) that are compatible with<br />
your machine (see Basic guide).<br />
Samsung Printer Status overview<br />
If an error occurs while operating, you can check the error from the<br />
Samsung Printer Status. Samsung Printer Status is installed<br />
automatically when you install the machine software.<br />
You can also launch Samsung Printer Status manually. Go to the<br />
Printing Preferences , click the Basic tab > Printer Status button.<br />
These icons appear on the Windows task bar:<br />
103
Useful management tools<br />
Icon Mean Description<br />
1<br />
Normal The machine is in ready mode and experiencing<br />
no errors or warnings.<br />
Warning The machine is in a state where an error might<br />
occur in the future. For example, it might be in<br />
toner low status, which may lead to toner empty<br />
status.<br />
Error The machine has at least one error.<br />
Toner Level You can view the level of toner remaining in<br />
each toner cartridge. The machine and the<br />
number of toner cartridge(s) shown in the<br />
above window may differ depending on the<br />
machine in use. Some machines do not have<br />
this feature.<br />
8<br />
2<br />
3<br />
4<br />
5. Maintenance<br />
Using Smart Panel (Macintosh and Linux only)<br />
104<br />
Alert Settings Select the settings you want from the options<br />
window.<br />
Order Supplies You can order replacement toner cartridge(s)<br />
from online.<br />
Troubleshooting You can directly open the troubleshooting<br />
section in the user’s guide.<br />
5 Close Close the window.<br />
Smart Panel is a program that monitors and informs you of the<br />
machine’s status, and allows you to customize the machine’s<br />
settings. For Macintosh, Smart Panel is installed automatically when<br />
you install the machine software. For Linux, you can download Smart<br />
Panel from the Samsung website (see "Installing the Smart Panel" on<br />
page 8).<br />
• The Smart Panel window and its contents shown in this<br />
user’s guide may differ depending on the machine or<br />
operating system in use.<br />
• Check the operating system(s) that are compatible with<br />
your machine (see Basic Guide).
Useful management tools<br />
Smart Panel overview<br />
If an error occurs while operating, you can check the error from the<br />
Smart Panel. You can also launch Smart Panel manually.<br />
Macintosh<br />
Linux<br />
1<br />
2<br />
Click this icon the Smart Panel icon on the menu<br />
bar.<br />
Double-click the Smart Panel icon in the<br />
Notification Area.<br />
1<br />
Toner Level You can view the level of toner remaining in<br />
each toner cartridge. The machine and the<br />
number of toner cartridge(s) shown in the<br />
above window may differ depending on the<br />
machine in use. Some machines do not have<br />
this feature.<br />
Buy Now You can order replacement toner cartridge(s)<br />
from online.<br />
2<br />
3<br />
4<br />
3<br />
4<br />
Changing Smart Panel ‘s settings<br />
5. Maintenance<br />
User’s Guide You can view the online User’s Guide.<br />
Right-click in Linux or in Mac OS X click on the Smart Panel icon and<br />
select Options. Select the settings you want from the Options<br />
window.<br />
105<br />
This button opens the<br />
Troubleshooting Guide when an<br />
error occurs. You can directly open<br />
the troubleshooting section in the<br />
user’s guide.<br />
Printer Setting You can configure various machine settings in<br />
the Printer Settings Utility window. Some<br />
machines do not have this feature.<br />
If you connect your machine to a<br />
network, the SyncThru Web<br />
Service window appears instead of<br />
the Printer Settings Utility.
Useful management tools<br />
9<br />
Using the Linux Unified Driver Configurator<br />
The Unified Driver Configurator is a tool primarily intended for<br />
configuring machine devices. You need to install Unified Linux<br />
Driver to use Unified Driver Configurator (see "Installation for Linux"<br />
on page 8).<br />
After the driver is installed on your Linux system, the Unified Driver<br />
Configurator icon will automatically be created on your desktop.<br />
Opening Unified Driver Configurator<br />
1<br />
2<br />
Double-click the Unified Driver Configurator on the<br />
desktop.<br />
You can also click the Startup Menu icon and select Samsung<br />
Unified Driver > Unified Driver Configurator.<br />
Click each button on the left to switch to the corresponding<br />
configuration window.<br />
3<br />
To use the on screen help, click Help.<br />
5. Maintenance<br />
After changing the configurations, click Exit to close the<br />
Unified Driver Configurator.<br />
Printers configuration<br />
1 Printer Configuration<br />
2 Port Configuration<br />
Printers configuration has the two tabs: Printers and Classes.<br />
106
Useful management tools<br />
Printers tab<br />
View the current system’s printer configuration by clicking on the<br />
machine icon button on the left side of the Unified Driver<br />
Configurator window.<br />
1 Switches to Printers configuration.<br />
2 Shows all of the installed machines.<br />
3 Shows the status, model name, and URI of your machine.<br />
The printer control buttons are, as follows:<br />
• Refresh: Renews the available machines list.<br />
• Add Printer: Allows you to add a new machines.<br />
• Remove Printer: Removes the selected machine.<br />
5. Maintenance<br />
• Set as Default: Sets the current selected machine as a default<br />
machine.<br />
• Stop/Start: Stops/starts the machine.<br />
• Test: Allows you to print a test page to ensure the machine is<br />
working properly.<br />
• Properties: Allows you to view and change the printer’s<br />
properties.<br />
Classes tab<br />
The Classes tab shows a list of available machine classes.<br />
107
Useful management tools<br />
1 Shows all of the machine classes.<br />
2<br />
Shows the status of the class and the number of machines in the<br />
class.<br />
• Refresh: Renews the classes list.<br />
• Add Class: Allows you to add a new machine class.<br />
• Remove Class: Removes the selected machine class.<br />
Ports configuration<br />
In this window, you can view the list of available ports, check the<br />
status of each port and release a port that is stalled in a busy state<br />
when its owner has terminated the job for any reason.<br />
1 Switches to Ports configuration.<br />
2 Shows all of the available ports.<br />
• Refresh: Renews the available ports list.<br />
• Release port: Releases the selected port.<br />
5. Maintenance<br />
3 Shows the port type, device connected to the port, and status.<br />
108
6. Troubleshooting<br />
This chapter gives helpful information for what to do if you encounter an error.<br />
• Paper feeding problems 110<br />
• Power and cable connecting problems 111<br />
• Printing problems 112<br />
• Printing quality problems 116<br />
• Operating system problems 124
Paper feeding problems<br />
Condition Suggested solutions<br />
Paper jams during printing. Clear the paper jam.<br />
Paper sticks together. • Check the maximum paper capacity of the tray.<br />
• Make sure that you are using the correct type of paper.<br />
• Remove paper from the tray and flex or fan the paper.<br />
• Humid conditions may cause some paper to stick together.<br />
6. Troubleshooting<br />
Multiple sheets of paper do not feed. Different types of paper may be stacked in the tray. Load paper of only one type, size, and weight.<br />
Paper does not feed into the<br />
machine.<br />
• Remove any obstructions from inside the machine.<br />
• Paper has not been loaded correctly. Remove paper from the tray and reload it correctly.<br />
• There is too much paper in the tray. Remove excess paper from the tray.<br />
• The paper is too thick. Use only paper that meets the specifications required by the machine.<br />
The paper keeps jamming. • There is too much paper in the tray. Remove excess paper from the tray. If you are printing on special<br />
materials, use the multi-purpose tray (or manual feeder).<br />
Transparencies stick together in the<br />
paper exit.<br />
Envelopes skew or fail to feed<br />
correctly.<br />
• An incorrect type of paper is being used. Use only paper that meets the specifications required by the<br />
machine.<br />
• There may be debris inside the machine. Open the front cover and remove any debris.<br />
Use only transparencies specifically designed for laser printers. Remove each transparency as it exits<br />
from the machine.<br />
Ensure that the paper guides are against both sides of the envelopes.<br />
110
Power and cable connecting problems<br />
Condition Suggested solutions<br />
The machine is not receiving power,<br />
or the connection cable between the<br />
computer and the machine is not<br />
connected properly.<br />
6. Troubleshooting<br />
• Connect the machine to the electricity supply first. If the machine has a (Power) button on the<br />
control panel, press until the machine is on.<br />
• Disconnect the machine’s cable and reconnect it.<br />
111
Printing problems<br />
Condition Possible cause Suggested solutions<br />
The machine does not<br />
print.<br />
6. Troubleshooting<br />
The machine is not receiving power. Connect the machine to the electricity supply first. If the machine has a<br />
The machine is not selected as the default<br />
machine.<br />
Check the machine for the following:<br />
• The front cover is not closed. Close the front cover.<br />
• Paper is jammed. Clear the paper jam.<br />
• No paper is loaded. Load paper.<br />
• The toner cartridge is not installed. Install the toner cartridge.<br />
If a system error occurs, contact your service representative.<br />
The connection cable between the<br />
computer and the machine is not<br />
connected properly.<br />
The connection cable between the<br />
computer and the machine is defective.<br />
(Power) button on the control panel, press until the machine is on.<br />
Select your machine as your default machine in Windows.<br />
Disconnect the machine cable and reconnect it.<br />
If possible, attach the cable to another computer that is working properly<br />
and print a job. You can also try using a different machine cable.<br />
The port setting is incorrect. Check the Windows printer settings to make sure that the print job is sent<br />
to the correct port. If the computer has more than one port, make sure that<br />
the machine is attached to the correct one.<br />
The machine may be configured<br />
incorrectly.<br />
Check the Printing Preferences to ensure that all of the print settings are<br />
correct.<br />
112
Printing problems<br />
Condition Possible cause Suggested solutions<br />
The machine does not<br />
print.<br />
The machine selects<br />
print materials from<br />
the wrong paper<br />
source.<br />
A print job is<br />
extremely slow.<br />
The printer driver may be incorrectly<br />
installed.<br />
Uninstall and reinstall the machine’s driver.<br />
6. Troubleshooting<br />
The machine is malfunctioning. Check the display message on the control panel to see if the machine is<br />
indicating a system error. Contact a service representative.<br />
The document size is so big that the hard<br />
disk space of the computer is insufficient<br />
to access the print job.<br />
Get more hard disk space and print the document again.<br />
The output tray is full. Once the paper is removed from the output tray, the machine resumes<br />
printing.<br />
The paper option that was selected in the<br />
Printing Preferences may be incorrect.<br />
For many software applications, the paper source selection is found under<br />
the Paper tab within the Printing Preferences. Select the correct paper<br />
source. See the printer driver help screen.<br />
The job may be very complex. Reduce the complexity of the page or try adjusting the print quality<br />
settings.<br />
Half the page is blank. The page orientation setting may be<br />
incorrect.<br />
The paper size and the paper size settings<br />
do not match.<br />
Change the page orientation in your application. See the printer driver help<br />
screen.<br />
Ensure that the paper size in the printer driver settings matches the paper<br />
in the tray.<br />
Or, ensure that the paper size in the printer driver settings matches the<br />
paper selection in the software application settings you use.<br />
113
Printing problems<br />
Condition Possible cause Suggested solutions<br />
The machine prints,<br />
but the text is wrong,<br />
garbled, or<br />
incomplete.<br />
Pages print, but they<br />
are blank.<br />
6. Troubleshooting<br />
The machine cable is loose or defective. Disconnect the machine cable and reconnect. Try a print job that you have<br />
already printed successfully. If possible, attach the cable and the machine<br />
to another computer that you know works and try a print job. Finally, try a<br />
new machine cable.<br />
The wrong printer driver was selected. Check the applicatinon’s printer selection menu to ensure that your<br />
machine is selected.<br />
The software application is<br />
malfunctioning.<br />
Try printing a job from another application.<br />
The operating system is malfunctioning. Exit Windows and reboot the computer. Turn the machine off and back on<br />
again.<br />
If you are in a DOS environment, the font<br />
setting for your machine may be set<br />
incorrectly.<br />
The toner cartridge is defective or out of<br />
toner.<br />
See "Changing the font setting" on page 73.<br />
Redistribute the toner, if necessary.<br />
If necessary, replace the toner cartridge.<br />
The file may have blank pages. Check the file to ensure that it does not contain blank pages.<br />
Some parts, such as the controller or the<br />
board, may be defective.<br />
Contact a service representative.<br />
114
Printing problems<br />
Condition Possible cause Suggested solutions<br />
The machine does not<br />
print PDF files<br />
correctly. Some parts<br />
of graphics, text, or<br />
illustrations are<br />
missing.<br />
The print quality of<br />
photos is not good.<br />
Images are not clear.<br />
Before printing, the<br />
machine emits vapor<br />
near the output tray.<br />
The machine does not<br />
print special-sized<br />
paper, such as billing<br />
paper.<br />
The printed billing<br />
paper is curled.<br />
Incompatibility between the PDF file and<br />
the Acrobat products.<br />
6. Troubleshooting<br />
Printing the PDF file as an image may enable the file to print. Turn on Print<br />
As Image from the Acrobat printing options.<br />
It will take longer to print when you print a PDF file as an image.<br />
The resolution of the photo is very low. Reduce the photo size. If you increase the photo size in the software<br />
application, the resolution will be reduced.<br />
Using damp paper can cause vapor during<br />
printing.<br />
Paper size and paper size setting do not<br />
match.<br />
This is not a problem. Just keep printing, and/or replace with fresh paper.<br />
Set the correct paper size in the Custom in Paper tab in Printing<br />
Preferences.<br />
The paper type setting does not match. Change the printer option and try again. Go to Printing Preferences , click<br />
Paper tab, and set type to Thick.<br />
115
Printing quality problems<br />
6. Troubleshooting<br />
If the inside of the machine is dirty or paper has been loaded improperly, there might be a reduction in print quality. See the table below to<br />
clear the problem.<br />
Condition Suggested Solutions<br />
Light or faded print • If a vertical white streak or faded area appears on the page, the toner supply is low. Install a new toner cartridge.<br />
The top half of the paper is<br />
printed lighter than the<br />
rest of the paper<br />
• The paper may not meet paper specifications; for example, the paper may be too moist or rough.<br />
• If the entire page is light, the print resolution setting is too low or the toner save mode is on. Adjust the print<br />
resolution and turn the toner save mode off. See the help screen of the printer driver.<br />
• A combination of faded or smeared defects may indicate that the toner cartridge needs cleaning. Clean the<br />
inside of your machine.<br />
• The surface of the LSU part inside the machine may be dirty. Clean the inside of your machine. If these steps do<br />
not correct the problem, contact a service representative.<br />
The toner might not adhere properly to this type of paper.<br />
• Change the printer option and try again. Go to Printing Preferences , click the Paper tab, and set the paper<br />
type to Recycled.<br />
116
Printing quality problems<br />
Toner specks • The paper may not meet specifications; for example, the paper may be too moist or rough.<br />
AaBbCc<br />
AaBbCc<br />
AaBbCc<br />
AaBbCc<br />
AaBbCc<br />
• The transfer roller may be dirty. Clean the inside of your machine.<br />
• The paper path may need cleaning. Contact a service representative.<br />
Dropouts If faded areas, generally rounded, occur randomly on the page:<br />
AaBbC<br />
AaBbC<br />
AaBbC<br />
AaBbC<br />
AaBbC<br />
Condition Suggested Solutions<br />
• A single sheet of paper may be defective. Try reprinting the job.<br />
6. Troubleshooting<br />
• The moisture content of the paper is uneven or the paper has moist spots on its surface. Try a different brand of<br />
paper.<br />
• The paper lot is bad. The manufacturing processes can cause some areas to reject toner. Try a different kind or<br />
brand of paper.<br />
• Change the printer option and try again. Go to Printing Preferences, click the Paper tab, and set type to Thick<br />
or Thicker (see Basic Guide for paper weights for each sheet).<br />
If these steps do not correct the problem, contact a service representative.<br />
White Spots If white spots appear on the page:<br />
• The paper is too rough and a lot of dirt from paper falls to the inner components within the machine, so the<br />
transfer roller may be dirty. Clean the inside of your machine.<br />
• The paper path may need cleaning. Clean the inside of your machine.<br />
If these steps do not correct the problem, contact a service representative.<br />
117
Printing quality problems<br />
Condition Suggested Solutions<br />
Vertical lines If black vertical streaks appear on the page:<br />
6. Troubleshooting<br />
• The surface (drum part) of the imaging unit inside the machine has probably been scratched. Remove the toner<br />
cartridge and install a new one.<br />
If white vertical streaks appear on the page:<br />
• The surface of the LSU part inside the machine may be dirty. Clean the inside of your machine. If these steps do<br />
not correct the problem, contact a service representative.<br />
Black background If the amount of background shading becomes unacceptable:<br />
• Change to a lighter weight paper.<br />
• Check the environmental conditions: very dry conditions or a high level of humidity (higher than 80% RH) can<br />
increase the amount of background shading.<br />
• Remove the old imaging unit and install a new one.<br />
Toner smear • Clean the inside of the machine.<br />
• Check the paper type and quality.<br />
• Remove the imaging unit and install a new one.<br />
118
Printing quality problems<br />
Vertical repetitive defects If marks repeatedly appear on the printed side of the page at even intervals:<br />
6. Troubleshooting<br />
• The imaging unit may be damaged. If you still have the same problem, remove the imaging unit and, install a<br />
new one.<br />
• Parts of the machine may have toner on them. If the defects occur on the back of the page, the problem will<br />
likely correct itself after a few more pages.<br />
• The fusing assembly may be damaged. Contact a service representative.<br />
Background scatter Background scatter results from bits of toner randomly distributed on the printed page.<br />
A<br />
Condition Suggested Solutions<br />
Toner particles are around<br />
bold characters or pictures<br />
• The paper may be too damp. Try printing with a different batch of paper. Do not open packages of paper until<br />
necessary so that the paper does not absorb too much moisture.<br />
• If background scatter occurs on an envelope, change the printing layout to avoid printing over areas that have<br />
overlapping seams on the reverse side. Printing on seams can cause problems.<br />
• If background scatter covers the entire surface area of a printed page, adjust the print resolution through your<br />
software application or in Printing Preferences.Ensure the correct paper type is selected. For example: If<br />
Thicker Paper is selected, but Plain Paper actually used, an overcharging can occur causing this copy quality<br />
problem.<br />
The toner might not adhere properly to this type of paper.<br />
• Change the printer option and try again. Go to Printing Preferences, click the Paper tab, and set the paper type<br />
to Recycled. Ensure the correct paper type is selected. For example: If Thicker Paper is selected, but Plain<br />
Paper actually used, an overcharging can occur causing this copy quality problem.<br />
119
Printing quality problems<br />
Condition Suggested Solutions<br />
6. Troubleshooting<br />
Misformed characters • If characters are improperly formed and producing hollow images, the paper stock may be too slick. Try<br />
different paper.<br />
Page skew • Ensure that the paper is loaded properly.<br />
• Check the paper type and quality.<br />
• Ensure that the guides are not too tight or too loose against the paper stack.<br />
Curl or wave • Ensure that the paper is loaded properly.<br />
• Check the paper type and quality. Both high temperature and humidity can cause paper curl.<br />
• Turn the stack of paper over in the tray. Also try rotating the paper 180° in the tray and/or replace with fresh<br />
paper.<br />
120
Printing quality problems<br />
Wrinkles or creases • Ensure that the paper is loaded properly.<br />
• Check the paper type and quality.<br />
6. Troubleshooting<br />
• Turn the stack of paper over in the tray. Also try rotating the paper 180° in the tray and/or replace with fresh<br />
paper.<br />
Back of printouts are dirty • Check for leaking toner. Clean the inside of the machine.<br />
Solid color or black pages • The imaging unit may not be installed properly. Remove the imaging unit and reinsert it.<br />
A<br />
Condition Suggested Solutions<br />
• The imaging unit may be defective. Remove the imaging unit and install a new one.<br />
• The machine may require repairing. Contact a service representative.<br />
121
Printing quality problems<br />
Loose toner • Clean the inside of the machine.<br />
• Check the paper type and quality.<br />
• Remove the imaging unit and then, install a new one.<br />
If the problem persists, the machine may require repair. Contact a service representative.<br />
Character voids Character voids are white areas within parts of characters that should be solid black:<br />
A<br />
Condition Suggested Solutions<br />
6. Troubleshooting<br />
• If you are using transparencies, try another type of transparency. Because of the composition of transparencies,<br />
some character voids are normal.<br />
• You may be printing on the wrong surface of the paper. Remove the paper and turn it around.<br />
• The paper may not meet paper specifications.<br />
Horizontal stripes If horizontally aligned black streaks or smears appear:<br />
• The imaging unit may be installed improperly. Remove the imaging unit and reinsert it.<br />
• The imaging unit may be defective. Remove the imaging unit and install a new one.<br />
If the problem persists, the machine may require repairing. Contact a service representative.<br />
122
Printing quality problems<br />
Curl If the printed paper is curled or paper does not feed into the machine:<br />
• An unknown image<br />
repetitively appears on<br />
a few sheets<br />
• Loose toner<br />
Condition Suggested Solutions<br />
• Light printor<br />
contamination occurs<br />
6. Troubleshooting<br />
• Turn the stack of paper over in the tray. Also try rotating the paper 180° in the tray and/or replace with fresh<br />
paper.<br />
• Change the printer’s paper option and try again. Go to Printing Preferences, click the Paper tab, and set type<br />
to Thin.<br />
Your machine is probably being used at an altitude of 1,000 m (3,281 ft) or above.<br />
The high altitude may affect the print quality, such as loose toner or light imaging. Change the altitude setting for<br />
your machine (See "Altitude adjustment" on page 72).<br />
123
Operating system problems<br />
1<br />
Common Windows problems<br />
Condition Suggested solutions<br />
“File in Use” message<br />
appears during<br />
installation.<br />
“General Protection<br />
Fault”, “Exception OE”,<br />
“Spool 32”, or “Illegal<br />
Operation” messages<br />
appear.<br />
“Fail To Print”, “A printer<br />
timeout error occurred”<br />
message appear.<br />
6. Troubleshooting<br />
Exit all software applications. Remove all software from the startup group, then restart Windows. Reinstall the<br />
printer driver.<br />
Close all other applications, reboot Windows and try printing again.<br />
These messages may appear during printing. Just keep waiting until the machine finishes printing. If the message<br />
appears in ready mode or after printing has completed, check the connection and/or whether an error has<br />
occurred.<br />
Refer to the Microsoft Windows OS User’s Guide that came with your computer for further information on Windows error messages.<br />
124
Operating system problems<br />
2<br />
Common Macintosh problems<br />
Condition Suggested solutions<br />
The machine does not print PDF<br />
files correctly. Some parts of<br />
graphics, text, or illustrations are<br />
missing.<br />
The document has printed, but the<br />
print job has not disappeared from<br />
the spooler in Mac OS X10.3.2.<br />
Some letters are not displayed<br />
normally during cover page<br />
printing.<br />
When printing a document in<br />
Macintosh with Acrobat<br />
Reader 6.0 or higher, colors print<br />
incorrectly.<br />
6. Troubleshooting<br />
Printing the PDF file as an image may enable the file to print. Turn on Print As Image from the Acrobat<br />
printing options.<br />
It will take longer to print when you print a PDF file as an image.<br />
Update your MAC OS to MAC OS X 10.3.3 or higher.<br />
Mac OS cannot create the font while printing the cover page. The English alphabet and numbers are<br />
displayed normally on the cover page.<br />
Make sure that the resolution setting in your machine driver matches the one in Acrobat Reader.<br />
Refer to the Macintosh User’s Guide that came with your computer for further information on Macintosh error messages.<br />
125
Operating system problems<br />
3<br />
Common Linux problems<br />
Condition Suggested solutions<br />
The machine does not<br />
print.<br />
The machine does not<br />
print whole pages, and<br />
output is printed on half<br />
the page.<br />
“Cannot open port device<br />
file” error message<br />
appears when printing a<br />
document.<br />
6. Troubleshooting<br />
• Check if the printer driver is installed in your system. Open Unified Driver Configurator and switch to the<br />
Printers tab in the Printers configuration window to look at the list of available machines. Make sure that<br />
your machine is displayed on the list. If not, open Add new printer wizard to set up your device.<br />
• Check if the machine is started. Open Printers configuration and select your machine from the printers list.<br />
Look at the description in the Selected printer pane. If its status contains Stopped, press the Start button.<br />
Normal operation of the machine should be restored. The “stopped” status might be activated when some<br />
problems in printing occur.<br />
• Check if your application has special print options such as “-oraw”. If “-oraw” is specified in the command line<br />
parameter, then remove it to print properly. For Gimp front-end, select “print” -> “Setup printer” and edit the<br />
command line parameter in the command item.<br />
It is a known problem that occurs when a color machine is used on version 8.51 or earlier of Ghostscript, 64-bit<br />
Linux OS, and has been reported to bugs.ghostscript.com as Ghostscript Bug 688252.The problem is solved in<br />
AFPL Ghostscript v. 8.52 or above. Download the latest version of AFPL Ghostscript from http://sourceforge.net/<br />
projects/ghostscript/ and install it to solve this problem.<br />
Avoid changing print job parameters (e.q., via LPR GUI) while a print job is in progress. Known versions of CUPS<br />
server break the print job whenever print options are changed and then try to restart the job from the beginning.<br />
Since Unified Linux Driver locks the port while printing, the abrupt termination of the driver keeps the port locked<br />
and unavailable for subsequent print jobs. If this situation occurs, try to release the port by selecting Release port<br />
in the Port configuration window.<br />
126
Operating system problems<br />
4<br />
Refer to the Linux User’s Guide that came with your computer for further information on Linux error messages.<br />
Common PostScript problems<br />
The following situations are PS language specific and may occur when several printer languages are used.<br />
Problem Possible cause Solution<br />
The PostScript file cannot<br />
be printed.<br />
Limit Check Error report<br />
prints.<br />
A PostScript error page<br />
prints.<br />
The optional tray is not<br />
selected in the driver.<br />
The PostScript driver may not be installed<br />
correctly.<br />
6. Troubleshooting<br />
• Install the PostScript driver (see "Software installation" on page 4).<br />
• Print a configuration page and verify that the PS version is available<br />
for printing.<br />
• If the problem persists, contact a service representative.<br />
The print job was too complex. You might need to reduce the complexity of the page or install more<br />
memory.<br />
The print job may not be PostScript. Make sure that the print job is a PostScript job. Check to see whether<br />
the software application expected a setup or PostScript header file to<br />
be sent to the machine.<br />
The printer driver has not been<br />
configured to recognize the optional tray.<br />
Open the PostScript driver properties, select the Device Options tab,<br />
and set the tray option.<br />
127
Contact SAMSUNG worldwide<br />
If you have any comments or questions regarding Samsung<br />
products, contact the Samsung customer care center.<br />
Country/Region Customer Care Center Web Site<br />
ALBANIA 42 27 5755<br />
ARGENTINE 0800-333-3733 www.samsung.com<br />
ARMENIA 0-800-05-555<br />
AUSTRALIA 1300 362 603 www.samsung.com<br />
AUSTRIA<br />
0810-SAMSUNG (7267864, €<br />
0.07/min)<br />
AZERBAIJAN 088-55-55-555<br />
www.samsung.com<br />
BAHRAIN 8000-4726 www.samsung.com<br />
BELARUS 810-800-500-55-500<br />
BELGIUM<br />
BOSNIA 05 133 1999<br />
BRAZIL<br />
02-201-24-18 www.samsung.com<br />
/be (Dutch)<br />
0800-124-421<br />
4004-0000<br />
www.samsung.com<br />
/be_fr (French)<br />
www.samsung.com<br />
BULGARIA 07001 33 11 www.samsung.com<br />
Country/Region Customer Care Center Web Site<br />
128<br />
CANADA 1-800-SAMSUNG (726-7864) www.samsung.com<br />
CHILE 800-SAMSUNG (726-7864) www.samsung.com<br />
CHINA 400-810-5858 www.samsung.com<br />
COLOMBIA 01-8000112112 www.samsung.com<br />
COSTA RICA 0-800-507-7267 www.samsung.com<br />
CROATIA<br />
CZECH<br />
REPUBLIC<br />
062 SAMSUNG (062 726<br />
7864)<br />
800-SAMSUNG (800-<br />
726786)<br />
www.samsung.com<br />
www.samsung.com<br />
Samsung Zrt., česká organizační složka, Oasis<br />
Florenc, Sokolovská394/17, 180 00, Praha 8<br />
DENMARK 70 70 19 70 www.samsung.com<br />
DOMINICA 1-800-751-2676 www.samsung.com<br />
ECUADOR 1-800-10-7267 www.samsung.com<br />
EGYPT 0800-726786 www.samsung.com<br />
EIRE 0818 717100 www.samsung.com<br />
EL SALVADOR 800-6225 www.samsung.com<br />
ESTONIA 800-7267 www.samsung.com<br />
FINLAND 030-6227 515 www.samsung.com
Contact SAMSUNG worldwide<br />
Country/Region Customer Care Center Web Site<br />
FRANCE 01 48 63 00 00 www.samsung.com<br />
GERMANY<br />
01805 - SAMSUNG (726-<br />
7864 € 0,14/min)<br />
GEORGIA 8-800-555-555<br />
GREECE<br />
IT and Mobile : 80111-<br />
SAMSUNG (80111 7267864)<br />
from land line, local charge/<br />
from mobile, 210 6897691<br />
Cameras, Camcorders,<br />
Televisions and Household<br />
Appliances<br />
From mobile and fixed<br />
2106293100<br />
www.samsung.com<br />
www.samsung.com<br />
GUATEMALA 1-800-299-0013 www.samsung.com<br />
HONDURAS 800-27919267 www.samsung.com<br />
HONG KONG<br />
(852) 3698-4698 www.samsung.com<br />
/hk<br />
www.samsung.com<br />
/hk_en/<br />
HUNGARY 06-80-SAMSUNG (726-7864) www.samsung.com<br />
Country/Region Customer Care Center Web Site<br />
INDIA<br />
INDONESIA<br />
3030 8282<br />
1800 3000 8282<br />
0800-112-8888<br />
021-5699-7777<br />
129<br />
www.samsung.com<br />
www.samsung.com<br />
IRAN 021-8255 www.samsung.com<br />
ITALY 800-SAMSUNG (726-7864) www.samsung.com<br />
JAMAICA 1-800-234-7267 www.samsung.com<br />
JAPAN 0120-327-527 www.samsung.com<br />
JORDAN 800-22273 www.samsung.com<br />
KAZAKHSTAN<br />
8-10-800-500-55-500<br />
(GSM:7799)<br />
KOSOVO +381 0113216899<br />
www.samsung.com<br />
KUWAIT 183-2255 www.samsung.com<br />
KYRGYZSTAN 00-800-500-55-500 www.samsung.com<br />
LATVIA 8000-7267 www.samsung.com<br />
LITHUANIA 8-800-77777 www.samsung.com<br />
LUXEMBURG 261 03 710 www.samsung.com<br />
MALAYSIA 1800-88-9999 www.samsung.com
Contact SAMSUNG worldwide<br />
Country/Region Customer Care Center Web Site<br />
MACEDONIA 023 207 777<br />
MEXICO<br />
01-800-SAMSUNG (726-<br />
7864)<br />
MOLDOVA 00-800-500-55-500<br />
MONTENEGRO 020 405 888<br />
www.samsung.com<br />
MOROCCO 080 100 2255 www.samsung.com<br />
NIGERIA 080-SAMSUNG(726-7864) www.samsung.com<br />
NETHERLANDS<br />
NEW ZEALAND<br />
0900-SAMSUNG (0900-<br />
7267864) (€ 0,10/min)<br />
0800 SAMSUNG (0800 726<br />
786)<br />
www.samsung.com<br />
www.samsung.com<br />
NICARAGUA 00-1800-5077267 www.samsung.com<br />
NORWAY 815-56 480 www.samsung.com<br />
OMAN 800-SAMSUNG (726-7864) www.samsung.com<br />
PANAMA 800-7267 www.samsung.com<br />
PERU 0-800-777-08 www.samsung.com<br />
Country/Region Customer Care Center Web Site<br />
PHILIPPINES<br />
POLAND<br />
PORTUGAL<br />
1800-10-SAMSUNG (726-<br />
7864)<br />
1-800-3-SAMSUNG (726-<br />
7864)<br />
1-800-8-SAMSUNG (726-<br />
7864)<br />
02-5805777<br />
0 801 1SAMSUNG (172678)<br />
022-607-93-33<br />
80820-SAMSUNG (726-<br />
7864)<br />
130<br />
www.samsung.com<br />
www.samsung.com<br />
www.samsung.com<br />
PUERTO RICO 1-800-682-3180 www.samsung.com<br />
RUMANIA<br />
08010 SAMSUNG (08010<br />
726 7864) only from<br />
landline, local network<br />
Romtelecom - local tariff /<br />
021 206 01 10 for landline<br />
and mobile, normal tariff.<br />
www.samsung.com<br />
RUSSIA 8-800-555-55-55 www.samsung.com<br />
SAUDI ARABIA 9200-21230 www.samsung.com<br />
SERBIA<br />
0700 SAMSUNG (0700 726<br />
7864)<br />
www.samsung.com
Contact SAMSUNG worldwide<br />
Country/Region Customer Care Center Web Site<br />
SINGAPORE 1800-SAMSUNG (726-7864) www.samsung.com<br />
SLOVAKIA 0800-SAMSUNG (726-7864) www.samsung.com<br />
SOUTH AFRICA 0860 SAMSUNG (726-7864) www.samsung.com<br />
SPAIN<br />
902-1-SAMSUNG(902 172<br />
678)<br />
www.samsung.com<br />
SWEDEN 0771 726 7864 (SAMSUNG) www.samsung.com<br />
SWITZERLAND<br />
0848-SAMSUNG (7267864,<br />
CHF 0.08/min)<br />
www.samsung.com<br />
/ch<br />
www.samsung.com<br />
/ch_fr/<br />
TADJIKISTAN 8-10-800-500-55-500 www.samsung.com<br />
TAIWAN 0800-329-999 www.samsung.com<br />
THAILAND<br />
TRINIDAD &<br />
TOBAGO<br />
1800-29-3232<br />
02-689-3232<br />
www.samsung.com<br />
1-800-SAMSUNG (726-7864) www.samsung.com<br />
TURKEY 444 77 11 www.samsung.com<br />
U.A.E 800-SAMSUNG (726-7864) www.samsung.com<br />
U.K 0330 SAMSUNG (726-7864) www.samsung.com<br />
Country/Region Customer Care Center Web Site<br />
U.S.A 1-800-SAMSUNG (726-7864) www.samsung.com<br />
UKRAINE<br />
131<br />
0-800-502-000 www.samsung.com<br />
/ua<br />
www.samsung.com<br />
/ua_ru<br />
UZBEKISTAN 8-10-800-500-55-500 www.samsung.com<br />
VENEZUELA 0-800-100-5303 www.samsung.com<br />
VIETNAM 1 800 588 889 www.samsung.com
Glossary<br />
802.11<br />
The following glossary helps you get familiar with the<br />
product by understanding the terminologies commonly<br />
used with printing as well as mentioned in this user’s guide.<br />
802.11 is a set of standards for wireless local area network (WLAN)<br />
communication, developed by the IEEE LAN/MAN Standards<br />
Committee (IEEE 802).<br />
802.11b/g/n<br />
802.11b/g/n can share same hardware and use the 2.4 GHz band.<br />
802.11b supports bandwidth up to 11 Mbps, 802.11n supports<br />
bandwidth up to 150 Mbps. 802.11b/g/n devices may occasionally<br />
suffer interference from microwave ovens, cordless telephones, and<br />
Bluetooth devices.<br />
Access point<br />
Access Point or Wireless Access Point (AP or WAP) is a device that<br />
connects wireless communication devices together on wireless local<br />
area networks (WLAN), and acts as a central transmitter and receiver<br />
of WLAN radio signals.<br />
ADF<br />
An Automatic Document Feeder (ADF) is a scanning unit that will<br />
automatically feed an original sheet of paper so that the machine<br />
can scan some amount of the paper at once.<br />
AppleTalk<br />
AppleTalk is a proprietary suite of protocols developed by Apple, Inc<br />
for computer networking. It was included in the original Macintosh<br />
(1984) and is now deprecated by Apple in favor of TCP/IP<br />
networking.<br />
BIT Depth<br />
132<br />
A computer graphics term describing the number of bits used to<br />
represent the color of a single pixel in a bitmapped image. Higher<br />
color depth gives a broader range of distinct colors. As the number<br />
of bits increases, the number of possible colors becomes<br />
impractically large for a color map. 1-bit color is commonly called as<br />
monochrome or black and white.<br />
BMP<br />
A bitmapped graphics format used internally by the Microsoft<br />
Windows graphics subsystem (GDI), and used commonly as a simple<br />
graphics file format on that platform.
Glossary<br />
BOOTP<br />
Bootstrap Protocol. A network protocol used by a network client to<br />
obtain its IP address automatically. This is usually done in the<br />
bootstrap process of computers or operating systems running on<br />
them. The BOOTP servers assign the IP address from a pool of<br />
addresses to each client. BOOTP enables 'diskless workstation'<br />
computers to obtain an IP address prior to loading any advanced<br />
operating system.<br />
CCD<br />
Charge Coupled Device (CCD) is a hardware which enables the scan<br />
job. CCD Locking mechanism is also used to hold the CCD module to<br />
prevent any damage when you move the machine.<br />
Collation<br />
Collation is a process of printing a multiple-copy job in sets. When<br />
collation is selected, the device prints an entire set before printing<br />
additional copies.<br />
Control Panel<br />
A control panel is a flat, typically vertical, area where control or<br />
monitoring instruments are displayed. They are typically found in<br />
front of the machine.<br />
Coverage<br />
133<br />
It is the printing term used for a toner usage measurement on<br />
printing. For example, 5% coverage means that an A4 sided paper<br />
has about 5% image or text on it. So, if the paper or original has<br />
complicated images or lots of text on it, the coverage will be higher<br />
and at the same time, a toner usage will be as much as the coverage.<br />
CSV<br />
Comma Separated Values (CSV). A type of file format, CSV is used to<br />
exchange data between disparate applications. The file format, as it<br />
is used in Microsoft Excel, has become a de facto standard<br />
throughout the industry, even among non-Microsoft platforms.<br />
DADF<br />
A Duplex Automatic Document Feeder (DADF) is a scanning unit that<br />
will automatically feed and turn over an original sheet of paper so<br />
that the machine can scan on both sides of the paper.<br />
Default<br />
The value or setting that is in effect when taking a printer out of its<br />
box state, reset, or initialized.
Glossary<br />
DHCP<br />
A Dynamic Host Configuration Protocol (DHCP) is a client-server<br />
networking protocol. A DHCP server provides configuration<br />
parameters specific to the DHCP client host requesting, generally,<br />
information required by the client host to participate on an IP<br />
network. DHCP also provides a mechanism for allocation of IP<br />
addresses to client hosts.<br />
DIMM<br />
Dual Inline Memory Module (DIMM), a small circuit board that holds<br />
memory. DIMM stores all the data within the machine like printing<br />
data, received fax data.<br />
DLNA<br />
The Digital Living Network Alliance (DLNA) is a standard that allows<br />
devices on a home network to share information with each other<br />
across the network.<br />
DNS<br />
The Domain Name Server (DNS) is a system that stores information<br />
associated with domain names in a distributed database on<br />
networks, such as the Internet.<br />
Dot Matrix Printer<br />
A dot matrix printer refers to a type of computer printer with a print<br />
head that runs back and forth on the page and prints by impact,<br />
striking an ink-soaked cloth ribbon against the paper, much like a<br />
typewriter.<br />
DPI<br />
Dots Per Inch (DPI) is a measurement of resolution that is used for<br />
scanning and printing. Generally, higher DPI results in a higher<br />
resolution, more visible detail in the image, and a larger file size.<br />
DRPD<br />
Distinctive Ring Pattern Detection. Distinctive Ring is a telephone<br />
company service which enables a user to use a single telephone line<br />
to answer several different telephone numbers.<br />
Duplex<br />
A mechanism that will automatically turn over a sheet of paper so<br />
that the machine can print (or scan) on both sides of the paper. A<br />
printer equipped with a Duplex Unit can print on both sides of paper<br />
during one print cycle.<br />
134
Glossary<br />
Duty Cycle<br />
Duty cycle is the page quantity which does not affect printer<br />
performance for a month. Generally the printer has the lifespan<br />
limitation such as pages per year. The lifespan means the average<br />
capacity of print-outs, usually within the warranty period. For<br />
example, if the duty cycle is 48,000 pages per month assuming 20<br />
working days, a printer limits 2,400 pages a day.<br />
ECM<br />
Error Correction Mode (ECM) is an optional transmission mode built<br />
into Class 1 fax machines or fax modems. It automatically detects<br />
and corrects errors in the fax transmission process that are<br />
sometimes caused by telephone line noise.<br />
Emulation<br />
Emulation is a technique of one machine obtaining the same results<br />
as another.<br />
An emulator duplicates the functions of one system with a different<br />
system, so that the second system behaves like the first system.<br />
Emulation focuses on exact reproduction of external behavior,<br />
which is in contrast to simulation, which concerns an abstract model<br />
of the system being simulated, often considering its internal state.<br />
Ethernet<br />
Ethernet is a frame-based computer networking technology for local<br />
area networks (LANs). It defines wiring and signaling for the physical<br />
layer, and frame formats and protocols for the media access control<br />
(MAC)/data link layer of the OSI model. Ethernet is mostly<br />
standardized as IEEE 802.3. It has become the most widespread LAN<br />
technology in use during the 1990s to the present.<br />
EtherTalk<br />
A suite of protocols developed by Apple Computer for computer<br />
networking. It was included in the original Macintosh (1984) and is<br />
now deprecated by Apple in favor of TCP/IP networking.<br />
FDI<br />
Foreign Device Interface (FDI) is a card installed inside the machine<br />
to allow a third party device such as a coin operated device or a card<br />
reader. Those devices allow the pay-for-print service on your<br />
machine.<br />
FTP<br />
A File Transfer Protocol (FTP) is a commonly used protocol for<br />
exchanging files over any network that supports the TCP/IP protocol<br />
(such as the Internet or an intranet).<br />
135
Glossary<br />
Fuser Unit<br />
The part of a laser printer that fuses the toner onto the print media.<br />
It consists of a heat roller and a pressure roller. After toner is<br />
transferred onto the paper, the fuser unit applies heat and pressure<br />
to ensure that the toner stays on the paper permanently, which is<br />
why paper is warm when it comes out of a laser printer.<br />
Gateway<br />
A connection between computer networks, or between a computer<br />
network and a telephone line. It is very popular, as it is a computer or<br />
a network that allows access to another computer or network.<br />
Grayscale<br />
A shades of gray that represent light and dark portions of an image<br />
when color images are converted to grayscale; colors are<br />
represented by various shades of gray.<br />
Halftone<br />
An image type that simulates grayscale by varying the number of<br />
dots. Highly colored areas consist of a large number of dots, while<br />
lighter areas consist of a smaller number of dots.<br />
Mass storage device<br />
Mass storage device, commonly referred to as a hard drive or hard<br />
disk, is a non-volatile storage device which stores digitally-encoded<br />
data on rapidly rotating platters with magnetic surfaces.<br />
IEEE<br />
The Institute of Electrical and Electronics Engineers (IEEE) is an<br />
international non-profit, professional organization for the<br />
advancement of technology related to electricity.<br />
IEEE 1284<br />
The 1284 parallel port standard was developed by the Institute of<br />
Electrical and Electronics Engineers (IEEE). The term "1284-B" refers<br />
to a specific connector type on the end of the parallel cable that<br />
attaches to the peripheral (for example, a printer).<br />
Intranet<br />
136<br />
A private network that uses Internet Protocols, network connectivity,<br />
and possibly the public telecommunication system to securely share<br />
part of an organization's information or operations with its<br />
employees. Sometimes the term refers only to the most visible<br />
service, the internal website.
Glossary<br />
IP address<br />
An Internet Protocol (IP) address is a unique number that devices use<br />
in order to identify and communicate with each other on a network<br />
utilizing the Internet Protocol standard.<br />
IPM<br />
The Images Per Minute (IPM) is a way of measuring the speed of a<br />
printer. An IPM rate indicates the number of single-sided sheets a<br />
printer can complete within one minute.<br />
IPP<br />
The Internet Printing Protocol (IPP) defines a standard protocol for<br />
printing as well as managing print jobs, media size, resolution, and<br />
so forth. IPP can be used locally or over the Internet to hundreds of<br />
printers, and also supports access control, authentication, and<br />
encryption, making it a much more capable and secure printing<br />
solution than older ones.<br />
IPX/SPX<br />
137<br />
IPX/SPX stands for Internet Packet Exchange/Sequenced Packet<br />
Exchange. It is a networking protocol used by the Novell NetWare<br />
operating systems. IPX and SPX both provide connection services<br />
similar to TCP/IP, with the IPX protocol having similarities to IP, and<br />
SPX having similarities to TCP. IPX/SPX was primarily designed for<br />
local area networks (LANs), and is a very efficient protocol for this<br />
purpose (typically its performance exceeds that of TCP/IP on a LAN).<br />
ISO<br />
The International Organization for Standardization (ISO) is an<br />
international standard-setting body composed of representatives<br />
from national standards bodies. It produces world-wide industrial<br />
and commercial standards.<br />
ITU-T<br />
The International Telecommunication Union is an international<br />
organization established to standardize and regulate international<br />
radio and telecommunications. Its main tasks include<br />
standardization, allocation of the radio spectrum, and organizing<br />
interconnection arrangements between different countries to allow<br />
international phone calls. A -T out of ITU-T indicates<br />
telecommunication.
Glossary<br />
ITU-T No. 1 chart<br />
Standardized test chart published by ITU-T for document facsimile<br />
transmissions.<br />
JBIG<br />
Joint Bi-level Image Experts Group (JBIG) is an image compression<br />
standard with no loss of accuracy or quality, which was designed for<br />
compression of binary images, particularly for faxes, but can also be<br />
used on other images.<br />
JPEG<br />
Joint Photographic Experts Group (JPEG) is a most commonly used<br />
standard method of lossy compression for photographic images. It is<br />
the format used for storing and transmitting photographs on the<br />
World Wide Web.<br />
LDAP<br />
The Lightweight Directory Access Protocol (LDAP) is a networking<br />
protocol for querying and modifying directory services running over<br />
TCP/IP.<br />
LED<br />
A Light-Emitting Diode (LED) is a semiconductor device that<br />
indicates the status of a machine.<br />
LSU<br />
LSU is a laser scanning unit that forms electric potential images on<br />
the OPC drum by focusing a laser beam off the rotating polygon<br />
mirror then through the lens<br />
MAC address<br />
Media Access Control (MAC) address is a unique identifier associated<br />
with a network adapter. MAC address is a unique 48-bit identifier<br />
usually written as 12 hexadecimal characters grouped in pairs (e. g.,<br />
00-00-0c-34-11-4e). This address is usually hard-coded into a<br />
Network Interface Card (NIC) by its manufacturer, and used as an aid<br />
for routers trying to locate machines on large networks.<br />
MFP<br />
Multi Function Peripheral (MFP) is an office machine that includes<br />
the following functionality in one physical body, so as to have a<br />
printer, a copier, a fax, a scanner and etc.<br />
138
Glossary<br />
MH<br />
Modified Huffman (MH) is a compression method for decreasing the<br />
amount of data that needs to be transmitted between the fax<br />
machines to transfer the image recommended by ITU-T T.4. MH is a<br />
codebook-based run-length encoding scheme optimized to<br />
efficiently compress white space. As most faxes consist mostly of<br />
white space, this minimizes the transmission time of most faxes.<br />
MMR<br />
Modified Modified READ (MMR) is a compression method<br />
recommended by ITU-T T.6.<br />
Modem<br />
A device that modulates a carrier signal to encode digital<br />
information, and also demodulates such a carrier signal to decode<br />
transmitted information.<br />
MR<br />
Modified Read (MR) is a compression method recommended by ITU-<br />
T T.4. MR encodes the first scanned line using MH. The next line is<br />
compared to the first, the differences determined, and then the<br />
differences are encoded and transmitted.<br />
NetWare<br />
A network operating system developed by Novell, Inc. It initially used<br />
cooperative multitasking to run various services on a PC, and the<br />
network protocols were based on the archetypal Xerox XNS stack.<br />
Today NetWare supports TCP/IP as well as IPX/SPX.<br />
OPC<br />
Organic Photo Conductor (OPC) is a mechanism that makes a virtual<br />
image for print using a laser beam emitted from a laser printer, and<br />
it is usually green or rust colored and has a cylinder shape.<br />
An imaging unit containing a drum slowly wears the drum surface by<br />
its usage in the printer, and it should be replaced appropriately since<br />
it gets worn from contact with the cartridge development brush,<br />
cleaning mechanism, and paper.<br />
Originals<br />
139<br />
The first example of something, such as a document, photograph or<br />
text, etc, which is copied, reproduced or translated to produce<br />
others, but which is not itself copied or derived from something else.
Glossary<br />
OSI<br />
Open Systems Interconnection (OSI) is a model developed by the<br />
International Organization for Standardization (ISO) for<br />
communications. OSI offers a standard, modular approach to<br />
network design that divides the required set of complex functions<br />
into manageable, self-contained, functional layers. The layers are,<br />
from top to bottom, Application, Presentation, Session, Transport,<br />
Network, Data Link and Physical.<br />
PABX<br />
A private automatic branch exchange (PABX) is an automatic<br />
telephone switching system within a private enterprise.<br />
PCL<br />
Printer Command Language (PCL) is a Page Description Language<br />
(PDL) developed by HP as a printer protocol and has become an<br />
industry standard. Originally developed for early inkjet printers, PCL<br />
has been released in varying levels for thermal, dot matrix printer,<br />
and laser printers.<br />
PDF<br />
Portable Document Format (PDF) is a proprietary file format<br />
developed by Adobe Systems for representing two dimensional<br />
documents in a device independent and resolution independent<br />
format.<br />
PostScript<br />
PostScript (PS) is a page description language and programming<br />
language used primarily in the electronic and desktop publishing<br />
areas. - that is run in an interpreter to generate an image.<br />
Printer Driver<br />
A program used to send commands and transfer data from the<br />
computer to the printer.<br />
Print Media<br />
The media like paper, envelopes, labels, and transparencies which<br />
can be used in a printer, a scanner, a fax or, a copier.<br />
140
Glossary<br />
PPM<br />
Pages Per Minute (PPM) is a method of measurement for<br />
determining how fast a printer works, meaning the number of pages<br />
a printer can produce in one minute.<br />
PRN file<br />
An interface for a device driver, this allows software to interact with<br />
the device driver using standard input/output system calls, which<br />
simplifies many tasks.<br />
Protocol<br />
A convention or standard that controls or enables the connection,<br />
communication, and data transfer between two computing<br />
endpoints.<br />
PS<br />
See PostScript.<br />
PSTN<br />
The Public-Switched Telephone Network (PSTN) is the network of<br />
the world's public circuit-switched telephone networks which, on<br />
industrial premises, is usually routed through the switchboard.<br />
RADIUS<br />
Remote Authentication Dial In User Service (RADIUS) is a protocol for<br />
remote user authentication and accounting. RADIUS enables<br />
centralized management of authentication data such as usernames<br />
and passwords using an AAA (authentication, authorization, and<br />
accounting) concept to manage network access.<br />
Resolution<br />
The sharpness of an image, measured in Dots Per Inch (DPI). The<br />
higher the dpi, the greater the resolution.<br />
SMB<br />
141<br />
Server Message Block (SMB) is a network protocol mainly applied to<br />
share files, printers, serial ports, and miscellaneous communications<br />
between nodes on a network. It also provides an authenticated Interprocess<br />
communication mechanism.
Glossary<br />
SMTP<br />
Simple Mail Transfer Protocol (SMTP) is the standard for e-mail<br />
transmissions across the Internet. SMTP is a relatively simple, textbased<br />
protocol, where one or more recipients of a message are<br />
specified, and then the message text is transferred. It is a clientserver<br />
protocol, where the client transmits an email message to the<br />
server.<br />
SSID<br />
Service Set Identifier (SSID) is a name of a wireless local area network<br />
(WLAN). All wireless devices in a WLAN use the same SSID in order to<br />
communicate with each other. The SSIDs are case-sensitive and have<br />
a maximum length of 32 characters.<br />
Subnet Mask<br />
The subnet mask is used in conjunction with the network address to<br />
determine which part of the address is the network address and<br />
which part is the host address.<br />
TCP/IP<br />
The Transmission Control Protocol (TCP) and the Internet Protocol<br />
(IP); the set of communications protocols that implement the<br />
protocol stack on which the Internet and most commercial networks<br />
run.<br />
TCR<br />
Transmission Confirmation Report (TCR) provides details of each<br />
transmission such as job status, transmission result and number of<br />
pages sent. This report can be set to print after each job or only after<br />
failed transmissions.<br />
TIFF<br />
142<br />
Tagged Image File Format (TIFF) is a variable-resolution bitmapped<br />
image format. TIFF describes image data that typically come from<br />
scanners. TIFF images make use of tags, keywords defining the<br />
characteristics of the image that is included in the file. This flexible<br />
and platform-independent format can be used for pictures that have<br />
been made by various image processing applications.
Glossary<br />
Toner Cartridge<br />
A kind of bottle or container used in a machine like a printer which<br />
contains toner. Toner is a powder used in laser printers and<br />
photocopiers, which forms the text and images on the printed paper.<br />
Toner can be fused by by a combination of heat/pressure from the<br />
fuser, causing it to bind to the fibers in the paper.<br />
TWAIN<br />
An industry standard for scanners and software. By using a TWAINcompliant<br />
scanner with a TWAIN-compliant program, a scan can be<br />
initiated from within the program. It is an image capture API for<br />
Microsoft Windows and Apple Macintosh operating systems.<br />
UNC Path<br />
Uniform Naming Convention (UNC) is a standard way to access<br />
network shares in Window NT and other Microsoft products. The<br />
format of a UNC path is: \\\\<br />
URL<br />
Uniform Resource Locator (URL) is the global address of documents<br />
and resources on the Internet. The first part of the address indicates<br />
what protocol to use, the second part specifies the IP address or the<br />
domain name where the resource is located.<br />
USB<br />
Universal Serial Bus (USB) is a standard that was developed by the<br />
USB Implementers Forum, Inc., to connect computers and<br />
peripherals. Unlike the parallel port, USB is designed to concurrently<br />
connect a single computer USB port to multiple peripherals.<br />
Watermark<br />
A watermark is a recognizable image or pattern in paper that<br />
appears lighter when viewed by transmitted light. Watermarks were<br />
first introduced in Bologna, Italy in 1282; they have been used by<br />
papermakers to identify their product, and also on postage stamps,<br />
currency, and other government documents to discourage<br />
counterfeiting.<br />
143
Glossary<br />
WEP<br />
Wired Equivalent Privacy (WEP) is a security protocol specified in IEEE<br />
802.11 to provide the same level of security as that of a wired LAN.<br />
WEP provides security by encrypting data over radio so that it is<br />
protected as it is transmitted from one end point to another.<br />
WIA<br />
Windows Imaging Architecture (WIA) is an imaging architecture that<br />
is originally introduced in Windows Me and Windows XP. A scan can<br />
be initiated from within these operating systems by using a WIAcompliant<br />
scanner.<br />
WPA<br />
Wi-Fi Protected Access (WPA) is a class of systems to secure wireless<br />
(Wi-Fi) computer networks, which was created to improve upon the<br />
security features of WEP.<br />
WPA-PSK<br />
WPA-PSK (WPA Pre-Shared Key) is special mode of WPA for small<br />
business or home users. A shared key, or password, is configured in<br />
the wireless access point (WAP) and any wireless laptop or desktop<br />
devices. WPA-PSK generates a unique key for each session between<br />
a wireless client and the associated WAP for more advanced security.<br />
WPS<br />
The Wi-Fi Protected Setup (WPS) is a standard for establishing a<br />
wireless home network. If your wireless access point supports WPS,<br />
you can configure the wireless network connection easily without a<br />
computer.<br />
XPS<br />
X<strong>ML</strong> Paper Specification (XPS) is a specification for a Page<br />
Description Language (PDL) and a new document format, which has<br />
benefits for portable document and electronic document,<br />
developed by Microsoft. It is an X<strong>ML</strong>-based specification, based on a<br />
new print path and a vector-based device-independent document<br />
format.<br />
144
Index<br />
C<br />
Changing 73<br />
D<br />
direct printing utility 84<br />
driver installation<br />
F<br />
Unix 26<br />
features<br />
machine features 58<br />
font setting 73<br />
G<br />
general settings 63<br />
glossary 132<br />
I<br />
information<br />
L<br />
machine status 59<br />
layout 60<br />
Linux<br />
common Linux problems 126<br />
M<br />
driver installation for network connected24<br />
driver installation for USB cable connected<br />
8<br />
driver reinstallation for USB cable connected<br />
10<br />
printer properties 90<br />
printing 89<br />
unifled driver configurator 106<br />
using SetIP 15<br />
machine information 59<br />
Macintosh<br />
common Macintosh problems 125<br />
driver installation for network connected23<br />
driver installation for USB cable connected<br />
5<br />
driver reinstallation for USB cable connected<br />
7<br />
printing 87<br />
using SetIP 15<br />
macintosh<br />
using help 88<br />
menu map 59<br />
N<br />
network<br />
driver installation<br />
145<br />
Linux 24<br />
Macintosh 23<br />
UNIX 26<br />
Windows 17<br />
general setup 67<br />
introducing network programs 12<br />
IPv6 configuration 29<br />
SetIP program 13 15 52<br />
N-up printing<br />
O<br />
Macintosh 87<br />
overlay printing<br />
P<br />
create 81<br />
delete 82<br />
print 82<br />
paper 61<br />
placing a machine<br />
adjusting the altitude 72<br />
PostScript driver
Index<br />
troubleshooting 127<br />
print resolution set<br />
Linux 89<br />
printer preferences<br />
Linux 90<br />
Printer Status<br />
general information 103 104<br />
printing<br />
changing the default print settings 74<br />
Linux 89<br />
Macintosh 87<br />
multiple pages on one sheet of paper<br />
Macintosh 87<br />
printing on both sides of paper<br />
Macintosh 88<br />
printing to a file 76<br />
UNIX 92<br />
using direct printing utility 84<br />
printing a document<br />
Linux 89<br />
Macintosh 87<br />
UNIX 92<br />
problems<br />
paper feeding problems 110<br />
power problems 111<br />
printing problems 112<br />
S<br />
printing quality problems 116<br />
service contact numbers 128<br />
SetIP program 13 52<br />
special print features 71<br />
supplies<br />
estimated toner cartridge life 96<br />
machine information 59<br />
SyncThru Web Service<br />
T<br />
general information 98<br />
toner cartridge<br />
U<br />
UNIX<br />
estimated life 96<br />
handling instructions 95<br />
non-Samsung and refilled 95<br />
storing 95<br />
driver installation for network connected26<br />
printing 92<br />
USB cable<br />
driver installation 5 8<br />
driver reinstallation 7 10<br />
W<br />
watermark<br />
146<br />
create 80<br />
delete 80<br />
edit 80<br />
Windows<br />
common Windows problems 124<br />
driver installation for network connected17<br />
using SetIP 13 52<br />
wireless<br />
ad hoc mode 32<br />
computer 32<br />
control panel 32<br />
Infrastructure mode 32<br />
installation 32<br />
USB cable 38<br />
WPS<br />
disconnectiong 34<br />
PBC mode 34<br />
WPS (the machine does not have a display<br />
screen)<br />
PBC 35<br />
PIN 36<br />
wireless network<br />
network cable 51


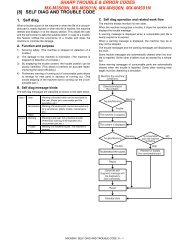
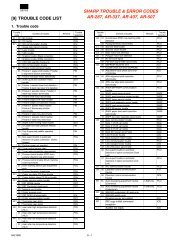
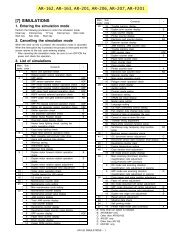
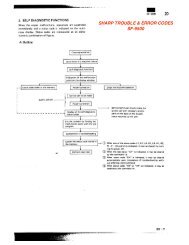
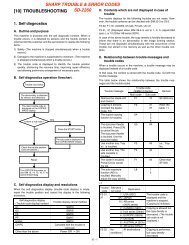
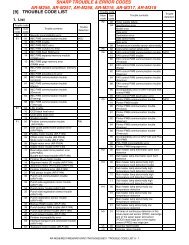
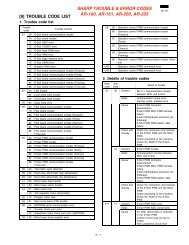

![[10] TEST COMMAND, TROUBLE CODES - OlsonBros](https://img.yumpu.com/18824764/1/190x245/10-test-command-trouble-codes-olsonbros.jpg?quality=85)