

™ Care & Use of Your New Grill - Rasmussen
™ Care & Use of Your New Grill - Rasmussen
™ Care & Use of Your New Grill - Rasmussen

Create successful ePaper yourself
Turn your PDF publications into a flip-book with our unique Google optimized e-Paper software.
Locating & Assembling the <strong>Grill</strong><br />
INITIAl ASSEMBlY<br />
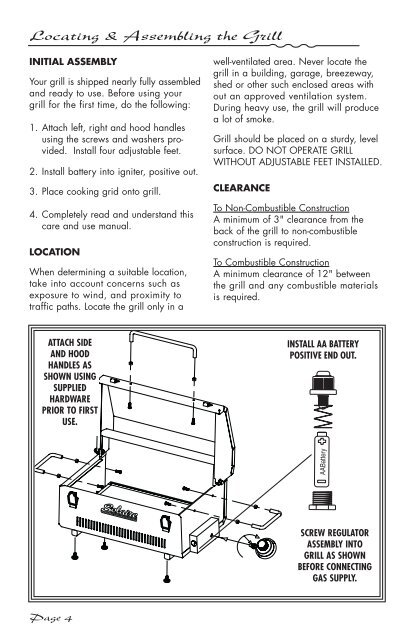
<strong>Your</strong> grill is shipped nearly fully assembled<br />
and ready to use. Before using your<br />
grill for the first time, do the following:<br />
1. Attach left, right and hood handles<br />
using the screws and washers provided.<br />
Install four adjustable feet.<br />
2. Install battery into igniter, positive out.<br />
3. Place cooking grid onto grill.<br />
4. Completely read and understand this<br />
care and use manual.<br />
lOCATION<br />
When determining a suitable location,<br />
take into account concerns such as<br />
exposure to wind, and proximity to<br />
traffic paths. Locate the grill only in a<br />
ATTACH SIDE<br />
AND HOOD<br />
HANDLES AS<br />
SHOWN USING<br />
SUPPLIED<br />
HARDWARE<br />
PRIOR TO FIRST<br />
USE.<br />
Page 4<br />
well-ventilated area. Never locate the<br />
grill in a building, garage, breezeway,<br />
shed or other such enclosed areas with<br />
out an approved ventilation system.<br />
During heavy use, the grill will produce<br />
a lot <strong>of</strong> smoke.<br />
<strong>Grill</strong> should be placed on a sturdy, level<br />
surface. DO NOT OPERATE GRILL<br />
WITHOUT ADJUSTABLE FEET INSTALLED.<br />
ClEARANCE<br />
To Non-Combustible Construction<br />
A minimum <strong>of</strong> 3" clearance from the<br />
back <strong>of</strong> the grill to non-combustible<br />
construction is required.<br />
To Combustible Construction<br />
A minimum clearance <strong>of</strong> 12" between<br />
the grill and any combustible materials<br />
is required.<br />
INSTALL AA BATTERY<br />
POSITIVE END OUT.<br />
AABattery<br />
SCREW REGULATOR<br />
ASSEMBLY INTO<br />
GRILL AS SHOWN<br />
BEFORE CONNECTING<br />
GAS SUPPLY.


