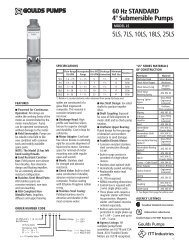
4" Submersible Pumps
4" Submersible Pumps
4" Submersible Pumps

Create successful ePaper yourself
Turn your PDF publications into a flip-book with our unique Google optimized e-Paper software.
CAUTION<br />
Hazardous<br />
Pressure<br />
9Connect the discharge pipe<br />
to the pressure tank and the<br />
house plumbing. Install the<br />
pressure switch at the tank cross<br />
tee. See 2.2<br />
CAUTION<br />
Hazardous<br />
Pressure<br />
what system<br />
pressure you want to<br />
10Decide<br />
use. Adjust the pressure<br />
switch to the desired range.<br />
Typically a 20 pound differential<br />
is used, eg.: 30-50 or 40-60 psi.<br />
Furnas switches have adjustment<br />
instructions on the inside of the<br />
cover.<br />
CAUTION<br />
Hazardous<br />
Pressure<br />
the pressure tank<br />
pre-charge 2 psi lower<br />
11Set<br />
than the pump cut-in<br />
pressure. Check tank pre-charge<br />
only when tank is completely<br />
empty. See 2.3<br />
CAUTION<br />
Hazardous<br />
Pressure<br />
12<br />
Install a pressure relief<br />
valve in any system<br />
capable of over 100 psi<br />
or 230' TDH. Install and set per<br />
relief valve manufacturers<br />
instructions. See 2.2<br />
DANGER<br />
Hazardous<br />
voltage<br />
13<br />
Connect the motor leads<br />
to the control box<br />
(3-wire), pressure<br />
switch (2-wire), or starter on<br />
3 phase systems. See 4.3<br />
DANGER<br />
Hazardous<br />
voltage<br />
DANGER<br />
Hazardous<br />
voltage<br />
14<br />
Connect the leads<br />
between the control<br />
box or starter and the<br />
pressure switch. See 4.3<br />
all piping<br />
connections before<br />
15Check<br />
starting pump.<br />
See 2.0 and 5.0<br />
CAUTION<br />
Hazardous<br />
Pressure<br />
flow between<br />
pump and tank if well<br />
16Restrict<br />
has a high static level or<br />
there is a long discharge pipe<br />
between well and tank. A<br />
partially closed ball or globe<br />
valve works well for throttling.<br />
See 5.1<br />
a faucet in the<br />
discharge piping. This<br />
17Open<br />
will allow air to escape<br />
the system and water to flow<br />
without filling the tank with<br />
dirty water. See 5.3<br />
DANGER<br />
Hazardous<br />
voltage<br />
breaker ON to<br />
power system. Pump<br />
18Turn<br />
should run. Allow water<br />
to flow until well clears. You can<br />
then close the faucet and allow<br />
the tank to fill and pressure to<br />
build. Switch should go ON and<br />
OFF without any chatter. See 5.3<br />
a few cycles to<br />
check pump and switch<br />
19Run<br />
operation. See 5.3<br />
DANGER<br />
Hazardous<br />
voltage<br />
20 Check<br />
amps and insure<br />
they are within<br />
nameplate amp range<br />
from motor data sheet or motor<br />
nameplate. Amps should be<br />
between Rated Input and Service<br />
Factor Amps. Enter the amp<br />
reading in this manual along<br />
with the model number.<br />
See Motor Specifications<br />
3