iBox® universal - Hansgrohe
iBox® universal - Hansgrohe
iBox® universal - Hansgrohe

Create successful ePaper yourself
Turn your PDF publications into a flip-book with our unique Google optimized e-Paper software.
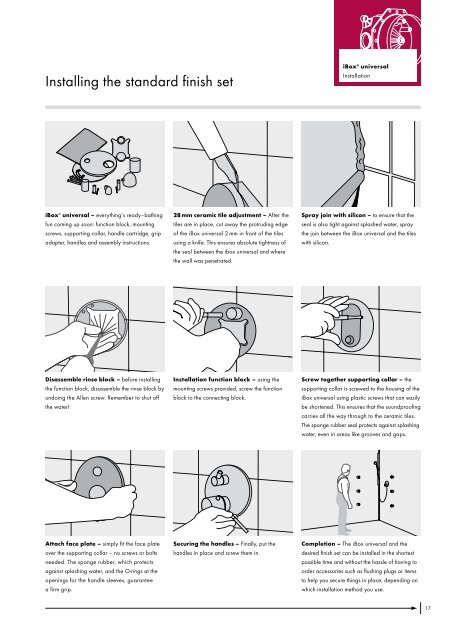
Installing the standard finish set<br />
iBox ® <strong>universal</strong> – everything‘s ready–bathing<br />
fun coming up soon: function block, mounting<br />
screws, supporting collar, handle cartridge, grip<br />
adapter, handles and assembly instructions.<br />
Disassemble rinse block – before installing<br />
the function block, disassemble the rinse block by<br />
undoing the Allen screw. Remember to shut off<br />
the water!<br />
Attach face plate – simply fit the face plate<br />
over the supporting collar – no screws or bolts<br />
needed. The sponge rubber, which protects<br />
against splashing water, and the O-rings at the<br />
openings for the handle sleeves, guarantee<br />
a firm grip.<br />
28 mm ceramic tile adjustment – After the<br />
tiles are in place, cut away the protruding edge<br />
of the iBox <strong>universal</strong> 2 mm in front of the tiles<br />
using a knife. This ensures absolute tightness of<br />
the seal between the ibox <strong>universal</strong> and where<br />
the wall was penetrated.<br />
Installation function block – using the<br />
mounting screws provided, screw the function<br />
block to the connecting block.<br />
Securing the handles – Finally, put the<br />
handles in place and screw them in.<br />
iBox ® <strong>universal</strong><br />
Installation<br />
Spray join with silicon – to ensure that the<br />
seal is also tight against splashed water, spray<br />
the join between the iBox <strong>universal</strong> and the tiles<br />
with silicon.<br />
Screw together supporting collar – the<br />
supporting collar is screwed to the housing of the<br />
iBox <strong>universal</strong> using plastic screws that can easily<br />
be shortened. This ensures that the soundproofing<br />
carries all the way through to the ceramic tiles.<br />
The sponge rubber seal protects against splashing<br />
water, even in areas like grooves and gaps.<br />
Completion – The iBox <strong>universal</strong> and the<br />
desired finish set can be installed in the shortest<br />
possible time and without the hassle of having to<br />
order accessories such as flushing plugs or items<br />
to help you secure things in place, depending on<br />
which installation method you use.<br />
17