AX2004
AX2004
AX2004

Create successful ePaper yourself
Turn your PDF publications into a flip-book with our unique Google optimized e-Paper software.
<strong>AX2004</strong><br />
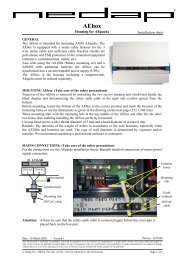
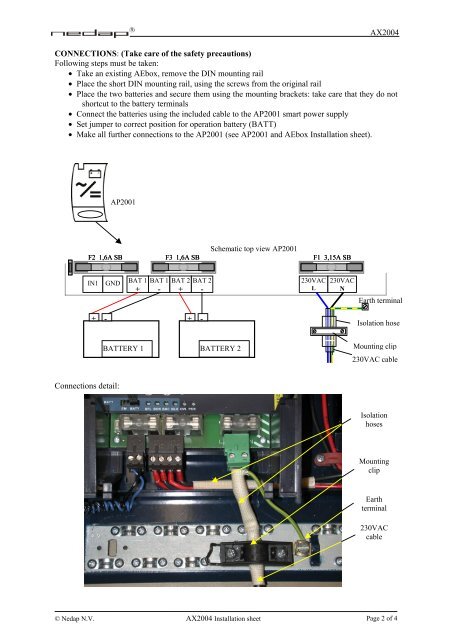
CONNECTIONS: (Take care of the safety precautions)<br />
Following steps must be taken:<br />
• Take an existing AEbox, remove the DIN mounting rail<br />
• Place the short DIN mounting rail, using the screws from the original rail<br />
• Place the two batteries and secure them using the mounting brackets: take care that they do not<br />
shortcut to the battery terminals<br />
• Connect the batteries using the included cable to the AP2001 smart power supply<br />
• Set jumper to correct position for operation battery (BATT)<br />
• Make all further connections to the AP2001 (see AP2001 and AEbox Installation sheet).<br />
Schematic top view AP2001<br />
F2 1,6A SB SB F3 1,6A SB F1 F1 3,15A SB<br />
IN1 GND<br />
+ -<br />
Connections detail:<br />
AP2001<br />
BAT 1<br />
+<br />
BATTERY 1<br />
BAT 1<br />
-<br />
BAT 2<br />
+<br />
BAT 2<br />
-<br />
+ -<br />
BATTERY 2<br />
230VAC<br />
L<br />
230VAC<br />
N<br />
Earth terminal<br />
Isolation hose<br />
Mounting clip<br />
230VAC cable<br />
Isolation<br />
hoses<br />
Mounting<br />
clip<br />
Earth<br />
terminal<br />
230VAC<br />
cable<br />
© Nedap N.V. <strong>AX2004</strong> Installation sheet Page 2 of 4