Woodworker West (July-August, 2013)
Covering woodworking in the Western U.S. For the hobbyist to professional woodworker, furniture maker, woodturner, and anyone else working with wood.
Covering woodworking in the Western U.S. For the hobbyist to professional woodworker, furniture maker, woodturner, and anyone else working with wood.

You also want an ePaper? Increase the reach of your titles
YUMPU automatically turns print PDFs into web optimized ePapers that Google loves.
2. Too Valuable. Whatever you do, do not pay for<br />
practice wood. There is plenty of free wood out there—<br />
the stuff really does grow on trees. Ask around at your<br />
AAW chapter; you’ll find a resourceful group with<br />
plenty of practice pieces.<br />
3. Too Hard. Green wood is a great way to start. Wood<br />
lots and local tree cutters are great sources for practice<br />
materials.<br />
4. Too Deep. Start out with a small (8"-diameter) platter<br />
before attempting any type of bowl. When you are<br />
comfortable with that, transition to a shallow bowl—<br />
just slightly deeper, but still about 8" in diameter.<br />
Keep the form open rather than making the openings<br />
smaller. The smaller the opening, the harder it is to cut<br />
the interior.<br />
5. Not Ready for Prime Time (or finish). Don’t worry<br />
about applying finish to anything—that will come later.<br />
Think practice pieces. I suggest that you use a screw<br />
chuck or faceplate and turn shapes that resemble bowl<br />
forms until you get to the point of becoming comfortable<br />
with the bowl gouge. When you get to where you<br />
do not have to think about what the tool is doing, you<br />
are ready to turn a bowl. Once you get a few decentlooking<br />
forms, turn the bowl around and begin hollowing<br />
the interior. Then, get out the finish.<br />
THE RIGHT SPEED<br />
Too often, novice woodturners go from turning<br />
spindles to turning bowls without adjusting the lathe<br />
speed. Too big and too fast is a deadly combination.<br />
Stop! Don’t do that!<br />
6. Too Much Speed. Before mounting stock between<br />
centers or on a faceplate or chuck, switch on the lathe<br />
without anything mounted. This will give you the opportunity<br />
to see where the speed was set when the lathe was<br />
last used. Developing this habit will prevent an accident.<br />
I encourage students to reduce the speed of their machines<br />
at the end of every turning session. This is easy on<br />
variable-speed lathes, but I meet resistance when students<br />
are learning on machines with step pulleys. Do it anyway;<br />
it’s never too early to develop good safety habits.<br />
7. Too Much of a Hurry. Another problem that can<br />
ruin your day occurs when you have a large piece on<br />
the lathe and stop the machine too quickly. This happened<br />
to my friend Andy Marinos, who suggested<br />
adding this tip to the Don’t Do! list.<br />
To turn the bottom of a bowl, Andy mounted his large<br />
flat jaws on his scroll chuck and mounted the rim of the<br />
bowl in the jaws. Without checking the speed, he turned<br />
on the lathe. It was going much too fast for the task at<br />
hand. Andy quickly hit the stop button on the machine,<br />
and the motor stopped. But, the chuck and the bowl had<br />
enough momentum to keep spinning—even with the<br />
lathe stopped. When it came off the spindle, the assembly<br />
caught his hand between it and the tool rest. Andy’s<br />
wound required numerous stitches.<br />
Here’s a good habit to develop: Before you turn on your lathe,<br />
always stand to the left or right of the chuck.<br />
Here’s a safer plan: Start the lathe at a low speed or use<br />
the setscrew in the chuck to lock it onto the spindle.<br />
8. Standing in the WrongPlace. You should always<br />
stand to one side of the workpiece (out of the path of<br />
the spinning blank) when you turn on your lathe, as<br />
shown in the photo above.<br />
THE RIGHT TOOL<br />
Before anyone stands in front of a lathe, I review all<br />
of the tools, their uses, and how to sharpen each. I<br />
identify each tool, explain how it is used, show how to<br />
sharpen it, and also show the various cuts that can be<br />
made. I also explain what each tool is not designed to<br />
do. But sometimes, that’s not enough.<br />
Stop! Don’t do that!<br />
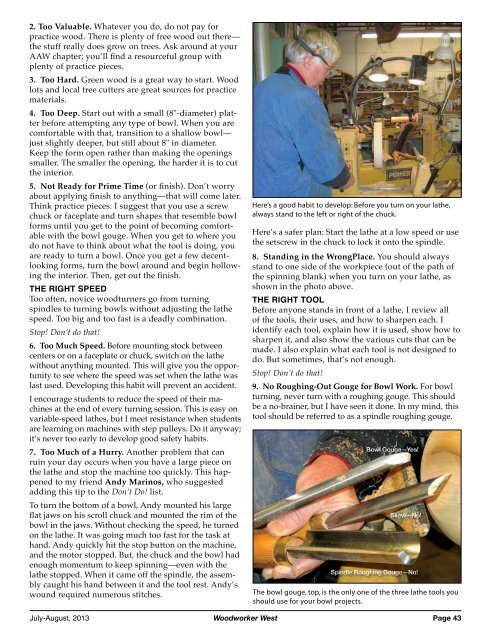
9. No Roughing-Out Gouge for Bowl Work. For bowl<br />
turning, never turn with a roughing gouge. This should<br />
be a no-brainer, but I have seen it done. In my mind, this<br />
tool should be referred to as a spindle roughing gouge.<br />
The bowl gouge, top, is the only one of the three lathe tools you<br />
should use for your bowl projects.<br />
<strong>July</strong>-<strong>August</strong>, <strong>2013</strong> <strong>Woodworker</strong> <strong>West</strong> Page 43